Archive for the ‘File Convert Tools’ Category

How to create SD Card DATA dump image to .ISO with dd and mount it with imdisk from command line on Windows CygWin with MobaXterm

Saturday, September 18th, 2021

dd-command-logo
I'm forced to use Windows every now and then and do some ordinary things which I do usually on Linux such as dumping the content of my Android phone SD Card SanDisk, Kingston etc. to .ISO image etc.

On Linux creating and mounting a data copy of a whole SD Card is a relatively simple thing and there are plenty of ways to do it such as using the dd ( command-line utility for Unix and Unix-like operating systems whose primary purpose is to convert and copy files as said in the command manual .- e.g. ''man dd'. ). On Microsoft Windows environment perhaps one of easiest ways is to use WinCDEmu (which is relatively free under LGPL License).
WinCDEmu is capable of doing plenty of things such as:
 

  • One-click mounting of ISO, CUE, NRG, MDS/MDF, CCD, IMG images.

  • Supports unlimited amount of virtual drives.

  • Runs on 32-bit and 64-bit Windows versions from XP to Windows 10.

  • Allows creating ISO images through a context menu in Explorer.

  • Small installer size – less than 2MB!

  • Have a portable version

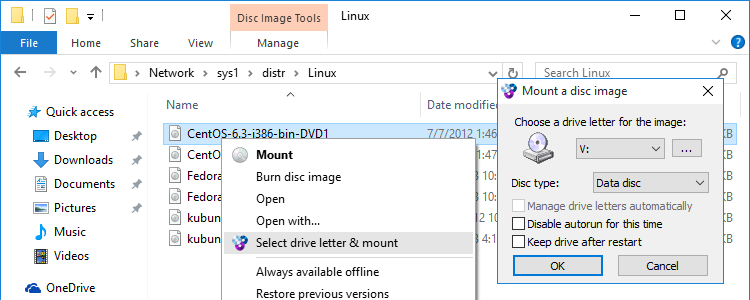
WinCDEmu is a nice piece of software that perhaps every Win poweruser can enjoy, plus it has a nice Graphical frontend:

wincdemu-graphical-create-iso-and-mount-so-ms-windows-software

But what if you're a console geek, like me and you end up forced to be using Windows on your Work PC and you still need to create .iso dump of your Mobile SD Card or external attached Hard Drive, without the graphical mambo jumbo in the old fashioned way with dd?

Luckily Windows advanced command lined users could massively benefit from Cygwin + Mobaxterm (if you don't know or used MobaXterm and you still use things like Putty / SuperPutty or SecureCRT – perhaps you can reconsider and make your sysadmin life easier with MobaXerm gnome-terminal like SSH tabbed Windows alternative.

Once having mobaxterm + cygwin you have dd installed on the Windows host as it is part of the busybox minimal environment and you can use it in the same manner as your used in Linux environment.

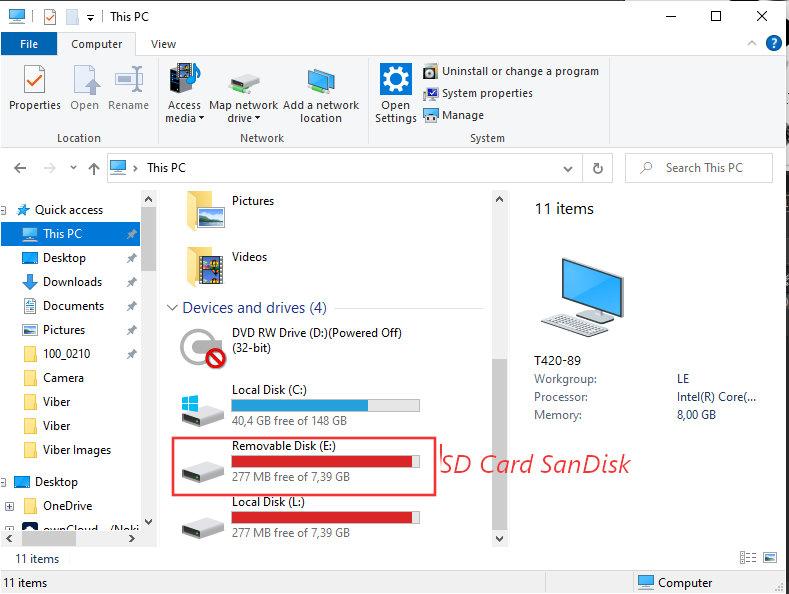
sdcard-sandisk-drive-my-computer-windows-screenshot
 

1. Using dd to copy files on Linux / UNIX OS with a dialog status bar

To use dd the usual syntax on Linux / BSD / Unix is:
 

dd if=/dev/dev-name_ID of=/path/to/directory/dump/location.iso bs=2048


As 2048 BS (Bytes) per second is quite a low value usually on Modern operating systems, this bytesize is usually increased to some MBs  ( Megabytes).

For example if the reading from carrier  is Solid State Drive Disk (SSD) supporting 100 MBs per second and the output SD Card is a 32 Bit Kingston Plus+ drive with whose write speed is up to 50 ~ 100 MBs, you can use cmd as:

dd if=/dev/dev-name_ID of=/path/to/directory/dump/location.iso bs=100M


If you need to have a progress on the dd copy (in case if you copy some large SD Card 128 GB or 256GB or a full copy of a hard drive partition that is really big lets say 8 Terabytes of data, dialog and pv comes quite handy.

To use them install them first:

# apt-get install –yes pv dialog


Next to have a beautiful ncurses dialog box with the status (very useful if you're shell scripting), use:
 

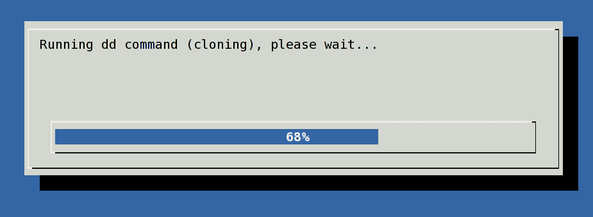
(pv -n /dev/sda | dd of=/dev/sdb bs=128M conv=notrunc,noerror) 2>&1 | dialog –gauge "Running dd command (cloning), please wait…" 10 70 0

pv-dialog-dd-command-ncurses-status-screenshot-gnu-linux
 

2. Listing the avaialble copy drives /dev/sda /dev/sdb1 … etc. disk locations on Windows 7 / 10 / 11 OS

[User.T420-89] ➤ for F in /dev/s* ; do echo "$F    $(cygpath -w $F)" ; done

check-drives-loop-on-cygwin-to-be-used-later-with-dd-copy-iso-creating-imageCheck drives device naming on WIndows PC – Screenshot extract from Mobaxterm

As you can see the drive location we've seen in Windows Explorer is located at drive E: above bash for loop reveals us this is located and readable from CygWin / MobaxTerm at /dev/sdb1


3. Create .iso image file on WIndows OS with dd command
 

To create a full data copy dump of to .iso (image file) with dd on Windows , I had to run:

[User.T420-89] ➤ dd if=/dev/sdb1 of=sdcard-blu-r1-hd-sdcard-backup_10092021a.img bs=100M

75+1 records in
75+1 records out
7944011776 bytes (7.4GB) copied, 391.794316 seconds, 19.3MB/s


dd-copy-drive-data-screenshot-100mb-bitesize-windows-mobaxterm


4. Mount the newly create dd Image with imdisk

In order to test the image is properly created, you can attempt to mount it from command line on Linux, mounting it is quite easy and is up to mounting the just created .img file as a loopback (loop) device, like so: 

# mount -o loop file.iso /mnt/dir

Unfortunately cygwin and mobaxterm's embedded mount command on Win OS does not support the loopback device so to have it you have to install and use some additional program  such as the upmentioned WinCDEmu or if you prefer to do it fully from command line and further on automate the process of creating a dump of images of attached drives out of a multiple computers (lets say belonging to a Windows Active Directory domain). You might install and use something like:


imdisk 

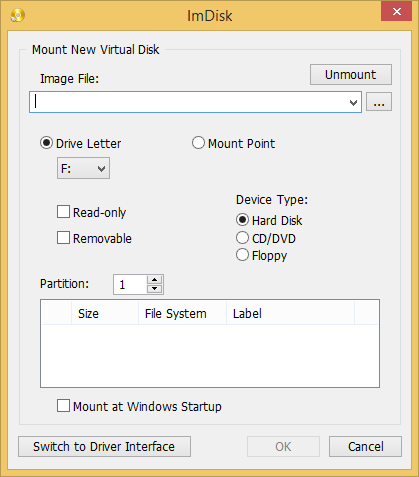
imdisk-gui-interface-ms-windows-screenshot

imdisk handy tool is  created by Olof Lagerkvist. It is free and open-source software, which  will let you mount image files of hard drive, cd-rom or floppy, and create one or several ramdisks with various parameters either from a command line or via its Graphical interface.

To use imdisk download it from its home page on sourceforge extract and install it, pretty much as any other software it has both 32 bit version as a legacy for old computers as well as 64 bit exe installer.
The general command line use of it follows a cmd syntax like:

  • Mounting .iso image files from command line on WIndows host with imdisk


[User.T420-89] ➤ ImDisk.exe -a -f "sdcard-blu-r1-hd-sdcard-backup_10092021.img" -m #:

Where:
 

  • #: – is the actual drive you would like to mount to.
     
  • -a option stands for attach to, it will configure and attach a virtual disk with the parameters specified and attach it to the system.
     
  • -f – is self explanatory, provides the iso image file naming 

If you want to attach the newly created image to lets say  L:\ windows new mapped drive

ImDisk.exe -a -f "sdcard-blu-r1-hd-sdcard-backup_10092021.img" -m l:

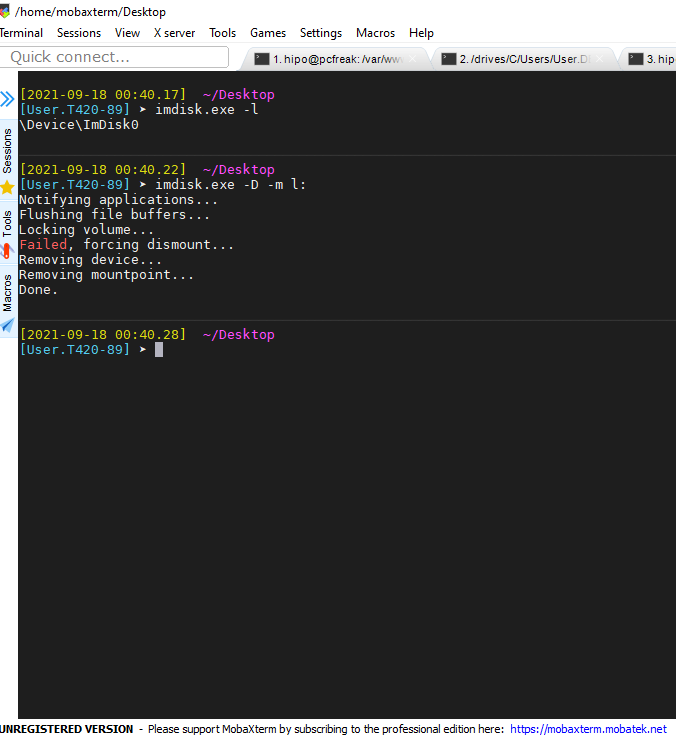
  • Unmount mounted .img image with imdisk from cmd line

[User.T420-89] ➤ imdisk.exe -l
\Device\ImDisk0
                                                                                                                              ✘

[User.T420-89] ➤ imdisk.exe -D -m l:
Notifying applications…
Flushing file buffers…
Locking volume…
Failed, forcing dismount…
Removing device…
Removing mountpoint…
Done.

imdisk-detach-attached-drive-mobaxterm-windows-screenshot


What we learned ?

What we have learned in this article is how to use Mobaxterm embedded dd Data Convert and Copy command to prepare full image backups of SD card or external drives on Windows OS. Also few alternative ways were entions such as using WinCDEmu free  open source alternative to DaemonTools program to create / mount or convert the image for the GUI lovers. Also for hard core sysadmins as me was shown how to list drives devices attached to the Win PC {/dev/sda,/dev/sdb} etc. and how to copy partition data with dd just like one would do on Linux OS. Finally to test the created image, I've shown you how to use the imdisk free software tool to attach and detach image to a mapped local Windows drive.

Hope this article learned you something new.

How to convert .CRT SSL Certificate to .PFX format (with openssl Linux command) and Import newly generated .PFX to Windows IIS Webserver

Tuesday, September 27th, 2016

IIS8_Windows_Webserver_logo_convert_CRT_and_import_PFX-certificate

1. Converting to .CRT to.PFX file format with OpenSSL tool on GNU / Linux to import in Windows (for example, IIS)

Assuming you have generated already a certificate using the openssl Linux command and you have issued the .CRT SSL Certificate issuer file
and you need to have the new .CRT SSL Certificate installed on Windows Server (lets say on Windows 2012) with IIS Webserver version 8.5, you will need a way to convert the .CRT file to .PFX, there is plenty of ways to do that including using online Web Site SSL Certificate converter or use a stand alone program on the Windows server or even use a simple perl / python / ruby script to do the conversion but anyways the best approach will be to convert the new .CRT file to IIS supported binary Certificate format .PFX on the same (Linux certificate issuer host where you have first generated the certificate issuer request .KEY (private key file used with third party certificate issuer such as Godaddy or Hostgator to receive the .CRT / PEM file).

Here is how to generate the .PFX file based on the .CRT file for an Internal SSL Certfiicate:


openssl pkcs12 -export -in server.crt -inkey server.key -out server.pfx

On the password prompt to appear use any password because otherwise the future IIS Webserver certificate import will not work.
 

To do a certificate chain SSL export to be accessed from the  internet.


openssl pkcs12 -export -in server.crt -inkey server.key -out server.pfx -certfile internet v2.crt

2. Import the PFX file in Windows


Run: mmc, add snap, Certificates, Computer account, Local Computer; in the
Console:

Certificates (Local Computer) > Personal > Certificates: Select All Tasks > Import File

Enter previously chosen password.
You should get further the Message "Import was successful."

You can import the PFX file by simply copying it to the server where you want it imported and double click it this will  open Windows Importwizzard.

Then select the IIS:


Site, Properties, Directory Security, Server Certificate, Replace the current certficate, select proper Certificate. Done.

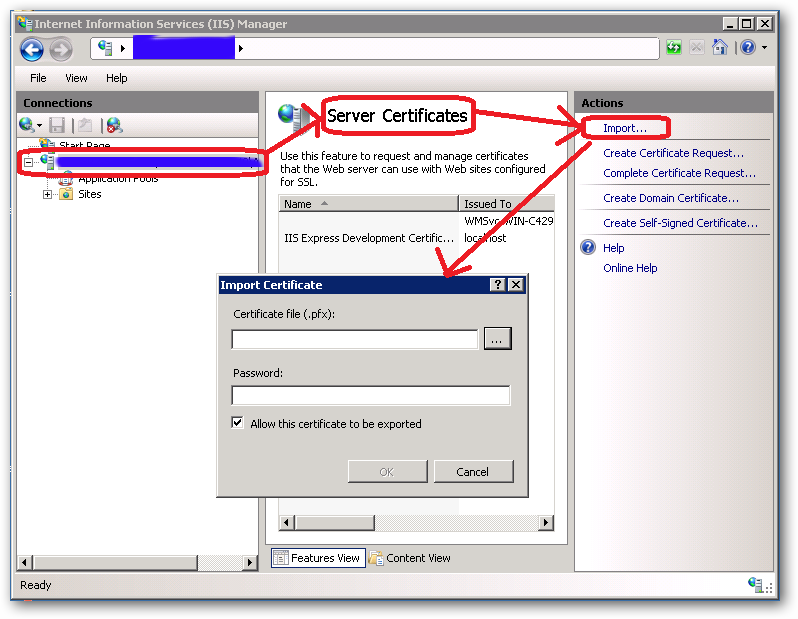
Alternatively to complete the IIS Webserver certificate import within one step when a new certificate is to be imported:

In IIS Manager interface go to :

Site, Properties, Directory Security, Server Certificate, Server Certificate Wizard


Click on

Next

Choose

import a certificate from a .pfx file, select and enter password.

Internet_Information_Server_IIS_Windows-SSL_Certificate-import-PKF-file

3. Import the PFX file into a Java keystore


Another thing you might need if you have the IIS Webserver using a backend Java Virtual Machine on the same or a different Windows server is to import the newly generated .PFX file within the Java VM keystore.

To import with keytool command for Java 1.6 type:


keytool -importkeystore -deststorepass your_pass_here -destkeypass changeit -destkeystore keystore.jks -srckeystore server.pfx -srcstoretype PKCS12 -srcstorepass 1234 -srcalias 1 -destalias xyz


Also the .CRT file could be directly imported into the Java keystore


Import a .crt in a Java keystore


/usr/java/jre/bin/keytool -import -keystore /webdienste/java/jdk/jre/lib/security/cacerts -file certificate.crt -alias Some alias


4. Get a list of Windows locally installed certificates

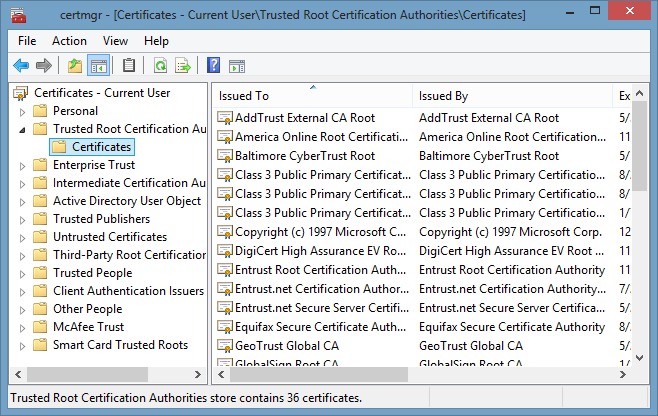
To manager installed certificates on Windows 7 / 8 / 2012 Server OS is to run command via

Start -> Run


certmgr.msc

certmgr_trca_windows_check-windows-installed-ssl-certificates


One other way to see the installed certificates on your Windows server is checking within

Internet Explorer

Go to Tools (Alt+X) → Internet Options → Content → Certificates.


To get a a complete list of installed Certificate Chain on Windows you can use PowerShell


Get-ChildItem -Recurse Cert:


That's all folks ! 🙂


How to remove ‘active contents’ from PDF file on Linux / Strip Active Contents from PDF

Thursday, July 18th, 2019

how-to-remove-active-content-from-pdf-with-ghoscript-on-gnu-linux.svg

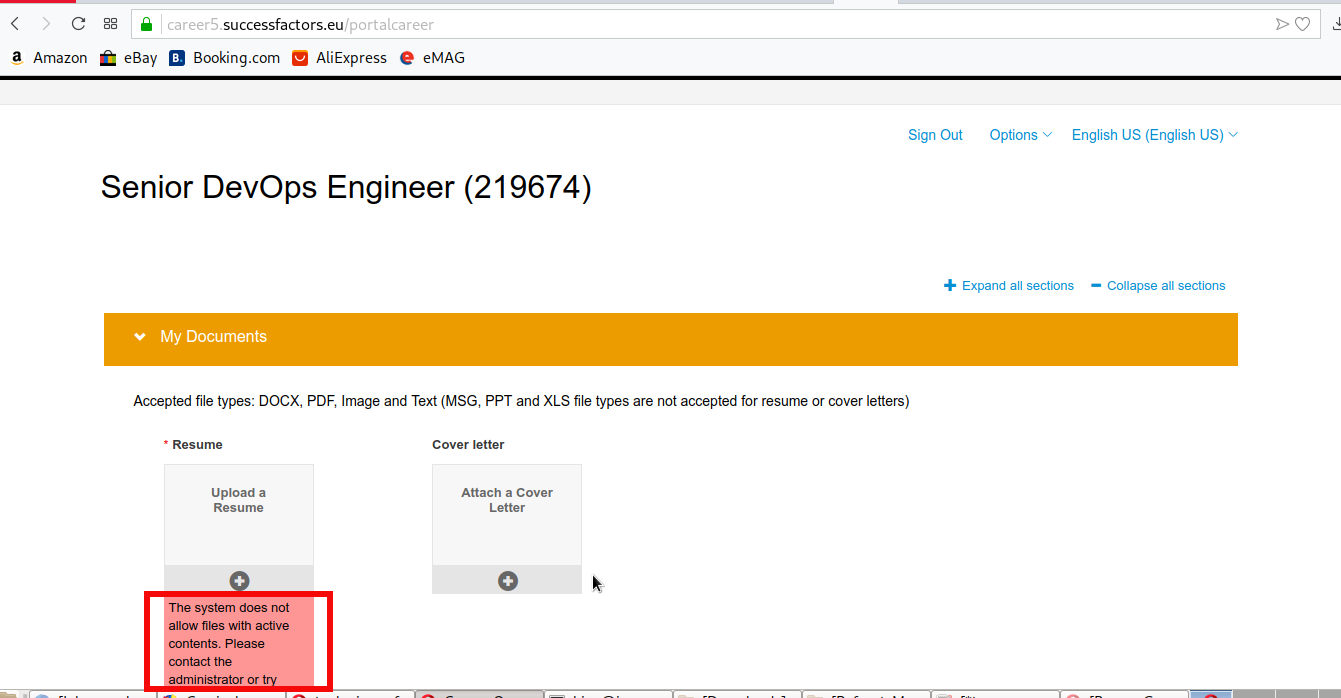
I'm updating my Autiobography (CV) with my latest job eployeers, technology expertise and certifications and usually use the EuroPassCV standard web service to update already generated PDF files.The service as web based application service allows easy edit from the web as most web services which is quite handy and then allows Export to DOCX or PDF file format. So far so good but today I faced a really weird problem after, I've used successfully EuroPassCV service  and downloaded the PDF to my computer and tried to submit my Curriculum Vitae application to SAP's Successfactor newly created account for the purpose I faced a weird I error saying

"The system does not allow files with Active contents. Please …"

the-system-does-not-allow-files-with-active-contents-pdf-error-successfactors-errors

Of course if this error message was received on a Start-up application on Application upload that would be fine, but come on this is SAP's Successfactors, it cannot accept a standard generated PDF from EuroPass which nowadays is a standard for CV here in Europe and hosted on of official European Union website europa.eu

To me this is a clear signal SAP needs an experienced ICT specialists and Quality Assurance testers like me to fix their mess and I will be willing to help them if they contact me until its too late for them, but let me go back to the topic of this article which was how to remove active contents from a PDF file 🙂

So first lets make clear what is Active content in a file ?

Active contents is content that includes programs like Internet polls, JavaScript applications, stock tickers, animated images, ActiveX applications, action items, streaming video and audio, weather maps, embedded objects, and much more. Active content contains programs that trigger automatic actions on a Web page without the user's knowledge or consent.
Active contents (Macros) could exist in many file formats that are used daily in most companies / organizations daily, active content can be contained in documents such as MS Excel,  Word, PDF, PowerPoint and so on.

So why does some applications disable document support for Active contents?

Well just for the reason of security, Active contents could often be some kind of malware or crapware and they can mess up with the web application (in case of bugs) or even mess up with server software if it is a complex warm like behavior exploiting some kind of vulnerability.
One thing to say about active contents removal on file upload by applications is that this practice could only be tolerated if the organization had already adapted a security through obscurity which most likely is the case with SAP's Successfactors and many other applications out there.

So next question is how to  Panicea (Resolution) Active Contents existing in a PDF file

Assuming you have a GNU / Linux Desktop or server with ghostscript package installed (which is the case by default with virtually any modern Linux distribution), removing Active Contents from PDF to make possible file to be submitted to the picky Security Conscious application with a single command:
 

gs -dNOPAUSE -sDEVICE=pdfwrite -sOUTPUTFILE=CV-Georgi_Dimitrov_Georgiev-Europass-20190718-EN-noact-content.pdf -dBATCH CV-Georgi_Dimitrov_Georgiev-Europass-20190718-EN.pdf


After that the stripped active contents PDF file would succeed in uploading to web app.


Howto create Linux Music Audio CD from MP3 files / Create playable WAV format Audio CD Albums from MP3s

Tuesday, July 16th, 2019

cdburning-audio-music-cd-from-mp3-on-linuxcomapct-disc-tux-linux-logo

Recently my Mother asked me to prepare a Music Audio CD for her from a popular musician accordionist Stefan Georgiev from Dobrudja who has a unique folklore Bulgarian music.

As some of older people who still remember the age of the CD and who had most likely been into the CD burning Copy / Piracy business so popular in the countries of the ex-USSR so popular in the years 1995-2000 audio ,  Old CD Player Devices were not able to play the MP3 file format due to missing codecs (as MP3 was a proprietary compression that can't be installed on every device without paying the patent to the MP3 compression rights holder.

The revolutionary MP3 compression used to be booming standard for transferring Music data due to its high compression which made an ordinary MP3 of 5 minutes of 5MB (10+ times more compression than an ordinary classic WAV Audio the CPU intensiveness of MP3 files that puts on the reading device, requiring the CD Player to have a more powerful CPU.

Hence  due to high licensing cost and requirement for more powerful CPU enabled Audio Player many procuders of Audio Players never introduced MP3 to their devices and MP3 Neve become a standard for the Audio CD that was the standard for music listening inside almost every car out there.

Nowdays it is very rare need to create a Audio CD as audio CDs seems to be almost dead (As I heard from a Richard Stallman lecture In USA nowadays there is only 1 shop in the country where you can still buy CD or DVD drives) and only in third world as Africa Audio CDs perhaps are still in circulation.

Nomatter that as we have an old Stereo CD player on my village and perhaps many others, still have some old retired CD reading devices being able to burn out a CD is a useful thing.

Thus to make mother happy and as a learning excercise, I decided to prepare the CD for her on my Linux notebook.
Here I'll shortly describe the takes I took to make it happen which hopefully will be useful for other people that need to Convert and burn Audio CD from MP3 Album.


1. First I downloaded the Album in Mp3 format from Torrent tracker

My homeland Bulgaria and specific birth place place the city of Dobrich has been famous its folklore:  Galina Durmushlijska and Stefan Georgiev are just 2 of the many names along with Оркестър Кристал (Orchestra Crystal) and the multitude of gifted singers. My mother has a santiment for Stefan Georgiev, as she listened to this gifted accordinist on her Uncle's marriage.

Thus In my case this was (Стефан Георгиев Хора и ръченици от Добруджа) the album full song list here If you're interested to listen the Album and Enjoy unique Folklore from Dobrudja (Dobrich) my home city, Stefan Georgiev's album Hora and Rachenica Dances is available here


Stefan_Georgiev-old-audio-Music-CD-Hora-i-Rychenici-ot-Dobrudja-Horos-and-Ruchenitsas-from-Dobrudja-CD_Cover
I've downloaded them from Bulgarian famous torrent tracker zamunda.net in MP3 format.
Of course you need to have a CD / DVD readed and write device on the PC which nowdays is not present on most modern notebooks and PCs but as a last resort you can buy some cheap External Optical CD / DVD drive for 25 to 30$ from Amazon / Ebay etc.


2. You will need to install a couple of programs on Linux host (if you don't have it already)


To be able to convert from command line from MP3 to WAV you will need as minimum ffmpeg and normalize-audio packages as well as some kind of command line burning tool like cdrskin  wodim which is
the fork of old good known cdrecord, so in case if you you're wondering what happened with it just
use instead wodim.

Below is a good list of tools (assuming you have enough HDD space) to install:


root@jeremiah:/ # apt-get install –yes dvd+rw-tools cdw cdrdao audiotools growisofs cdlabelgen dvd+rw-tools k3b brasero wodim ffmpeg lame normalize-audio libavcodec58


Note that some of above packages I've installed just for other Write / Read operations for DVD drives and you might not need that but it is good to have it as some day in future you will perhaps need to write out a DVD or something.
Also the k3b here is specific to KDE and if you're a GNOME user you could use Native GNOME Desktop app such brasero or if you're in a more minimalistic Linux desktop due to hardware contrains use XFCE's native xfburn program.

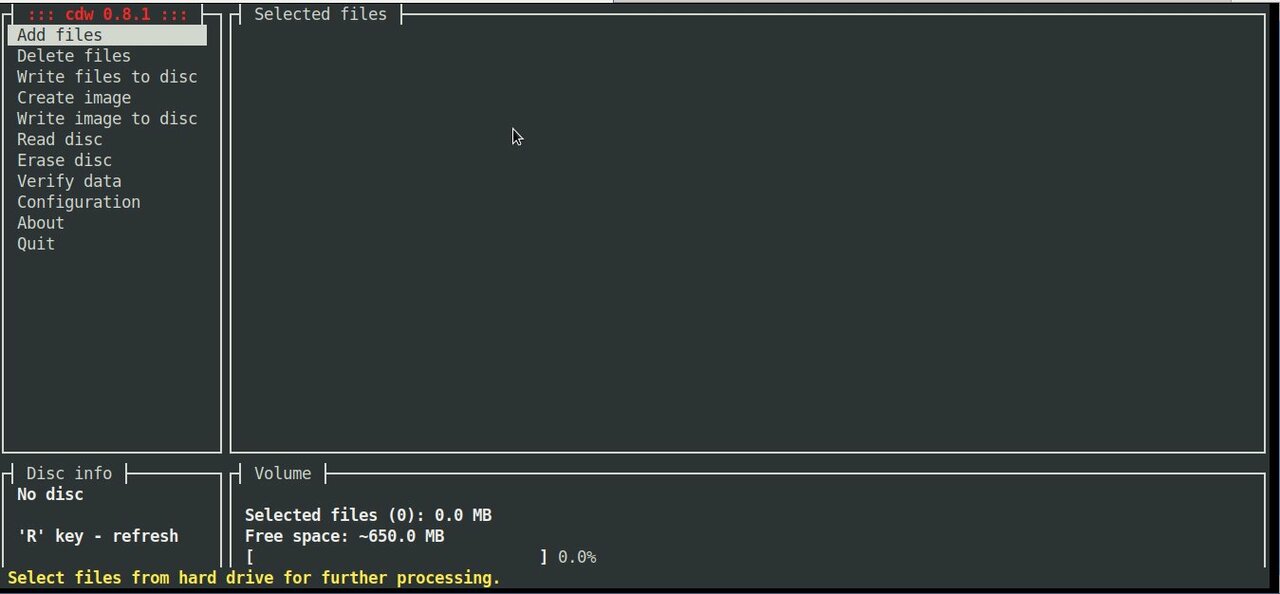
If you're a console / terminal geek like me you will definitely enjoy to use cdw
 

root@jeremiah:/ # apt-cache show cdw|grep -i description -A 1
Description-en: Tool for burning CD's – console version
 Ncurses-based frontend for wodim and genisoimage. It can handle audio and

Description-md5: 77dacb1e6c00dada63762b78b9a605d5
Homepage: http://cdw.sourceforge.net/


3. Selecting preferred CD / DVD / BD program to use to write out the CD from Linux console


cdw uses wodim (which is a successor of good old known console cdrecord command most of use used on Linux in the past to burn out new Redhat / Debian / different Linux OS distro versions for upgrade purposes on Desktop and Server machines.

To check whether your CD / DVD drive is detected and ready to burn on your old PC issue:


root@jeremiah:/# wodim -checkdrive
Device was not specified. Trying to find an appropriate drive…
Detected CD-R drive: /dev/cdrw
Using /dev/cdrom of unknown capabilities
Device type    : Removable CD-ROM
Version        : 5
Response Format: 2
Capabilities   :
Vendor_info    : 'HL-DT-ST'
Identification : 'DVDRAM GT50N    '
Revision       : 'LT20'
Device seems to be: Generic mmc2 DVD-R/DVD-RW.
Using generic SCSI-3/mmc   CD-R/CD-RW driver (mmc_cdr).
Driver flags   : MMC-3 SWABAUDIO BURNFREE
Supported modes: TAO PACKET SAO SAO/R96P SAO/R96R RAW/R16 RAW/R96P RAW/R96R

You can also use xorriso (whose added value compared to other console burn cd tools is is not using external program for ISO9660 formatting neither it use an external or an external burn program for CD, DVD or BD (Blue Ray) drive but it has its own libraries incorporated from libburnia-project.org libs.

Below output is from my Thinkpad T420 notebook. If the old computer CD drive is there and still functional in most cases you should not get issues to detect it.

cdw ncurses text based CD burner tool's interface is super intuitive as you can see from below screenshot:

cdw-burn-cds-from-console-terminal-on-GNU-Linux-and-FreeBSD-old-PC-computer

CDW has many advanced abilities such as “blanking” a disk or ripping an audio CD on a selected folder. To overcome the possible problem of CDW not automatically detecting the disk you have inserted you can go to the “Configuration” menu, press F5 to enter the Hardware options and then on the first entry press enter and choose your device (by pressing enter again). Save the setting with F9.
 

4. Convert MP3 / MP4 Files or whatever format to .WAV to be ready to burn to CD


Collect all the files you want to have collected from the CD album in .MP3 a certain directory and use a small one liner loop to convert files to WAV with ffmpeg:
 

cd /disk/Music/Mp3s/Singer-Album-directory-with-MP3/

for i in $( ls *.mp3); do ffmpeg -i $i $i.wav; done


If you don't have ffmpeg installed and have mpg123 you can also do the Mp3 to WAV conversion with mpg123 cmd like so:


for i in $( ls ); do mpg123 -w $i.wav $i.mp3; done


Another alternative for conversion is to use good old lame (used to create Mp3 audio files but abling to also) decode
mp3 to wav.


lame –decode somefile.mp3 somefile.wav


In the past there was a burn command tool that was able to easily convert MP3s to WAV but in up2date Linux modern releases it is no longer available most likely due to licensing issues, for those on older Debian Linux 7 / 8 / 9 / Ubuntu 8 to 12.XX / old Fedoras etc. if you have the command you can install burn and use it (and not bother with shell loops):

apt-get install burn

or

yum install burn


Once you have it to convert


$ burn -A -a *.mp3


5. Fix file naming to remove empty spaces such as " " and substitute to underscores as some Old CD Players are
unable to understand spaces in file naming with another short loop.


for f in *; do mv "$f" `echo $f | tr ' ' '_'`; done


6. Normalize audio produced .WAV files (set the music volume to a certain level)


In case if wondering why normalize audio is needed here is short extract from normalize-audio man page command description to shed some light.

"normalize-audio  is  used  to  adjust  the volume of WAV or MP3 audio files to a standard volume level.  This is useful for things like creating mp3 mixes, where different recording levels on different albums can cause the volume to  vary  greatly from song to song."
 

cd /disk/Music/Mp3s/Singer-Album-directory-with-MP3/

normalize-audio -m *.wav


7. Burn the produced normalized Audio WAV files to the the CD


wodim -v -fix -eject dev='/dev/sr0' -audio -pad *.wav


Alternatively you can conver all your MP3 files to .WAV with anything be it audacity
or another program or even use 
GNOME's CDBurn tool brasero (if gnome user) or KDE's CDBurn which in my opinion is
the best CD / DVD burning application for Linux K3B.

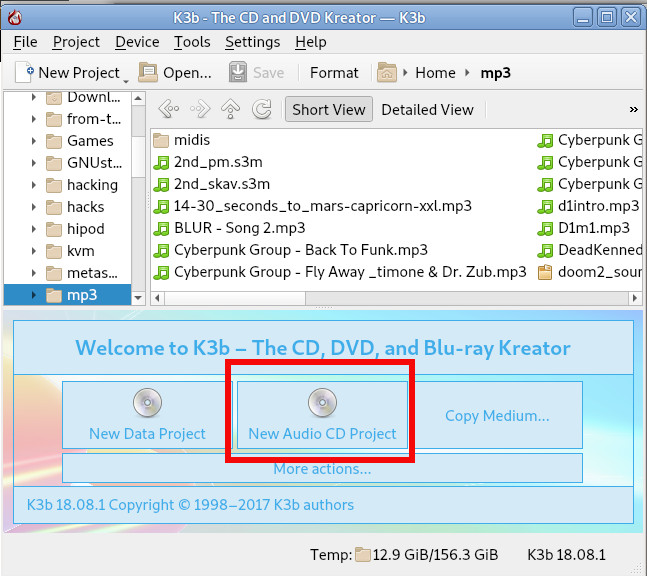
Burning Audio CD with K3b is up to few clicks and super easy and even k3b is going to handle the MP3 to WAV file Conversion itself. To burn audio with K3B just run it and click over 'New Audio CD Project'.

k3b-on-debian-gnu-linux-burn-audio-cd-screenshot

For those who want to learn a bit more on CD / DVD / Blue-Ray burning on GNU / Linux good readings are:
Linux CD Burning Mini Howto, is Linux's CD Writing Howto on ibiblio (though a bit obsolete) or Debian's official documentation on BurnCD.
 

8. What we learned here


Though the accent of this tutorial was how to Create Audio Music CD from MP3 on GNU / Linux, the same commands are available in most FreeBSD / NetBSD / OpenBSD ports tree so you can use the same method to build prepare Audio Music CD on *BSDs.

In this article, we went through few basic ways on how to prepare WAV files from MP3 normalize the new created WAV files on Linux, to prepare files for creation of Audio Music CD for the old mom or grandma's player or even just for fun to rewind some memories. For GUI users this is easily done with  k3b,  brasero or xfburn.

I've pointed you to cdw a super useful text ncurses tool that makes CD Burninng from plain text console (on servers) without a Xorg / WayLand  GUI installed super easy. It was shortly reviewed what has changed over the last few years and why and why cdrecord was substituted for wodim. A few examples were given on how to handle conversion through bash shell loops and you were pointed to some extra reading resources to learn a bit more on the topic.
There are plenty of custom scripts around for doing the same CD Burn / Covnersion tasks, so pointing me to any external / Shell / Perl scripts is mostly welcome.

Hope this learned you something new, Enjoy ! 🙂

How to install BlueJeans Video calls, sharing, Conference software on Debian / Ubuntu Linux – Convert RPM to DEB package with alien howto

Tuesday, August 28th, 2018

bluejeans-linux-logo

As I'm currently looking for ways to maximize my incomes without taking participation in 5 days week 8 hours schedule in a Big Corporation office job (which prooved for me to be a terrible slavery) I decided to give Free Lancing a try once again. 
Historically I have registrations in some of the most popular Free Lancing services Web platforms such as freelancer.com and upwork.com.
But none of them really was easy enough to handle as applying and winning a project there is usually a lot of headbanging into the walls and the platforms are full of clients that are looking for free lancers for short-term projects the work selection there required too much work, often projects offered there are seriously under-paid and its really hard to negotiate with many of the clients as they're unprofessional in the fields they're working (don't get me wrong I'm not saying many people are not very successful with this platforms, and that the platforms are not providing work for me I only say it is not really something to my liking …

In the mean time if you happen to read this article and looking for a High Quality Empoyee Cheap System Administrator or automation developmer, an IT counseling FreeLancer or a Ultra cheap WebHosting service in the European Union, I'll be very happy if you become my client.

Anyways … further on I decided to further experiment a little bit with other Free Lancing platforms (suggested by a friend Mitko Ivanov who helped me a lot with things and is continuing to help me over the last year ).

So following his kind suggestion I already tried one of the popular FreeLancing freeeup.com which is looking only for a best specialists into the fields of Marketing, Development, System Administration etc. but even though I tried hard with them the guys decided I am not matching there criteria for a the best 1% of all the people in the field of IT so my application for the platform was rejected twice over the last 1 month and a half.

Another similar new platform for free lancing that looks promising that I've learned about is toptal.com (there site Slogan is Hire FreeLance Talent from the Top 3%) so I went there and registered.

I had hit a road block there too as it seems, there website registration form was not tested enough with non-Windows operating systems with Mozilla Firefox and as it happens that I am using Debian GNU / Linux for my Desktop their drop-down menus was not working, just like some of the form on their website regular expression checks failed.

I've contacted the guys to inform them about their problems (and they kindly advised) I just give a try a registration with different browser (i.e. Google Chrome) which I immediately did and registratoin there was finally a success.
I have to say the new user application form registration of toptal also annoyed me with the stupid requirement to provide a picture in 1000px x 1000px but as this freelancing platform is still new and has way to go until it is established name in the field of freelancing such as upwork.com and I warmly excuse them.

Once registerered for them the user has to schedule an entry interview just like it goes with a standard company interview with a kind of Human Resources (HR) specialist and I guess some technical guys in order to evaluate on your value (Ha-Ha, someone else to determine your value is already crazy but all crazy employees do it still, of course I don't care as I well know that my value is much more than what they put on me).
The online interview once scheduled has to be done in a Web Meeting (Online Rooms) Platform called BlueJeans similar to Cisco WebEx (that is today heavily used in Corporate world in companies such as Hewlett Packard where we used it heavily, IBM, Concentrix etc.) and others Zoom, JoinMe GotoMeeting, HighFive.

As you could guess BlueJeans (which is by the way a Cloud based meeting software – yackes !) is planned to work mainly on Windows and Mac OS Operating Systems and even though there is a BlueJeans Linux version the provided binary is only for RedHat based linuxes in the RPM binary package format, so in order for me to participate in the scheduled meeting, I either had to port the package and install it on my Debian (what triggeted me to write this article or) use a Virtual Machine such as VirtualBox or VMWare running some kind of Windows OS such as Windows 8 / 10 etc.

Even though I have a Windows 10 OS testbed in a Virtualbox container, I preferred to not use it for BlueJeans and do it the hard way and install BlueJeans on my Debian 9.5 Stretch Linux.

That appeared to be a relatively easy process, so below is how I did it:

1. Download alien convertion (tool) that allows you to convert RPM -> deb, Slackware -> Deb and Linux Standard Base (LDB) packages to deb package format


noah:~# apt-get install –yes alien


2. Download latest BlueJeans version from BlueJeans website
 

As of time of writting this article the download link for bluejeans online conferencing software is here


noah:~# wget https://swdl.bluejeans.com/desktop/linux/1.36/1.36.9/bluejeans-1.36.9.x86_64.rpm


3. Convert bluejeans rpm package with alien


noah:~# alien –to-deb bluejeans-*.rpm


Warning: Skipping conversion of scripts in package bluejeans: postinst postrm preinst prerm
Warning: Use the –scripts parameter to include the scripts.
bluejeans_1.36.9-2_amd64.deb generated
root@jericho:/home/hipo/Свалени# dpkg -i bluejeans_*.deb
Selecting previously unselected package bluejeans.
(Reading database … 516203 files and directories currently installed.)
Preparing to unpack bluejeans_1.36.9-2_amd64.deb …
Unpacking bluejeans (1.36.9-2) …
Setting up bluejeans (1.36.9-2) …


4. Install the deb package as usual with dpkg tool


noah: ~# dpkg -i bluejeans_*.deb


By default BlueJeans were installed under directory /opt/bluejeans


noah:~# ls -al /opt/bluejeans/bluejeans-bin
-rwxr-xr-x 1 root root 72423392 Jun 14 02:31 /opt/bluejeans/bluejeans-bin*


5. Fix missing library links if such are present in order to make BlueJeans workable

Historically I have dealt with many Linux programs that are provided only in RPM package format and I knew that often once an RPM is converted to DEB with alien due to the package dependency differences on Redhats (CentOS / Fedora etc.) there are problems with missing libraries.

This time this was the case as well, so as usual right after install I did a check up with ldd (print shared object dependencies Linux command) to find out about missing libraries and one library appeared missing.


noah:~# ldd /opt/bluejeans/bluejeans-bin
    linux-vdso.so.1 (0x00007fffa2182000)
    librt.so.1 => /lib/x86_64-linux-gnu/librt.so.1 (0x00007fae95f5e000)
    libdl.so.2 => /lib/x86_64-linux-gnu/libdl.so.2 (0x00007fae95d5a000)
    libgtk-x11-2.0.so.0 => /usr/lib/x86_64-linux-gnu/libgtk-x11-2.0.so.0 (0x00007fae95718000)
    libgdk-x11-2.0.so.0 => /usr/lib/x86_64-linux-gnu/libgdk-x11-2.0.so.0 (0x00007fae95463000)
    libatk-1.0.so.0 => /usr/lib/x86_64-linux-gnu/libatk-1.0.so.0 (0x00007fae9523d000)
    libpangocairo-1.0.so.0 => /usr/lib/x86_64-linux-gnu/libpangocairo-1.0.so.0 (0x00007fae95030000)
    libgdk_pixbuf-2.0.so.0 => /usr/lib/x86_64-linux-gnu/libgdk_pixbuf-2.0.so.0 (0x00007fae94e0c000)
    libcairo.so.2 => /usr/lib/x86_64-linux-gnu/libcairo.so.2 (0x00007fae94aef000)
    libpango-1.0.so.0 => /usr/lib/x86_64-linux-gnu/libpango-1.0.so.0 (0x00007fae948aa000)
    libfreetype.so.6 => /usr/lib/x86_64-linux-gnu/libfreetype.so.6 (0x00007fae945f5000)
    libfontconfig.so.1 => /usr/lib/x86_64-linux-gnu/libfontconfig.so.1 (0x00007fae943b2000)
    libgobject-2.0.so.0 => /usr/lib/x86_64-linux-gnu/libgobject-2.0.so.0 (0x00007fae9415e000)
    libglib-2.0.so.0 => /usr/lib/x86_64-linux-gnu/libglib-2.0.so.0 (0x00007fae93e48000)
    libX11.so.6 => /usr/lib/x86_64-linux-gnu/libX11.so.6 (0x00007fae93b0a000)
    libXi.so.6 => /usr/lib/x86_64-linux-gnu/libXi.so.6 (0x00007fae938fa000)
    libnss3.so => /usr/lib/x86_64-linux-gnu/libnss3.so (0x00007fae935b1000)
    libnssutil3.so => /usr/lib/x86_64-linux-gnu/libnssutil3.so (0x00007fae93381000)
    libsmime3.so => /usr/lib/x86_64-linux-gnu/libsmime3.so (0x00007fae93154000)
    libplc4.so => /usr/lib/x86_64-linux-gnu/libplc4.so (0x00007fae92f4f000)
    libnspr4.so => /usr/lib/x86_64-linux-gnu/libnspr4.so (0x00007fae92d10000)
    libgconf-2.so.4 => /usr/lib/x86_64-linux-gnu/libgconf-2.so.4 (0x00007fae92adf000)
    libexpat.so.1 => /lib/x86_64-linux-gnu/libexpat.so.1 (0x00007fae928ad000)
    libXext.so.6 => /usr/lib/x86_64-linux-gnu/libXext.so.6 (0x00007fae9269b000)
    libXfixes.so.3 => /usr/lib/x86_64-linux-gnu/libXfixes.so.3 (0x00007fae92495000)
    libXrender.so.1 => /usr/lib/x86_64-linux-gnu/libXrender.so.1 (0x00007fae9228b000)
    libXcomposite.so.1 => /usr/lib/x86_64-linux-gnu/libXcomposite.so.1 (0x00007fae92088000)
    libasound.so.2 => /usr/lib/x86_64-linux-gnu/libasound.so.2 (0x00007fae91d8a000)
    libXdamage.so.1 => /usr/lib/x86_64-linux-gnu/libXdamage.so.1 (0x00007fae91b87000)
    libXtst.so.6 => /usr/lib/x86_64-linux-gnu/libXtst.so.6 (0x00007fae91981000)
    libpthread.so.0 => /lib/x86_64-linux-gnu/libpthread.so.0 (0x00007fae91763000)
    libcap.so.2 => /lib/x86_64-linux-gnu/libcap.so.2 (0x00007fae9155d000)
    libudev.so.0 => not found
    libdbus-1.so.3 => /lib/x86_64-linux-gnu/libdbus-1.so.3 (0x00007fae9130c000)
    libnotify.so.4 => /usr/lib/x86_64-linux-gnu/libnotify.so.4 (0x00007fae91104000)
    libstdc++.so.6 => /usr/lib/x86_64-linux-gnu/libstdc++.so.6 (0x00007fae90d85000)
    libm.so.6 => /lib/x86_64-linux-gnu/libm.so.6 (0x00007fae909f2000)
    libgcc_s.so.1 => /lib/x86_64-linux-gnu/libgcc_s.so.1 (0x00007fae907db000)
    libc.so.6 => /lib/x86_64-linux-gnu/libc.so.6 (0x00007fae90421000)
    /lib64/ld-linux-x86-64.so.2 (0x00007fae96166000)
    libgmodule-2.0.so.0 => /usr/lib/x86_64-linux-gnu/libgmodule-2.0.so.0 (0x00007fae9021d000)
    libgio-2.0.so.0 => /usr/lib/x86_64-linux-gnu/libgio-2.0.so.0 (0x00007fae8fe7f000)
    libpangoft2-1.0.so.0 => /usr/lib/x86_64-linux-gnu/libpangoft2-1.0.so.0 (0x00007fae8fc6a000)
    libfribidi.so.0 => /usr/lib/x86_64-linux-gnu/libfribidi.so.0 (0x00007fae8fa53000)
    libXinerama.so.1 => /usr/lib/x86_64-linux-gnu/libXinerama.so.1 (0x00007fae8f850000)
    libXrandr.so.2 => /usr/lib/x86_64-linux-gnu/libXrandr.so.2 (0x00007fae8f645000)
    libXcursor.so.1 => /usr/lib/x86_64-linux-gnu/libXcursor.so.1 (0x00007fae8f43b000)
    libpng16.so.16 => /usr/lib/x86_64-linux-gnu/libpng16.so.16 (0x00007fae8f208000)
    libz.so.1 => /lib/x86_64-linux-gnu/libz.so.1 (0x00007fae8efea000)
    libpixman-1.so.0 => /usr/lib/x86_64-linux-gnu/libpixman-1.so.0 (0x00007fae8ed44000)
    libxcb-shm.so.0 => /usr/lib/x86_64-linux-gnu/libxcb-shm.so.0 (0x00007fae8eb41000)
    libxcb.so.1 => /usr/lib/x86_64-linux-gnu/libxcb.so.1 (0x00007fae8e919000)
    libxcb-render.so.0 => /usr/lib/x86_64-linux-gnu/libxcb-render.so.0 (0x00007fae8e70b000)
    libthai.so.0 => /usr/lib/x86_64-linux-gnu/libthai.so.0 (0x00007fae8e501000)
    libuuid.so.1 => /lib/x86_64-linux-gnu/libuuid.so.1 (0x00007fae8e2fa000)
    libffi.so.6 => /usr/lib/x86_64-linux-gnu/libffi.so.6 (0x00007fae8e0f1000)
    libpcre.so.3 => /lib/x86_64-linux-gnu/libpcre.so.3 (0x00007fae8de7f000)
    libplds4.so => /usr/lib/x86_64-linux-gnu/libplds4.so (0x00007fae8dc7b000)
    libgthread-2.0.so.0 => /usr/lib/x86_64-linux-gnu/libgthread-2.0.so.0 (0x00007fae8da79000)
    libdbus-glib-1.so.2 => /usr/lib/x86_64-linux-gnu/libdbus-glib-1.so.2 (0x00007fae8d851000)
    libsystemd.so.0 => /lib/x86_64-linux-gnu/libsystemd.so.0 (0x00007fae8d5c9000)
    libselinux.so.1 => /lib/x86_64-linux-gnu/libselinux.so.1 (0x00007fae8d3a1000)
    libresolv.so.2 => /lib/x86_64-linux-gnu/libresolv.so.2 (0x00007fae8d18a000)
    libmount.so.1 => /lib/x86_64-linux-gnu/libmount.so.1 (0x00007fae8cf31000)
    libharfbuzz.so.0 => /usr/lib/x86_64-linux-gnu/libharfbuzz.so.0 (0x00007fae8cc81000)
    libXau.so.6 => /usr/lib/x86_64-linux-gnu/libXau.so.6 (0x00007fae8ca7d000)
    libXdmcp.so.6 => /usr/lib/x86_64-linux-gnu/libXdmcp.so.6 (0x00007fae8c877000)
    libdatrie.so.1 => /usr/lib/x86_64-linux-gnu/libdatrie.so.1 (0x00007fae8c66f000)
    liblzma.so.5 => /lib/x86_64-linux-gnu/liblzma.so.5 (0x00007fae8c449000)
    liblz4.so.1 => /usr/lib/x86_64-linux-gnu/liblz4.so.1 (0x00007fae8c22c000)
    libgcrypt.so.20 => /lib/x86_64-linux-gnu/libgcrypt.so.20 (0x00007fae8bf10000)
    libblkid.so.1 => /lib/x86_64-linux-gnu/libblkid.so.1 (0x00007fae8bcc1000)
    libgraphite2.so.3 => /usr/lib/x86_64-linux-gnu/libgraphite2.so.3 (0x00007fae8ba94000)
    libbsd.so.0 => /lib/x86_64-linux-gnu/libbsd.so.0 (0x00007fae8b87d000)
    libgpg-error.so.0 => /lib/x86_64-linux-gnu/libgpg-error.so.0 (0x00007fae8b65d000)


As I am on my notebook with Debian 9 and on Debian / Ubuntus and other Linuxes udevd daemon and connected libraries are long time existing, it was obvious the problems to dependencies are because of missing library links (or library version inconsistencies).

To find out what kind of libudev.so* are present I used slocate package (locate) command.


noah:~# locate libudev.so
/lib/i386-linux-gnu/libudev.so.1
/lib/i386-linux-gnu/libudev.so.1.6.10
/lib/x86_64-linux-gnu/libudev.so
/lib/x86_64-linux-gnu/libudev.so.1
/lib/x86_64-linux-gnu/libudev.so.1.6.10


Obviously the missing library libudev.so.0 was present under a different name so I give a try to just create a new symbolic link from libudev.so.1 to libudev.so.0 hoping that the libudev library version Blue Jeans was compiled against did not have a missing binary objects from the ones installed on my OS.


noah:~# ln -sf /lib/x86_64-linux-gnu/libudev.so.1 /lib/x86_64-linux-gnu/libudev.so.0


noah:~# ldd /opt/bluejeans/bluejeans-bin |grep -i 'not found'


Above command did not return any missing libraries, so I went further and executed it.

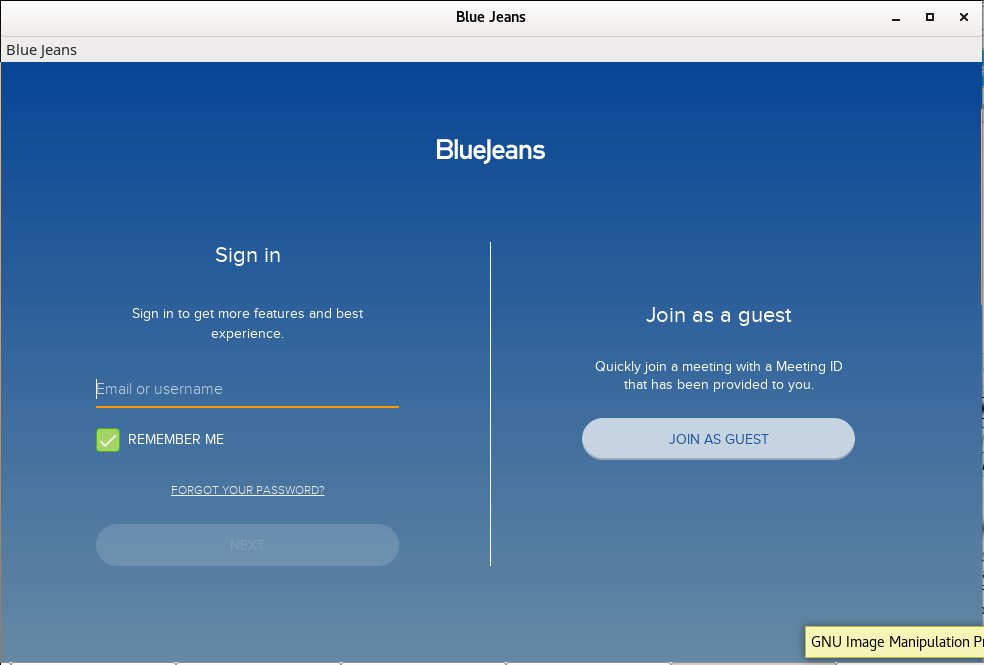
6. Go start BlueJeans and register a user or use the anonymous login to be ready for the scheduled online meting

… And, Guess, what it works! 🙂


noah:~# /opt/bluejeans/bluejeans-bin


To make it easy to remember to later start the binary under a familiar name, I've also created a link into


noah:~# ln -sf /opt/bluejeans/bluejeans-bin /usr/bin/bluejeans


noah:~#  sudo su – hipo
hipo@noah:~$ /usr/bin/bluejeans


bluejeans-video-conferencing-online-sharing-meeting-software-running-on-debian-gnu-linux-screenshot
 

How to turn keyboard backlight on GNU / Linux, keyboard no backlight solution

Friday, October 20th, 2017

how-to-make-CM_Storm_Devastator-keyboard_backlight-work-on-linux-enabled-disable-keyboard-glowing-gnu-linux

If you're a GNU / Linux user and you happen to buy a backlighted keyboard, some nice new laptop whose keyboard supports the more and more modern keyboard growing or if you happen to install a GNU / Linux for a Gamer friend no matter the Linux distribution, you might encounter sometimes  problem even in major Linux distributions Debian / Ubuntu / Mint / Fedora with keyboard backlight not working.

Lets say you buy a Devastator II backlighted keyboard or any other modern keyboard you plug it into the Linux machine and there is no nice blinking light coming out of the keyboard, all the joy is gone yes I know. The free software coolness would have been even more grandiose if your keyboard was shiny and glowing in color / colors 🙂

But wait, there is hope for your joy to be made complete.

To make the keyboard backlight switch on Just issue commands:


xmodmap -e 'add mod3 = Screen_Lock'


# Turn on the keyboard bright lamps
xset led on

# Turns off the keyboard bright lamps
xset led off


If you want to make the keyboard backlight be enabled permanent the easiest solution is to

– add the 3 command lines to /etc/rc.local

E.g. to do so open /etc/rc.local and before exit 0 command just add the lines:


vim /etc/rc.local


xmodmap -e 'add mod3 = Screen_Lock'

# Turn on the keyboard bright lamps
xset led on

# Turns off the keyboard bright lamps
xset led off


If you prefer to have the keyboard colorful backlight enable and disabled from X environment on lets say GNOME , here is how to make yourself an icon that enabled and disables the colors.

That's handy because at day time it is a kind of meaningless for the keyboard to glow.

Here is the shell script:

#!/bin/bash
sleep 1
xset led 3
xmodmap -e 'add mod3 = Scroll_Lock'


I saved it as /home/hipo/scripts/backlight.sh

(don't forget to make it executable!, to do so run):


chmod +x /home/hipo/scripts/backlight.sh


Then create  the .desktop file at /etc/xdg/autostart/backlight.desktop so that it runs the new shell script, like so:

[Desktop Entry]
Type=Application
Name=Devastator Backlight
Exec=/home/hipo/scripts/backlight.sh
Icon=system-run
X-GNOME-Autostart-enabled=true

How to extract a deb package on Debian, Ubuntu, Mint Linux and other non debian based distributions

Friday, October 13th, 2017

how-to-extract-deb-packages-with-dpkg-and-ar-application-x-deb

How to extract a deb package? 


Have you ever had a debian .deb package which contains image files you need, but the dependencies doesn't allow you to install it on your Debian / Ubuntu / Mint Linux release?
I had just recently downloaded the ultimate-edition-themes latest release v 0.0.7 a large pack of GNOME Themes and wanted to install it on my Debian Stretch Linux but I faced problems because of dependencies when trying to install with dpkg.

That is why I took another appoarch and decided to only extract the necessery themes from the archive only with dpkg.

Here is how I have extracted ultimate-edition-themes-.0.0.7_all.deb ;


dpkg -x ultimate-edition-themes-.0.0.7_all.deb /tmp/ultimate-edition-themes


So how dpkg extracts the .deb file?


Debian .deb packages are a regular more in Wikipedia – Unix archive files (ar) .

The structure of a deb file consists of another 3 files (2 tar.gzs and one binary) as follows:


debian-binary: regular text file, contains the version of the deb package format
control.tar.gz: compressed file, contains file md5sums and control directory for the deb package
data.tar.gz: compressed file, contains all the files which will be installed


Basicly if you're on a Linux distribution that lacks dpkg you can easily extract .deb binary using GNU AR  command (used to create, modify extract Unix ar files and is the GNU / Linux equivallent of the UNIX ar command).

To extract on Fedora or RPM based Linux distributions as well as BSDs with AR:

First print file conetnt with:

ar p  ultimate-edition-themes-.0.0.7_all.deb

Then extract it with:

ar x ultimate-edition-themes-.0.0.7_all.deb


Later just extract with tar (untar), the 2 other archived files contained in the .deb (ar) archive:


tar -zxvvf control.tar.gz; tar -zxxvf data.tar.gz


Get everything you need from there in my case that's the usr/share/themes folder, then enjoy life 🙂


Converting .crt .cer .der to PEM, converting .PEM to .DER and convert .PFX PKCS#12 (.P12) to .PEM file using OpenSSL

Friday, September 1st, 2017

openssl_check_verify_crt_csr_key_certificate_consistency-with-openssl-command-openssl-logo

These commands allow you to convert certificates and keys to different formats to make them compatible with specific types of servers or software. For example, you can convert a normal PEM file that would work with Apache to a PFX (PKCS#12) file and use it with Tomcat or IIS.

  • Convert a DER file (.crt .cer .der) to PEM


    openssl x509 -inform der -in certificate.cer -out certificate.pem
    
  • Convert a PEM file to DER


    openssl x509 -outform der -in certificate.pem -out certificate.der
    
  • Convert a PKCS#12 file (.pfx .p12) containing a private key and certificates to PEM


    openssl pkcs12 -in keyStore.pfx -out keyStore.pem -nodes


    You can add -nocerts to only output the private key or add -nokeys to only output the certificates.

  • Convert a PEM certificate file and a private key to PKCS#12 (.pfx .p12)


    openssl pkcs12 -export -out certificate.pfx -inkey privateKey.key \
    -in certificate.crt -certfile CACert.crt