Archive for the ‘Computer Security’ Category

Monitoring network traffic tools to debug network issues in console interactively on Linux

Thursday, December 14th, 2023

transport-layer-fourth-layer-data-transport-diagram


In my last article Debugging and routing network issues on Linux (common approaches), I've given some step by step methology on how to debug a network routing or unreachability issues between network hosts. As the article was mostly targetting a command line tools that can help debugging the network without much interactivity. I've decided to blog of a few other tools that might help the system administrator to debug network issues by using few a bit more interactive tools. Throughout the years of managing multitude of Linux based laptops and servers, as well as being involved in security testing and penetration in the past, these tools has always played an important role and are worthy to be well known and used by any self respecting sys admin or network security expert that has to deal with Linux and *Unix operating systems.
 

1. Debugging what is going on on a network level interactively with iptraf-ng

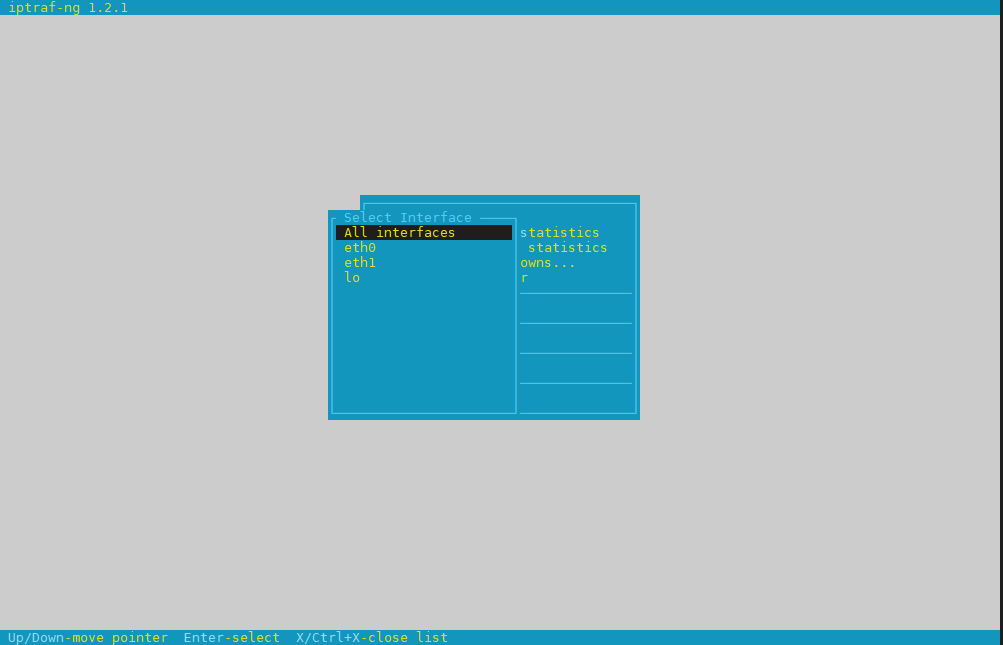
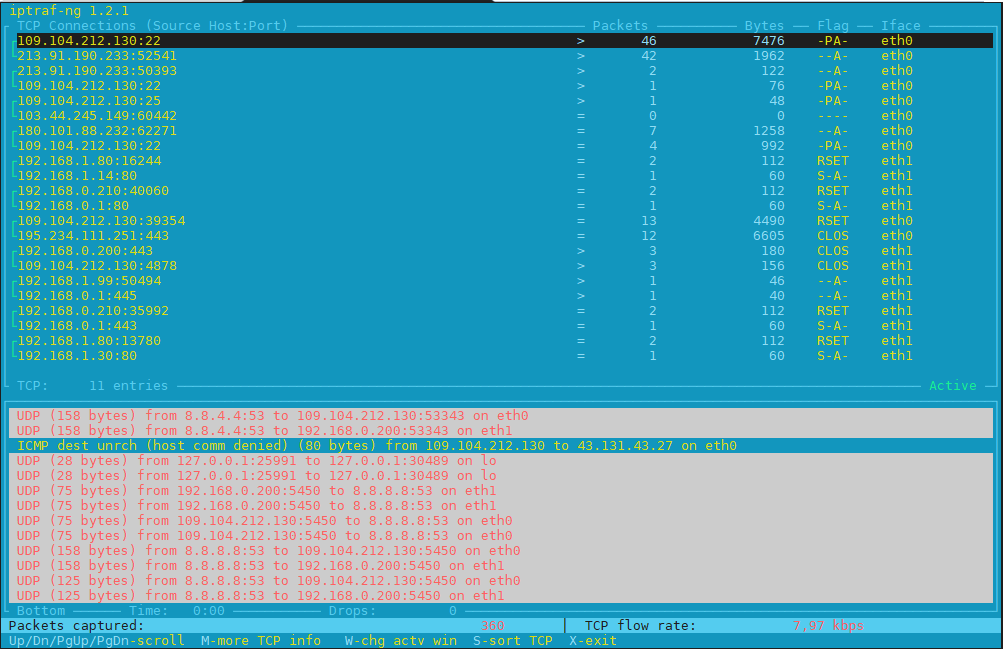
Historically iptraf and today's iptraf is also a great tool one can use to further aid the arsenal debug a network issue or Protocol problem, failure of packets or network interaction issues SYN -> ACK etc. proto interactions and check for Flag states and packets flow.

To use iptraf-ng which is a ncurses based tool just install it and launch it and select the interface you would like to debug trafic on.

To install On Debians distros

# apt install iptraf-ng –yes

# iptraf-ng


iptraf-ng-linux-select-interface-screen
 

iptraf-ng-listen-all-interfaces-check-tcp-flags-and-packets


Session-Layer-in-OSI-Model-diagram
 

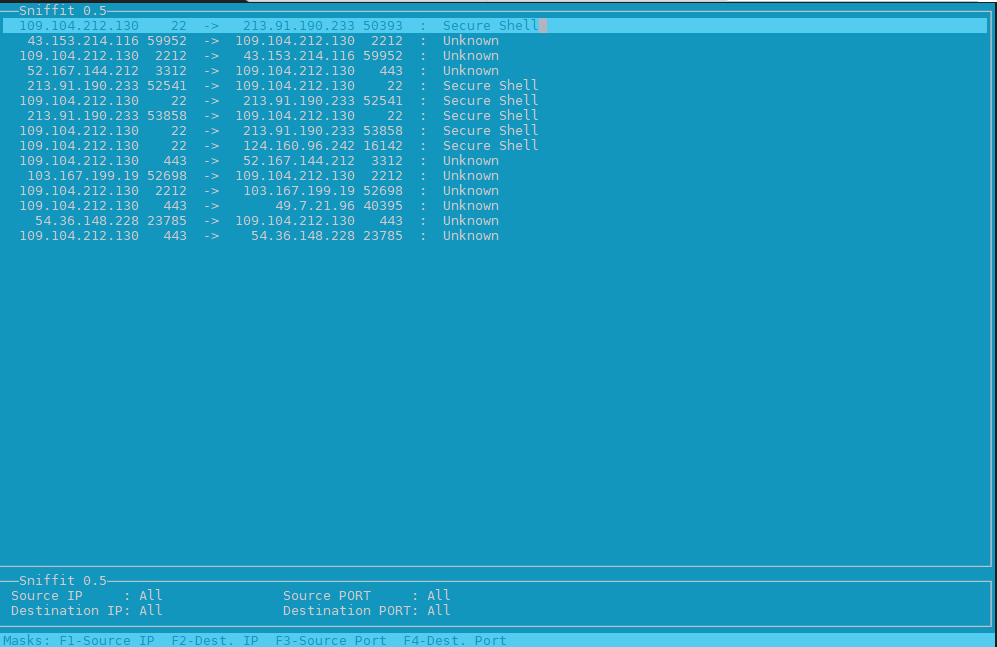
2. Use hackers old tool sniffit to monitor current ongoing traffic and read plain text messages

Those older who remember the rise of Linux to the masses, should remember sniffit was a great tool to snoop for traffic on the network.

root@pcfreak:~# apt-cache show sniffit|grep -i description -A 10 -B10
Package: sniffit
Version: 0.5-1
Installed-Size: 139
Maintainer: Joao Eriberto Mota Filho <eriberto@debian.org>
Architecture: amd64
Depends: libc6 (>= 2.14), libncurses6 (>= 6), libpcap0.8 (>= 0.9.8), libtinfo6 (>= 6)
Description-en: packet sniffer and monitoring tool
 Sniffit is a packet sniffer for TCP/UDP/ICMP packets over IPv4. It is able
 to give you a very detailed technical info on these packets, as SEQ, ACK,
 TTL, Window, etc. The packet contents also can be viewed, in different
 formats (hex or plain text, etc.).
 .
 Sniffit is based in libpcap and is useful when learning about computer
 networks and their security.
Description-md5: 973beeeaadf4c31bef683350f1346ee9
Homepage: https://github.com/resurrecting-open-source-projects/sniffit
Tag: interface::text-mode, mail::notification, role::program, scope::utility,
 uitoolkit::ncurses, use::monitor, use::scanning, works-with::mail,
 works-with::network-traffic
Section: net
Priority: optional
Filename: pool/main/s/sniffit/sniffit_0.5-1_amd64.deb
Size: 61796
MD5sum: ea4cc0bc73f9e94d5a3c1ceeaa485ee1
SHA256: 7ec76b62ab508ec55c2ef0ecea952b7d1c55120b37b28fb8bc7c86645a43c485


Sniffit is not installed by default on deb distros, so to give it a try install it

# apt install sniffit –yes
# sniffit


sniffit-linux-check-tcp-traffic-screenshot
 

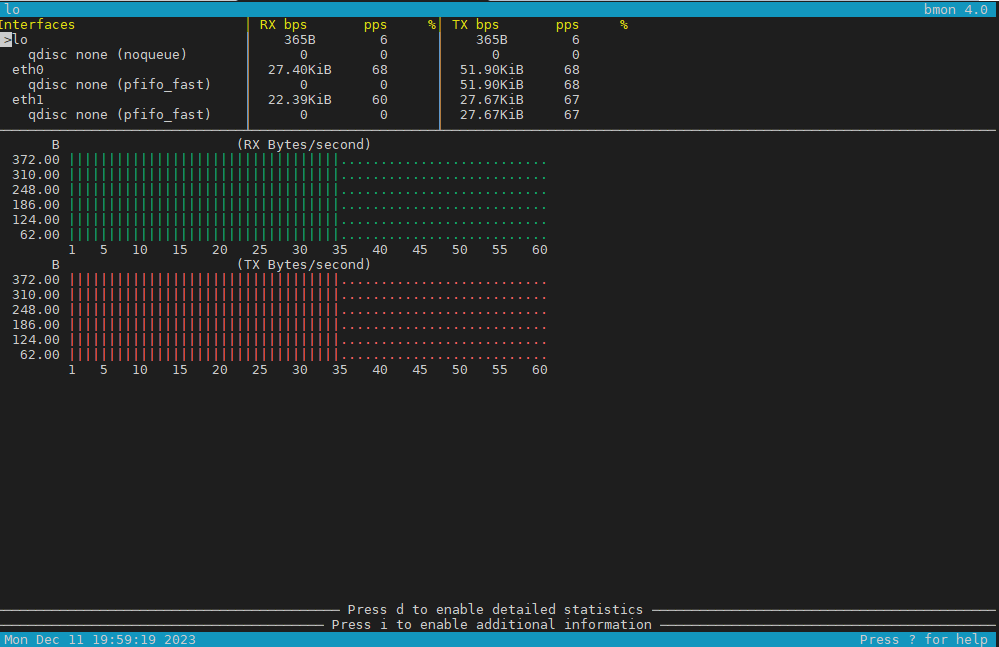
3. Use bmon to monitor bandwidth and any potential traffic losses and check qdisc pfifo
Linux network stack queues


root@pcfreak:~# apt-cache show bmon |grep -i description
Description-en: portable bandwidth monitor and rate estimator
Description-md5: 3288eb0a673978e478042369c7927d3f
root@pcfreak:~# apt-cache show bmon |grep -i description -A 10 -B10
Package: bmon
Version: 1:4.0-7
Installed-Size: 146
Maintainer: Patrick Matthäi <pmatthaei@debian.org>
Architecture: amd64
Depends: libc6 (>= 2.17), libconfuse2 (>= 3.2.1~), libncursesw6 (>= 6), libnl-3-200 (>= 3.2.7), libnl-route-3-200 (>= 3.2.7), libtinfo6 (>= 6)
Description-en: portable bandwidth monitor and rate estimator
 bmon is a commandline bandwidth monitor which supports various output
 methods including an interactive curses interface, lightweight HTML output but
 also simple ASCII output.
 .
 Statistics may be distributed over a network using multicast or unicast and
 collected at some point to generate a summary of statistics for a set of
 nodes.
Description-md5: 3288eb0a673978e478042369c7927d3f
Homepage: http://www.infradead.org/~tgr/bmon/
Tag: implemented-in::c, interface::text-mode, network::scanner,
 role::program, scope::utility, uitoolkit::ncurses, use::monitor,
 works-with::network-traffic
Section: net
Priority: optional
Filename: pool/main/b/bmon/bmon_4.0-7_amd64.deb
Size: 47348
MD5sum: c210f8317eafa22d9e3a8fb8316e0901
SHA256: 21730fc62241aee827f523dd33c458f4a5a7d4a8cf0a6e9266a3e00122d80645


root@pcfreak:~# apt install bmon –yes

root@pcfreak:~# bmon

bmon_monitor_qdisc-network-stack-bandwidth-on-linux

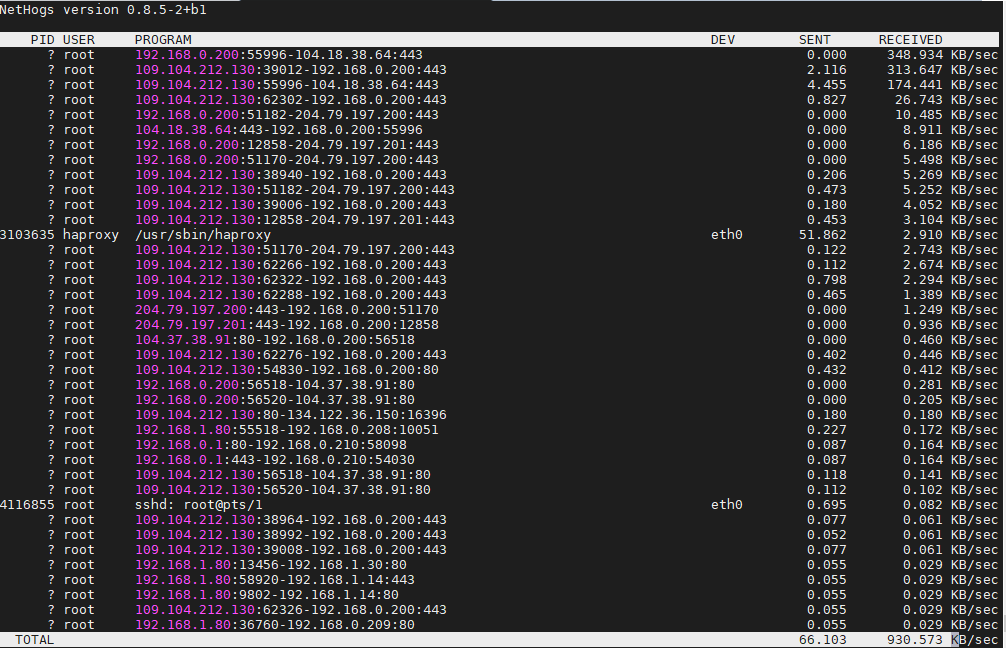
4. Use nethogs net diagnosis text interactive tool

NetHogs is a small 'net top' tool. 
Instead of breaking the traffic down per protocol or per subnet, like most tools do, it groups bandwidth by process.
 

root@pcfreak:~# apt-cache show nethogs|grep -i description -A10 -B10
Package: nethogs
Source: nethogs (0.8.5-2)
Version: 0.8.5-2+b1
Installed-Size: 79
Maintainer: Paulo Roberto Alves de Oliveira (aka kretcheu) <kretcheu@gmail.com>
Architecture: amd64
Depends: libc6 (>= 2.15), libgcc1 (>= 1:3.0), libncurses6 (>= 6), libpcap0.8 (>= 0.9.8), libstdc++6 (>= 5.2), libtinfo6 (>= 6)
Description-en: Net top tool grouping bandwidth per process
 NetHogs is a small 'net top' tool. Instead of breaking the traffic down per
 protocol or per subnet, like most tools do, it groups bandwidth by process.
 NetHogs does not rely on a special kernel module to be loaded.
Description-md5: 04c153c901ad7ca75e53e2ae32565ccd
Homepage: https://github.com/raboof/nethogs
Tag: admin::monitoring, implemented-in::c++, role::program,
 uitoolkit::ncurses, use::monitor, works-with::network-traffic
Section: net
Priority: optional
Filename: pool/main/n/nethogs/nethogs_0.8.5-2+b1_amd64.deb
Size: 30936
MD5sum: 500047d154a1fcde5f6eacaee45148e7
SHA256: 8bc69509f6a8c689bf53925ff35a5df78cf8ad76fff176add4f1530e66eba9dc

root@pcfreak:~# apt install nethogs –yes

# nethogs


nethogs-tool-screenshot-show-user-network--traffic-by-process-name-ID

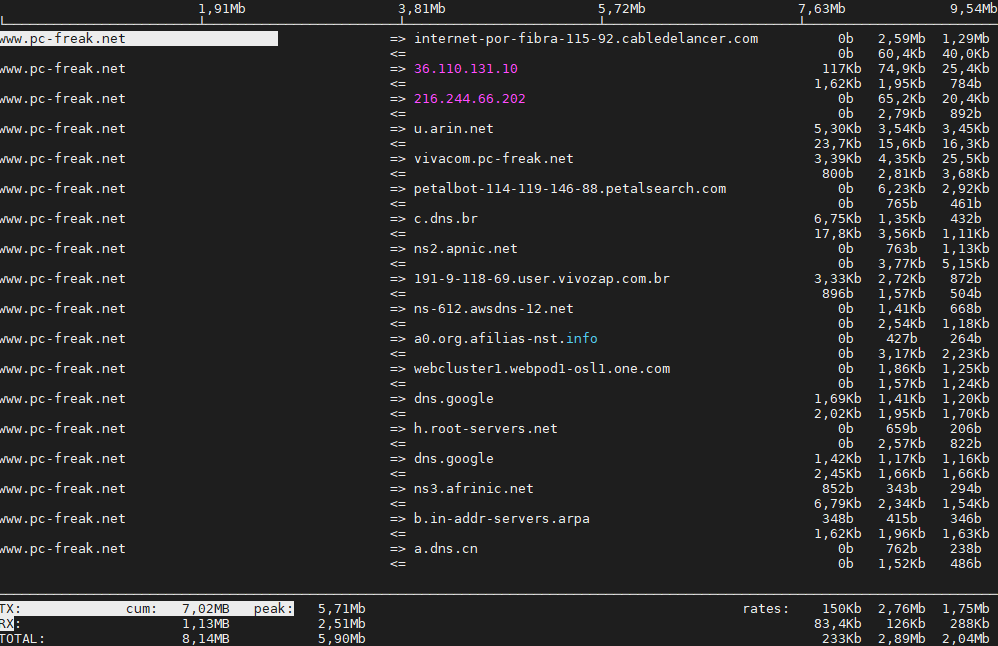
5;.Use iftop –  to display network interface usage


root@pcfreak:~# apt-cache show iftop |grep -i description -A10 -B10
Package: iftop
Version: 1.0~pre4-7
Installed-Size: 97
Maintainer: Markus Koschany <apo@debian.org>
Architecture: amd64
Depends: libc6 (>= 2.29), libncurses6 (>= 6), libpcap0.8 (>= 0.9.8), libtinfo6 (>= 6)
Description-en: displays bandwidth usage information on an network interface
 iftop does for network usage what top(1) does for CPU usage. It listens to
 network traffic on a named interface and displays a table of current bandwidth
 usage by pairs of hosts. Handy for answering the question "Why is my Internet
 link so slow?".
Description-md5: f7e93593aba6acc7b5a331b49f97466f
Homepage: http://www.ex-parrot.com/~pdw/iftop/
Tag: admin::monitoring, implemented-in::c, interface::text-mode,
 role::program, scope::utility, uitoolkit::ncurses, use::monitor,
 works-with::network-traffic
Section: net
Priority: optional
Filename: pool/main/i/iftop/iftop_1.0~pre4-7_amd64.deb
Size: 42044
MD5sum: c9bb9c591b70753880e455f8dc416e0a
SHA256: 0366a4e54f3c65b2bbed6739ae70216b0017e2b7421b416d7c1888e1f1cb98b7


root@pcfreak:~# apt install –yes iftop

iftop-interactive-network-traffic-output-linux-screenshot


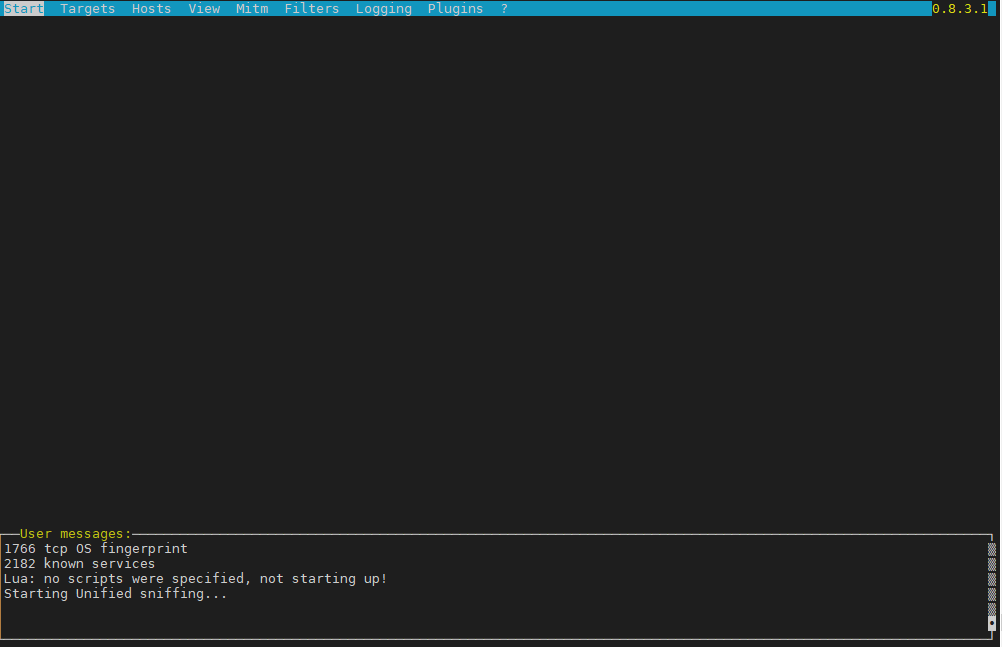
6. Ettercap (tool) to active and passive dissect network protocols for in depth network and host analysis

root@pcfreak:/var/www/images# apt-cache show ettercap-common|grep -i description -A10 -B10
Package: ettercap-common
Source: ettercap
Version: 1:0.8.3.1-3
Installed-Size: 2518
Maintainer: Debian Security Tools <team+pkg-security@tracker.debian.org>
Architecture: amd64
Depends: ethtool, geoip-database, libbsd0 (>= 0.0), libc6 (>= 2.14), libcurl4 (>= 7.16.2), libgeoip1 (>= 1.6.12), libluajit-5.1-2 (>= 2.0.4+dfsg), libnet1 (>= 1.1.6), libpcap0.8 (>= 0.9.8), libpcre3, libssl1.1 (>= 1.1.1), zlib1g (>= 1:1.1.4)
Recommends: ettercap-graphical | ettercap-text-only
Description-en: Multipurpose sniffer/interceptor/logger for switched LAN
 Ettercap supports active and passive dissection of many protocols
 (even encrypted ones) and includes many feature for network and host
 analysis.
 .
 Data injection in an established connection and filtering (substitute
 or drop a packet) on the fly is also possible, keeping the connection
 synchronized.
 .
 Many sniffing modes are implemented, for a powerful and complete
 sniffing suite. It is possible to sniff in four modes: IP Based, MAC Based,
 ARP Based (full-duplex) and PublicARP Based (half-duplex).
 .
 Ettercap also has the ability to detect a switched LAN, and to use OS
 fingerprints (active or passive) to find the geometry of the LAN.
 .
 This package contains the Common support files, configuration files,
 plugins, and documentation.  You must also install either
 ettercap-graphical or ettercap-text-only for the actual GUI-enabled
 or text-only ettercap executable, respectively.
Description-md5: f1d894b138f387661d0f40a8940fb185
Homepage: https://ettercap.github.io/ettercap/
Tag: interface::text-mode, network::scanner, role::app-data, role::program,
 uitoolkit::ncurses, use::scanning
Section: net
Priority: optional
Filename: pool/main/e/ettercap/ettercap-common_0.8.3.1-3_amd64.deb
Size: 734972
MD5sum: 403d87841f8cdd278abf20bce83cb95e
SHA256: 500aee2f07e0fae82489321097aee8a97f9f1970f6e4f8978140550db87e4ba9


root@pcfreak:/ # apt install ettercap-text-only –yes

root@pcfreak:/ # ettercap -C


ettercap-text-interface-unified-sniffing-screenshot-linux

7. iperf and netperf to measure connecitivity speed on Network LAN and between Linux server hosts

iperf and netperf are two very handy tools to measure the speed of a network and various aspects of the bandwidth. It is mostly useful when designing network infrastructure or building networks from scratch.
 

If you never used netperf in the past here is a description from man netperf

NAME
       netperf – a network performance benchmark

SYNOPSIS
       netperf [global options] — [test specific options]

DESCRIPTION
       Netperf  is  a benchmark that can be used to measure various aspects of
       networking performance.  Currently, its focus is on bulk data  transfer
       and  request/response  performance  using  either  TCP  or UDP, and the
       Berkeley Sockets interface. In addition, tests for DLPI, and  Unix  Do‐
       main Sockets, tests for IPv6 may be conditionally compiled-in.


root@freak:~# netperf
MIGRATED TCP STREAM TEST from 0.0.0.0 (0.0.0.0) port 0 AF_INET to localhost () port 0 AF_INET : demo
Recv   Send    Send
Socket Socket  Message  Elapsed
Size   Size    Size     Time     Throughput
bytes  bytes   bytes    secs.    10^6bits/sec

 87380  65536  65536    10.00    17669.96


Testing UDP network throughput using NetPerf

Change the test name from TCP_STREAM to UDP_STREAM. Let’s use 1024 (1MB) as the message size to be sent by the client.
If you receive the following error send_data: data send error: Network is unreachable (errno 101) netperf: send_omni:

send_data failed: Network is unreachable, add option -R 1 to remove the iptable rule that prohibits NetPerf UDP flow.

$ netperf -H 172.31.56.48 -t UDP_STREAM -l 300 — -R 1 -m 1024
MIGRATED UDP STREAM TEST from 0.0.0.0 (0.0.0.0) port 0 AF_INET to 172.31.56.48 () port 0 AF_INET
Socket Message Elapsed Messages
Size Size Time Okay Errors Throughput
bytes bytes secs # # 10^6bits/sec

212992 1024 300.00 9193386 0 251.04
212992 300.00 9131380 249.35

UDP Throughput in a WAN

$ netperf -H HOST -t UDP_STREAM -l 300 — -R 1 -m 1024
MIGRATED UDP STREAM TEST from (null) (0.0.0.0) port 0 AF_INET to (null) () port 0 AF_INET : histogram : spin interval
Socket Message Elapsed Messages
Size Size Time Okay Errors Throughput
bytes bytes secs # # 10^6bits/sec

9216 1024 300.01 35627791 0 972.83
212992 300.01 253099 6.91


Testing TCP throughput using iPerf


Here is a short description of iperf

NAME
       iperf – perform network throughput tests

SYNOPSIS
       iperf -s [options]

       iperf -c server [options]

       iperf -u -s [options]

       iperf -u -c server [options]

DESCRIPTION
       iperf  2  is  a tool for performing network throughput and latency mea‐
       surements. It can test using either TCP or UDP protocols.  It  supports
       both  unidirectional  and  bidirectional traffic. Multiple simultaneous
       traffic streams are also supported. Metrics are displayed to help  iso‐
       late the causes which impact performance. Setting the enhanced (-e) op‐
       tion provides all available metrics.

       The user must establish both a both a server (to discard traffic) and a
       client (to generate traffic) for a test to occur. The client and server
       typically are on different hosts or computers but need not be.


Run iPerf3 as server on the server:

$ iperf3 –server –interval 30
———————————————————–
Server listening on 5201
———————————————————–


Test TCP Throughput in Local LAN


$ iperf3 –client 172.31.56.48 –time 300 –interval 30
Connecting to host 172.31.56.48, port 5201
[ 4] local 172.31.100.5 port 44728 connected to 172.31.56.48 port 5201
[ ID] Interval Transfer Bandwidth Retr Cwnd
[ 4] 0.00-30.00 sec 1.70 GBytes 488 Mbits/sec 138 533 KBytes
[ 4] 30.00-60.00 sec 260 MBytes 72.6 Mbits/sec 19 489 KBytes
[ 4] 60.00-90.00 sec 227 MBytes 63.5 Mbits/sec 15 542 KBytes
[ 4] 90.00-120.00 sec 227 MBytes 63.3 Mbits/sec 13 559 KBytes
[ 4] 120.00-150.00 sec 228 MBytes 63.7 Mbits/sec 16 463 KBytes
[ 4] 150.00-180.00 sec 227 MBytes 63.4 Mbits/sec 13 524 KBytes
[ 4] 180.00-210.00 sec 227 MBytes 63.5 Mbits/sec 14 559 KBytes
[ 4] 210.00-240.00 sec 227 MBytes 63.5 Mbits/sec 14 437 KBytes
[ 4] 240.00-270.00 sec 228 MBytes 63.7 Mbits/sec 14 516 KBytes
[ 4] 270.00-300.00 sec 227 MBytes 63.5 Mbits/sec 14 524 KBytes
– – – – – – – – – – – – – – – – – – – – – – – – –
[ ID] Interval Transfer Bandwidth Retr
[ 4] 0.00-300.00 sec 3.73 GBytes 107 Mbits/sec 270 sender
[ 4] 0.00-300.00 sec 3.73 GBytes 107 Mbits/sec receiver

Test TCP Throughput in a WAN Network

$ iperf3 –client HOST –time 300 –interval 30
Connecting to host HOST, port 5201
[ 5] local 192.168.1.73 port 56756 connected to HOST port 5201
[ ID] Interval Transfer Bitrate
[ 5] 0.00-30.00 sec 21.2 MBytes 5.93 Mbits/sec
[ 5] 30.00-60.00 sec 27.0 MBytes 7.55 Mbits/sec
[ 5] 60.00-90.00 sec 28.6 MBytes 7.99 Mbits/sec
[ 5] 90.00-120.00 sec 28.7 MBytes 8.02 Mbits/sec
[ 5] 120.00-150.00 sec 28.5 MBytes 7.97 Mbits/sec
[ 5] 150.00-180.00 sec 28.6 MBytes 7.99 Mbits/sec
[ 5] 180.00-210.00 sec 28.4 MBytes 7.94 Mbits/sec
[ 5] 210.00-240.00 sec 28.5 MBytes 7.97 Mbits/sec
[ 5] 240.00-270.00 sec 28.6 MBytes 8.00 Mbits/sec
[ 5] 270.00-300.00 sec 27.9 MBytes 7.81 Mbits/sec
– – – – – – – – – – – – – – – – – – – – – – – – –
[ ID] Interval Transfer Bitrate
[ 5] 0.00-300.00 sec 276 MBytes 7.72 Mbits/sec sender
[ 5] 0.00-300.00 sec 276 MBytes 7.71 Mbits/sec receiver


$ iperf3 –client 172.31.56.48 –interval 30 -u -b 100MB
Accepted connection from 172.31.100.5, port 39444
[ 5] local 172.31.56.48 port 5201 connected to 172.31.100.5 port 36436
[ ID] Interval Transfer Bandwidth Jitter Lost/Total Datagrams
[ 5] 0.00-30.00 sec 354 MBytes 98.9 Mbits/sec 0.052 ms 330/41774 (0.79%)
[ 5] 30.00-60.00 sec 355 MBytes 99.2 Mbits/sec 0.047 ms 355/41903 (0.85%)
[ 5] 60.00-90.00 sec 354 MBytes 98.9 Mbits/sec 0.048 ms 446/41905 (1.1%)
[ 5] 90.00-120.00 sec 355 MBytes 99.4 Mbits/sec 0.045 ms 261/41902 (0.62%)
[ 5] 120.00-150.00 sec 354 MBytes 99.1 Mbits/sec 0.048 ms 401/41908 (0.96%)
[ 5] 150.00-180.00 sec 353 MBytes 98.7 Mbits/sec 0.047 ms 530/41902 (1.3%)
[ 5] 180.00-210.00 sec 353 MBytes 98.8 Mbits/sec 0.059 ms 496/41904 (1.2%)
[ 5] 210.00-240.00 sec 354 MBytes 99.0 Mbits/sec 0.052 ms 407/41904 (0.97%)
[ 5] 240.00-270.00 sec 351 MBytes 98.3 Mbits/sec 0.059 ms 725/41903 (1.7%)
[ 5] 270.00-300.00 sec 354 MBytes 99.1 Mbits/sec 0.043 ms 393/41908 (0.94%)
– – – – – – – – – – – – – – – – – – – – – – – – –
[ ID] Interval Transfer Bandwidth Jitter Lost/Total Datagrams
[ 5] 0.00-300.04 sec 3.45 GBytes 98.94 Mbits/sec 0.043 ms 4344/418913 (1%)

UDP Throughput in a WAN

$ iperf3 –client HOST –time 300 -u -b 7.7MB
Accepted connection from 45.29.190.145, port 60634
[ 5] local 172.31.56.48 port 5201 connected to 45.29.190.145 port 52586
[ ID] Interval Transfer Bandwidth Jitter Lost/Total Datagrams
[ 5] 0.00-30.00 sec 27.4 MBytes 7.67 Mbits/sec 0.438 ms 64/19902 (0.32%)
[ 5] 30.00-60.00 sec 27.5 MBytes 7.69 Mbits/sec 0.446 ms 35/19940 (0.18%)
[ 5] 60.00-90.00 sec 27.5 MBytes 7.68 Mbits/sec 0.384 ms 39/19925 (0.2%)
[ 5] 90.00-120.00 sec 27.5 MBytes 7.68 Mbits/sec 0.528 ms 70/19950 (0.35%)
[ 5] 120.00-150.00 sec 27.4 MBytes 7.67 Mbits/sec 0.460 ms 51/19924 (0.26%)
[ 5] 150.00-180.00 sec 27.5 MBytes 7.69 Mbits/sec 0.485 ms 37/19948 (0.19%)
[ 5] 180.00-210.00 sec 27.5 MBytes 7.68 Mbits/sec 0.572 ms 49/19941 (0.25%)
[ 5] 210.00-240.00 sec 26.8 MBytes 7.50 Mbits/sec 0.800 ms 443/19856 (2.2%)
[ 5] 240.00-270.00 sec 27.4 MBytes 7.66 Mbits/sec 0.570 ms 172/20009 (0.86%)
[ 5] 270.00-300.00 sec 25.3 MBytes 7.07 Mbits/sec 0.423 ms 1562/19867 (7.9%)
– – – – – – – – – – – – – – – – – – – – – – – – –
[ ID] Interval Transfer Bandwidth Jitter Lost/Total Datagrams
[ 5] 0.00-300.00 sec 272 MBytes 7.60 Mbits/sec 0.423 ms 2522/199284 (1.3%)
[SUM] 0.0-300.2 sec 31 datagrams received out-of-order


Sum it up what learned


Debugging network issues and snooping on a Local LAN (DMZ) network on a server or home LAN is useful  to debug for various network issues and more importantly track and know abou tsecurity threads such as plain text passowd communication via insecure protocols a failure of proper communication between Linux network nodes at times, or simply to get a better idea on what kind of network is your new purchased dedicated server living in .It can help you also strenghten your security and close up any possible security holes, or even help you start thinking like a security intruder (cracker / hacker) would do. In this article we went through few of my favourite tools I use for many years quite often. These tools are just part of the tons of useful *Unix free tools available to do a network debug. Tools mentioned up are worthy to install on every server you have to administratrate or even your home desktop PCs, these are iptraf, sniffit, iftop, bmon, nethogs, nmon, ettercap, iperf and netperf.
 If you have some other useful tools used on Linux sys admin tasks please share, I'll be glad to know it and put them in my arsenal of used tools.

Enjoy ! 🙂

Enable PSK encryption on Zabbix Agent (client) sent encrypted monitored datas to Zabbix server

Friday, April 7th, 2023

zabbix-client-server-encryption-public-key-exchange

Those concerned of security and in use of their Zabbix monitored data who communicate Zabbix collected agent
data over internet or via some kind of untrusted network might definitely not enjoy the fact that zabbix-agent sents
its collected data to server in a plain text. Clear text data is allowing any network sniffer to possibly collect your
monitored server and hardware devices data and exposes all data sent over the network to same problems like in the past
the old uencrypted SMTP protocol.

To mitigate those great security hole for the paranoid sys admin it is rather easy to enable PSK (Pre Shared Key) based encryption.
To generate Pre Shared key you have to had to important values present

1. PSK Identity
2. PSK Secret

PSK secret should be minimum of 128 bit (16-byte PSK, entered as 32 hexadecimal digits), and supports up to
2048 bit (256-byte PSK, entered as 512 hexadecimal digits)

Usually something like 256 bit PSK secret on the machine should be strong enough and simply generated by running

# openssl rand -hex 32

1. Agent to zabbix server or proxy connection config

In /etc/zabbix/zabbix_agentd.conf for a Server Active (e.g. server to actively request the client to sent its collected data)
On machine running zabbix-agent should have a configuration similar to:

# cat /etc/zabbix/zabbix_agentd.conf

PidFile=/var/run/zabbix/zabbix_agentd.pid
LogFile=/var/log/zabbix/zabbix_agentd.log
LogFileSize=0

# IP of the machine
SourceIP=10.10.10.30
# turn it on if you need to execute to remote machine commands
EnableRemoteCommands=0

# IP of the server
servers=10.30.50.80
ListenPort=10080

# IP of the machine
ListenIP=10.30.30.31

# IP of the server
ServerActive=10.30.50.80

HostMetadataItem=system.uname
BufferSize=5400
MaxLinesPerSecond=5
Timeout=10
AllowRoot=0
StartAgents=5
LogRemoteCommands=0


# Machine hostname
Hostname=fqdn-of-zabbix-data-collect-server.com
Include=/etc/zabbix/zabbix_agentd.d/*.conf

# Encryption
TLSConnect=psk
TLSAccept=psk
TLSPSKIdentity=PSK to Zabbix Server5
TLSPSKFile=/etc/zabbix/zabbix_agentd.psk


! Important security note

!!! The TLSPSKIdentity value you decide will not be encrypted on transport, so don't use anything sensitive.

Once you include the TSL config

2 Generate / Create Zabbix Agent Key

Generate the key with pseudo-random bites inside /etc/zabbix/zabbix_agentd_key.psk

# cd /etc/zabbix
# openssl rand -hex 32 > zabbix_agentd_key.psk
# chown zabbix:zabbix zabbix_agentd_key.psk
# chmod 600 zabbix_agentd_key.psk

3. Configure PSK encryption in Zabbix Server Web User interface

Go to Zabbix Server User interface in browser and configure the PSK encryption options for the host.

Select the:

'Connections to host' = PSK

'Connections from host' = PSK

'PSK Identity' = [public-value-configured-in-Zabbix-agent-config]

'PSK' = [paste the long hex string generated from the OpenSSL command above]


In some seconds up to a minute or two the Zabbix Server and Agent will successfully communicate using PSK encryption.
Making the monitored data unreadable in plain text for malignant sniffers hanging in the middle equipment between the zabbix-agent and zabbix-server hosts.

4. PSK encryption behind a Proxy

Many companies, nowadays use zabbix proxy for improvement of network infrastrucutre. For example it is used to offload the zabbix-server when multiple zabbix-agents have to report various datas or to monitor servers and devices that are phyisically in separate networks or data centers (are passing through paranoic built firewalls) or monitor locations are having unreliable communications between each other.
 

To enable PSK for communications between your Zabbix Server and Zabbix Proxy.

1. Create a new secret, and add the PSK Identity and Secret to

Administration ⇾ Proxies ⇾ [Your proxy] ⇾ Encryption

2. Adjust the settings inside the zabbix proxies configuration file at /etc/zabbix/zabbix_proxy.conf


If setting up PSK encryption for agents behind a Zabbix proxy, ensure your have

Zabbix Server ⇽⇾ Proxy PSK enabled
first in Zabbix Server UI.

This is because, when you start the Proxy, or do some testing to send some key value to Zabbix server via the proxy with commands :

# zabbix_get -s 127.0.0.1 -k system.hostname
# zabbix_server -R config_cache_reload


config_cache_reload, the Proxy will download all its host settings from the server, and this also includes the servers copy of the secret.

The proxy needs to know the secret since it is now managing the communications on behalf of the server.

3. To add PSK encryption for any Agents behind a proxy, then you continue to set up the Agents as normal by creating a new secret, editing

Configuration ⇾ Hosts ⇾ [Your Host] ⇾ Encryption page

and also editing /etc/zabbix/zabbix_agentd.conf.

Remember that, since your Agents Host configuration in the Zabbix UI will be set as Monitored by Proxy, the PSK settings will be applicable for communications happening between the Zabbix Proxy and the Agent that it is monitoring, not between the Zabbix Server and the Agent behind the proxy.

You can also add PSK Encryption between your Zabbix Proxy and its own local Agent if you want.
You would set its PSK settings in the Proxy Agents host configuration at

Configuration ⇾ Hosts ⇾ [Your proxy] ⇾ Encryption

and modify the settings in the agents on configuration file at /etc/zabbix/zabbix_agentd.conf.
Keep in mind, this is only applicable to communications between the Zabbix Proxy, and its own Agent process.

When setting up PSK encryption for the Zabbix Server, Proxy and Agents, you may see an error in the Proxy logs,

cannot send proxy data to server at "zabbix.your-domain.tld": connection of type "TLS with PSK" is not allowed for proxy "your-proxy".

If you hit this, check that your

Zabbix Server ⇽⇾ Proxy PSK settings

are correct first.

Don't get confused between the Proxies own optional agent process, and its main Proxy process which is required.

Configure aide file integrity check server monitoring in Zabbix to track for file changes on servers

Tuesday, March 28th, 2023

zabbix-aide-log-monitoring-logo

Earlier I've written a small article on how to setup AIDE monitoring for Server File integrity check on Linux, which put the basics on how this handy software to improve your server overall Security software can be installed and setup without much hassle.

Once AIDE is setup and a preset custom configuration is prepared for AIDE it is pretty useful to configure AIDE to monitor its critical file changes for better server security by monitoring the AIDE log output for new record occurs with Zabbix. Usually if no files monitored by AIDE are modified on the machine, the log size will not grow, but if some file is modified once Advanced Linux Intrusion Detecting (aide) binary runs via the scheduled Cron job, the /var/log/app_aide.log file will grow zabbix-agentd will continuously check the file for size increases and will react.

Before setting up the Zabbix required Template, you will have to set few small scripts that will be reading a preconfigured list of binaries or application files etc. that aide will monitor lets say via /etc/aide-custom.conf
 

1. Configure aide to monitor files for changes


Before running aide, it is a good idea to prepare a file with custom defined directories and files that you plan to monitor for integrity checking e.g. future changes with aide, for example to capture bad intruders who breaks into server which runs aide and modifies critical files such as /etc/passwd /etc/shadow /etc/group or / /usr/local/etc/* or /var/* / /usr/* critical files that shouldn't be allowed to change without the admin to soon find out.

# cat /etc/aide-custom.conf

# Example configuration file for AIDE.
@@define DBDIR /var/lib/aide
@@define LOGDIR /var/log/aide
# The location of the database to be read.
database=file:@@{DBDIR}/app_custom.db.gz
database_out=file:@@{DBDIR}/app_aide.db.new.gz
gzip_dbout=yes
verbose=5

report_url=file:@@{LOGDIR}/app_custom.log
#report_url=syslog:LOG_LOCAL2
#report_url=stderr
#NOT IMPLEMENTED report_url=mailto:root@foo.com
#NOT IMPLEMENTED report_url=syslog:LOG_AUTH

# These are the default rules.
#
#p:      permissions
#i:      inode:
#n:      number of links
#u:      user
#g:      group
#s:      size
#b:      block count
#m:      mtime
#a:      atime
#c:      ctime
#S:      check for growing size
#acl:           Access Control Lists
#selinux        SELinux security context
#xattrs:        Extended file attributes
#md5:    md5 checksum
#sha1:   sha1 checksum
#sha256:        sha256 checksum
#sha512:        sha512 checksum
#rmd160: rmd160 checksum
#tiger:  tiger checksum

#haval:  haval checksum (MHASH only)
#gost:   gost checksum (MHASH only)
#crc32:  crc32 checksum (MHASH only)
#whirlpool:     whirlpool checksum (MHASH only)

FIPSR = p+i+n+u+g+s+m+c+acl+selinux+xattrs+sha256

#R:             p+i+n+u+g+s+m+c+acl+selinux+xattrs+md5
#L:             p+i+n+u+g+acl+selinux+xattrs
#E:             Empty group
#>:             Growing logfile p+u+g+i+n+S+acl+selinux+xattrs

# You can create custom rules like this.
# With MHASH…
# ALLXTRAHASHES = sha1+rmd160+sha256+sha512+whirlpool+tiger+haval+gost+crc32
ALLXTRAHASHES = sha1+rmd160+sha256+sha512+tiger
# Everything but access time (Ie. all changes)
EVERYTHING = R+ALLXTRAHASHES

# Sane, with multiple hashes
# NORMAL = R+rmd160+sha256+whirlpool
NORMAL = FIPSR+sha512

# For directories, don't bother doing hashes
DIR = p+i+n+u+g+acl+selinux+xattrs

# Access control only
PERMS = p+i+u+g+acl+selinux

# Logfile are special, in that they often change
LOG = >

# Just do sha256 and sha512 hashes
LSPP = FIPSR+sha512

# Some files get updated automatically, so the inode/ctime/mtime change
# but we want to know when the data inside them changes
DATAONLY =  p+n+u+g+s+acl+selinux+xattrs+sha256

##############TOUPDATE
#To delegate to app team create a file like /app/aide.conf
#and uncomment the following line
#@@include /app/aide.conf
#Then remove all the following lines
/etc/zabbix/scripts/check.sh FIPSR
/etc/zabbix/zabbix_agentd.conf FIPSR
/etc/sudoers FIPSR
/etc/hosts FIPSR
/etc/keepalived/keepalived.conf FIPSR
# monitor haproxy.cfg
/etc/haproxy/haproxy.cfg FIPSR
# monitor keepalived
/home/keepalived/.ssh/id_rsa FIPSR
/home/keepalived/.ssh/id_rsa.pub FIPSR
/home/keepalived/.ssh/authorized_keys FIPSR

/usr/local/bin/script_to_run.sh FIPSR
/usr/local/bin/another_script_to_monitor_for_changes FIPSR

#  cat /usr/local/bin/aide-config-check.sh
#!/bin/bash
/sbin/aide -c /etc/aide-custom.conf -D

# cat /usr/local/bin/aide-init.sh
#!/bin/bash
/sbin/aide -c /etc/custom-aide.conf -B database_out=file:/var/lib/aide/custom-aide.db.gz -i


# cat /usr/local/bin/aide-check.sh

#!/bin/bash
/sbin/aide -c /etc/custom-aide.conf -Breport_url=stdout -B database=file:/var/lib/aide/custom-aide.db.gz -C|/bin/tee -a /var/log/aide/custom-aide-check.log|/bin/logger -t custom-aide-check-report
/usr/local/bin/aide-init.sh


# cat /usr/local/bin/aide_app_cron_daily.txt

#!/bin/bash
#If first time, we need to init the DB
if [ ! -f /var/lib/aide/app_aide.db.gz ]
   then
    logger -p local2.info -t app-aide-check-report  "Generating NEW AIDE DATABASE for APPLICATION"
    nice -n 18 /sbin/aide –init -c /etc/aide_custom.conf
    mv /var/lib/aide/app_aide.db.new.gz /var/lib/aide/app_aide.db.gz
fi

nice -n 18 /sbin/aide –update -c /etc/aide_app.conf
#since the option for syslog seems not fully implemented we need to push logs via logger
/bin/logger -f /var/log/aide/app_aide.log -p local2.info -t app-aide-check-report
#Acknoledge the new database as the primary (every results are sended to syslog anyway)
mv /var/lib/aide/app_aide.db.new.gz /var/lib/aide/app_aide.db.gz

What above cron job does is pretty simple, as you can read it yourself. If the configuration predefined aide database store file /var/lib/aide/app_aide.db.gz, does not
exists aide will create its fresh empty database and generate a report for all predefined files with respective checksums to be stored as a comparison baseline for file changes. 

Next there is a line to write aide file changes via rsyslog through the logger and local2.info handler


2. Setup Zabbix Template with Items, Triggers and set Action

2.1 Create new Template and name it YourAppName APP-LB File integrity Check

aide-itengrity-check-zabbix_ Configuration of templates

Then setup the required Items, that will be using zabbix's Skip embedded function to scan file in a predefined period of file, this is done by the zabbix-agent that is
supposed to run on the server.

2.2 Configure Item like

aide-zabbix-triggers-screenshot
 

*Name: check aide log file

Type: zabbix (active)

log[/var/log/aide/app_aide.log,^File.*,,,skip]

Type of information: Log

Update Interval: 30s

Applications: File Integrity Check

Configure Trigger like

Enabled: Tick On

images/aide-zabbix-screenshots/check-aide-log-item


2.3 Create Triggers with the respective regular expressions, that would check the aide generated log file for file modifications


aide-zabbix-screenshot-minor-config

Configure Trigger like
 

Enabled: Tick On


*Name: Someone modified {{ITEM.VALUE}.regsub("(.*)", \1)}

*Expression: {PROD APP-LB File Integrity Check:log[/var/log/aide/app_aide.log,^File.*,,,skip].strlen()}>=1

Allow manual close: yes tick

*Description: Someone modified {{ITEM.VALUE}.regsub("(.*)", \1)} on {HOST.NAME}


2.4 Configure Action


aide-zabbix-file-monitoring-action-screensho

Now assuming the Zabbix server has  a properly set media for communication and you set Alerting rules zabbix-server can be easily set tosend mails to a Support email to get Notifications Alerts, everytime a monitored file by aide gets changed.

That's all folks ! Enjoy being notified on every file change on your servers  !
 

How to install and configure AIDE ( Advanced Intrusion Detection Environment ) on Debian GNU / Linux 11 to monitor files for changes

Thursday, March 9th, 2023

aide-logo-linux

How to install and configure AIDE ( Advanced Intrusion Detection Environment ) on Debian GNU / Linux 11 to monitor files for changes

Having a intrusion detection system is essential to keeping a server security to good level and being compliant with PCI (Payment Card Industry) DSS Standards. It is a great thing for the sake to protect oneself from hackers assaults. 

There is plenty of Intrusion Detection systems available all around since many years, in the past one of main ones for Linux as older system administrators should remember was Tripwire – integrity tool for monitoring and alerting on specific file change(s) on a range of systems

Tripwire is still used today but many today prefer to use AIDE that is a free software replacement for Tripwire under GPL (General Public License), that is starting to become like a "standard"  for many Unix-like systems as an inexpensive baseline control and rootkit detection system.

In this article I'll explain shortly how to Install / Configure and Use AIDE to monitor, changes with files on the system.

But before proceeding it is worthy to mention on some of the alternatives companies and businesses choose to as an IDS (Intrusion Detection Systems), that is useful to give a brief idea of the sysadmins that has to deal with Security, on what is some of the main Intrusion Detection Systems adopted on UNIX OSes today:
 

  • Samhain

    An integrity checker and host intrusion detection system that can be used on single hosts as well as large, UNIX-based networks. It supports central monitoring as well as powerful (and new) stealth features to run undetected in memory, using steganography. Samhain is an open-source multiplatform application for POSIX systems (Unix, Linux, Cygwin/Windows).

  • OSSEC 
    OSSEC uses a centralized, cross-platform architecture allowing multiple systems to be monitored and managed.
     
  • Snort
    IDS which has the capabilities to prevent attacks. By taking a particular action based on traffic patterns, it can become an intrusion prevention system (IPS). – written in Pure C.
     
  • Zeek (Bro)
    Zeek helps to perform security monitoring by looking into the network's activity. It can find suspicious data streams. Based on the data, it alert, react, and integrate with other tools – written in C++.
  • Maltrail (Maltrail monitors for traffic on the network that might indicate system compromise or other bad behavior. It is great for intrusion detection and monitoring. – written in Python).

1. Install aide deb package

# apt -y install aide

root@haproxy2:~# aide -v
Aide 0.17.3

Compiled with the following options:

WITH_MMAP
WITH_PCRE
WITH_POSIX_ACL
WITH_SELINUX
WITH_XATTR
WITH_CAPABILITIES
WITH_E2FSATTRS
WITH_ZLIB
WITH_MHASH
WITH_AUDIT

Default config values:
config file: <none>
database_in: <none>
database_out: <none>

Available hashsum groups:
md5: yes
sha1: yes
sha256: yes
sha512: yes
rmd160: yes
tiger: yes
crc32: yes
crc32b: yes
haval: yes
whirlpool: yes
gost: yes
stribog256: no
stribog512: no

Default compound groups:
R: l+p+u+g+s+c+m+i+n+md5+acl+selinux+xattrs+ftype+e2fsattrs+caps
L: l+p+u+g+i+n+acl+selinux+xattrs+ftype+e2fsattrs+caps
>: l+p+u+g+i+n+acl+S+selinux+xattrs+ftype+e2fsattrs+caps
H: md5+sha1+rmd160+tiger+crc32+haval+gost+crc32b+sha256+sha512+whirlpool
X: acl+selinux+xattrs+e2fsattrs+caps

2. Prepare AIDE configuration and geenrate (initialize) database

Either you can use the default AIDE configuration which already has a preset rules for various files and directories to be monitored,
or you might add up additional ones.
 

  • For details on configuration of aide.conf accepted options "man aide.conf"

The rules and other configurations resides lays under  /etc/aide/ directory
 

The AIDE database is located under /var/lib/aide

root@server:~# ls -al /var/lib/aide/
общо 33008
drwxr-xr-x  2 root root     4096  9 мар 12:38 ./
drwxr-xr-x 27 root root     4096  9 мар 12:01 ../
-rw——-  1 root root 16895467  9 мар 16:03 aide.db
-rw——-  1 root root 16895467  9 мар 18:49 aide.db.new


Also, details about major setting rules config regarding how AIDE will run via cronjob as with most debian services are into /etc/default/aide

Default aide.conf config is in /etc/aide/aide.conf if you need custom stuff to do with it simply edit it.

Here is an Example:
Lets say you want to omit some directory to not be monitored by aide, which would otherwise do, i.e.
omit /var/log/* from monitoring

# At the end of file /etc/aide/aide.conf

add:

!/var/log
!/home/
!/var/lib
!/proc

  • Initialize the aide database first time

Run aideinit command, aideinit will create a new baseline database –  /var/lib/aide/aide.db.new (a baseline)
Note that, /var/lib/aide/aide.db is the old database that aide uses to check against for any changes of files / directories on the configured monitored filesystem objects.

root@server:~# aideinit
Running aide –init…

debug1: client_input_channel_req: channel 0 rtype keepalive@openssh.com reply 1
Start timestamp: 2023-03-09 12:06:16 +0200 (AIDE 0.17.3)
AIDE initialized database at /var/lib/aide/aide.db.new

Number of entries:      66971

—————————————————
The attributes of the (uncompressed) database(s):
—————————————————

/var/lib/aide/aide.db.new
 SHA256    : nVrYljiBFM/KaKCTjbaJtR2w6N8vc8qN
             DPObbo2UMVo=
 SHA512    : S1ZNB0DCqb4UTmuqaalTgiQ3UAltTOzO
             YNfEQJldp32q5ahplBo4/65uwgtGusMy
             rJC8nvxvYmh+mq+16kfrKA==
 RMD160    : xaUnfW1+/DJV/6FEm/nn1k1UKOU=
 TIGER     : nGYEbX281tsQ6T21VPx1Hr/FwBdwF4cK
 CRC32     : fzf7cg==
 HAVAL     : yYQw/87KUmRiRLSu5JcEIvBUVfsW/G9H
             tVvs6WqL/0I=
 WHIRLPOOL : 6b5y42axPjpUxWFipUs1PtbgP2q0KJWK
             FwFvAGxHXjZeCBPEYZCNkj8mt8MkXBTJ
             g83ZELK9GQBPLea7UF3tng==
 GOST      : sHAzx7hkr5H3q8TCSGCKjndEiZgcvCEL
             E45qcRb25tM=


End timestamp: 2023-03-09 12:38:30 +0200 (run time: 32m 14s)


Be patient now, go grab a coffee / tea or snack as the command might take up to few minutes for the aide to walk through the whole monitored filesystems and built its database.

root@server:~# echo cp /var/lib/aide/aide.db{.new,}
cp /var/lib/aide/aide.db.new /var/lib/aide/aide.db


root@server:~# cp /var/lib/aide/aide.db{.new,}

root@server:~# aide –check –config /etc/aide/aide.conf

Start timestamp: 2023-03-09 13:01:32 +0200 (AIDE 0.17.3)
AIDE found differences between database and filesystem!!

Summary:
  Total number of entries:      66972
  Added entries:                1
  Removed entries:              0
  Changed entries:              7

—————————————————
Added entries:
—————————————————

f+++++++++++++++++: /var/lib/aide/aide.db

—————————————————
Changed entries:
—————————————————

d =…. mc.. .. . : /etc/aide
d =…. mc.. .. . : /root
f <…. mci.H.. . : /root/.viminfo
f =…. mc..H.. . : /var/lib/fail2ban/fail2ban.sqlite3
d =…. mc.. .. . : /var/lib/vnstat
f =…. mc..H.. . : /var/lib/vnstat/vnstat.db
f >b… mc..H.. . : /var/log/sysstat/sa09

—————————————————
Detailed information about changes:
—————————————————

Directory: /etc/aide
 Mtime     : 2023-03-09 12:04:03 +0200        | 2023-03-09 12:51:11 +0200
 Ctime     : 2023-03-09 12:04:03 +0200        | 2023-03-09 12:51:11 +0200

Directory: /root
 Mtime     : 2023-03-09 12:06:13 +0200        | 2023-03-09 12:51:11 +0200
 Ctime     : 2023-03-09 12:06:13 +0200        | 2023-03-09 12:51:11 +0200

File: /root/.viminfo
 Size      : 18688                            | 17764
 Mtime     : 2023-03-09 12:06:13 +0200        | 2023-03-09 12:51:11 +0200
 Ctime     : 2023-03-09 12:06:13 +0200        | 2023-03-09 12:51:11 +0200
 Inode     : 133828                           | 133827
 SHA256    : aV54gi33aA/z/FuBj2ZioU2cTa9H16TT | dnFdLVQ/kx3UlTah09IgEMrJ/aYgczHe
             TzkLSxBDSB4=                     | DdxDAmPOSAM=

3. Test aide detects file changes

Create a new file and append some text and rerun the aide check


root@server:~# touch /root/test.txt
root@server:~# echo aaa > /root/test.txt
root@server:~# aide –check –config /etc/aide/aide.conf


Start timestamp: 2023-03-09 13:07:21 +0200 (AIDE 0.17.3)
AIDE found differences between database and filesystem!!

Summary:
  Total number of entries:      66973
  Added entries:                2
  Removed entries:              0
  Changed entries:              7

—————————————————
Added entries:
—————————————————

f+++++++++++++++++: /root/test.txt
f+++++++++++++++++: /var/lib/aide/aide.db

—————————————————
Changed entries:
—————————————————

d =…. mc.. .. . : /etc/aide
d =…. mc.. .. . : /root
f <…. mci.H.. . : /root/.viminfo
f =…. mc..H.. . : /var/lib/fail2ban/fail2ban.sqlite3
d =…. mc.. .. . : /var/lib/vnstat
f =…. mc..H.. . : /var/lib/vnstat/vnstat.db
f >b… mc..H.. . : /var/log/sysstat/sa09

….


The same command can be shortened for the lazy typist:

root@server:~# aide -c /etc/aide/aide.conf -C

The command will basically try to check the deviation between the AIDE database and the filesystem.

4. Limiting AIDES Integrity Checks to Specific Files / Directories

In order to limit the integrity checks to a specific entries for example /etc, pass the –limit REGEX option to AIDE check command where REGEX is the entry to check.

For example, check and update the database entries matching /etc, you would run aide command as shown below;
 

root@server:~# aide -c /etc/aide/aide.conf –limit /etc –check


AIDE found differences between database and filesystem!!
Limit: /etc

Summary:
  Total number of entries:      66791
  Added entries:                0
  Removed entries:              0
  Changed entries:              2

—————————————————
Changed entries:
—————————————————

d =…. mc.. .. . : /etc/aide
d =…. mc.. .. . : /etc/default

—————————————————
Detailed information about changes:
—————————————————

Directory: /etc/aide
 Mtime     : 2023-03-09 15:59:53 +0200        | 2023-03-09 16:43:03 +0200
 Ctime     : 2023-03-09 15:59:53 +0200        | 2023-03-09 16:43:03 +0200

Directory: /etc/default
 Mtime     : 2023-03-09 12:06:13 +0200        | 2023-03-09 18:42:12 +0200
 Ctime     : 2023-03-09 12:06:13 +0200        | 2023-03-09 18:42:12 +0200


—————————————————
The attributes of the (uncompressed) database(s):
—————————————————

/var/lib/aide/aide.db
 SHA256    : sjCxyIkr0nC/gTkNmn7DNqAQWttreDF6
             vSUV4jBoFY4=
 SHA512    : vNMpb54qxrbOk6S1Z+m9r0UwGvRarkWY
             0m50TfMvGElfZWR1I3SSaeTdORAZ4rQe
             17Oapo5+Sc0E2E+STO93tA==
 RMD160    : anhm5E6UlKmPYYJ4WYnWXk/LT3A=
 TIGER     : 5e1wycoF35/ABrRf7FNypZ45169VTuV4
 CRC32     : EAJlFg==
 HAVAL     : R5imONWRYgNGEfhBTc096K+ABnMFkMmh
             Hsqe9xt20NU=
 WHIRLPOOL : c6zySLliXNgnOA2DkHUdLTCG2d/T18gE
             4rdAuKaC+s7gqAGyA4p2bnDHhdd0v06I
             xEGY7YXCOXiwx8BM8xHAvQ==
 GOST      : F5zO2Ovtvf+f7Lw0Ef++ign1znZAQMHM
             AApQOiB9CqA=


End timestamp: 2023-03-09 20:02:18 +0200 (run time: 1m 32s)

5. Add the modified /root/test.txt to AIDE list of known modified files database
 

root@server:~# aide –update –config /etc/aide/aide.
  ERROR: cannot open config file '/etc/aide/aide.': No such file or directory


root@server:~# ​ aide –update –config /etc/aide/aide.conf
 

Start timestamp: 2023-03-09 18:45:17 +0200 (AIDE 0.17.3)
AIDE found differences between database and filesystem!!
New AIDE database written to /var/lib/aide/aide.db.new

Summary:
  Total number of entries:      66791
  Added entries:                0
  Removed entries:              0
  Changed entries:              8

—————————————————
Changed entries:
—————————————————

d =…. mc.. .. . : /etc/aide
d =…. mc.. .. . : /etc/default
d =…. mc.. .. . : /root
f >…. mci.H.. . : /root/.viminfo
f >…. mci.H.. . : /root/test.txt
f =…. mc..H.. . : /var/lib/fail2ban/fail2ban.sqlite3
d =…. mc.. .. . : /var/lib/vnstat
f =…. mc..H.. . : /var/lib/vnstat/vnstat.db

—————————————————
Detailed information about changes:
—————————————————

Directory: /etc/aide
 Mtime     : 2023-03-09 15:59:53 +0200        | 2023-03-09 16:43:03 +0200
 Ctime     : 2023-03-09 15:59:53 +0200        | 2023-03-09 16:43:03 +0200

Directory: /etc/default
 Mtime     : 2023-03-09 12:06:13 +0200        | 2023-03-09 18:42:12 +0200
 Ctime     : 2023-03-09 12:06:13 +0200        | 2023-03-09 18:42:12 +0200

Directory: /root
 Mtime     : 2023-03-09 15:59:53 +0200        | 2023-03-09 18:44:34 +0200
 Ctime     : 2023-03-09 15:59:53 +0200        | 2023-03-09 18:44:34 +0200

File: /root/.viminfo
 Size      : 16706                            | 16933
 Mtime     : 2023-03-09 15:59:53 +0200        | 2023-03-09 18:44:34 +0200
 Ctime     : 2023-03-09 15:59:53 +0200        | 2023-03-09 18:44:34 +0200
 Inode     : 136749                           | 133828
 SHA256    : KMHGoMVJo10BtafVrWIOLt3Ht9gK8bc+ | rrp8S3VftzZzvjBP1JC+PBpODv9wPKGw
             9uHh/z7iJWA=                     | TA+hyhTiY+U=
 SHA512    : ieDHy7ObSTfYm5d8DtYcHKxHya13CS65 | PDAJjyZ39uU3kKFo2lHBduTqxMDq4i01
             ObMYIRAre6IgvLslEs0ZodQFyrczMyRt | 1Kvm/h6xzFhHtFgjidtcemG8wDcjtfNF
             +d6SrW0gn3skKn2B7G09eQ==         | Z7LO230fgGeO7UepqtxZjQ==
 RMD160    : nUgg/G4zsVGKzVmmrqltuYUDvtg=     | jj61KAFONK92mj+u66RDJmxFhmI=
 TIGER     : 3vPSOrla5k+k2br1E2ES4eNiSZ2novFX | mn4kNCzd8SQr2ID2VSe4f4l0ta7pO/xo
 CRC32     : NDnMgw==                         | AyzVUQ==
 HAVAL     : Q9/KozxRiPbLEkaIfnBUZdEWftaF52Mw | 6jADKV6jg7ZVr/A/oMhR4NXc8TO1AOGW
             7tiR7DXhl0o=                     | NrYe+j6UcO0=
 WHIRLPOOL : vB/ZMCul4hN0aYd39gBu+HmZT/peRUI8 | mg6c1lYYVNZcy4mVzGojwraim8e3X2/R
             KDkaslNb8+YleoFWx0mbhAbkGurc0+jh | urVvEmbsgTuUCJOuf9+OrEACiF0fbe/x
             YPBviZIKcxUbTc2nGthTWw==         | t+BXnSQWk08OL9EI6gMGqA==
 GOST      : owVGTgU9BH3b0If569wQygw3FAbZIZde | ffx29GV2jaCB7XzuNjdiRzziIiZYnbi3
             eAfQfzlRPGY=                     | Ar7jyNMUutk=

File: /root/test.txt
 Size      : 4                                | 8
 Mtime     : 2023-03-09 13:07:12 +0200        | 2023-03-09 18:44:34 +0200
 Ctime     : 2023-03-09 13:07:12 +0200        | 2023-03-09 18:44:34 +0200
 Inode     : 133828                           | 136751
 SHA256    : F+aC8GC1+OR+oExcSFWQiwpa1hICImD+ | jUIZMGfiMdAlWFHu8mmmlml4qAGNQNL5
             UOEeywzAq3Y=                     | 6NhzJ1sYFZE=
 SHA512    : d+UmFKFBzvGadt5hk+nIRbjP//7PSXNl | ixn20lcEMDEtsJo3hO90Ea/wHWLCHcrz
             Pl16XRIUUPq2FCiQ4PeUcVciukJX7ijL | seBWunbBysY0z3BWcfgnN2vH05WfRfvA
             D045ZvGOEcnmL6a6vwp0jw==         | QiNtQS1tStuEdB3Voq54zQ==
 RMD160    : I6waxKN3rMx4WTz4VCUQXoNoxUg=     | urTh1j1t3UHchnJGnBG4lUZnjI4=
 TIGER     : cwUYgfKHcJnWXcA0pr/OKuxuoxh+b9lA | prstKqCfMXL39aVGFPA0kX4Q9x7a+hUn
 CRC32     : UD78Dw==                         | zoYiEA==
 HAVAL     : bdbKR9LvPgsYClViKiHx48fFixfIL/jA | ZdpdeMhw4MvKBgWsM4EeyUgerO86Rt82
             F3tjdc2Gm8Y=                     | W94fJFRWbrM=
 WHIRLPOOL : OLP0Y4oKcqW2yEvme8z419N1KE4TB9GJ | Xk8Ujo3IU2SzSqbJFegq7p1ockmrnxJF
             biHn/9XgrBz4fQiDJ8eHpx+0exA9hXmY | R3Rfstd1jWSwLFNTEwfbRRw+TARtRK50
             EbbakMJJdzLt1ipKWiV9gg==         | iWJeHLsD5dZ+CzV0tf4sUg==
 GOST      : ystISzoeH/ZznYrrXmxe4rwmybWMpGuE | GhMWNxg7Is0svJ+5LP+DVWbgt+CDQO+3
             0PzRnVEqnR8=                     | 08dwBuVAwB8=

File: /var/lib/fail2ban/fail2ban.sqlite3
 Mtime     : 2023-03-09 15:55:01 +0200        | 2023-03-09 18:45:01 +0200
 Ctime     : 2023-03-09 15:55:01 +0200        | 2023-03-09 18:45:01 +0200
 SHA256    : lLilXNleqSgHIP1y4o7c+oG5XyUPGzgi | NCJJ2H6xgCw/NYys1LMA7hOWwoOoxI8Y
             RHYH+zvlAL4=                     | 4SJygfqEioE=
 SHA512    : iQj2pNT4NES4fBcujzdlEEGZhDnkhKgc | ClQZ5HMOSayUNb//++eZc813fiMJcXnj
             QDlGFSAn6vi+RXesFCjCABT7/00eEm5/ | vTGs/2tANojoe6cqpsT/LaJ3QZXpmrfh
             ILcaqlQtBSLJgHjMQehzdg==         | syVak1I4n9yg8cDKEkZUvw==
 RMD160    : Xg4YU8YI935L+DLvkRsDanS4DGo=     | SYrQ27n+/1fvIZ7v+Sar/wQHulI=
 TIGER     : 2WhhPq9kuyeNJkOicDTDeOeJB8HR8zZe | o1LDZtRclri2KfZBe5J3D4YhM05UaP4E
 CRC32     : NQmi4A==                         | tzIsqg==
 HAVAL     : t1ET+84+8WgfwqlLy4R1Qk9qGZQRUbJI | MwVnjtM3dad/RuN2BfgsySX2DpfYq4qi
             z2J0ROGduXc=                     | H1pq6RYsA6o=
 WHIRLPOOL : xKSn71gFIVhk5rWJIBaYQASl0V+pGn+3 | m5LEXfhBbhWFg/d8CFJhklOurmRSkDSG
             N85R0tiCKsTZ2+LRkxDrzcVQdss2k8+z | LC/vICnbEWzLwrCuMwBi1/e5wDNIY8gK
             oqExhoXtPsMaREjpCugd3Q==         | mvGn40x+G4cCYNZ6lGT9Zg==
 GOST      : WptpUlfooIlUjzDHU8XGuOU2waRud5SR | i6K4COXU0nyZ1mL3ZBuGUPz/ZXTj8KKQ
             E/tnoBqk+q0=                     | L6VNyS8/X2Y=

Directory: /var/lib/vnstat
 Mtime     : 2023-03-09 16:00:00 +0200        | 2023-03-09 18:45:01 +0200
 Ctime     : 2023-03-09 16:00:00 +0200        | 2023-03-09 18:45:01 +0200

File: /var/lib/vnstat/vnstat.db
 Mtime     : 2023-03-09 16:00:00 +0200        | 2023-03-09 18:45:00 +0200
 Ctime     : 2023-03-09 16:00:00 +0200        | 2023-03-09 18:45:00 +0200
 SHA256    : X/lnJuuSo4jX4HRzxMBodnKHAjQFvugi | oqtY3HTNds/qDNFCRAEsfN5SuO0U5LRg
             2sh2c0u69x8=                     | otc5z1y+eGY=
 SHA512    : U/g8O6G8cuhsqCUCbrElxgiy+naJKPkI | y+sw4LX8mlDWkRJMX38TsYSo1DQzxPOS
             hG7vdH9rBINjakL87UWajT0s6WSy0pvt | 068otnzw2FSSlM5X5j5EtyJiY6Hd5P+A
             ALaTcDFKHBAmmFrl8df2nQ==         | jFiWStMbx+dQidXYZ4XFAw==
 RMD160    : F6YEjIIQu2J3ru7IaTvSemA9e34=     | bmVSaRKN2qU7qpEWkzfXFoH4ZK4=
 TIGER     : UEwLoeR6Qlf2oOI58pUCEDaWk0pHDkcY | 0Qb4nUqe3cKh/g5CQUnOXGfjZwJHjeWa
 CRC32     : Bv3/6A==                         | jvW6mg==
 HAVAL     : VD7tjHb8o8KTUo5xUH7eJEmTWgB9zjft | rumfiWJvy/sTK/09uj7XlmV3f7vj6KBM
             kOkzKxFWqqU=                     | qeOuKvu0Zjc=
 WHIRLPOOL : wR0qt8u4N8aQn8VQ+bmfrxB7CyCWVwHi | FVWDRE3uY6qHxLlJQLU9i9QggLW+neMj
             ADHpMTUxBEKOpOBlHTWXIk13qYZiD+o/ | Wt+Dj9Rz92BG9EomgLUgUkxfiVFO8cMq
             XtzTB4rMbxS4Z5PAdC/07A==         | WaR/KKq3Z7R8f/50tc9GMQ==
 GOST      : l3ibqMkHMSPpQ+9ok51/xBthET9+JQMd | qn0GyyCg67KRGP13At52tnviZfZDgyAm
             OZtiFGYXmgU=                     | c82NXSzeyV0=


—————————————————
The attributes of the (uncompressed) database(s):
—————————————————

/var/lib/aide/aide.db
 SHA256    : sjCxyIkr0nC/gTkNmn7DNqAQWttreDF6
             vSUV4jBoFY4=
 SHA512    : vNMpb54qxrbOk6S1Z+m9r0UwGvRarkWY
             0m50TfMvGElfZWR1I3SSaeTdORAZ4rQe
             17Oapo5+Sc0E2E+STO93tA==
 RMD160    : anhm5E6UlKmPYYJ4WYnWXk/LT3A=
 TIGER     : 5e1wycoF35/ABrRf7FNypZ45169VTuV4
 CRC32     : EAJlFg==
 HAVAL     : R5imONWRYgNGEfhBTc096K+ABnMFkMmh
             Hsqe9xt20NU=
 WHIRLPOOL : c6zySLliXNgnOA2DkHUdLTCG2d/T18gE
             4rdAuKaC+s7gqAGyA4p2bnDHhdd0v06I
             xEGY7YXCOXiwx8BM8xHAvQ==
 GOST      : F5zO2Ovtvf+f7Lw0Ef++ign1znZAQMHM
             AApQOiB9CqA=

/var/lib/aide/aide.db.new
 SHA256    : QRwubXnz8md/08n28Ek6DOsSQKGkLvuc
             gSZRsw6gRw8=
 SHA512    : 238RmI1PHhd9pXhzcHqM4+VjNzR0es+3
             6eiGNrXHAdDTz7GlAQQ4WfKeQJH9LdyT
             1r5ho/oXRgzfa2BfhKvTHg==
 RMD160    : GJWuX/nIPY05gz62YXxk4tWiH5I=
 TIGER     : l0aOjXlM4/HjyN9bhgBOvvCYeqoQyjpw
 CRC32     : KFz6GA==
 HAVAL     : a//4jwVxF22URf2BRNA612WOOvOrScy7
             OmI44KrNbBM=
 WHIRLPOOL : MBf+NeXElUvscJ2khIuAp+NDu1dm4h1f
             5tBQ0XrQ6dQPNA2HZfOShCBOPzEl/zrl
             +Px3QFV4FqD0jggr5sHK2g==
 GOST      : EQnPh6jQLVUqaAK9B4/U4V89tanTI55N
             K7XqZR9eMG4=


End timestamp: 2023-03-09 18:49:51 +0200 (run time: 4m 34s)
 

6. Substitute old aide database with the new that includes the modified files

As you see AIDE detected the changes in /root/test.txt

To apply the changes be known by AIDE for next time (e.g. this file was authorized and supposed to be written there) simply move the new generated database
to current aide database.

# copy generated DB to master DB
root@dlp:~# cp -p /var/lib/aide/aide.db.new /var/lib/aide/aide.db

7. Check once again to make sure recently modified files are no longer seen as changed by AIDE

Recheck again the database to make sure the files you wanted to omit are no longer mentioned as changed

root@server:~# aide –check –config /etc/aide/aide.conf
Start timestamp: 2023-03-09 16:23:05 +0200 (AIDE 0.17.3)
AIDE found differences between database and filesystem!!

Summary:
  Total number of entries:      66791
  Added entries:                0
  Removed entries:              0
  Changed entries:              3

—————————————————
Changed entries:
—————————————————

f =…. mc..H.. . : /var/lib/fail2ban/fail2ban.sqlite3
d =…. mc.. .. . : /var/lib/vnstat
f =…. mc..H.. . : /var/lib/vnstat/vnstat.db

—————————————————
Detailed information about changes:
—————————————————

File: /var/lib/fail2ban/fail2ban.sqlite3
 Mtime     : 2023-03-09 15:55:01 +0200        | 2023-03-09 16:25:02 +0200
 Ctime     : 2023-03-09 15:55:01 +0200        | 2023-03-09 16:25:02 +0200
 SHA256    : lLilXNleqSgHIP1y4o7c+oG5XyUPGzgi | MnWXC2rBMf7DNJ91kXtHXpM2c2xxF60X
             RHYH+zvlAL4=                     | DfLUQLHiSiY=
 SHA512    : iQj2pNT4NES4fBcujzdlEEGZhDnkhKgc | gxHVBxhGTKi0TjRE8/sn6/gtWsRw7Mfy
             QDlGFSAn6vi+RXesFCjCABT7/00eEm5/ | /wCfPlDK0dkRZEbr8IE2BNUhBgwwocCq
             ILcaqlQtBSLJgHjMQehzdg==         | zuazTy4N4x6X8bwOzRmY0w==
 RMD160    : Xg4YU8YI935L+DLvkRsDanS4DGo=     | +ksl9kjDoSU9aL4tR7FFFOK3mqw=
 TIGER     : 2WhhPq9kuyeNJkOicDTDeOeJB8HR8zZe | 9cvXZNbU+cp5dA5PLiX6sGncXd1Ff5QO
 CRC32     : NQmi4A==                         | y6Oixg==
 HAVAL     : t1ET+84+8WgfwqlLy4R1Qk9qGZQRUbJI | aPnCrHfmZAUm7QjROGEl6rd3776wO+Ep
             z2J0ROGduXc=                     | s/TQn7tH1tY=
 WHIRLPOOL : xKSn71gFIVhk5rWJIBaYQASl0V+pGn+3 | 9Hu6NBhz+puja7uandb21Nt6cEW6zEpm
             N85R0tiCKsTZ2+LRkxDrzcVQdss2k8+z | bTsq4xYA09ekhDHMQJHj2WpKpzZbA+t0
             oqExhoXtPsMaREjpCugd3Q==         | cttMDX8J8M/UadqfL8KZkQ==
 GOST      : WptpUlfooIlUjzDHU8XGuOU2waRud5SR | WUQfAMtye4wADUepBvblvgO+vBodS0Ej
             E/tnoBqk+q0=                     | cIbXy4vpPYc=

Directory: /var/lib/vnstat
 Mtime     : 2023-03-09 16:00:00 +0200        | 2023-03-09 16:25:01 +0200
 Ctime     : 2023-03-09 16:00:00 +0200        | 2023-03-09 16:25:01 +0200

File: /var/lib/vnstat/vnstat.db
 Mtime     : 2023-03-09 16:00:00 +0200        | 2023-03-09 16:25:01 +0200
 Ctime     : 2023-03-09 16:00:00 +0200        | 2023-03-09 16:25:01 +0200
 SHA256    : X/lnJuuSo4jX4HRzxMBodnKHAjQFvugi | N1lzhV3+tkDBud3AVlmIpDkU1c3Rqhnt
             2sh2c0u69x8=                     | YqE8naDicoM=
 SHA512    : U/g8O6G8cuhsqCUCbrElxgiy+naJKPkI | +8B9HvHhOp1C/XdlOORjyd3J2RtTbRBF
             hG7vdH9rBINjakL87UWajT0s6WSy0pvt | b0Moo2Gj+cIxaMCu5wOkgreMp6FloqJR
             ALaTcDFKHBAmmFrl8df2nQ==         | UH4cNES/bAWtonmbj4W7Vw==
 RMD160    : F6YEjIIQu2J3ru7IaTvSemA9e34=     | 8M6TIOHt0NWgR5Mo47DxU28cp+4=
 TIGER     : UEwLoeR6Qlf2oOI58pUCEDaWk0pHDkcY | Du9Ue0JA2URO2tiij31B/+663OaWKefR
 CRC32     : Bv3/6A==                         | v0Ai4w==
 HAVAL     : VD7tjHb8o8KTUo5xUH7eJEmTWgB9zjft | XA+vRnMNdVGFrO+IZtEA0icunWqBGaCf
             kOkzKxFWqqU=                     | leR27LN4ejc=
 WHIRLPOOL : wR0qt8u4N8aQn8VQ+bmfrxB7CyCWVwHi | HG31dNEEcak2zZGR24W7FDJx8mh24MaJ
             ADHpMTUxBEKOpOBlHTWXIk13qYZiD+o/ | BQNhqkuS6R/bmlhx+P+eQ/JimwPAPOaM
             XtzTB4rMbxS4Z5PAdC/07A==         | xWG7cMETIXdT9sUOUal8Sw==
 GOST      : l3ibqMkHMSPpQ+9ok51/xBthET9+JQMd | y6Ek/TyAMGV5egkfCu92Y4qqk1Xge8c0
             OZtiFGYXmgU=                     | 3ONXRveOlr0=


—————————————————
The attributes of the (uncompressed) database(s):
—————————————————

/var/lib/aide/aide.db
 SHA256    : sjCxyIkr0nC/gTkNmn7DNqAQWttreDF6
             vSUV4jBoFY4=
 SHA512    : vNMpb54qxrbOk6S1Z+m9r0UwGvRarkWY
             0m50TfMvGElfZWR1I3SSaeTdORAZ4rQe
             17Oapo5+Sc0E2E+STO93tA==
 RMD160    : anhm5E6UlKmPYYJ4WYnWXk/LT3A=
 TIGER     : 5e1wycoF35/ABrRf7FNypZ45169VTuV4
 CRC32     : EAJlFg==
 HAVAL     : R5imONWRYgNGEfhBTc096K+ABnMFkMmh
             Hsqe9xt20NU=
 WHIRLPOOL : c6zySLliXNgnOA2DkHUdLTCG2d/T18gE
             4rdAuKaC+s7gqAGyA4p2bnDHhdd0v06I
             xEGY7YXCOXiwx8BM8xHAvQ==
 GOST      : F5zO2Ovtvf+f7Lw0Ef++ign1znZAQMHM
             AApQOiB9CqA=


End timestamp: 2023-03-09 16:27:33 +0200 (run time: 4m 28s)

As you can see there are no new added entries for /root/test.txt and some other changed records for vnstat service as well as fail2ban ones, so the Intrusion detection system works just as we expected it.

8. Configure Email AIDE changed files alerting Email recipient address

From here on aide package has set its own cron job which is automatically doing the check operation every day and any new file modifications will be captured and alerts sent to local root@localhost mailbox account, so you can check it out later with mail command.

If you want to sent the Email alert for any files modifications occured to another email, assuming that you have a locally running SMTP server with a mail relay to send to external mails, you can do it via /etc/default/aide via:

MAILTO=root


For example change it to a FQDN email address

MAILTO=external_mail@your-mail.com

9.Force AIDE to run AIDE at specitic more frequent time intervals

You can as well install a cron job to execute AIDE at specific time intervals, as of your choice

Lets say you want to run a custom prepared set of files to monitor in /etc/aide/aide_custom_config.conf configure a new cronjob like below:

root@server:~# crontab -u root -e
*/5 * * * * aide -c /etc/aide/aide_custom_config.conf -u && cp /var/lib/custom-aide/aide.db{.new,}


This will execute AIDE system check every 5 minutse and email the report to ealier configured email username@whatever-your-smtp.com via /etc/default/aide

10. Check the output of AIDE for changes – useful for getting a files changes from aide from scripts

Check the command exit status.

root@server:~# echo $?

According to AIDE man pages, the AIDE’s exit status is normally 0 if no errors occurred. Except when the –check, –compare or –update command was requested, in which case the exit status is defined as:

   1 * (new files detected?)     +

   2 * (removed files detected?) +

   4 * (changed files detected?)


   Since  those three cases can occur together, the respective error codes are added. For example, if there are new files and removed files detected, the exit status will be 1 + 2 = 3.

   Additionally, the following exit codes are defined for generic error conditions in aide help manual:

   14 Error writing error

   15 Invalid argument error

   16 Unimplemented function error

   17 Invalid configureline error

   18 IO error

   19 Version mismatch error

PLEASE CONSIDER

  • That AIDE checks might be resource intensive
    and could cause a peak in CPU use and have a negative effect on lets very loaded application server machines,
    thus causing a performance issuea during integrity checks !
     
  • If you are scanning file system wide and you do it frequent, be sure to provide “enough” resources or schedule the scan at a times that the Linux host will be less used !
     
  • Whenever you made any AIDE configuration changes, remember to initialize the database to create a baseline !

Switching from PasswordSafe to Keepass database, migrating .psafe3 to .kdbx format howto

Thursday, February 23rd, 2023

passwordsafe-to-keepass-migration-logo

I have been using PasswordSafe for many years within my job location as system administrator on the Windows computers I do use as dumb hosts to administrate remotely via ssh servers, develop code in bash / perl or just store different SysAdmin management tools and interfaces passwords. The reason behind was simply that I come out from a Linux background as I've used for daily Sysadmin job for many years GNU / Linux and there I always prefer GNOME (gnome GTK interface) in favour of KDE's (QT Library), and whence I came to work for the "Evil" Windows oriented world of corporations  for the sake of Outlook use and Office 365 as well as Citrix accessibility i've become forced by the circumstances to use Windows. 
Hence for a PasswordManager for Windows back in the years, I preferred the simplicity of interface of PasswordSafe instead of Keepass which always reminded me of the nasty KDE.
PasswordSafe is really cool and a handy program and it works well, but recetnly when I had to store many many passwords and easily navigate through each of it I realized, by observing colleagues, that KeePass as of time of writting this article is much more Powerful and easy to use, as I can see all records of a searched passwords on a Single screen, instead of scrolling like crazy with PasswordSafe through the passowrds.

I didn’t really feel like cutting and pasting every field for all my passwords (plus I started experiencing some PasswordSafe copy / paste passwords issues – maybe not related to PasswordSafe itself so this was the turning point I decided to migrate to Keepass.

For that, started looking at the import export functions for each program. 

After a quick search, I found few articles online explaining on how the migration of PasswordSafe to KeePass can be easily handled as the versions of Keepass and Password safe are moving all the time, of course usually some of the guides to be found online are never competely upto date, so I had to slightly modify one of the articles and come up with this one 🙂 .
 

  •  My PasswordSafe program that keeps my account password records and notes is version is
    V 3.59 built on May 28 2022 and is running on my Windows 10 OS 64 bit release
  • The installed KeePass version to where I have migrated the Pwsafe password database Successfully is 2.48 64 Bit
     
  1. Use the Password Safe function to export to XML file Format
    (File -> Export To -> XML Format )


    pwsafe.screenshot-export-password-psafe3
     

  2. Import the text file into KeePass
    (File->Import From-> Password Safe XML file)


    import-file-data-keepass-screenshot

This process worked quite fine. All of the passwords were imported .
Despite the importing (expected small glitches – please recheck that all was imported fine, before joy), the process is quicker than copy/pasting every field for each entry.

For those of you who are more worried about security than I am, you know this is a very insecure method to transfer passwords. For others, you may wish to export the (unencrypted) text file to a Veracrypt – that is a Truecypt fork (as nowadays obsolete unmaintaned and probably insecury) – a Free Open-Source On-The-Fly Disk Encryption Software to prepare  Veracrypt  partition and / or use Eraser on the text file once you’re finished with it or use another of the free Veracrypt open-source (free software) alternatives such DiskCryptor or even the proprietary Windows BitLocker / CipherShed / Axcrypt or some other encryption alternative software for Windows XP / 2000 / 7 10 that is out there.

NB! Please  don’t do this on a public computer or a PC that you don't administrate.
You never know who might find your passwords or might be sniffing on your OS, as today there are so many devices that perhaps are hacked and listening and collecting password datas  🙂

That's it now I enjoy my KeePass but I'm thankful to PasswordSafe developers, who have easified my password management Virtual life for years 🙂
Any hints on how you migrated PasswordSafe to Keepass are mostly welcome. Also will be nice to hear of hard-core PasswordSafe hints or plugins that can power-up the password storage, maybe I can get convinced back to return back to PasswordSafe 🙂
 

Install and configure rkhunter for improved security on a PCI DSS Linux / BSD servers with no access to Internet

Wednesday, November 10th, 2021

install-and-configure-rkhunter-with-tightened-security-variables-rkhunter-logo

rkhunter or Rootkit Hunter scans systems for known and unknown rootkits. The tool is not new and most system administrators that has to mantain some good security servers perhaps already use it in their daily sysadmin tasks.

It does this by comparing SHA-1 Hashes of important files with known good ones in online databases, searching for default directories (of rootkits), wrong permissions, hidden files, suspicious strings in kernel modules, commmon backdoors, sniffers and exploits as well as other special tests mostly for Linux and FreeBSD though a ports for other UNIX operating systems like Solaris etc. are perhaps available. rkhunter is notable due to its inclusion in popular mainstream FOSS operating systems (CentOS, Fedora,Debian, Ubuntu etc.).

Even though rkhunter is not rapidly improved over the last 3 years (its last Official version release was on 20th of Febuary 2018), it is a good tool that helps to strengthen even further security and it is often a requirement for Unix servers systems that should follow the PCI DSS Standards (Payment Card Industry Data Security Standards).

Configuring rkhunter is a pretty straight forward if you don't have too much requirements but I decided to write this article for the reason there are fwe interesting options that you might want to adopt in configuration to whitelist any files that are reported as Warnings, as well as how to set a configuration that sets a stricter security checks than the installation defaults. 

1. Install rkhunter .deb / .rpm package depending on the Linux distro or BSD

  • If you have to place it on a Redhat based distro CentOS / Redhat / Fedora

[root@Centos ~]# yum install -y rkhunter


  • On Debian distros the package name is equevallent to install there exec usual:

root@debian:~# apt install –yes rkhunter

  • On FreeBSD / NetBSD or other BSD forks you can install it from the BSD "World" ports system or install it from a precompiled binary.

freebsd# pkg install rkhunter

One important note to make here is to have a fully functional Alarming from rkhunter, you will have to have a fully functional configured postfix / exim / qmail whatever mail server to relay via official SMTP so you the Warning Alarm emails be able to reach your preferred Alarm email address. If you haven't installed postfix for example and configure it you might do.

– On Deb based distros 

[root@Centos ~]#yum install postfix


– On RPM based distros

root@debian:~# apt-get install –yes postfix


and as minimum, further on configure some functional Email Relay server within /etc/postfix/main.cf
 

# vi /etc/postfix/main.cf
relayhost = [relay.smtp-server.com]

2. Prepare rkhunter.conf initial configuration


Depending on what kind of files are present on the filesystem it could be for some reasons some standard package binaries has to be excluded for verification, because they possess unusual permissions because of manual sys admin monification this is done with the rkhunter variable PKGMGR_NO_VRFY.

If remote logging is configured on the system via something like rsyslog you will want to specificly tell it to rkhunter so this check as a possible security issue is skipped via ALLOW_SYSLOG_REMOTE_LOGGING=1. 

In case if remote root login via SSH protocol is disabled via /etc/ssh/sshd_config
PermitRootLogin no variable, the variable to include is ALLOW_SSH_ROOT_USER=no

It is useful to also increase the hashing check algorithm for security default one SHA256 you might want to change to SHA512, this is done via rkhunter.conf var HASH_CMD=SHA512

Triggering new email Warnings has to be configured so you receive, new mails at a preconfigured mailbox of your choice via variable
MAIL-ON-WARNING=SetMailAddress


# vi /etc/rkhunter.conf

PKGMGR_NO_VRFY=/usr/bin/su

PKGMGR_NO_VRFY=/usr/bin/passwd

ALLOW_SYSLOG_REMOTE_LOGGING=1

# Needed for corosync/pacemaker since update 19.11.2020

ALLOWDEVFILE=/dev/shm/qb-*/qb-*

# enabled ssh root access skip

ALLOW_SSH_ROOT_USER=no

HASH_CMD=SHA512

# Email address to sent alert in case of Warnings

MAIL-ON-WARNING=Your-Customer@Your-Email-Server-Destination-Address.com

MAIL-ON-WARNING=Your-Second-Peronsl-Email-Address@SMTP-Server.com

DISABLE_TESTS=os_specific


Optionally if you're using something specific such as corosync / pacemaker High Availability cluster or some specific software that is creating /dev/ files identified as potential Risks you might want to add more rkhunter.conf options like:
 

# Allow PCS/Pacemaker/Corosync
ALLOWDEVFILE=/dev/shm/qb-attrd-*
ALLOWDEVFILE=/dev/shm/qb-cfg-*
ALLOWDEVFILE=/dev/shm/qb-cib_rw-*
ALLOWDEVFILE=/dev/shm/qb-cib_shm-*
ALLOWDEVFILE=/dev/shm/qb-corosync-*
ALLOWDEVFILE=/dev/shm/qb-cpg-*
ALLOWDEVFILE=/dev/shm/qb-lrmd-*
ALLOWDEVFILE=/dev/shm/qb-pengine-*
ALLOWDEVFILE=/dev/shm/qb-quorum-*
ALLOWDEVFILE=/dev/shm/qb-stonith-*
ALLOWDEVFILE=/dev/shm/pulse-shm-*
ALLOWDEVFILE=/dev/md/md-device-map
# Needed for corosync/pacemaker since update 19.11.2020
ALLOWDEVFILE=/dev/shm/qb-*/qb-*

# tomboy creates this one
ALLOWDEVFILE="/dev/shm/mono.*"
# created by libv4l
ALLOWDEVFILE="/dev/shm/libv4l-*"
# created by spice video
ALLOWDEVFILE="/dev/shm/spice.*"
# created by mdadm
ALLOWDEVFILE="/dev/md/autorebuild.pid"
# 389 Directory Server
ALLOWDEVFILE=/dev/shm/sem.slapd-*.stats
# squid proxy
ALLOWDEVFILE=/dev/shm/squid-cf*
# squid ssl cache
ALLOWDEVFILE=/dev/shm/squid-ssl_session_cache.shm
# Allow podman
ALLOWDEVFILE=/dev/shm/libpod*lock*


3. Set the proper mirror database URL location to internal network repository


Usually  file /var/lib/rkhunter/db/mirrors.dat does contain Internet server address where latest version of mirrors.dat could be fetched, below is how it looks by default on Debian 10 Linux.

root@debian:/var/lib/rkhunter/db# cat mirrors.dat 
Version:2007060601
mirror=http://rkhunter.sourceforge.net

As you can guess a machine that doesn't have access to the Internet neither directly, neither via some kind of secure proxy because it is in a Paranoic Demilitarized Zone (DMZ) Network with many firewalls. What you can do then is setup another Mirror server (Apache / Nginx) within the local PCI secured LAN that gets regularly the database from official database on http://rkhunter.sourceforge.net/ (by installing and running rkhunter –update command on the Mirror WebServer and copying data under some directory structure on the remote local LAN accessible server, to keep the DB uptodate you might want to setup a cron to periodically copy latest available rkhunter database towards the http://mirror-url/path-folder/)

# vi /var/lib/rkhunter/db/mirrors.dat

local=http://rkhunter-url-mirror-server-url.com/rkhunter/1.4/


A mirror copy of entire db files from Debian 10.8 ( Buster ) ready for download are here.

Update entire file property db and check for rkhunter db updates


# rkhunter –update && rkhunter –propupdate

[ Rootkit Hunter version 1.4.6 ]

Checking rkhunter data files…
  Checking file mirrors.dat                                  [ Skipped ]
  Checking file programs_bad.dat                             [ No update ]
  Checking file backdoorports.dat                            [ No update ]
  Checking file suspscan.dat                                 [ No update ]
  Checking file i18n/cn                                      [ No update ]
  Checking file i18n/de                                      [ No update ]
  Checking file i18n/en                                      [ No update ]
  Checking file i18n/tr                                      [ No update ]
  Checking file i18n/tr.utf8                                 [ No update ]
  Checking file i18n/zh                                      [ No update ]
  Checking file i18n/zh.utf8                                 [ No update ]
  Checking file i18n/ja                                      [ No update ]


rkhunter-update-propupdate-screenshot-centos-linux


4. Initiate a first time check and see whether something is not triggering Warnings

# rkhunter –check

rkhunter-checking-for-rootkits-linux-screenshot

As you might have to run the rkhunter multiple times, there is annoying Press Enter prompt, between checks. The idea of it is that you're able to inspect what went on but since usually, inspecting /var/log/rkhunter/rkhunter.log is much more easier, I prefer to skip this with –skip-keypress option.

# rkhunter –check  –skip-keypress


5. Whitelist additional files and dev triggering false warnings alerts


You have to keep in mind many files which are considered to not be officially PCI compatible and potentially dangerous such as lynx browser curl, telnet etc. might trigger Warning, after checking them thoroughfully with some AntiVirus software such as Clamav and checking the MD5 checksum compared to a clean installed .deb / .rpm package on another RootKit, Virus, Spyware etc. Clean system (be it virtual machine or a Testing / Staging) machine you might want to simply whitelist the files which are incorrectly detected as dangerous for the system security.

Again this can be achieved with

PKGMGR_NO_VRFY=

Some Cluster softwares that are preparing their own /dev/ temporary files such as Pacemaker / Corosync might also trigger alarms, so you might want to suppress this as well with ALLOWDEVFILE

ALLOWDEVFILE=/dev/shm/qb-*/qb-*


If Warnings are found check what is the issue and if necessery white list files due to incorrect permissions in /etc/rkhunter.conf .

rkhunter-warnings-found-screenshot

Re-run the check until all appears clean as in below screenshot.

rkhunter-clean-report-linux-screenshot

Fixing Checking for a system logging configuration file [ Warning ]

If you happen to get some message like, message appears when rkhunter -C is done on legacy CentOS release 6.10 (Final) servers:

[13:45:29] Checking for a system logging configuration file [ Warning ]
[13:45:29] Warning: The 'systemd-journald' daemon is running, but no configuration file can be found.
[13:45:29] Checking if syslog remote logging is allowed [ Allowed ]

To fix it, you will have to disable SYSLOG_CONFIG_FILE at all.
 

SYSLOG_CONFIG_FILE=NONE

How to fix rkhunter checking dev for suspisiocus files, solve rkhunter checking if SSH root access is allowed warning

Friday, November 20th, 2020

rkhunter-logo

On a server if you have a rkhunter running and you suddenly you get some weird Warnings for suspicious files under dev, like show in in the screenshot and you're puzzled how comes this happened as so far it was not reported before the regular package patching update conducted …

root@haproxy-server ~]# rkhunter –check

rkhunter-warn-screenshot

To investigate further I've checked rkhunter produced log /var/log/rkhunter.log for a verobose message and found more specifics there on what is the exact files which rkhunter finds suspicious.
To further investigate what exactly are this suspicious files for or where, they're used for something on the system or in reality it is a hacker who hacked our supposibly PCI compliant system,
I've used the good old fuser command which is capable to show which system process is actively using a file. To have fuser report for each file from /var/log/rkhunter.log with below shell loop:

[root@haproxy-server ~]#  for i in $(tail -n 50 /var/log/rkhunter/rkhunter.log|grep -i /dev/shm|awk '{ print $2 }'|sed -e 's#:##g'); do fuser -v $i; done
                     BEN.        PID ZUGR.  BEFEHL
/dev/shm/qb-1783-1851-27-f1sTlC/qb-request-cpg-header:
                     root       1783 ….m corosync
                     hacluster   1851 ….m attrd
                     BEN.        PID ZUGR.  BEFEHL
/dev/shm/qb-1783-1844-26-Znk1UM/qb-event-quorum-data:
                     root       1783 ….m corosync
                     root       1844 ….m pacemakerd
                     BEN.        PID ZUGR.  BEFEHL
/dev/shm/qb-1783-1844-26-Znk1UM/qb-event-quorum-header:
                     root       1783 ….m corosync
                     root       1844 ….m pacemakerd
                     BEN.        PID ZUGR.  BEFEHL
/dev/shm/qb-1783-1844-26-Znk1UM/qb-response-quorum-data:
                     root       1783 ….m corosync
                     root       1844 ….m pacemakerd
                     BEN.        PID ZUGR.  BEFEHL
/dev/shm/qb-1783-1844-26-Znk1UM/qb-response-quorum-header:
                     root       1783 ….m corosync
                     root       1844 ….m pacemakerd
                     BEN.        PID ZUGR.  BEFEHL
/dev/shm/qb-1783-1844-26-Znk1UM/qb-request-quorum-data:
                     root       1783 ….m corosync
                     root       1844 ….m pacemakerd
                     BEN.        PID ZUGR.  BEFEHL
/dev/shm/qb-1783-1844-26-Znk1UM/qb-request-quorum-header:
                     root       1783 ….m corosync
                     root       1844 ….m pacemakerd
                     BEN.        PID ZUGR.  BEFEHL
/dev/shm/qb-1783-1844-25-oCdaKX/qb-event-cpg-data:
                     root       1783 ….m corosync
                     root       1844 ….m pacemakerd
                     BEN.        PID ZUGR.  BEFEHL
/dev/shm/qb-1783-1844-25-oCdaKX/qb-event-cpg-header:
                     root       1783 ….m corosync
                     root       1844 ….m pacemakerd
                     BEN.        PID ZUGR.  BEFEHL
/dev/shm/qb-1783-1844-25-oCdaKX/qb-response-cpg-data:
                     root       1783 ….m corosync
                     root       1844 ….m pacemakerd
                     BEN.        PID ZUGR.  BEFEHL
/dev/shm/qb-1783-1844-25-oCdaKX/qb-response-cpg-header:
                     root       1783 ….m corosync
                     root       1844 ….m pacemakerd
                     BEN.        PID ZUGR.  BEFEHL
/dev/shm/qb-1783-1844-25-oCdaKX/qb-request-cpg-data:
                     root       1783 ….m corosync
                     root       1844 ….m pacemakerd
                     BEN.        PID ZUGR.  BEFEHL
/dev/shm/qb-1783-1844-25-oCdaKX/qb-request-cpg-header:
                     root       1783 ….m corosync
                     root       1844 ….m pacemakerd
                     BEN.        PID ZUGR.  BEFEHL
/dev/shm/qb-1783-1844-24-GKyj3l/qb-event-cfg-data:
                     root       1783 ….m corosync
                     root       1844 ….m pacemakerd
                     BEN.        PID ZUGR.  BEFEHL
/dev/shm/qb-1783-1844-24-GKyj3l/qb-event-cfg-header:
                     root       1783 ….m corosync
                     root       1844 ….m pacemakerd
                     BEN.        PID ZUGR.  BEFEHL
/dev/shm/qb-1783-1844-24-GKyj3l/qb-response-cfg-data:
                     root       1783 ….m corosync
                     root       1844 ….m pacemakerd
                     BEN.        PID ZUGR.  BEFEHL
/dev/shm/qb-1783-1844-24-GKyj3l/qb-response-cfg-header:
                     root       1783 ….m corosync
                     root       1844 ….m pacemakerd
                     BEN.        PID ZUGR.  BEFEHL
/dev/shm/qb-1783-1844-24-GKyj3l/qb-request-cfg-data:
                     root       1783 ….m corosync
                     root       1844 ….m pacemakerd
                     BEN.        PID ZUGR.  BEFEHL
/dev/shm/qb-1783-1844-24-GKyj3l/qb-request-cfg-header:
                     root       1783 ….m corosync
                     root       1844 ….m pacemakerd


As you see from the output all the /dev/shm/qb/ files in question are currently opened by the corosync / pacemaker and necessery for proper work of the haproxy cluster processes running on the machines.
 

How to solve the /dev/ suspcisios files rkhunter warning?

To solve we need to tell rkhunter not check against this files this is done via  /etc/rkhunter.conf first I thought this is done by EXISTWHITELIST= but then it seems there is  a special option for rkhunter whitelisting /dev type of files only ALLOWDEVFILE.

Hence to resolve the warning for the upcoming planned early PCI audit and save us troubles we had to add on running OS which is CentOS Linux release 7.8.2003 (Core) in /etc/rkhunter.conf

ALLOWDEVFILE=/dev/shm/qb-*/qb-*

Re-run

# rkhunter –check

and Voila, the warning should be no more.

rkhunter-check-output

Another thing is on another machine the warnings produced by rkhunter were a bit different as rkhunter has mistakenly detected the root login is enabled where in reality PermitRootLogin was set to no in /etc/ssh/sshd_config

rkhunter-warning

As the problem was experienced on some machines and on others it was not.
I've done the standard boringconfig comparison we sysadmins do to tell
why stuff differs.
The result was on first machine where we had everything working as expected and
PermitRootLogin no was recognized the correct configuration was:

— SNAP —
#ALLOW_SSH_ROOT_USER=no
ALLOW_SSH_ROOT_USER=unset
— END —

On the second server where the problem was experienced the values was:

— SNAP —
#ALLOW_SSH_ROOT_USER=unset
ALLOW_SSH_ROOT_USER=no
— END —

Note that, the warning produced regarding the rsyslog remote logging is allowed is perfectly fine as, we had enabled remote logging to a central log server on the machines, this is done with:

This is done with config options under /etc/rsyslog.conf

# Configure Remote rsyslog logging server
*.* @remote-logging-server.com:514

Improve wordpress admin password encryption authentication keys security with WordPress Unique Authentication Keys and Salts

Friday, October 9th, 2020

wordpress-improve-security-logo-linux

Having a wordpress blog or website with an admistrator and access via a Secured SSL channel is common nowadays. However there are plenty of SSL encryption leaks already out there and many of which are either slow to be patched or the hosting companies does not care enough to patch on time the libssl Linux libraries / webserver level. Taking that in consideration many websites hosted on some unmaintained one-time run not-frequently updated Linux servers are still vulneable and it might happen that, if you paid for some shared hosting in the past and someone else besides you hosted the website and forget you even your wordpress installation is still living on one of this SSL vulnerable hosts. In situations like that malicious hackers could break up the SSL security up to some level or even if the SSL is secured use MITM (MAN IN THE MIDDLE) attack to simulate your well secured and trusted SSID Name WIFi network to  redirects the network traffic you use (via an SSL transparent Proxy) to connect to WordPress Administrator Dashbiard via https://your-domain.com/wp-admin. Once your traffic is going through the malicious hax0r even if you haven't used the password to authenticate every time, e.g. you have saved the password in browser and WordPress Admin Panel authentication is achieved via a Cookie the cookies generated and used one time by Woddpress site could be easily stealed one time and later from the vicious 1337 h4x0r and reverse the hash with an interceptor Tool and login to your wordpress …

Therefore to improve the wordpress site security it very important to have configured WordPress Unique Authentication Keys and Salts (known also as the WordPress security keys).

They're used by WordPress installation to have a uniquely generated different key and Salt from the default one to the opened WordPress Blog / Site Admin session every time.

So what are the Authentication Unique Keys and Salts and why they are Used?

Like with almost any other web application, when PHP session is opened to WordPress, the code creates a number of Cookies stored locally on your computer.

Two of the cookies created are called:

 wordpress_[hash]
wordpress_logged_in_[hash]

First  cookie is used only in the admin pages (WordPress dashboard), while the second cookie is used throughout WordPress to determine if you are logged in to WordPress or not. Note: [hash] is a random hashed value typically assigned to your session, therefore in reality the cookies name would be named something like wordpress_ffc02f68bc9926448e9222893b6c29a9.

WordPress session stores your authentication details (i.e. WordPress username and password) in both of the above mentioned cookies.

The authentication details are hashed, hence it is almost impossible for anyone to reverse the hash and guess your password through a cookie should it be stolen. By almost impossible it also means that with today’s computers it is practically unfeasible to do so.

WordPress security keys are made up of four authentication keys and four hashing salts (random generated data) that when used together they add an extra layer to your cookies and passwords. 

The authentication details in these cookies are hashed using the random pattern specified in the WordPress security keys. I will not get into too much details but as you might have heard in Cryptography Salts and Keys are important – an indepth explanation on Salts Cryptography (here). A good reading for those who want to know more on how does the authentication based and salts work is on stackexchange.

How to Set up Salt and Key Authentication on WordPress
 

To be used by WP Salts and Key should be configured under wp-config.php usually they look like so:

wordpress-website-blog-salts-keys-wp-config-screenshot-linux

!!! Note !!!  that generating (manually or generated via a random generator program), the definition strings you have to use a random string value of more than 60 characters to prevent predictability 

The default on any newly installed WordPress Website is to have the 4 definitions with _KEY and the four _SALTs to be unconfigured strings looks something like:

default-WordPress-security-keys-and-salts-entries-in-wordPress-wp-config-php-file

Most people never ever take a look at wp-config.php as only the Web GUI Is used for any maintainance, tasks so there is a great chance that if you never heard specifically by some WordPress Security Expert forum or some Security plugin (such as WP Titan Anti Spam & Security) installed to report the WP KEY / SALT you might have never noticed it in the config.

There are 8 WordPress security keys in current WP Installs, but not all of them have been introduced at the same time.
Historically they were introduced in WP versions in below order:

WordPress 2.6: AUTH_KEY, SECURE_AUTH_KEY, LOGGED_IN_KEY
WordPress 2.7: NONCE_KEY
WordPress 3.0: AUTH_SALT, SECURE_AUTH_SALT, LOGGED_IN_SALT, NONCE_SALT

Setting a custom random generated values is an easy task as there is already online Wordpress Security key Random generator.
You can visit above address and you will get an automatic randomly generated values which could be straight copy / pasted to your wp-config.php.

Howeever if you're a paranoic on the guessability of the random generator algorithm, I would advice you use the generator and change some random values yourself on each of the 8 line, the end result in the configuration should be something similar to:


define('AUTH_KEY',         '|w+=W(od$V|^hy$F5w)g6O-:e[WI=NHY/!Ez@grd5=##!;jHle_vFPqz}D5|+87Q');
define('SECURE_AUTH_KEY',  'rGReh.<%QBJ{DP )p=BfYmp6fHmIG~ePeHC[MtDxZiZD;;_OMp`sVcKH:JAqe$dA');
define('LOGGED_IN_KEY',    '%v8mQ!)jYvzG(eCt>)bdr+Rpy5@t fTm5fb:o?@aVzDQw8T[w+aoQ{g0ZW`7F-44');
define('NONCE_KEY',        '$o9FfF{S@Z-(/F-.6fC/}+K 6-?V.XG#MU^s?4Z,4vQ)/~-[D.X0<+ly0W9L3,Pj');
define('AUTH_SALT',        ':]/2K1j(4I:DPJ`(,rK!qYt_~n8uSf>=4`{?LC]%%KWm6@j|aht@R.i*ZfgS4lsj');
define('SECURE_AUTH_SALT', 'XY{~:{P&P0Vw6^i44Op*nDeXd.Ec+|c=S~BYcH!^j39VNr#&FK~wq.3wZle_?oq-');
define('LOGGED_IN_SALT',   '8D|2+uKX;F!v~8-Va20=*d3nb#4|-fv0$ND~s=7>N|/-2]rk@F`DKVoh5Y5i,w*K');
define('NONCE_SALT',       'ho[<2C~z/:{ocwD{T-w+!+r2394xasz*N-V;_>AWDUaPEh`V4KO1,h&+c>c?jC$H');


Wordpress-auth-key-secure-auth-salt-Linux-wordpress-admin-security-hardening

Once above defines are set, do not forget to comment or remove old AUTH_KEY / SECURE_AUTH_KEY / LOGGED_IN_KEY / AUTH_SALT / SECURE_AUTH_SALT / LOGGED_IN_SALT /NONCE_SALT keys.

The values are configured one time and never have to be changed, WordPress installation automatic updates or Installed WP Plugins will not tamper the value with time.
You should never expand or show your private generated keys to anyone otherwise this could be used to hack your website site.
It is also a good security practice to change this keys, especially if you have some suspects someone has somehow stolen your wp-onfig keys. 
 

Closure

Having AUTH KEYs and Properly configured is essential step to improve your WordPress site security. Anytime having any doubt for a browser hijacked session (or if you have logged in) to your /wp-admin via unsecured public Computer with a chance of a stolen site cookies you should reset keys / salts to a new random values. Setting the auth keys is not a panacea and frequent WP site core updates and plugins should be made to secure your install. Always do frequent audits to WP owned websites with a tool such as WPScan is essential to keep your WP Website unhacked.


Sysadmin tip: How to force a new Linux user account password change after logging to improve security

Thursday, June 18th, 2020

chage-linux-force-password-expiry-check-user-password-expiry-setting

Have you logged in through SSH to remote servers with the brand new given UNIX account in your company just to be prompted for your current Password immediately after logging and forced to change your password?
The smart sysadmins or security officers use this trick for many years to make sure the default set password for new user is set to a smarter user to prevent default password leaks which might later impose a severe security risk for a company Demiliterized networks confidential data etc.

If you haven't seen it yet and you're in the beautiful world of UNIX / Linux as a developer qa tester or sysadmin sooner or later you will face it.
Here of course I'm talking about plain password local account authentication using user / pass credentials stored in /etc/passwd or /etc/shadow.

Lets Say hello to the main command chage that is used to do this sysadmin trick.
chage command is used to change user password expiry information and  set and alter password aging parameters on user accounts.


1. Force chage to make password expire on next user login for a new created user
 

# chage -d 0 {user-name} 


Below is a real life example
 

chage-force-user-account-password-expiry-linux


2. Get information on when account expires


[hipo@linux ~]$ chage -l hipo
Last password change                                    : Apr 03, 2020
Password expires                                        : Jul 08, 2020
Password inactive                                       : never
Account expires                                         : never
Minimum number of days between password change          : 0
Maximum number of days between password change          : 90
Number of days of warning before password expires       : 14


3. Use chage to set user account password expiration

The most straight forward way to set an expiration date for an active user acct is with:


# chage -E 2020-08-16 username


To make the account get locked automatically if the password has expired and the user did not logged in to it for 2 days after its expiration.

# chage -I 2 username


– Set Password expire with Minimum days 7 (-n mindays 7), (-x maxdays 28) and (-w warndays 5)

# passwd -n 7 -x 28 -w 5 username

To check the passwod expiration settings use list command:

# chage -l username
Last password change                                    : юни 18, 2020
Password expires                                        : юли 16, 2020
Password inactive                                       : never
Account expires                                         : never
Minimum number of days between password change          : 7
Maximum number of days between password change          : 28
Number of days of warning before password expires       : 5


chage is a command is essential sysadmin command that is mentioned in every Learn Linux book out there, however due to its often rare used many people and sysadmins either, don't know it or learn of it only once it is needed. 
A note to make here is some sysadmins prefer to use usermod to set a password expire instead of chage.

usermod -e 2020-10-14 username


For those who wonder how to set password expiry on FreeBSD and other BSD-es is done, there it is done via the pw system user management tool as chage is not present there.


A note to make here is chage usually does not provide information for Linux user accounts that are stored in LDAP. To get information of such you can use ldapsearch with a query to the LDAP domain store with something like.
 

ldapsearch -x -ZZ -LLL -b dc=domain.com,dc=com objectClass=*


It is worthy to mention also another useful command when managing users this is getent used to get entries from Name Service Switch libraries. 
getent is useful to get various information from basic /etc/ stored db files such as /etc/services /etc/shadow, /etc/group, /etc/aliases, /etc/hosts and even do some simple rpc queries.

Improve SSL security: Generate and add Diffie Hellman key to SSL certificate for stronger line encryption

Wednesday, June 10th, 2020

Diffie–Hellman key exchange (DH) is a method of securely exchanging cryptographic keys over a public channel and was one of the first public-key protocols as conceived by Ralph Merkle and named after Whitfield Diffie and Martin Hellman. DH is one of the earliest practical examples of public key exchange implemented within the field of cryptography.

Traditionally, secure encrypted communication between two parties required that they first exchange keys by some secure physical means, such as paper key lists transported by a trusted courier. The Diffie–Hellman key exchange method allows two parties that have no prior knowledge of each other to jointly establish a shared secret key over an insecure channel. This key can then be used to encrypt subsequent communications using a symmetric key cipher.

DH has been widely used on the Internet for improving the authentication encryption among parties. The only note is it useful if both the communication sides A and B are at your control, as what DH does is just strenghten the already established connection between client A and B and not protect from Man in the Middle Attacks. If some malicious user could connect to B pretending it is A the encryption will be established.

diffie-hellman-explained

Alternatively, the Diffie-Hellman key exchange can be combined with an algorithm like the Digital Signature Standard (DSS) to provide authentication, key exchange, confidentiality and check the integrity of the data. In such a situation, RSA is not necessary for securing the connection.

TLS, which is a protocol that is used to secure much of the internet, can use the Diffie-Hellman exchange in three different ways: anonymous, static and ephemeral. In practice, only ephemeral Diffie-Hellman should be implemented, because the other options have security issues.

Anonymous Diffie-Hellman – This version of the Diffie-Hellman key exchange doesn’t use any authentication, leaving it vulnerable to man-in-the-middle attacks. It should not be used or implemented.

Static Diffie-Hellman – Static Diffie-Hellman uses certificates to authenticate the server. It does not authenticate the client by default, nor does it provide forward secrecy.

Ephemeral Diffie-Hellman – This is considered the most secure implementation because it provides perfect forward secrecy. It is generally combined with an algorithm such as DSA or RSA to authenticate one or both of the parties in the connection.

Ephemeral Diffie-Hellman uses different key pairs each time the protocol is run. This gives the connection perfect forward secrecy, because even if a key is compromised in the future, it can’t be used to decrypt all of the past messages.

diffie-hellman-dh-revised

DH encryption key could be generated with the openssl command and could be generated depending on your preference using a 1024 / 2048 or 4096 bit encryption.
Of course it is best to have the strongest encryption possible i.e 4096.

The Logjam attack 

The Diffie-Hellman key exchange was designed on the basis of the discrete logarithm problem being difficult to solve. The most effective publicly known mechanism for finding the solution is the number field sieve algorithm.

The capabilities of this algorithm were taken into account when the Diffie-Hellman key exchange was designed. By 1992, it was known that for a given group, G, three of the four steps involved in the algorithm could potentially be computed beforehand. If this progress was saved, the final step could be calculated in a comparatively short time.

This wasn’t too concerning until it was realized that a significant portion of internet traffic uses the same groups that are 1024 bits or smaller. In 2015, an academic team ran the calculations for the most common 512-bit prime used by the Diffie-Hellman key exchange in TLS.

They were also able to downgrade 80% of TLS servers that supported DHE-EXPORT, so that they would accept a 512-bit export-grade Diffie-Hellman key exchange for the connection. This means that each of these servers is vulnerable to an attack from a well-resourced adversary.

The researchers went on to extrapolate their results, estimating that a nation-state could break a 1024-bit prime. By breaking the single most-commonly used 1024-bit prime, the academic team estimated that an adversary could monitor 18% of the one million most popular HTTPS websites.

They went on to say that a second prime would enable the adversary to decrypt the connections of 66% of VPN servers, and 26% of SSH servers. Later in the report, the academics suggested that the NSA may already have these capabilities.

“A close reading of published NSA leaks shows that the agency’s attacks on VPNs are consistent with having achieved such a break.”

Despite this vulnerability, the Diffie-Hellman key exchange can still be secure if it is implemented correctly. As long as a 2048-bit key is used, the Logjam attack will not work. Updated browsers are also secure from this attack.

Is the Diffie-Hellman key exchange safe?

While the Diffie-Hellman key exchange may seem complex, it is a fundamental part of securely exchanging data online. As long as it is implemented alongside an appropriate authentication method and the numbers have been selected properly, it is not considered vulnerable to attack.

The Diffie-Hellman key exchange was an innovative method for helping two unknown parties communicate safely when it was developed in the 1970s. While we now implement newer versions with larger keys to protect against modern technology the protocol itself looks like it will continue to be secure until the arrival of quantum computing and the advanced attacks that will come with it.

Here is how easy it is to add this extra encryption to make the SSL tunnel between A and B stronger.

On a Linux / Mac / BSD OS machine install and use openssl client like so:
 

# openssl dhparam -out dhparams1.pem 2048
Generating DH parameters, 2048 bit long safe prime, generator 2
This is going to take a long time
……………………………………………………….+………..+………………………………………………………+


…..
…. ………………..++*++*

Be aware that the Diffie-Hellman key exchange would be insecure if it used numbers as small as those in our example. We are only using such small numbers to demonstrate the concept in a simpler manner.


# cat dhparams1.pem
—–BEGIN DH PARAMETERS—–
MIIBCAKCAQEAwG85wZPoVAVhwR23H5cF81Ml4BZTWuEplrmzSMOR9UNMnKjURf10
JX9xe/ZaqlwMxFYwZLyqtFQB2zczuvp1j+tKkSi4/TbD6Qm6gtsTeRghqunfypjS
+c4dNOVSbo/KLuIB5jDT31iMUAIDJF8OBUuqazRsg4pmYVHFm1KLHCcgcTk5kXqh
m8vXoCTlaLlmicC9pRTgQLuAQRXAF8LnVLCUvGlsyynTdc0yUFePWkmeYHMYAmWo
aBS6AMFNDvOxCubWv9cULkOouhPzd8k0wWYhUrrxMJXc1bSDFCBA7DiRCLPorefd
kCcNJFrh7rgy1lmu00d3I5S9EPH/EyoGSwIBAg==
—–END DH PARAMETERS—–


Copy the generated DH PARAMETERS headered key string to your combined .PEM certificate pair at the end of the file and save it


# vim /etc/haproxy/cert/ssl-cert.pem
….
—–BEGIN DH PARAMETERS—–
MIIBCAKCAQEAwG85wZPoVAVhwR23H5cF81Ml4BZTWuEplrmzSMOR9UNMnKjURf10
JX9xe/ZaqlwMxFYwZLyqtFQB2zczuvp1j+tKkSi4/TbD6Qm6gtsTeRghqunfypjS
+c4dNOVSbo/KLuIB5jDT31iMUAIDJF8OBUuqazRsg4pmYVHFm1KLHCcgcTk5kXqh
m8vXoCTlaLlmicC9pRTgQLuAQRXAF8LnVLCUvGlsyynTdc0yUFePWkmeYHMYAmWo
aBS6AMFNDvOxCubWv9cULkOouhPzd8k0wWYhUrrxMJXc1bSDFCBA7DiRCLPorefd
kCcNJFrh7rgy1lmu00d3I5S9EPH/EyoGSwIBAg==
—–END DH PARAMETERS—–

…..

Restart the WebServer or Proxy service wher Diffie-Hellman key was installed and Voila you should a bit more secure.