Archive for September, 2017

Finding top access IPs in Webserver or how to delay connects from Bots (Web Spiders) to your site to prevent connect Denial of Service

Friday, September 15th, 2017

analyze-log-files-most-visited-ips-and-find-and-stopwebsite-hammering-bot-spiders-neo-tux

If you're a sysadmin who has to deal with cracker attemps for DoS (Denial of Service) on single or multiple servers (clustered CDN or standalone) Apache Webservers, nomatter whether working for some web hosting company or just running your private run home brew web server its very useful thing to inspect Web Server log file (in Apache HTTPD case that's access.log).

Sometimes Web Server overloads and the follow up Danial of Service (DoS) affect is not caused by evil crackers (mistkenly often called hackers but by some data indexing Crawler Search Engine bots who are badly configured to aggressively crawl websites and hence causing high webserver loads flooding your servers with bad 404 or 400, 500 or other requests, just to give you an example of such obstructive bots.

1. Dealing with bad Search Indexer Bots (Spiders) with robots.txt

Just as I mentioned hackers word above I feel obliged to expose the badful lies the press and media spreading for years misconcepting in people's mind the word cracker (computer intruder) with a hacker, if you're one of those who mistakenly call security intruders hackers I recommend you read Dr. Richard Stallman's article On Hacking to get the proper understanding that hacker is an cheerful attitude of mind and spirit and a hacker could be anyone who has this kind of curious and playful mind out there. Very often hackers are computer professional, though many times they're skillful programmers, a hacker is tending to do things in a very undstandard and weird ways to make fun out of life but definitelely follow the rule of do no harm to the neighbor.

Well after the short lirical distraction above, let me continue;

Here is a short list of Search Index Crawler bots with very aggressive behaviour towards websites:


# mass download bots / mirroring utilities
1. webzip
2. webmirror
3. webcopy
4. netants
5. getright
6. wget
7. webcapture
8. libwww-perl
9. megaindex.ru
10. megaindex.com
11. Teleport / TeleportPro
12. Zeus
….

Note that some of the listed crawler bots are actually a mirroring clients tools (wget) etc., they're also included in the list of server hammering bots because often  websites are attempted to be mirrored by people who want to mirror content for the sake of good but perhaps these days more often mirror (duplicate) your content for the sake of stealing, this is called in Web language Content Stealing in SEO language.


I've found a very comprehensive list of Bad Bots to block on Mike's tech blog his website provided example of bad robots.txt file is mirrored as plain text file here

Below is the list of Bad Crawler Spiders taken from his site:


# robots.txt to prohibit bad internet search engine spiders to crawl your website
# Begin block Bad-Robots from robots.txt
User-agent: asterias
Disallow:/
User-agent: BackDoorBot/1.0
Disallow:/
User-agent: Black Hole
Disallow:/
User-agent: BlowFish/1.0
Disallow:/
User-agent: BotALot
Disallow:/
User-agent: BuiltBotTough
Disallow:/
User-agent: Bullseye/1.0
Disallow:/
User-agent: BunnySlippers
Disallow:/
User-agent: Cegbfeieh
Disallow:/
User-agent: CheeseBot
Disallow:/
User-agent: CherryPicker
Disallow:/
User-agent: CherryPickerElite/1.0
Disallow:/
User-agent: CherryPickerSE/1.0
Disallow:/
User-agent: CopyRightCheck
Disallow:/
User-agent: cosmos
Disallow:/
User-agent: Crescent
Disallow:/
User-agent: Crescent Internet ToolPak HTTP OLE Control v.1.0
Disallow:/
User-agent: DittoSpyder
Disallow:/
User-agent: EmailCollector
Disallow:/
User-agent: EmailSiphon
Disallow:/
User-agent: EmailWolf
Disallow:/
User-agent: EroCrawler
Disallow:/
User-agent: ExtractorPro
Disallow:/
User-agent: Foobot
Disallow:/
User-agent: Harvest/1.5
Disallow:/
User-agent: hloader
Disallow:/
User-agent: httplib
Disallow:/
User-agent: humanlinks
Disallow:/
User-agent: InfoNaviRobot
Disallow:/
User-agent: JennyBot
Disallow:/
User-agent: Kenjin Spider
Disallow:/
User-agent: Keyword Density/0.9
Disallow:/
User-agent: LexiBot
Disallow:/
User-agent: libWeb/clsHTTP
Disallow:/
User-agent: LinkextractorPro
Disallow:/
User-agent: LinkScan/8.1a Unix
Disallow:/
User-agent: LinkWalker
Disallow:/
User-agent: LNSpiderguy
Disallow:/
User-agent: lwp-trivial
Disallow:/
User-agent: lwp-trivial/1.34
Disallow:/
User-agent: Mata Hari
Disallow:/
User-agent: Microsoft URL Control – 5.01.4511
Disallow:/
User-agent: Microsoft URL Control – 6.00.8169
Disallow:/
User-agent: MIIxpc
Disallow:/
User-agent: MIIxpc/4.2
Disallow:/
User-agent: Mister PiX
Disallow:/
User-agent: moget
Disallow:/
User-agent: moget/2.1
Disallow:/
User-agent: mozilla/4
Disallow:/
User-agent: Mozilla/4.0 (compatible; BullsEye; Windows 95)
Disallow:/
User-agent: Mozilla/4.0 (compatible; MSIE 4.0; Windows 95)
Disallow:/
User-agent: Mozilla/4.0 (compatible; MSIE 4.0; Windows 98)
Disallow:/
User-agent: Mozilla/4.0 (compatible; MSIE 4.0; Windows NT)
Disallow:/
User-agent: Mozilla/4.0 (compatible; MSIE 4.0; Windows XP)
Disallow:/
User-agent: Mozilla/4.0 (compatible; MSIE 4.0; Windows 2000)
Disallow:/
User-agent: Mozilla/4.0 (compatible; MSIE 4.0; Windows ME)
Disallow:/
User-agent: mozilla/5
Disallow:/
User-agent: NetAnts
Disallow:/
User-agent: NICErsPRO
Disallow:/
User-agent: Offline Explorer
Disallow:/
User-agent: Openfind
Disallow:/
User-agent: Openfind data gathere
Disallow:/
User-agent: ProPowerBot/2.14
Disallow:/
User-agent: ProWebWalker
Disallow:/
User-agent: QueryN Metasearch
Disallow:/
User-agent: RepoMonkey
Disallow:/
User-agent: RepoMonkey Bait & Tackle/v1.01
Disallow:/
User-agent: RMA
Disallow:/
User-agent: SiteSnagger
Disallow:/
User-agent: SpankBot
Disallow:/
User-agent: spanner
Disallow:/
User-agent: suzuran
Disallow:/
User-agent: Szukacz/1.4
Disallow:/
User-agent: Teleport
Disallow:/
User-agent: TeleportPro
Disallow:/
User-agent: Telesoft
Disallow:/
User-agent: The Intraformant
Disallow:/
User-agent: TheNomad
Disallow:/
User-agent: TightTwatBot
Disallow:/
User-agent: Titan
Disallow:/
User-agent: toCrawl/UrlDispatcher
Disallow:/
User-agent: True_Robot
Disallow:/
User-agent: True_Robot/1.0
Disallow:/
User-agent: turingos
Disallow:/
User-agent: URLy Warning
Disallow:/
User-agent: VCI
Disallow:/
User-agent: VCI WebViewer VCI WebViewer Win32
Disallow:/
User-agent: Web Image Collector
Disallow:/
User-agent: WebAuto
Disallow:/
User-agent: WebBandit
Disallow:/
User-agent: WebBandit/3.50
Disallow:/
User-agent: WebCopier
Disallow:/
User-agent: WebEnhancer
Disallow:/
User-agent: WebmasterWorldForumBot
Disallow:/
User-agent: WebSauger
Disallow:/
User-agent: Website Quester
Disallow:/
User-agent: Webster Pro
Disallow:/
User-agent: WebStripper
Disallow:/
User-agent: WebZip
Disallow:/
User-agent: WebZip/4.0
Disallow:/
User-agent: Wget
Disallow:/
User-agent: Wget/1.5.3
Disallow:/
User-agent: Wget/1.6
Disallow:/
User-agent: WWW-Collector-E
Disallow:/
User-agent: Xenu’s
Disallow:/
User-agent: Xenu’s Link Sleuth 1.1c
Disallow:/
User-agent: Zeus
Disallow:/
User-agent: Zeus 32297 Webster Pro V2.9 Win32
Disallow:/
Crawl-delay: 20
# Begin Exclusion From Directories from robots.txt
Disallow: /cgi-bin/

Veryimportant variable among the ones passed by above robots.txt is
 

Crawl-Delay: 20


You might want to tune that variable a Crawl-Delay of 20 instructs all IP connects from any Web Spiders that are respecting robots.txt variables to delay crawling with 20 seconds between each and every connect client request, that is really useful for the Webserver as less connects means less CPU and Memory usage and less degraded performance put by aggressive bots crawling your site like crazy, requesting resources 10 times per second or so …

As you can conclude by the naming of some of the bots having them disabled would prevent your domain/s clients from Email harvesting Spiders and other not desired activities.


2. Listing IP addresses Hits / How many connects per IPs used to determine problematic server overloading a huge number of IPs connects

After saying few words about SE bots and I think it it is fair to also  mention here a number of commands, that helps the sysadmin to inspect Apache's access.log files.
Inspecting the log files regularly is really useful as the number of malicious Spider Bots and the Cracker users tends to be
raising with time, so having a good way to track the IPs that are stoning at your webserver and later prohibiting them softly to crawl either via robots.txt (not all of the Bots would respect that) or .htaccess file or as a last resort directly form firewall is really useful to know.
 

– Below command Generate a list of IPs showing how many times of the IPs connected the webserver (bear in mind that commands are designed log fields order as given by most GNU / Linux distribution + Apache default logging configuration;


webhosting-server:~# cd /var/log/apache2 webhosting-server:/var/log/apache2# cat access.log| awk '{print $1}' | sort | uniq -c |sort -n


Below command provides statistics info based on whole access.log file records, sometimes you will need to have analyzed just a chunk of the webserver log, lets say last 12000 IP connects, here is how:
 

webhosting-server:~# cd /var/log/apache2 webhosting-server:/var/log/apache2# tail -n 12000 access.log| awk '{print $1}' | sort | uniq -c |sort -n


You can combine above basic bash shell parser commands with the watch command to have a top like refresh statistics every few updated refreshing IP statistics of most active customers on your websites.

Here is an example:


webhosting-server:~# watch "cat access.log| awk '{print $1}' | sort | uniq -c |sort -n";


Once you have the top connect IPs if you have a some IP connecting with lets say 8000-10000 thousand times in a really short interval of time 20-30 minues or so. Hence it is a good idea to investigate further where is this IP originating from and if it is some malicious Denial of Service, filter it out either in Firewall (with iptables rules) or ask your ISP or webhosting to do you a favour and drop all the incoming traffic from that IP.

Here is how to investigate a bit more about a server stoner IP;
Lets assume that you found IP: 176.9.50.244 to be having too many connects to your webserver:
 

webhosting-server:~# grep -i 176.9.50.244 /var/log/apache2/access.log|tail -n 1
176.9.50.244 – – [12/Sep/2017:07:42:13 +0300] "GET / HTTP/1.1" 403 371 "-" "Mozilla/5.0 (compatible; MegaIndex.ru/2.0; +http://megaindex.com/crawler)"


webhosting-server:~# host 176.9.50.244
244.50.9.176.in-addr.arpa domain name pointer static.244.50.9.176.clients.your-server.de.


webhosting-server:~# whois 176.9.50.244|less


The outout you will get would be something like:

% This is the RIPE Database query service.
% The objects are in RPSL format.
%
% The RIPE Database is subject to Terms and Conditions.
% See http://www.ripe.net/db/support/db-terms-conditions.pdf

% Note: this output has been filtered.
%       To receive output for a database update, use the "-B" flag.

% Information related to '176.9.50.224 – 176.9.50.255'

% Abuse contact for '176.9.50.224 – 176.9.50.255' is 'abuse@hetzner.de'

inetnum:        176.9.50.224 – 176.9.50.255
netname:        HETZNER-RZ15
descr:          Hetzner Online GmbH
descr:          Datacenter 15
country:        DE
admin-c:        HOAC1-RIPE
tech-c:         HOAC1-RIPE
status:         ASSIGNED PA
mnt-by:         HOS-GUN
mnt-lower:      HOS-GUN
mnt-routes:     HOS-GUN
created:        2012-03-12T09:45:54Z
last-modified:  2015-08-10T09:29:53Z
source:         RIPE

role:           Hetzner Online GmbH – Contact Role
address:        Hetzner Online GmbH
address:        Industriestrasse 25
address:        D-91710 Gunzenhausen
address:        Germany
phone:          +49 9831 505-0
fax-no:         +49 9831 505-3
abuse-mailbox:  abuse@hetzner.de
remarks:        *************************************************
remarks:        * For spam/abuse/security issues please contact *
remarks:        * abuse@hetzner.de, not this address. *
remarks:        * The contents of your abuse email will be *
remarks:        * forwarded directly on to our client for *
….


3. Generate list of directories and files that are most called by clients
 

webhosting-server:~# cd /var/log/apache2; webhosting-server:/var/log/apache2# awk '{print $7}' access.log|cut -d? -f1|sort|uniq -c|sort -nk1|tail -n10

( take in consideration that this info is provided only on current records from /var/log/apache2/ and is short term for long term statistics you have to merge all existing gzipped /var/log/apache2/access.log.*.gz )

To merge all the old gzipped files into one single file and later use above shown command to analyize run:


cd /var/log/apache2/
cp -rpf *access.log*.gz apache-gzipped/
cd apache-gzipped
for i in $(ls -1 *access*.log.*.gz); do gzip -d $i; done
rm -f *.log.gz;
for i in $(ls -1 *|grep -v access_log_complete); do cat $i >> access_log_complete; done


Though the accent of above article is Apache Webserver log analyzing, the given command examples can easily be recrafted to work properly on other Web Servers LigHTTPD, Nginx etc.

Above commands are about to put a higher load to your server during execution, so on busy servers it is a better idea, to first go and synchronize the access.log files to another less loaded servers in most small and midsized companies this is being done by a periodic synchronization of the logs to the log server used usually only to store log various files and later used to do various analysis our run analyse software such as Awstats, Webalizer, Piwik, Go Access etc.

Worthy to mention one great text console must have Apache tool that should be mentioned to analyze in real time for the lazy ones to type so much is Apache-top but those script will be not installed on most webhosting servers and VPS-es, so if you don't happen to own a self-hosted dedicated server / have webhosting company etc. – (have root admin access on server), but have an ordinary server account you can use above commands to get an overall picture of abusive webserver IPs.

logstalgia-visual-loganalyzer-in-reali-time-windows-linux-mac
 

If you have a Linux with a desktop GUI environment and have somehow mounted remotely the weblog server partition another really awesome way to visualize in real time the connect requests to  web server Apache / Nginx etc. is with Logstalgia

Well that's all folks, I hope that article learned you something new. Enjoy

Thanks for article neo-tux picture to segarkshtri.com.np)
Apache Webserver: How to Set up multile SSL certificates on multiple domains running on one IP address with Apache SNI feature

Wednesday, September 13th, 2017

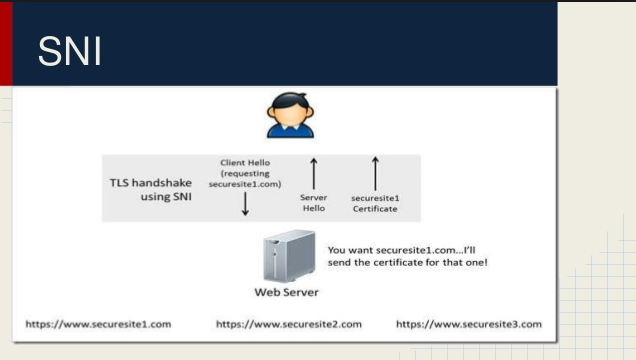
apache-ssl-handshake-how-client-talks-to-server-illustrated

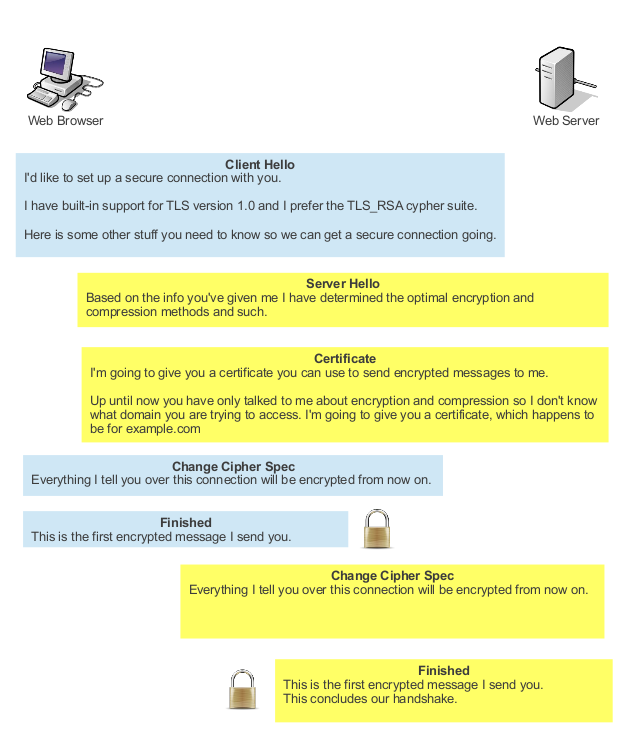
In the recent past it was impossible to add multiple different SSL .crt / .pem bundle certificates on Apache Webserver but each one of it was supposed to run under a separate domain or subdomain, preconfigured with a separate IP address, this has changed with the introduction of Apache SNI (Server Name Indication). What SNI does is it sends, the site visitor initiating connections on encrypted SSL port (443) or whatever configured a certificate that matches, the client requested server name.

Note that SNI is Apache HTTPD supported only and pitily can't be used on other services such as Mail Servers (SMTPS), (POP3S), (IMAPS) etc.
Older browsers did not have support for proper communication with WebServers supporting SNI communication, so for Websites whose aim is interoperatibility and large audience of Web clients still the preferrable way is to set up each VirtualHost under a separate IP, just like the good old days.

However Small and MidSized businesses could save some cash by not having to buy separate IPs for each Virtualhost, but just use SNI.
Besides that the people are relatively rarely using old browsers without SNI, so having clients with browsers not supporting SNI would certiainly be too rare. To recognize where a browser is having support for TLS or not is to check whether the Browser has support for TLS extension.

One requirement in order for SNI to work properly is to have registered domain because SNI works based on the requested ServerName by client.

On Debian GNU / Linux based distributions, you need to have Apache Webserver installed with enabled mod_ssl module:


linux:~# apt-get install –yes apache2

linux:~# a2enmod ssl

linux:~# /etc/init.d/apache2 restart


If you're not planning to get a trusted source certificate, especially if you're just a start-up business which is in process of testing the environment (you still did not ordered certificate via some domain registrar you might want to generate self signed certificate with openssl command and use that temporary:


linux:~# openssl req -x509 -nodes -days 365 -newkey rsa:2048 -keyout /etc/apache2/ssl/your-domain.com/apache.key –out /etc/apache2/ssl/your-domain.com/apache.crt

Here among the prompted questions you need the a Distinguished Name or a DN.
There are quite a few fields but you can leave some blank.
For some fields leave the default value,
If you enter '.', or press enter the field will be left blank.

—–
 

Country Name (2 letter code) [AU]:BG
State or Province Name (full name) [Some-State]: Sofia
Locality Name (eg, city) []:SOF
Organization Name (eg, company) [Internet Widgits Pty Ltd]:Pc-Freak.NET
Organizational Unit Name (eg, section) []:
Common Name (e.g. server FQDN or YOUR name) []:your-domain.com                
Email Address []:webmaster@your-domain.com


(by the way it might be interesting to mention here the list of cheapest domain name registrars on the Internet as of January 2017 – source site here


Below order is given as estimated by price /  quality and provided service approximate


1. BlueHost.com – Domains $6.95

2. NameCheap.Com – Annual fee $10.69

3. GoDaddy.com – Annual fee $8.99 for first year, $14.99$ for each additional year

4. HostGator.com – Annual fee $15.00

5. 1and1.com – Annual fee $0.99 for first year ($14.99 for each additional year)

6. Network Solutions – This was historically one of the first domain registrar companies, but the brand is pricy $34.99

7. Register.com – Not sure

8. Hostway.com – $9.95 (first year and $9.95 renewals)

9. Moniker.com – Annual fee $11.99

10. Netfirms.ca – Annual fee $9.95 first year, Renewal fee is $11.99 per year


Note that domain pricing could value depending on the type of domain name country extension and many of the domain registrars would give you discount if you purchase domain name / SSL for 2 / 3+ years.

sni-illustrated-how-it-works-how-to-configure-multiple-domains-ssl-on-same-ip-apache-webserver

Next step in order to use SNI is to configure the WebServer Virtualhosts file:


linux:~# vim /etc/apache2/sites-available/domain-names.com


# Instruct Apache to listen for connections on port 443
Listen 443
# Listen for virtual host requests on all IP addresses
NameVirtualHost *:443

# Go ahead and accept connections for these vhosts
# from non-SNI clients
SSLStrictSNIVHostCheck off

<VirtualHost *:80>
        ServerAdmin webmaster@your-domain.com
        ServerName your-domain.com
        DocumentRoot /var/www

# More directives comes here

</VirtualHost>


<VirtualHost *:443>

        ServerAdmin webmaster@localhost
        ServerName your-domain.com
        DocumentRoot /var/www

        #   SSL Engine Switch:
        #   Enable/Disable SSL for this virtual host.
        SSLEngine on

        #   A self-signed (snakeoil) certificate can be created by installing
        #   the ssl-cert package. See
        #   /usr/share/doc/apache2.2-common/README.Debian.gz for more info.
        #   If both key and certificate are stored in the same file, only the
        #   SSLCertificateFile directive is needed.
        SSLCertificateFile /etc/apache2/ssl/your-domain.com/apache.crt
        SSLCertificateKeyFile /etc/apache2/ssl/your-domain.com/apache.key

# More Apache directives could be inserted here
</VirtualHost>


<VirtualHost *:443>
  DocumentRoot /var/www/sites/your-domain2
  ServerName www.your-domain2.com

  # Other directives here

</VirtualHost>

Add as many of the SNI enabled VirtualHosts following the example below, or if you prefer seperate the vhosts into separate domains.

I also recommend to check out Apache's official documentation on SNI for NameBasedSSLVhostsWithSNI etc.


Hope this article was not too boring 🙂
Enjoy life


How to configure mutual Apache WebServer SSL authentication – Two Way SSL mutual authentication for better security and stronger encryption

Tuesday, September 12th, 2017

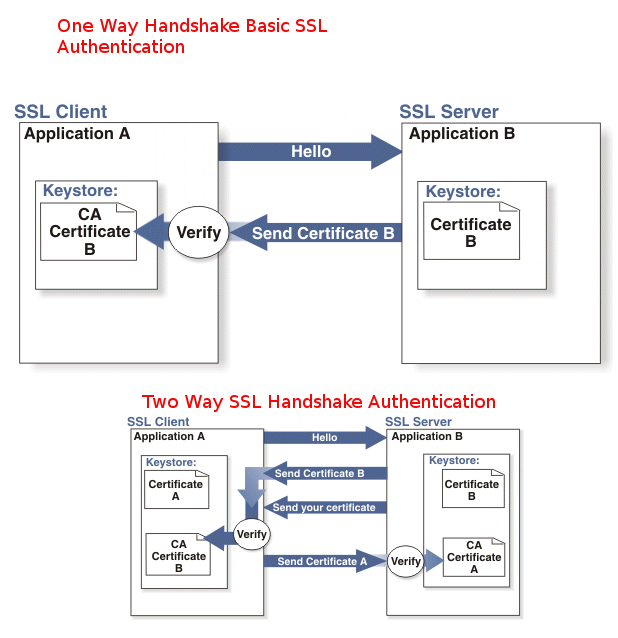
how-to-configure-one-way-and-two-way-handshake-authentication-apache-one-and-two-way-ssl-handshake-authentication-explained-diagram

In this post I'm about to explain how to configure Apache Web server for Two Way SSL Authentication alone and how to configure Two Way SSL Authentication for a Certain Domain URL Locations and the mixture of both One Way standar SSL authentication and Two Way Handshake Authentication .
 

Generally before starting I have to say most Web sites does not require a Mutual SSL  Authentication (the so called Two-Way SSL).

In most configurations Apache Web server is configured for One Way Basic authentication where The Web server authenticates to the Client usuall that's Browser program such as Mozilla  Firefox / Chrome / IE / Epiphany whatever presenting certificate signed by Trustable Certificate Authority such as VeriSign.

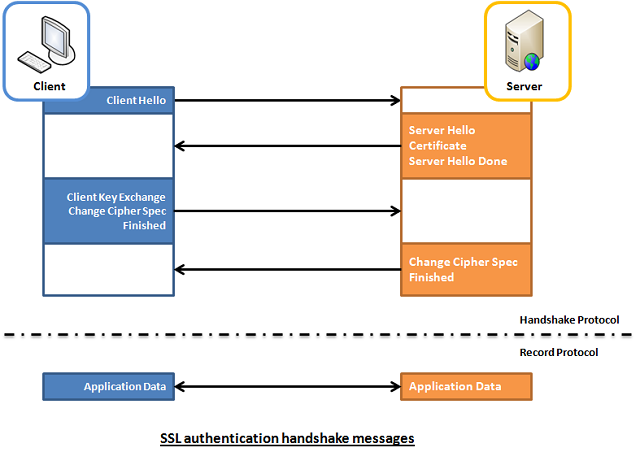
1WaySSL-clien-to-server-illustrated
 

The authority then autneticates to the browser that the Installed certificate on the Apache Web Server is trustable and the website is not a fraudulant, that is especially important for websites where sensitive data is being transferred, lets say Banks (Doing Money Transfers online), Hospitals (Transfelling your Medical results data) or purchasing something from Amazon.com, Ebay.Com, PayPal etc.

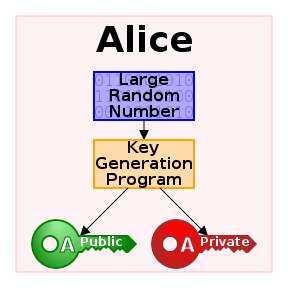
Once client validates the certificate the communication line gets encrypted based on Public Key, below diagram illustrates this.

Public Ke Cryptography diagram how it works

However in some casis where an additional Security Hardening is required, the Web Server might be configured to require additional certificate so the authentication between Client -> Server doesn't work by certificating with just a Server provided certificate but to work Two Ways, e.g. the Client might be setup to also have a Trusted Authority Certificate and to present it to server and send back this certificate to the Server as well for a mutual authentication and only once the certificate handshake between;

client -> server and server -> client

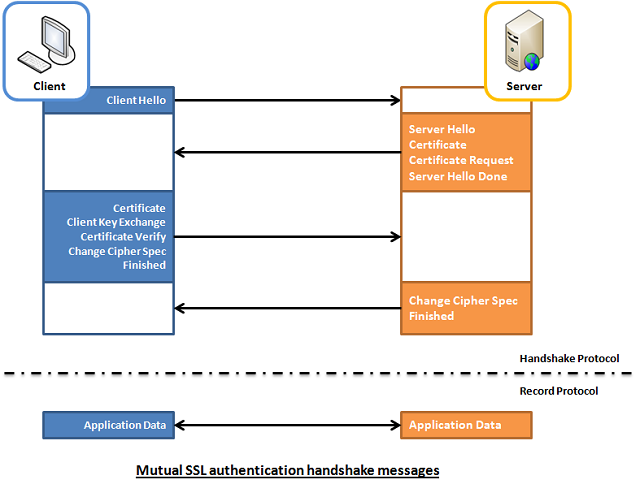
2WaySSL-client-to-server-and-server-to-client-mutual-authentication-illustration

is confirmed as successful the two could establish a trustable encypted SSL channel over which they can talk securely this is called
Two way SSL Authentication.


1. Configure Two Way SSL Authentication on Apache HTTPD
 

To be able to configure Two Way SSL Authentication handshake on Apache HTTPD just like with One way standard one, the mod_ssl Apache module have to enabled.

Enabling two-way SSL is usually not done on normal clients but is done with another server acting as client that is using some kind of REST API to connect to the server


The Apache directive used for Mutual Authentication is SSLVerifyClient directive (this is provided by mod_ssl)

the options that SSLVerifyClient receives are:

none: instructs no client Certificate is required
optional: the client is allowed to present a valid certificate but optionally
require: the client is always required to present a valid Certificate for mutual Authenticaton
optional_no_ca: the client is asked to present a valid Certificate however it has to be successfully verified.

In most of Apache configuratoins the 2 ones that are used are either none or require
because optional is reported to not behave properly with some of the web browsers and
optional_no_ca is not restrictive and is usually used just for establishing basic SSL test pages.

At some cases when configuring Apache HTTPD it is required to have a mixture of both One Way and Two Way Authentication, if that is your case the SSLVerifyClient none is to be used inside the virtual host configuration and then include SSLVerifyClient require to each directory (URL) location that requires a client certificate with mutual auth.

Below is an example VirtualHost configuration as a sample:


The SSLVerifyClient directive from mod_ssl dictates whether a client certificate is required for a given location:
 

<VirtualHost *:443>

SSLVerifyClient none
<Location /whatever_extra_secured_location/dir>
            …
            SSLVerifyClient require
</Location>
</VirtualHost>


Because earlier in configuration the SSLVerifyClient none is provided, the client will not be doing a Two Way Mutual Authentication for the whole domain but just the selected Location the client certificate will be not requested by the server for a 2 way mutual auth, but only when the client requests the Location setupped resouce a renegotiation will be done and client will be asked to provide certificate for the two way handshake authentication.

Keep in mind that on a busy servers with multitudes of connections this renegotiation might put an extra load on the server and this even can turn into server scaling issue on a high latency networks, because of the multiple client connects. Every new SSL renegotiation is about to assign new session ID and that could have a negative impact on overall performance and could eat you a lot of server memory.
To avoid this often it i suseful to use SSLRenegBufferSize directive which by default is set in Apache 2.2.X to 128 Kilobytes and for multiple connects it might be wise to raise this.

A mutual authentication that is done on a Public Server that is connected to the Internet without any DMZ might be quite dangerous thing as due to to the multiple renegotiations the server might end up easily a victim of Denial of Service (DOS) attack, by multiple connects to the server trying to consume all its memory …
Of course the security is not dependent on how you have done the initial solution design but also on how the Client software that is doing the mutual authentication is written to make the connections to the Web Server.


2. Configure a Mixture of One Way Standard (Basic) SSL Authentication together with Two Way Client Server Handshake SSL Authentication


Below example configuring is instructing Apache Webserver to listen for a mixture of One Way standard Client to browser authentication and once the client browser establishes the session it asks for renegotiation for every location under Main Root / to be be authenticated with a Mutual Two Way Handshake Authentication, then the received connection is proxied by the Reverse Proxy to the end host which is another proxy server listening on the same host on (127.0.0.1 or localhost) on port 8080.


<VirtualHost *:8001>
  ServerAdmin name@your-server.com
  SSLEngine on
  SSLCertificateFile /etc/ssl/server-cert.pem
  SSLCertificateKeyFile /etc/ssl/private/server-key.pem

  SSLVerifyClient require
  SSLVerifyDepth 10
  SSLCACertificateFile /home/etc/ssl/cacert.pem
  <location />
    Order allow,deny
    allow from all
    SSLRequire (%{SSL_CLIENT_S_DN_CN} eq "clientcn")
 </location>
  ProxyPass / http://127.0.0.1:8080/
  ProxyPassReverse / http://127.0.0.1:8080/
</VirtualHost>


3. So what other useful options do we have?


Keep Connections Alive

This is a good option but it may consume significant amount of memory. If Apache is using the prefork MPM (as many Webservers still do instead of Apache Threading), keeping all connections alive means multiple live processes. For example, if Apache has to support 1000 concurrent connections, each process consuming 2.7MB, an additional 2700MB should be considered. This may be of lesser significance when using other MPMs. This option will mitigate the problem but will still require SSL renegotiation when the SSL sessions will time out.

Another better approach in terms of security to the mixture of requirement for both One Side Basic SSL Authentication to a Webserver and Mutual Handshake SSL Auth is just to set different Virtualhosts one or more configuration to serve the One Way SSL authentication and others that are configured just to do the Mutual Two Way Handshake SSL to specified Locations.

4. So what if you need to set-up multiple Virtualhosts with SSL authentication on the Same IP address Apache (SNI) ?


For those who did not hear still since some time Apache Web Server has been rewritten to support SNI (Server Name Indication), SNI is really great feature as it can give to the webserver the ability to serve multiple one and two way handshake authentications on the same IP address. For those older people you might remember earlier before SNI was introduced, in order to support a VirtualHost with SSL encryption authentication the administrator had to configure a separate IP address for each SSL certificate on each different domian name.  

SNI feature can also be used here with both One Way standard Apache SSL auth or Two Way one the only downside of course is SNI could be a performance bottleneck if improperly scaled. Besides that some older browsers are not supporting SNI at all, so possibly for public services SNI is less recommended but it is better to keep-up to the good old way to have a separate IP address for each :443 set upped VirtualHost.
One more note to make here is SNI works by checking the Host Header send by the Client (browser) request
SSL with Virtual Hosts Using SNI.

SNI (Server Name Indication) is a cool feature. Basically it allows multiple virtual hosts with different configurations to listen to the same port. Each virtual host should specify a unique server name identification using the SeverName directive. When accepting connections, Apache will select a virtual host based on the host header that is part of the request (must be set on both HTTP and SSL levels). You can also set one of the virtual hosts as a default to serve clients that don’t support SNI. You should bear in mind that SNI has different support levels in Java. Java 1.7 was the first version to support SNI and therefore it should be a minimum requirement for Java clients.

5. Overall list of useful Options for Mutual Two Way And Basic SSL authentication
 

Once again the few SSL options for Apache Mutual Handhake Authentication

SSLVerifyClient -> to enable the two-way SSL authentication

SSLVerifyDepth -> to specify the depth of the check if the certificate has an approved CA

SSLCACertificateFile -> the public key that will be used to decrypt the data recieved

SSLRequire -> Allows only requests that satisfy the expression


Below is another real time example for a VirtualHost Apache configuration configured for a Two Way Handshake Mutual Authentication


For the standard One way Authentication you need the following Apache directives


SSLEngine on -> to enable the single way SSL authentication

SSLCertificateFile -> to specify the public certificate that the WebServer will show to the users

SSLCertificateKeyFIle -> to specify the private key that will be used to encrypt the data sent


6. Configuring Mutual Handshake SSL Authentication on Apache 2.4.x

Below guide is focusing on Apache HTTPD 2.2.x nomatter that it can easily be adopted to work on Apache HTTPD 2.4.x branch, if you're planning to do a 2 way handshake auth on 2.4.x I recommend you check SSL / TLS Apache 2.4.x Strong Encryption howto official Apache documentation page.

In meantime here is one working configuration for SSL Mutual Auth handshake for Apache 2.4.x:


<Directory /some-directory/location/html>
    RedirectMatch permanent ^/$ /auth/login.php
    Options -Indexes +FollowSymLinks

    # Anything which matches a Require rule will let us in

    # Make server ask for client certificate, but not insist on it
    SSLVerifyClient optional
    SSLVerifyDepth  2
    SSLOptions      +FakeBasicAuth +StrictRequire

    # Client with appropriate client certificate is OK
    <RequireAll>
        Require ssl-verify-client
        Require expr %{SSL_CLIENT_I_DN_O} eq "Company_O"
    </RequireAll>

    # Set up basic (username/password) authentication
    AuthType Basic
    AuthName "Password credentials"
    AuthBasicProvider file
    AuthUserFile /etc/apache2/htaccess/my.passwd

    # User which is acceptable to basic authentication is OK
    Require valid-user

    # Access from these addresses is OK
    Require ip 10.20.0.0/255.255.0.0
    Require ip 10.144.100
</Directory>

Finally to make the new configurations working depending you need to restart Apache Webserver depending on your GNU / Linux / BSD or Windows distro use the respective script to do it.

Enjoy!

rc.local missing in Debian 8 Jessie and Debian 9 Stretch and newer Ubuntu 16, Fedora, CentOS Linux – Why is /etc/rc.local not working and how to make it work again

Monday, September 11th, 2017

rc.local-not-working-solve-fix-linux-startup-with-rc.local-explained-how-to-make-rc.local-working-again-on-newer-linux-distributions

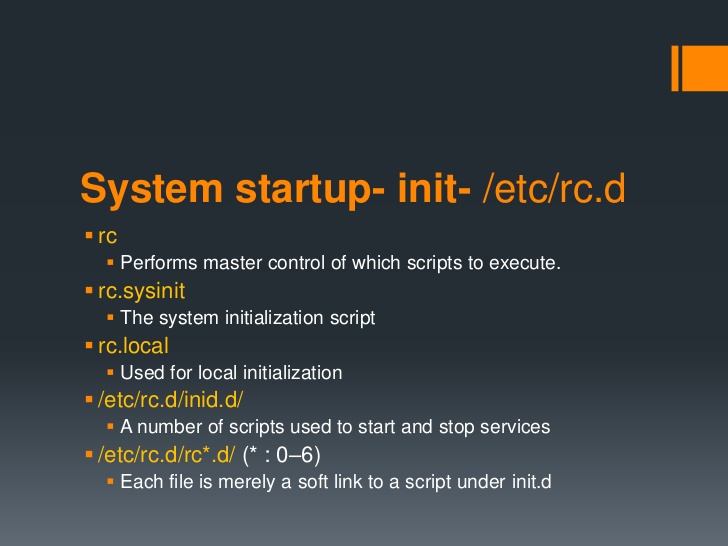
If you have installed a newer version of Debian GNU / Linux such as Debian Jessie or Debian  9 Stretch or Ubuntu 16 Xenial Xerus either on a server or on a personal Desktop laptop and you want tto execute a number of extra commands next to finalization of system boot just like we GNU / Linux users used to do already for the rest 25+ years you will be surprised that /etc/rc.local is no longer available (file is completely missing!!!).

This kind of behaviour (to avoid use of /etc/rc.local and make the file not present by default right after Linux OS install) was evident across many RedHack (Redhat) distributions such as Fedora and CentOS Linux for the last number of releases and the tendency was to also happen in Debian based distros too as it often does, however there was a possibility on this RPM based distros as well as rest of Linux distros to have the /etc/rc.local manually created to work around the missing file.

But NOoooo, the smart new generation GNU / Linux architects with large brains decided to completely wipe out the execution on Linux boot of /etc/rc.local from finalization stage, SMART isn't it??

For instance If you used to eat certain food for the last 25+ years and they suddenly prohibit you to eat it because they say this is not necessery anymore how would you feel?? Crazy isn't it??

Yes I understand the idea to wipe out /etc/rc.local did have a reason as the developers are striving to constanly improve the boot speed process (and the introduction of systemd (system and service manager) in Debian 8 Jessie over the past years did changed significantly on how Linux boots (earlier used SysV boot and LSB – linux standard based init scripts), but come on guys /etc/rc.local
doesn't stone the boot process with minutes, including it will add just 2, 3 seconds extra to boot runtime, so why on earth did you decided to remove it??

What I really loved about Linux through the years was the high level of consistency and inter-operatibility, most things worked just the same way across distributions and there was some logic upgrade, but lately this kind of behaviour is changing so in many of the new things in both GUI and text mode (console) way to interact with a GNU / Linux PC all becomes messy sadly …

So the smart guys who develop Gnu / Linux distros said its time to depreciate /etc/rc.local to prevent the user to be able to execute his set of finalization commands at the end of each booted multiuser runlevel.

The good news is you can bring back (resurrect) /etc/rc.local really easy:

To so, just execute the following either in Physical /dev/tty Console or in Gnome-Terminal (for GNOME users) or for KDE GUI environment users in KDE's terminal emulator konsole:


cat <<EOF >/etc/rc.local
#!/bin/sh -e
#
# rc.local
#
# This script is executed at the end of each multiuser runlevel.
# Make sure that the script will "exit 0" on success or any other
# value on error.
#
# In order to enable or disable this script just change the execution
# bits.
#
# By default this script does nothing.
exit 0
EOF
chmod +x /etc/rc.local
systemctl start rc-local
systemctl status rc-local


I think above is self-explanatory /etc/rc.local file is being created and then to enable it we run systemctl start rc-local and then to check the just run rc-local service status systemctl status

You will get an output similar to below:


root@jericho:/home/hipo# systemctl start rc-local
root@jericho:/home/hipo# systemctl status rc-local
● rc-local.service – /etc/rc.local Compatibility
   Loaded: loaded (/lib/systemd/system/rc-local.service; static; vendor preset:
  Drop-In: /lib/systemd/system/rc-local.service.d
           └─debian.conf
   Active: active (exited) since Mon 2017-09-11 13:15:35 EEST; 6s ago
  Process: 5008 ExecStart=/etc/rc.local start (code=exited, status=0/SUCCESS)
    Tasks: 0 (limit: 4915)
   CGroup: /system.slice/rc-local.service
sep 11 13:15:35 jericho systemd[1]: Starting /etc/rc.local Compatibility…
setp 11 13:15:35 jericho systemd[1]: Started /etc/rc.local Compatibility.

To test /etc/rc.local is working as expected you can add to print any string on boot, right before exit 0 command in /etc/rc.local

you can add for example:
 

echo "YES, /etc/rc.local IS NOW AGAIN WORKING JUST LIKE IN EARLIER LINUX DISTRIBUTIONS!!! HOORAY !!!!";


On CentOS 7 and Fedora 18 codename (Spherical Cow) or other RPM based Linux distro if /etc/rc.local is missing you can follow very similar procedures to have it enabled, make sure

/etc/rc.d/rc.local

is existing

and /etc/rc.local is properly symlined to /etc/rc.d/rc.local

Also don't forget to check whether /etc/rc.d/rc.local is set to be executable file with ls -al /etc/rc.d/rc.local

If it is not executable, make it be by running cmd:
 

chmod a+x /etc/rc.d/rc.local


If file /etc/rc.d/rc.local happens to be missing just create it with following content:


#!/bin/sh

# Your boot time rc.commands goes somewhere below and above before exit 0

exit 0


That's all folks rc.local not working is solved,
enjoy /etc/rc.local working again 🙂


Things to install on newly installed GNU / Linux (My favourite must have Linux text and GUI programs missing in fresh Linux installs)

Thursday, September 7th, 2017

must-have-packages-to-install-on-a-freshly-brand-new-linux-installed-on-desktop-computer-gnu-linux-logo

On every next computer I use as a Desktop or Laptop, I install with Debian GNU / Linux I install the following bunch of extra packages in order to turn the computer into a powerful Multimedia, User, Sys Admin army knife tools, A Programmer desktop and Hacker / Penetration Testing security auditting station.

The packages names might vary less or more across various Debian releases and should be similar or the same in Ubuntu / Linux Mint and the rest of Deb based distribtuions.

Also some of the package names might given in the article might change from time of writting this article just like some  already changed in time from a release to release, nomatter that the general list is a collection of packages I have enjoyed for the last 8 years. And I believe anyone who is new to GNU / Linux and  or even some experienced free software users in need of  full featured computer system for remote system administration purposes or general software development and even small entertainment such as Movie Watching or Playing some unsophisticated basic games to kill some time might benefit from the list of programs collected from my experience as a Free Software GNU / Linux users over the last 12 years or so.

So here we go as you might know, once you have a Debian GNU / Linux, first thing to do is to add some extra repositories in /etc/apt/sources.list

For example my debian 9 Stretch sources.list looks like this:

cp -rpf /etc/apt/sources.list /etc/apt/sources.list-bak

vim /etc/apt/sources.list

And delete / substitute everything within with something as following:

deb http://deb.debian.org/debian stretch main non-free
deb-src http://deb.debian.org/debian stretch main

deb http://deb.debian.org/debian stretch-updates main
deb-src http://deb.debian.org/debian stretch-updates main

deb http://security.debian.org/ stretch/updates main
deb-src http://security.debian.org/ stretch/updates main

deb http://security.debian.org/debian-security stretch/updates main contrib
deb-src http://security.debian.org/debian-security stretch/updates main contrib

deb http://download.virtualbox.org/virtualbox/debian stretch contrib

If you're using an older Debian release for example debian 7 or 8, the sources.list codename stretch word should be changed to wheezy for legacy debian 7 or jessie for debian 8, do it respectively for any future or older Deb releases.

Then proceed and update all current installed packages to their latest release with:

apt-get update && apt-get upgrade

If you're running on a very old Debian GNU / Linux release , you might encounter errors from above cmds, if that's your case just follow the online guides and update to a newer still supported Deb release.

Once all this is done assuming you have connected to the internet via LAN network or if on a laptop via Wireless, here are some useful stuff to install especially if you're planning to use your computer effectively in both console and graphics environment.


1. Install some basic packages necessery if you're planning to be using compilers on the freshly installed GNU / linux

apt-get install –yes gcc autoconf build-essential fakeroot devscripts equivs libncurses5-dev g++ make libc6-dev fontconfig gdc

The most notable package here is build-essential it provides the following collection of C / C++ programs on Deb package based distributions Debian / Ubuntu / Mint etc.
 

  1. libc6-dev – C standard library.
  2. gcc – C compiler.
  3. g++ – C++ compiler.
  4. make – GNU make utility to maintain groups of programs.
  5. dpkg-dev – Debian package development tools.

2. Install w3m lynx elinks text browsers

apt-get install –yes lynx elinks w3m-img w3m

3. Install wireless and networking tools
 

apt-get install  –yes tcpdump vnstat wpasupplicant wpagui dnsutils

4. Install Network sniffing, penetration testing and network evaluation tools
 

apt-get install  –yes wireshark nmap zenmap sniffit iptraf iptraf-ng tshark dsniff netsniff-ng netwox netwag sslsniff darkstat kismet netcat ngrep hashcat hydra hydra-gtk ophcrack ophcrack-cli

————–

wiresharkGUI network traffic analyzer

nmapnmap port mapper and security audit tool

zenmapGUI frontend to nmap

sniffitconsole text based basic packet sniffer and monitoring tool very used tool to sniff servers authenticatoins in the past

iptraf-ngNext Generation interactive colorful IP Lan mointor

tsharkanother network traffic analyzer console version

dsniffVarious tools to sniff network traffic for cleartext insecurities

netsniff-ngLinux network packet sniffer toolkit

netwoxProvides more than 200 tools to solve network problems with DNS, FTP, HTTP, IRC, NNTP, SMTP, SNMP, SYSLOG, TELNET, TFTP

netwaggraphical frontend to netwox

sslsniff SSL/TLS man-in-the-middle attack tool

darkstatnetwork traffic analyzer

kismetwireless sniffer and monitor (very useful in the past for sniffing passwords on a Wi-Fi network)

netcatTCP / IP swiss army knife (good tool to listen and connect to local and remote ports)

ngrepgrep like tool for network traffic

hashcatClaims to be world's fastest and most advanced password recovery utility, capable of attacking more than 160 highly optimized hashing algorithms, supports CPU and GPU (using the video card CPU to enhance password cracking speed), also could be used for distributed password cracking

hydra Very fast network logon cracker, supports webforms works with dictionary attacks etc.

hydra-gtkGTK GUI version of Hydra

ophcrackMicrosoft Windows password cracker using rainbow tables GUI

ophcrack-cli Console version of Microsoft Windows password cracker using rainbow tables for speed

————


5. Install multimedia, entertainment few useful tools and other useful stuff
 

apt-get install –yes workrave xscreensaver xscreensaver-data xulrunner xutils zenity yelp zgv   tracker-utils alltray ant apt-utils bsdutils  aumix bwidget ca-certificates pulseaudio-module-jack aumix audacious ffmpeg bluefish bluefish-plugins blender blueman bluez cabextract bluez-firmware bsdmainutils dcraw dmidecode evtest file fonts-liberation fonts-stix fonts-uralic fonts-opensymbol fonts-lyx fonts-cantarell fuse gimp gimp-data-extras gimp-plugin-registry git gnupg gnupg2 imagemagick imwheel inkscape iw less 


bsdutils – Provides some nice old school programs such as :

-=-=-=-=-=-

wall – a program to write to every logged in user console, used in old times on time sharing servers to notify all users about sys admin planning for a reboot or for some other update activity

renice – allows to renice priority over already prioritized process with (nice command)

script – Allows you to do a recorder like saves of user activity on a console / terminal

logger – send logging output from programs to syslog 

-=-=-=-=-=-

alltray – A small program that allows you to bring to dock any program useful to make Thunderbird appear in Gnome / Mate / KDE Dock in a similar manner as Outlook does in m$ Windows

zgv – SVGAlib graphical (picture viewer) useful to view pictures from tty consoles

zenity – allows to display graphical dialog boxes by using shell scripts

aumix – Simple text based mixer control, useful to tune up sound values and mic recording volume from console

WorkRave – is a useful program to periodically remind you to stand out of the computer on a specified interval and shows you graphically some exercies to do to prevent your physical health to not deteriorate by standing all day immobilized

Bluefish – Is Advanced GTK+ HTML Editor useful if you're about to edit HTML / CSS and other Web files

dcraw – Decode raw digital images

dmidecode – Text program that reports your computer hardware

blueman, bluez – Programs to enable USB support on your Linux

evtest – evtest is a utility to monitor Linux input devices

file – little tool to determine file type based on "magic numbes"

fontsliberation – Fonts with same metrics as Times, Arial and Courier


6. Install Text based console Multimedia Mp3 / Mod / S3m players

apt-get install –yes mpg321 mpg123 cmus mp3blaster mplayer sox  ogg123 mikmod cplay cdcd cdck eject

———

mpg321, mpg123 Mp3 and Ogg Vorbis console player historically one of the earliest I used to play my music

cmus Another awesome ncurses menu based small music player

mp3blaster Full Screen ncurses text console mp3 and Ogg vorbis music player

mplayer An awesome old school (the defacto standard) and still one of the best Music and Video player for GNU / Linux

sox Swiss army knife of sound processing, contains (sox, play, rec and soxi commands), which could be used to play, rec and add effects to WAV and other popular old sound formats

ogg123 Play Ogg Vorbis .OGG Free encoding file format in console

mikmodThe most famous Tracker (S3M, MOD, IT) music player for *NIX, play the old soundtracker formats on your GNU / Linux

cplay – A really nice text front end to music players, the cool thing about it it shows how much is left for the song to over using ASCII

cdcd – play Audio CDs from console

eject – eject your CD Drive from console

cdck – tool to verify the quality of written CDs/DVDs

———


7. Install Games

apt-get install –yes xpenguins frozen-bubble alex4 bsdgames bb ninvaders blobwars btanks chromium-bsu criticalmass figlet freetennis njam swell-foop dreamchess extremetuxracer gltron gnuchess wesnoth njam wing nikwi dreamchess gltron gnome-games swell-foop aisleriot prboom

———–

xpenguins – little penguins walk on your screen great to use as a screensaver

frozen-bubble – cool game with bubbles you have to pop out

blobwars – platform shooting game

njam – pacman like game with multiplayer support

extremetuxracer – 3D racing game featuring Tux the Linux penguin mascot

gltron – 3D remake of the good well known Tron Game

gnuchess – GNU remake of classic Chess game

wing – arcade Galaga like game for GNU / Linux

wesnoth – Fantasy turne based strategy game

dremachess – 3D chess game

swell-fool – Colored ball puzzle game

gnome-games – A collection of Games for the GNOME Desktop

nikwi – platform game with a goal to collect candies

aisleriot – GNOME solitaire card game 

prboom – PrBoom, a remake of the Doom 3d shooter classic game using SDL (supports OpenGL), to play it you will need WAD files if you don't have it install (doom-wad-shareware) package

figlet – Make large character ASCII banners out of ordinary provided text (just provide any text and get a nice ASCII picture out of it)

———-
 

8. Install basic archivers such as rar, zip, arj etc.

apt-get install –yes zip unrar arj cpio p7zip unzip bzip2 file-roller


———–

cpioGNU cpio, a program to manager archive files

bzip2BunZip2 block compressor decompressor utility (necessery to untar the .tar.bz2 tar balls)

unzipDe-archiver for .zip files console version

rar, unrarArchiver Unarchiver for .rar files in terminal / console (unfortunately non-free software)

file-rollerArchive manager for gnome

gpg – gnu privacy guard to be able to generate gpg keys

————-

If you're looking for an advanced file archive, dearchive software GUI that be a substitute for Windows WinRar,  WinZip there is also the proprietary software PeaZip for Linux, as I stay as much as possible away from non-free software I don't use PeaZip though. For me file-roller's default GNOME archiver / unarchiver does a pretty good job and if it fails someties I use the console versions of above programs
 

9. Install text and speech synthesizer festival freetts
 

apt-get install –yes festival festival-cmu festvox-kallpc16k festvox-ru mbrola-en1 speech-dispatcher-festival freetts flite yasr gnupg2

————-

FestivalIs the general multi-lingual speech synthesis system

yasris a basic console screen reader program

flitea small run time speech synthesis engine alternative to festival, another free software synthesis tool based built using FestVox

————–

Festival is great if you want to listen to text files and can easily be used to convert basic PDFs or DOC files to listen them if you're lazy to read I've explained on how you can use festival to read speak for you PDFs and DOCs, ODF (Open Document Format) here
 

10. Install linux-header files for latest installed Debian kernel

apt-get install –yes linux-headers-$(uname -r)

You will need that package if you need to compile external usually DRM (Digital Rights Management)  external modules that could be loaded to current Debian precompiled kernel, I recommend you abstain from it since most of the modules are DRMed and doesn't respect your freedom.
 

11. Install GUI programs and browsers

apt-get install –yes gnome-themes-standard gnome-themes-standard-data epiphany-browser dconf-tools gnome-tweak-tool

epiphany-browserIntuitive GNOME web browser (I love this browser, though sometimes Crashing I prefer to use it as it is really fast and lightweight I think Mac OS's Safari has been partially based on its programming code)

dconf-tools Dconf is a low-level key / value database designed for storing desktop environment variables (provides dconf-editor – which allows you to tune tons of gnome settings tunable only through this database it is something like Windows regedit registry editor tool but for GNOME)

gnome-themes-standard / gnome-themes-standard-data The name says it all it provides beautiful gnome standard themes

gnome-tweak-tool Graphic tool to adjust many advanced configuration settings in GNOME in GNOME 3.2, many of the old GNOME 3.0 and 2.X capabilities such as Desktop icons or Computer on the Desktop and many more useful gnome capabilities you might be used for historically can be enabled through that handy tool, it is a must for the GNOME user

12. Install text and GUI mail clients

apt-get install –yes mutt fetchmail bsd-mailx mailutils thunderbird aspell-bg aspell-en aspell-ru

I use primary 3 languages Russian, Bulgarian and English, so by installing the 3 packages aspell-bg, aspell-en, aspell-ru, that would add a possiility for Thunderbird and LibreOffice to have ability to spell check your mails and ODF documents, if your native language is different or you speak different languages do run:
 

apt-cache search aspell 


And install whatever languages spell check support you need


13. Install filesystem mount, check and repair tools
 

apt-get install –yes ntfs-3g sshfs dosfstools ext3grep  e2fsprogs e2fsck-static growisofs  e2undel extundelete recover bleachbit


———–

ntfs-3g – read / write NTFS driver support for FUSE (Filesystem in UserSpace) or in other words install these to be able to mount in read/write mode NTFS filesystems

sshfs – filesystem client based on SSH File Transfer Protocol, that little nitty tool enables you to mount remotely SSH Filesystems to your local Linux Desktop, it is also useful to install across servers if you need to remotely mount SSH Filesystems

e2fsprogs ext2 / ext3 / ext4 filesystem utilities to check, fix, tune, defragment resize and create etc. new filesystems  (provides crucial commands such as fsck.ext2, fsck.ext3, fsck.ext4, e2label, lsattr, chattr, resize2fs, mkfs.ext2, mkfs.ext3, mkfs.ext4 …)

dosfstoolstool giving you ability to check, create and diagnose DOS and Windows FAT 32 Filesystems provides commands such as dosfsck, mkdosfs, dosfslabel, fsck.msdos, fsck.vfat, mkfs.msdos

growisofs DVD+ RW / Read Only Recorder

ext3greptool to help recover deleted files on ext3 filesystems

e2undel Undelete utility for ext2 filesystems
———–

14. Install emulators for PC OS Emuation (Qemu), DOS and Wine to run native Windows programs on GNU / Linux
 

apt-get install –yes qemu qemu-utils aqemu dosbox mame mame-extra os8 simh wine nestopia dgen


—————-

QemuVirtual Machine emulator with support UEFI firmware

Aqemu – Qemu QT VM GUI Frotend

Dosbox – Dos Emulator, great to have to play the good old DOS games on your GNU / Linux

Mame – Multiple Arcade Machine Emulator, great if you want to play the old arcade games of your youth such as The Punisher, Cadillacs and Dinosaurs, Captain America, Robocop, Captain Commando, Wonderboy and so on the list goes on and on …

simh – PDP-1 PDP-4 PDP-7, PDP-9, PDP-10, PDP-11, PDP-15 HP 2100, IBM System 3, IBM 1620, Interdata, SDS, LGP-21, LGP-30, DEC VaX emulator

nestopia Nintendo Entertainment System / Famicom Emulator

dgen – Sega MegaDrive GNU / Linux Emulator

—————


15. Install Network Time protocol daemon and ntpdate (time synchronizing text client)

apt-get install –yes ntpdate ntp

16. Install Djview and CHM books reader

apt-get install –yes djview djview4 djvulibre-bin xchm kchmviewer chm2pdf

Install this packages to be able read DjView and CHM book formats

17. Install other text stuff

# Install text calculator I always prefer and use this console tool instead of the GUI gnome-calculator

apt-get install –yes bc

18. Install printing CUPs and printing utilities

apt-get install –yes cups-client cups-daemon cups-server-common hplip hplip-data printer-driver-hpcups printer-driver-hpijs ghostscript 

A bunch of packages for your Linux Deskto po properly support printing, you might need to install some extra packages depending on the type of printer you need to use, perhaps you will have to take few minutes probably to configure CUPs.

19. Install text monitoring tools

apt-get install –yes htop atop  dnstop  iftop iotop  jnettop ntopng  pktstat  powertop  sntop mariadb-client  iotop  itop jnettop kerneltop logtop
pgtop powertop


—————–

htop – More interactive colorful process viewer similar to top

atop – Monitor for system resources and process activity

dnstop – Console tool for analyze DNS traffic

iftop displays bandwidth usage information on a chosen network interface

iotopsimple top-like I/O (I / O) information output by the Linux kernel

jnettopView hosts / ports taking up the most network traffic

ntopng High-Speed Web-based Traffic analysis and Flow Collection tool

pktstat top like utility for network connections usage

powertop tool to diagnose issues with power consumption and management (useful for Linux running laptops)

sntop A ncurses-based utility that polls hosts to determine connectivity

mariadb-clientthis is the new name for the old mytop / mtop MySQL top package

kerneltop shows Linux kernel usage in a style like top

pgtop Show PostgreSQL queries in a top like style

lograte real time log line rate analyzer

—————-

20. Install text command line tools for transferring data from Web sites and FTP

apt-get install –yes curl wget lftp filezilla gftp transmission linuxdcpp

———-
curl command line tool for transferring data with URL syntax

wget tool to retrvie files and html from the web

lftp sophisticated command-line FTP/HTTP/BitTorrent client program

filezilla Full-featured graphical FTP/FTPS/SFTP client

gftp X/GTK+ and console FTP client

transmission lightweight Bittorrent client

linuxdcpp – Port of the Windows file-sharing program DC++

———–

21. Install text based communication programs

apt-get install –yes irssi freetalk centerim finch

———-

Irssi Great console IRC chat client with support for encryption

FreeTalk console based jabber client

centerim Console based ICQ client

finch – Multi protocol Text console client for AIM/ICQ, Yahoo!, MSN, IRC, Jabber / XMPP / Google Talk Sametime, MySpaceIM, Napster, Zephyr, Gadu-Gadu, Bonjour, GroupWise

———-

22. Install Apache Webserver and MySQL

This two are necessery if you're about to use your computer as a PHP / MySQL develment station

apt-get install –yes mysql-server phpmyadmin apache2 libapache2-mod-php php-pear php php-mysql  ant ant-contrib apache2-dev apache2-ssl-dev

———-

mysql-server MySQL community edition

ant Java based build tool like make (necessery for building many third party apache modules and code)

libapache2-mod-php5the php module loaded into apache

phpmyadminWebtool admin to manage your MySQL database

——–

23. Install mouse support for consoles

apt-get install –yes gpm


———–

gpm is the general purpose mouse interface, if you want to have support for your mouse in TTY consoles (the ones you go to with CTRL + ALT + F2, CTRL + ALT + F3 and so on install it).

———–

24. Install various formats converter tools

apt-get install –yes html2text pdf2djvu unoconv oggconvert webkit2pdf img2pdf gsscan2pdf netpbm dir2ogg soundconverter


————

gsscan2pdfGUI program to produce PDF or DJVU from scanned documents

img2pdfLossless conversion of raster images to PDF

webkit2pdfexport web pages to PDF files or printer

html2textAdvanced HTML to text converter

oggcconvert – convert media files to free format 

netpbmGraphics conversion tools between image formats

dir2ogg – converts MP3, M4A, WMA, FLAC, WAV files and Audio CDs to the open-source OGG format.

soundconverter – GNOME application to convert audio files into other formats

————

There are probably a lot of more handy packages that other Free Software users like to install to make the GNU / Linux desktop notebook even more entertaining and fulfillful for daily work. If you can think of other useful packages not mentioned here you tend to use on a daily basis no matter where Debian based or other distro, please share that would help me too to learn a new thing and I'll be greateful.

Enjoy !

UPDATE: If you get errors with missing packages, just delete them out of the apt-get lines. The reason is some packages are beying removed from .deb repositories or the software package name has changed due to some reason.
 

Znachar ( Quack ) a great must watch old school soviet times Polish classic movie worhty to see

Tuesday, September 5th, 2017

znachor-znachar-movie-a-great-must-watch-old-school-soviet-times-polish-movie

My wife recently recommended a fantastic old times movie from the distant 1981 called Znachar (translated in English as Quack).
The movie is directed by Polish director called Jerzy Goffman though made in 1982 the movie premierre happened in 1982, the story plot behind the movie is based on a book from polish writer and journalist Tadeusz Dołęga Mostowicz novel Znachor.

The movie is actually a remake of older movie called under the same name Знахарь (a naturally divine gifted herbal medicine doctor).

Movie Plot

The story goes in the middle of first and second World Wars with main actor being a famous surgeon a professor in medicine Rafal Vilchur.
When back from a hard surgery operation in his county house just about to great his wife with a big bucket of flowers he finds out he is abandoned by his life, reading a letter in which she says she leaves him because she fall in love with another man, his wife takes his daughter with him and as a result of the shocking event the surgeon walks the streets hopeless still uncapable of realizing and properly evaluating his tragedy, he meets a beggar to whom he gives a lot of money and the beggar brings him in a pub and they do a heavily drinking together as a way to forget his great misfortune.

Being deadly drunk he walks out and a gang of drunkards seeing him paying with a big bucks and finding out his richness, they put him in a carret and smuggle all his money throughing him out of the city after robbing him to the last penny.
Being throughn of the carret the professor hurts his head and loses his memory, and once he wakes up and finds himself in the middle of nowhere he realizes he did not remember anything including who is he. As the robbers steal all his money and documents and he is out of the town with no ability to remember he wonders in villages and seeks to find any kind of job that can win him his daily bread.

He lived in that noman manner a couple of years and the police has catched him trying to figure out who is he but failed to identify him and even put him in jail for few weeks on the occasion he is living illegal with on identity.

Having the experience of a kind of hermit life in the woods, in one of his next catch ups by police and their rude way to try to identify him he is able to steal a documents laying on the police table that belonged to an already dead person called Anthony Kosiby and from that moment on he starts identifying under Anthony Kosibiy's name.

Even though Anthony did not remember his real identity he feels his ability to help sick people.
He starts working in another village he wanders to in a family of a small wheat orthodox christian producer called Prokop.
The only left living son of Prokop Vasiliy is since a couple of months has become a disabled due to accident and the failure of the uncaring local doctor Pavlickogo who has improperly joined his leg bones, after Vasiliy's broke his legs.

Anthony has realized the doctors failure as he still holds his subconcsious ability for surgeon and a professor. Kasiba convinces Anthony's father to agree on a improvised operation with another breaking of legs. As Vasiliy's legs gets healed, rumors all around the village spread about the natural healer and self learned doctor. 

As a mean to payback Prokop wants to reply a huge sum of gold money to Kasiba but as Casiba is already unattached to money and he only needs a play to work and stay he asks his master Prokop to keep him in his home as a part of family to whose offer Prokop happily agrees.

A mobs of sick people start coming to the newly found herbalist and a "witch doctor" for healing and all finds confort and healing this makes the quack even more famous and known all around the region.

Nearby in the village there is a small grocery store where Kasiba buys the basic goods necessery for his healing and improvised operations.
Kasiba finds himself attacted with unexplained symphathy to the young orphanned sells lady named Marusya. Marusya's beauty impresses all the young villages. In one of his visits Kasiba hears from Marusya a known melody he heard but he can't recall where he heard it but it deeply affects his soul and slowly this songs starts cherishing some memories.

The local village and nearby region state doctor Pavlickij happens to meet Anthony and because of jealousy for Anthony's success he makes prank and threatens him to expose his fraudulent medicine practices believing truly that Anthony is one of those self proclaimed doctors earlier prohibited by Polish government for the many harm these which doctors did to conventional medicine. Pavlickijy requires Anthony to immediately cancels his medicine practices or otherwise he will be exposed to police authorities.

Anthony uncareful about the prisoning threatens replies the doctor with words such as "People live in priso too". But even as the talk between two goes Vasiliy the healed lepper boy from Anthony the ex-disabled comes along and shows in front of Pavlickijy walking and even dancing and the doctor cancels his bullying instantly telling how Anthony managed to heal him.

In mean time Marusya the grocery store sells lady is being visited by a local royal count young person who falls in love with her and gives his best to attract Marusya, another local waiter guy is also in love with Marusya and a hidden competion emerges between the two.

Marusya is doubtful about the love relatio with the royal count named Leshek Chinsky. Chinsky is dressed impressingly has a good manners and all in village is amazed with his strange affair with the village orphan Marusya.

Chinsky fells in love so strongly that he makes even an offer to Marusya to which of course Marusya is doubtful. The family of count Chinsky is against the relation and does its best to cancel the untrustful and unequal relations between his royal song and the village girl.

In mean time the waiter guy named Zanek who is also after Marusya and wants her hand. Marusya dates Zanek 2 times and partly she things this relation could end up even with a marriage but her heart is still with the county.

Because the the improsed shop datings between count Chinsky and Marusya are continuing publicly among his friends Zanek led by his envy for not having Marusya's heart publicly insults her and accuses her of her secret sexual relation with the count as Chinsky becomes accidently witness of the mockery he stands on Marusya's side and rejects the badfull lies of Zanek ending up beating him publicly because of his blatant and improer behavior and shortly after he makes official marriage offer to Marusya in the small grocery store.
The two them ride on Chinsky's motorcycle (noone in village has a motorcycle as all are poor), as they ride near a small lake and share their feelings for each other Zanek is drunk and in want for revenge, so he puts a chunk of tree on a bridge hoping to kill Chinsky. 

For his amusement and misfortune Chinsky is riding with Marusya on the back of the cycle and because of the three both fall in a crash and both are in a state near death.

Zanek understanding his fault and scared for his soul being endangered to have been worthy for eternal hell because of the killing quickly takes the two injured and unconscious lovers to the quack Anthony as a last hope for help.

Anthony seeing the two patients and understanding his ability to fully manage the dying persons and scared about possibility to be responsible for the death of the lovers quickly calls for a conventional doctor for help.
Doctor Pavlickij comes but again consumed for his arrogance and the unequal state in society of the two gives his best to heal Chinsky and is not too willful to heal the poor village girl Marusya.

In the mean time Anthony manage to help the count and for the luck of the count his state is much better and he is about to recover, where on the countrary Marusya is in a state of dying with a bone being stuck in her brain.

Anthony asks the doctor for an a help and all Pavlickij does is to give her a heart support injection and he leaves.
Anthony seeing the surgeon instruments in Pavlickij and with no hope for a surgery intervention from the coventional doctor, remembers his professor surgeon skills and decides steals the doctors instruments and makes a perfect operation removing the bone out of the brain of the young lady.

In morning the operation makes clear it is perfectly made and the Marusya comes to a conscious perfectly normal in mind. As she is now jobless for leaving the shop for her offer for marriage she stays to live with Propop's family.

Soon Pavlickij finds out his surgeon instruments are gone and comes hearing about the successful operation to Marusya suspects about the steal by Anthony and comes with a police.
The quack is an honest man so he confesses about the steal but he explains the steal with the need for the immediate operation.

The police catch the stealer and there is a quick court session to whom he is judged to stay 3 years in prison.
In mean time count Chinsky managed to recover completely being sent in Switzerland and is travelling back with train back to Poland hopeless because told by his family that Marusya is dead and convinced that life is meaningless without the love of Marusya. The count decides for a love suicide and writes a suicide letter to his family asking one of the servents to hand it in to his family and preparing to kill himself with a gun.

By the providence he leads a small talk with the servent person by whom he finds out that Marusya did not die but live in Prokops family.

Being shocked he takes a carret going out of the train and hurries to Prokops family with a large bucket of roses.

The two lovers bind together and they soon marry. As a way to thank Anthony Cassiba, count Chinsky and his family (which finds out about the suicidal intentions of their son and finally agree for the marriage), hire a bunch of experts to inspect the professional surgeon lead by Anthony and to defend him in court once again trying to release him.

Again by providence the expert which does evaluated Anthony's operation who has to confirm the success of the operation over Marusya, happens to be one one of professor Rafal Vilchur (now living under the namy of Anthony) and in the middle of trial he hears by Marusya's testimony the family name of Marusya which is also Vilchur.

At that moment the surgeon expert and ex-colleague recognizes his missing for 15+ years professor  and colleague Rafal and identifies him. professor Rafal Vilchur finds out the young lady he just operated is his lost daughter and he is crying out of joy.

The movie is a touching one and shows a lot of how people used to live in the age before technology and electricity took over human life.
It has a deep meaning and a charge of good and the happy end in the movie makes it so different from a lot of the modern especially American movies, which nowadays end up with a messy and unclear ends without any moral to get out of it.


Watch the 2 series movie below and enjoy I promise you will not regret you watch it I promise ! 🙂


Here is a link to Quack in IMDB the IMDB movie rating is quite high 7.9.

Find all running hosts, used IPs and ports on your local wireless / ethernet network or how to do a basic network security audit with nmap

Monday, September 4th, 2017

Find all running hosts / used IPs on your local wireless or ethernet network

nmap-scn-local-network-find-all-running-hosts-used-IPs-on-your-wireless-ethernet-network

If you're using a Free Software OS such as GNU / Linux or some other proprietary OS such as Mac OS X or Windows and you need a quick way to check all running IPs hosts / nodes locally on your current connected Ethernet or Wireless network, here is how to do it with nmap (Network exploration and security tool port scanner).

So why would you do scan that? 

Well just for fun, out of curiousity or just because you want to inspect your local network whether someone unexpected cracker did not break and is not using your Wi-Fi or Ethernet local network and badly snoring your network listening for passwords.

Before you start you should have installed NMAP network scanner on your GNU / Linux, to do so on 

Redhat Based Linux (Fedora / CentOS / Redhat Enterprise RHEL):


yum -y install nmap


On Deb based GNU / Linux-es such as Ubuntu / Mint / Debian etc.


apt-get install –yes nmap


To install nmap on FreeBSD / NetBSD / OpenBSD OS issue from console or terminal:


cd /usr/ports/security/nmap
make install clean 


or if you prefer to install it from latest binary instead of compiling


pkg_add -vr nmap


On a proprietary Mac OS X (I don't recommend you to use this obnoxious OS which is designed as a proprpietary software to steal your freedom and control you, but anyways for Mac OS victims), you can do it to with Macs equivalent tool of apt-get / yum called homebrew:

Open Mac OS X terminal and to install homebrew run:


ruby -e "$(curl -fsSL https://raw.githubusercontent.com/Homebrew/install/master/install)"
brew install nmap
brew search nmap
brew info nmap


If you want to do it system wide become root (super user) from Mac terminal with


su root


and run above commands as administrator user.

Windows users might take a look at Nmap for Windows or use the M$ Windows native portqry command line port scanner

Test whether nmap is properly installed and ready to use with command:


nmap –help
Nmap 6.00 ( http://nmap.org )
Usage: nmap [Scan Type(s)] [Options] {target specification}
TARGET SPECIFICATION:
  Can pass hostnames, IP addresses, networks, etc.
  Ex: scanme.nmap.org, microsoft.com/24, 192.168.0.1; 10.0.0-255.1-254
  -iL <inputfilename>: Input from list of hosts/networks
  -iR <num hosts>: Choose random targets
  –exclude <host1[,host2][,host3],…>: Exclude hosts/networks
  –excludefile <exclude_file>: Exclude list from file
HOST DISCOVERY:
  -sL: List Scan – simply list targets to scan
  -sn: Ping Scan – disable port scan
  -Pn: Treat all hosts as online — skip host discovery
  -PS/PA/PU/PY[portlist]: TCP SYN/ACK, UDP or SCTP discovery to given ports
  -PE/PP/PM: ICMP echo, timestamp, and netmask request discovery probes
  -PO[protocol list]: IP Protocol Ping
  -n/-R: Never do DNS resolution/Always resolve [default: sometimes]
  –dns-servers <serv1[,serv2],…>: Specify custom DNS servers
  –system-dns: Use OS's DNS resolver
  –traceroute: Trace hop path to each host
SCAN TECHNIQUES:
  -sS/sT/sA/sW/sM: TCP SYN/Connect()/ACK/Window/Maimon scans
  -sU: UDP Scan
  -sN/sF/sX: TCP Null, FIN, and Xmas scans
  –scanflags <flags>: Customize TCP scan flags
  -sI <zombie host[:probeport]>: Idle scan
  -sY/sZ: SCTP INIT/COOKIE-ECHO scans
  -sO: IP protocol scan
  -b <FTP relay host>: FTP bounce scan
PORT SPECIFICATION AND SCAN ORDER:
  -p <port ranges>: Only scan specified ports
    Ex: -p22; -p1-65535; -p U:53,111,137,T:21-25,80,139,8080,S:9
  -F: Fast mode – Scan fewer ports than the default scan
  -r: Scan ports consecutively – don't randomize
  –top-ports <number>: Scan <number> most common ports
  –port-ratio <ratio>: Scan ports more common than <ratio>
SERVICE/VERSION DETECTION:
  -sV: Probe open ports to determine service/version info
  –version-intensity <level>: Set from 0 (light) to 9 (try all probes)
  –version-light: Limit to most likely probes (intensity 2)
  –version-all: Try every single probe (intensity 9)
  –version-trace: Show detailed version scan activity (for debugging)
SCRIPT SCAN:
  -sC: equivalent to –script=default
  –script=<Lua scripts>: <Lua scripts> is a comma separated list of 
           directories, script-files or script-categories
  –script-args=<n1=v1,[n2=v2,…]>: provide arguments to scripts
  –script-args-file=filename: provide NSE script args in a file
  –script-trace: Show all data sent and received
  –script-updatedb: Update the script database.
  –script-help=<Lua scripts>: Show help about scripts.
           <Lua scripts> is a comma separted list of script-files or
           script-categories.
OS DETECTION:
  -O: Enable OS detection
  –osscan-limit: Limit OS detection to promising targets
  –osscan-guess: Guess OS more aggressively
TIMING AND PERFORMANCE:
  Options which take <time> are in seconds, or append 'ms' (milliseconds),
  's' (seconds), 'm' (minutes), or 'h' (hours) to the value (e.g. 30m).
  -T<0-5>: Set timing template (higher is faster)
  –min-hostgroup/max-hostgroup <size>: Parallel host scan group sizes
  –min-parallelism/max-parallelism <numprobes>: Probe parallelization
  –min-rtt-timeout/max-rtt-timeout/initial-rtt-timeout <time>: Specifies
      probe round trip time.
  –max-retries <tries>: Caps number of port scan probe retransmissions.
  –host-timeout <time>: Give up on target after this long
  –scan-delay/–max-scan-delay <time>: Adjust delay between probes
  –min-rate <number>: Send packets no slower than <number> per second
  –max-rate <number>: Send packets no faster than <number> per second
FIREWALL/IDS EVASION AND SPOOFING:
  -f; –mtu <val>: fragment packets (optionally w/given MTU)
  -D <decoy1,decoy2[,ME],…>: Cloak a scan with decoys
  -S <IP_Address>: Spoof source address
  -e <iface>: Use specified interface
  -g/–source-port <portnum>: Use given port number
  –data-length <num>: Append random data to sent packets
  –ip-options <options>: Send packets with specified ip options
  –ttl <val>: Set IP time-to-live field
  –spoof-mac <mac address/prefix/vendor name>: Spoof your MAC address
  –badsum: Send packets with a bogus TCP/UDP/SCTP checksum
OUTPUT:
  -oN/-oX/-oS/-oG <file>: Output scan in normal, XML, s|<rIpt kIddi3,
     and Grepable format, respectively, to the given filename.
  -oA <basename>: Output in the three major formats at once
  -v: Increase verbosity level (use -vv or more for greater effect)
  -d: Increase debugging level (use -dd or more for greater effect)
  –reason: Display the reason a port is in a particular state
  –open: Only show open (or possibly open) ports
  –packet-trace: Show all packets sent and received
  –iflist: Print host interfaces and routes (for debugging)
  –log-errors: Log errors/warnings to the normal-format output file
  –append-output: Append to rather than clobber specified output files
  –resume <filename>: Resume an aborted scan
  –stylesheet <path/URL>: XSL stylesheet to transform XML output to HTML
  –webxml: Reference stylesheet from Nmap.Org for more portable XML
  –no-stylesheet: Prevent associating of XSL stylesheet w/XML output
MISC:
  -6: Enable IPv6 scanning
  -A: Enable OS detection, version detection, script scanning, and traceroute
  –datadir <dirname>: Specify custom Nmap data file location
  –send-eth/–send-ip: Send using raw ethernet frames or IP packets
  –privileged: Assume that the user is fully privileged
  –unprivileged: Assume the user lacks raw socket privileges
  -V: Print version number
  -h: Print this help summary page.
EXAMPLES:
  nmap -v -A scanme.nmap.org
  nmap -v -sn 192.168.0.0/16 10.0.0.0/8
  nmap -v -iR 10000 -Pn -p 80
SEE THE MAN PAGE (http://nmap.org/book/man.html) FOR MORE OPTIONS AND EXAMPLES


Most local router local networks are running under an IP range of 192.168.0.1/24 (192.168.0.1.254) or 192.168.1.1/24 or at some weird occasions depending on how the router is configured it might be something like 192.168.10.0/24 to be sure on what kind of network your computer is configured, you can check with ifconfig command, what kind of network IP has the router assigned to your computer, here is output from my Debian GNU / Linux /sbin/ifconfig


 hipo@noah:~$ /sbin/ifconfig 
lo        Link encap:Local Loopback  
          inet addr:127.0.0.1  Mask:255.0.0.0
          inet6 addr: ::1/128 Scope:Host
          UP LOOPBACK RUNNING  MTU:16436  Metric:1
          RX packets:336 errors:0 dropped:0 overruns:0 frame:0
          TX packets:336 errors:0 dropped:0 overruns:0 carrier:0
          collisions:0 txqueuelen:0 
          RX bytes:26656 (26.0 KiB)  TX bytes:26656 (26.0 KiB)


wlan0     Link encap:Ethernet  HWaddr 00:1c:bf:bd:27:59  
          inet addr:192.168.0.103  Bcast:192.168.0.255  Mask:255.255.255.0
          inet6 addr: fe80::21c:bfff:ffbd:2759/64 Scope:Link
          UP BROADCAST RUNNING MULTICAST  MTU:1500  Metric:1
          RX packets:112836 errors:0 dropped:0 overruns:0 frame:0
          TX packets:55363 errors:0 dropped:0 overruns:0 carrier:0
          collisions:0 txqueuelen:1000 
          RX bytes:141318655 (134.7 MiB)  TX bytes:7391330 (7.0 MiB)


As evident from above output my router assigns IPs via DHCP once authenticated into the Wi-Fi router under standard IP range of 192.168.0.0/24

So under this IP range case, to inspect my small local networkconnected computer I had to run from gnome-terminal or under a /dev/ttyX virtual console:


hipo@noah:~$ nmap -sn 192.168.0.0/24

Starting Nmap 6.00 ( http://nmap.org ) at 2017-09-04 12:45 EEST
Nmap scan report for pcfreak (192.168.0.1)
Host is up (0.011s latency).
Nmap scan report for 192.168.0.103
Host is up (0.00011s latency).
Nmap done: 256 IP addresses (2 hosts up) scanned in 2.53 seconds


-sn argument instructs nmap to do the so called ping scan, e.g. not to do a port s
can after host discovery but just print available hosts that are responding

Some bigger corporate networks are configured to run a couple of local networks simultaneously such as 192.168.168.0.0/24, 192.168.1.0/24, 192.168.2.0/24 etc.

So if that's the case you can add more virtual IPs to your ifconfig after becoming root super user with:


hipo@noah:~$ su root 
Password: 
root@noah:/home/hipo# 


And then run:


/sbin/ifconfig wlan0:0 192.168.1.110 netmask 255.255.255.0
/sbin/ifconfig wlan0:1 192.168.2.110 netmask 255.255.255.0


etc.

Note that here I purposefully choose .110 IP because often the 192.168.1.1 is an IP assigned to the router and that might cause some IP conflicts and trigger alarms in the router security which I want to avoid.

To check just added extra Virtual IPs on wlan0 wireless interface (note that depending on your Wi-Fi card and your driver this interface might come under a different name on your computer):


root@noah# /sbin/ifconfig |grep -i wlan0 -A 1
wlan0     Link encap:Ethernet  HWaddr 00:1c:bf:bd:25:59  
          inet addr:192.168.0.103  Bcast:192.168.0.255  Mask:255.255.255.0

wlan0:0   Link encap:Ethernet  HWaddr 00:1c:bf:bd:25:59  
          inet addr:192.168.1.110  Bcast:192.168.1.255  Mask:255.255.255.0

wlan0:1   Link encap:Ethernet  HWaddr 00:1c:bf:bd:27:59  
          inet addr:192.168.2.110  Bcast:192.168.2.255  Mask:255.255.255.0


If you're scanning not on your own network but on a public connected network you might prefer to not use the ping scan as this might identify you in router's firewall as possible intruder and could cause you headaches, besides that some network connected nodes are connected to not respond on a ping scan (some networks purposefully disable pings at all) to avoid possibility of the so called ping flood that might overload a router buffer or bring down hosts on the network beinf flooded.

If you have doubts that a network has ping disabled and it shows no result you can give a try to the so called SYN / FIN Stealth packet scan with added requirement to scan for UDP open ports (-sS) argument


root@noah:/~# nmap -sS -sU -sT 192.168.0.1-255

Starting Nmap 6.00 ( http://nmap.org ) at 2017-09-04 13:31 EEST
Nmap scan report for pcfreak (192.168.0.1)
Host is up (0.012s latency).
Not shown: 998 closed ports
PORT     STATE SERVICE
80/tcp   open  http
1900/tcp open  upnp
MAC Address: 10:FE:ED:43:CF:0E (Unknown)

Nmap scan report for 192.168.0.100
Host is up (0.0036s latency).
Not shown: 998 closed ports
PORT      STATE SERVICE
625/tcp   open  apple-xsrvr-admin
49153/tcp open  unknown
MAC Address: 84:38:35:5F:28:75 (Unknown)

Nmap scan report for 192.168.0.103
Host is up (0.000012s latency).
Not shown: 999 closed ports
PORT   STATE SERVICE
22/tcp open  ssh


You might also like to add some verbosy (that would generate a lot of output so be careful):

In case if above scan fails due to firewalls and you have a ping scan disabled on the network too you might also try out the so called nmap connect TCP connect scan (-sT), that would avoid the SYN scan. The -sT is useful also if you're not possessing root superprivileges on nmap running host.


nmap -sS -sU 192.168.0.1-255


Note that connect scan could take ages as nmap tries to connect every port from default port scanned ranged on remote found hosts that are reporting as up and running.

If the shown results lead you find some unknown computer / tablet / mobile / phone device connected to your network, then connect to your router and thoroughfully inspect the traffic flowing through it, if you find intruder cut him off and change immediately your router passwords and monitor your network periodically to make sure the unwanted guest did not go back in future.

There is much more you can do with nmap so if you have some extra time and interest into penetration testing I recommend you check out Nmap Book (The Official Nmap project guide to Network Discovery and Security Scanning)

Howto configure Qmail Mail server to Listen on port 587 for SMTP with STARTTLS

Saturday, September 2nd, 2017

qMail_configure_tls-secure-listener-587-on-server-logo_large_01
If you followed Qmailrocks or the updated QmailThibs Qmailrocks tutorial you have configured Qmail Mail SMTP server to listen by default for encrypted SSL connections on port 465. However many Mail for POP3 Secure  / Imapd Secure Clients are doing auto configuration and many prefers to have the 587 port configured too to accept Secure SMTP connections with STARTTLS support and not 465 Secure Connections with SSL certificate. 

So the logical queston comes how to configure 587 port to listen for STARTTLS connections? 

In below article I'll show you how you can configure Qmail to also have a listener on TCP port 587.

Perhaps there are numerous ways to configure Qmail Mail to listen on 587 (assuming it is already configured to properly accept mail on SMTP port 25) and a properly configure IMAP Secure and POP Secure in order for Thunderbird and Outlook desktop mail clients to be able to communicate (Send / Receive) mails without obstacles to the custom confiured Mail server.

By the way having Qmail SMTP listener on 587 besides 25 has another reason for many as some Internet Service Providers (ISPs) have purposefully filtered access to unencrypted port 25 for the sake of reducing auto spam sent in their networks.

So here we go.

Howto setup Qmail Mail server to use have listener on Port 587

Here I assume you have already qmail-smtpd running as a service via Dan Bernstein's Daemontools (Supervice), e.g. the qmail-smtpd run script is stored in lets say /var/qmail/supervise/qmail-smtpd and linked properly to run  from /service/qmail-smtpd
 

ls -al /service/qmail-smtpd
lrwxrwxrwx 1 root root 32 сеп 18  2012 /service/qmail-smtpd -> /var/qmail/supervise/qmail-smtpd/


cd /var/qmail/supervise/
cp -rf qmail-smptd/ qmail-smptd587/

Once the script template is copied we need to change the default listener port from 25 to 587 for edit the /var/qmail/supervice/qmail-smtpd587/run respawn script
 

vim /var/qmail/supervise/qmail-smtpd587/run


If you're not familiar with vim use nano / pico / joe / emacs etc. or your favourite text editor if you're running Xserver environment with gnome on the server (hope you didn't) for simplicity you can use even gedit

Here we need to change


PORT=25


to 


PORT=587


Also make sure the script value of


FORCE_TLS=0


(if configured that way) is set to:


FORCE_TLS=1


Value of


AUTH=0


should also be equal to


AUTH=1


Here I assume the run script is standard one from ex-QmailRocks  step by step qmail install (which up2date is the so called QmailRocks Qmail Thibs).

For some older or custom Qmail Installs /var/qmail/supervise/qmail-smtpd587/run might look slightly different e.g. could be something like:


exec /usr/local/bin/softlimit -m 50000000 \
/usr/local/bin/tcpserver -v -R -l "$LOCAL" -x /etc/tcp.smtp.cdb -c "$MAXSMTPD" \
-u "$QMAILDUID" -g "$NOFILESGID" 0 smtp \


If you find your /var/qmail/supervise/qmail-smtpd587/run just copied script has a structure like that then you will have instead to change it look like so to enable 587 TLS port listener


exec /usr/local/bin/softlimit -m 50000000 \
/usr/local/bin/tcpserver -v -R -l "$LOCAL" -x /etc/tcp.smtp.cdb -c "$MAXSMTPD" \
-u "$QMAILDUID" -g "$NOFILESGID" 0 587 \


Save the file now what is left is to also make the necessery changes for logging to work for /var/qmail/supervise/qmail-smtpd587/log/run


Before we do that we'll copy the log files from /var/log/qmail/qmail-smtpd to /var/log/qmail/qmail-smtpd587
(Note here if your qmail-smtpd log is configured on some other location just change the appropriate paths in below cp command)
 

cp -rpf /var/log/qmail/qmail-smtpd /var/log/qmail/qmail-smtpd587


Once copied edit the supervise script /var/qmail/supervise/qmail-smtpd587/log/run

Mine looks like so:


#!/bin/sh
VQ="/var/qmail"

exec env – PATH="$VQ/bin:/usr/local/bin:/usr/bin:/bin" \
setuidgid qmaill multilog t n1024 s1048576 n20 /var/log/qmail/qmail-smtpd


Add the 587 to the end of qmail-smtpd directory so it looks like so:


#!/bin/sh
VQ="/var/qmail"

exec env – PATH="$VQ/bin:/usr/local/bin:/usr/bin:/bin" \
setuidgid qmaill multilog t n1024 s1048576 n20 /var/log/qmail/qmail-smtpd587


If you're not runing QmailRocks based scripts Qmail but some custom one you might have here also something different for example:
 

exec setuidgid qmaill multilog t s100000 n20 /var/log/qmail/qmail-smtpd 2>&1


In that case also add the 587 to the end of qmail-smtpd so the file content is like so:
 

exec setuidgid qmaill multilog t s100000 n20 /var/log/qmail/qmail-smtpd587 2>&1


All left so far is to link the new copied created supervise scripts to be processed by daemontools service auto-respawn service


cd /service/
ln -s /var/qmail/supervise/qmail-smtpd587


Now restart qmail with qmailctl script or whatever script you're using to make the qmail server processes reload:


qmailctl restart

Restarting qmail: * Stopping qmail-smtpdssl. * Stopping qmail-smtpd. * Sending qmail-send SIGTERM and restarting. * Restarting qmail-smtpd. * Restarting qmail-smtpdssl. * Restarting qmail-pop3d.


Now as we should have everything setup, last step is to check the TCP Port 587 listener on server is listening / accepting connections on the GNU / Linux server:


netstat -lptn|grep -i 587 tcp 0 0 0.0.0.0:587 0.0.0.0:* LISTEN 9396/tcpserver


As you see everything looks fine we're listening on 587, it is generally a good idea to check also all the running services on the server including rest of Qmail listeners to make sure something else did not broke, so I recommend you issue once again:


netstat -lptn

….


It is recommended to also check the readproctitle daemontools process to make sure no any kind of errors are reporting while runing the supervise scripts, to do so run:


ps axu|grep -i readproc root 6029 0.0 0.0 3756 356 ? S Aug31 0:00 readproctitle service errors: …………………………………………………………………………………………………………………………………………………………………………………………………………………………………………………………………………………………………………………………………………………………………. root 6542 0.0 0.0 112404 920 pts/0 S+ 13:25 0:00 grep -i readproc


Above many dots indicate no errors were encountered while runing the supervise scripts and everything is okay, if you instead get some errors, you have to debug what is crashing and fix it, but hopefully you should have gone without any errors just like me. Even if there errors expect something minor like a typo in the just modified run scripts or some missing log path or something.

In the mean time if you happen to have a Qmail, Postfix or other mail server with errors you can't solve and need for help or system administration services on a cheaper price please hire me to manage it it.

That's all, Enjoy now using your Mail client of choice to connect to 587 with TLS.


Converting .crt .cer .der to PEM, converting .PEM to .DER and convert .PFX PKCS#12 (.P12) to .PEM file using OpenSSL

Friday, September 1st, 2017

openssl_check_verify_crt_csr_key_certificate_consistency-with-openssl-command-openssl-logo

These commands allow you to convert certificates and keys to different formats to make them compatible with specific types of servers or software. For example, you can convert a normal PEM file that would work with Apache to a PFX (PKCS#12) file and use it with Tomcat or IIS.

  • Convert a DER file (.crt .cer .der) to PEM


    openssl x509 -inform der -in certificate.cer -out certificate.pem
    
  • Convert a PEM file to DER


    openssl x509 -outform der -in certificate.pem -out certificate.der
    
  • Convert a PKCS#12 file (.pfx .p12) containing a private key and certificates to PEM


    openssl pkcs12 -in keyStore.pfx -out keyStore.pem -nodes


    You can add -nocerts to only output the private key or add -nokeys to only output the certificates.

  • Convert a PEM certificate file and a private key to PKCS#12 (.pfx .p12)


    openssl pkcs12 -export -out certificate.pfx -inkey privateKey.key \
    -in certificate.crt -certfile CACert.crt