Archive for September, 2017

Disable graphical boot GRUB on Linux or how to boot Linux in true text mode

Saturday, September 30th, 2017

Is it possible to disable the graphical boot screen in Linux?

I have always loved to see the exact services that are loaded in Linux, during its boot.

I use Linux for 17 years already and I'm really used to see the status of Loaded services in Linux kernel boot from /etc/init.d/

Unfortunately since some time in all major Linux distributions for Desktop use  – the eb based, e.g. Debian, Ubuntu and RPM package system based – Fedora, OpenSUSE  Linux etc. that comes with GRUB2 boot loader pre-installed are configured by default to either show a static picture, or because of the faster boot times with the new systemd that replaced the old System V  to just show a blackscreen for a while during the actual processes being initialized quietly in the background.

Besides that if the Linux is to be installed on some Bare Metal Servers it is pretty much useless to have the Grub2 graphical boot enabled, so especially on Linux Servers Disabling Graphical Boot in GRUB is absolutely mandatory as on a servers debugging the boot process is an often task for the sysadmin.


Thanksfully for the curious people like me that want to see Boot loading statuses in order to see whether some service is improperly booted or there are some kind of warnings on boot, it is possible to:

DISABLE / TURN OFF GRAPHICAL BOOT IN LINUX


The way to disable graphical boot across both .deb and rpm – package based distributions is identical.


To disable graphical boot (enable text mode service status boot) mode in GRUB:


Become superuser (root) or use sudo (su wrapper) to edit /etc/default/grub 


vim /etc/default/grub


Find the line reading like:


GRUB_CMDLINE_LINUX_DEFAULT="quiet splash"


quiet keyword tells GRUB to show little information about the boot process, while
splash option instructs GRUB2 to load the pre-configured Boot Picture showing up during the 5 seconds wait time in Grub Menu Screen, that requires us to choose the Kernel version or Advanced Options (Recovery, or other Kernel version to boot).

Change the value for GRUB_CMDLINE_LINUX_DEFAULT to be simply text, e.g.:


GRUB_CMDLINE_LINUX_DEFAULT="text"


Then to make GRUB loader reload the new configuration set run:


server:~# update-grub


Note that update-grub configuration reload command might be on a different location across various Linux distributions and generally it is a good practice to check with which command where exactly it is located and give a fullpath to the command, for example on Debian Linux, to give fullpath location.


# /usr/sbin/update-grub

Generating grub configuration file …
Found linux image: /boot/vmlinuz-4.9.0-3-amd64
Found initrd image: /boot/initrd.img-4.9.0-3-amd64
done

Well now restart PC / Server and enjoy, the text mode GRUB2 loader and the verbosity added to the boot process 😉
 

How to boost Linux sound volume over 100% – Maximum Volume Audio Boost in GNOME and KDE

Friday, September 29th, 2017

how-to-boost-increase-sound-in-linux-audio-stack-illustrated
 

How to boost Linux sound volume over 100% to 150% or 200% ?


If you have recently migrated to Free Software Operating System Fedora,  Ubuntu or Debian GNU / Linux, OpenSuSE with GNOME / Mate / KDE / Xfce graphical environment, you might encounter that sometimes when using your computer for Multimedia the audio sound produced and streamed to the Sound Card is very low, so low that it prevents you from comprehending what the video, music etc. played says or you have to strain hardly your ears to hear what is to be said.

Let me illustrate what I mean, say  you watch an educational video  within Firefox / Opera (browser) in Youtube or listen some songs playlist in Vimeo.COM and the Sound on the follow up video suddenly becomes so low that you can't understand what the Coach or Instructor on the video is saying, or it could be a low sound within a Video downloaded on the PC and watched with Mplayer or VLC (Movie Players),
or lets say you listen MP3 / MP4 / OGG Song, S3M with mpg123 (in console) or with Qmmp (a graphical mp3 Windows WinAmp like player for Linux similar to good old XMMS Player).

So what is to be done to increase the audio volume from your Linux powered Notebook over 100% ??

I assume you already tried everything possible such as using aumix (Console / Terminal based tool) to boost your Sound Output to maximum and you also checked Gnome Alsa Mixer to make sure the Volume status is set to maximum but nothing helped as the sound produced is way lower behind you wish too.

By the using alsamixer command might help sometimes to increase the Linux sound volume a little bit but still you can't boost over 100% with it.

alsamixer-linux-screenshot

Apple Mac OS X users have surely experienced similar issues and are probably aware of the existence of a Trial (paid) application Boom 2 – A Mac OS Sound Volume Booster with Advanced Audio Equalizers and Effects but is there some similar Sound Increaseing software over the standard maximum 100% Volume for Linux?

Well yes, there is its called PavuControl (PulseAudio Volume Control)


linux-desktop:~# apt-cache show pavucontrol|grep -i description -A 3
Description-en: PulseAudio Volume Control
 PulseAudio Volume Control (pavucontrol) is a simple GTK+ based volume
 control tool (mixer) for the PulseAudio sound server. In contrast to
 classic mixer tools this one allows you to control both the volume of

Description-md5: c43956d9d08801fbaa1a405d7b6a9e6b
Homepage: http://freedesktop.org/software/pulseaudio/pavucontrol/
Tag: admin::configuring, implemented-in::c++, interface::graphical,
 interface::x11, role::program, scope::utility, sound::mixer,
root@jericho:/home/hipo# apt-cache show pavucontrol|grep -i description -A 2
Description-en: PulseAudio Volume Control
 PulseAudio Volume Control (pavucontrol) is a simple GTK+ based volume
 control tool (mixer) for the PulseAudio sound server. In contrast to

Description-md5: c43956d9d08801fbaa1a405d7b6a9e6b
Homepage: http://freedesktop.org/software/pulseaudio/pavucontrol/


To run it run pavucontrol from terminal program:

linux-desktop:~$ pavucontrol

how-to-boost-linux-sound-in-gnu-linux-fedora-debian-ubuntu-program-application-to-increase-sound-over-hundred-percents

If pavucontrol command is not present on your Linux install it with apt as usual:
 

linux-desktop:~# apt-get install –yes pavucontrol


Note that PavuControl is using PulseAudio Linux Sound Streaming server to boost the Audio and not the ALSA (Advanced Linux Sound Server – which receives sounds from various applications and paralyzes them in different sound channels). 


If you want to prevent the Volume Boost audio increase over 100% to lets say either the 150% percentages, the maximum pavucontrol gives you can do that by including the /usr/bin/pactl command (which is a part of pulseaudio-utils package) to /etc/rc.local (be sure you include the command in rc.local before exit 0 command)

To give it a test you can manually run from terminal:

linux-desktop:~$ pactl — set-sink-volume 0 150%


You will notice the audio output sound increased immediately Note that the Sound boosting in Linux can be done over 150% to lets say 200% or 250 out of the normal maximum, and you can test 200% if you have a nice big speakers connected to your Computer to piss off your wife :), e.g. run:

# !!!!!!! RUN BELOW COMMAND AT YOUR OWN RISK AS THIS MIGHT DAMAGE YOUR COMPUTER OR EXTERNAL SOUND SPEAKERS !!!!!!


linux-desktop:~$ pactl — set-sink-volume 0 250%

How to enable Control Alt Backspace to Kill X server on Debian / Ubuntu Linux

Thursday, September 28th, 2017

kill-X-server-switch-revert-back-to-ctrl-alt-backspace-howto
Being a long time GNU / Linux user, I've been quite dissatisfied for the fact that in latest Debian and Ubuntu Linux, the default Key combination to Kill X (CTRL + ALT + BACKSPACE) is no longer working.

Though nowdays Xorg (XServer) is pretty stable it still happens from time to time for some application to overload the PC badly and make Gnome or KDE environment little or no responsive at all and here comes the goody CTRL + ALT + BACKSPACE it is pretty much  like  (CTRL + ALT + DEL) did restarted the computer in DOS and earlier Windows OS-es once the environment became unusable with the only difference that just Xorg server is restarted and the other using programs that are in background work just like they used to. 

CTRL + ALT + Backspace is a great thing to use especially if you're running some homebrew server and you use it both as a Server with some few little websites and as a Desktop environment to browse the net and do basic stuff.

So here comes the question how to make the CTRL + ALT + BACKSPACE keyboard combination be killing Xserver like in the good old days?

The easiest way to do it interactively in ncurses interface is by  running:


root@noah:~# dpkg-reconfigure keyboard-configuration


If somehow on the machine you don't have dpkg-reconfigure or you prefer to do set CTRL + ALT + BACKSPACE Kill Switch manually edit /etc/default/keyboard 

inside change value of


XKBOPTIONS="terminate:ctrl_alt_bksp" 


like shown below file:

root@noah:/home/hipo# cat  /etc/default/keyboard

# KEYBOARD CONFIGURATION FILE

# Consult the keyboard(5) manual page.

XKBMODEL="pc105"
XKBLAYOUT="us"
XKBVARIANT=""
XKBOPTIONS="terminate:ctrl_alt_bksp"

BACKSPACE="guess"

The configuration should be working across Debian 7, 8, 9 as well as Ubuntu 12 ..14 .. 16 and hopefully in future releases too, just as many other Linux distributions like Mint etc. the Xserver Kill Switch setting should be located in same file.

Finally if even after that change the Control Alt BackSpace Kill Switch sequence refuses to work in GNOME Desktop environment, it might be due to a local setting typical for GNOME and this should be fixed via the good known gnome-tweak-tool

So GNOME users should run it from command line and check the setting there, e.g.:


$ gnome-tweak-tool


You should check:


Typing -> Kill Sequence to Kill the X Server


it should look like shown in below screenshot:

how-to-set-X-server-kill-switch-in-GNOME-gnak-tool-screenshot-debian-stretch


How to fix unfixable broken package dependencies on Debian GNU / Linux – Fix package mismatch

Wednesday, September 27th, 2017

how-to-fix-unfixable-broken-package-dependency-on-debian-ubuntu-linux-icon

I just tried to upgrade my Debian Wheezy 7 to the latest stable Debian Stretch 9 by not thinking too much and just changing the word wheezy with stretch in /etc/apt/sources.list so onwards on it looked like so:
 

cat /etc/apt/sources.list


deb http://ftp.bg.debian.org/debian/ stretch main contrib non-free
deb-src http://ftp.bg.debian.org/debian/ stretch main

deb http://security.debian.org/ stretch/updates main
deb-src http://security.debian.org/ stretch/updates main 

# stretch-updates, previously known as 'volatile'
##deb http://deb.debian.org/debian/ stretch-updates main
deb-src http://deb.debian.org/debian/ stretch-updates main


I also make sure all the defined Google Chrome / Opera / Skype and Squeeze Backports repositories existent in /etc/apt/sources.list.d directory files which in my case were like so;


root@noah:/etc/apt/sources.list.d# ls
google-chrome.list  opera-stable.list  squeeze-backports.list
opera.list          skype-stable.list


 were commented out because they were producing extra apt update errors …

And afterwards ran as usual:


apt-get update
apt-get –yes upgrade


The upgrade command executed fine and a lot of packages got downloaded and reinstalled without much issue, so I thought everything would be fine and just proceeded with the attempt to finalize the distribution major release 7 to major release 9 by running:


apt-get –yes dist-upgrade


But guess what now I got some dependency errors with cron and other installed packages that depend on package versions that are not going to be installed as the apt-get tool informed me.

I tried to out-smart the dpkg dependency system and removed all the packages reporting to have a missing dependencies with a short for bash loop after duming all the problematic packages showing dependency issues with commands such as:

apt-get -f dist-upgrade >> out.txt
for i in $(cat out.txt); awk '{ print $1 }' >> to_delete.txt; done


Before proceeding further I had to manually edit few lines in a text editor to remove some of the junk left from apt-get too.

So i was brave and just removed the dependency missing packages with following other for loop:


for i in $(cat to_delete.txt); do dpkg -r –force-all $i; done


Now I was hoping that rerunning:


apt-get autoremove

dpkg --configure -a

apt-get update -f
apt-get dist-upgrade -f


would no longer complain and I would just install the removed packages in another for shell loop once every other packages gets installed.

But guess what I was wrong … the system entered into another bunch of depedency terribly issues and messed up so badly that there were at least 50 packages reporting to have a missing / broken or uninstallable deb version depedency …

I got totally Angry, I knew already from experience that just trying to jump over while skipping a major release e.g. upgrade Debian 7 to Debian 9, instead of first upgrading to Debian 8 Linux and then upgrading Debian 8 to Debian 9 have always produced the same mess but I was lame and stupid again to f**k it up and I was out of mind swearing (a truly bad habid I'm not proud of) …

So as the notebook with Linux so far was perfectly working with Debian 7 and had a tons of old installed software and I was in a state where if I restart the system it was very likely my Thinkpad r61 laptop won't boot at all, I googled around to find a solution unfortunately without any luck, so finally I used the good old and tested method to DO IT MYSELF and Find the Fix without Uncle Google's help and by God's grace I did, after experimenting a while with the aptitude package / install / remove update tool without much success, finally I find the solution to the totally messed up Debian package dependencies and it all came to a simply reverting back my /etc/apt/source.list to look like following:


# deb cdrom:[Debian GNU/Linux 7.0.0 _Wheezy_ – Official amd64 CD Binary-1 20130504-14:44]/ wheezy main

##deb cdrom:[Debian GNU/Linux 7.0.0 _Wheezy_ – Official amd64 CD Binary-1 20130504-14:44]/ wheezy main

deb http://ftp.bg.debian.org/debian/ wheezy main contrib non-free
deb-src http://ftp.bg.debian.org/debian/ wheezy main

deb http://security.debian.org/ wheezy/updates main
deb-src http://security.debian.org/ wheezy/updates main

# wheezy-updates, previously known as 'volatile'
##deb http://deb.debian.org/debian/ wheezy-updates main
deb-src http://deb.debian.org/debian/ wheezy-updates main
##deb http://www.deb-multimedia.org wheezy main non-free
#deb http://ftp.debian.org/debian/ wheezy-backports main
###deb http://ftp.debian.org/debian/ wheezy-backports main contrib non-free
##deb http://dl.google.com/linux/chrome/deb/ wheezy main
#deb http://ftp2.de.debian.org/debian-volatile wheezy/volatile main
###deb http://www.deb-multimedia.org wheezy main non-free


run of the following two depedency fix commands !!!!


aptitude upgrade –full-resolver

aptitude full-upgrade –full-resolver


After a while a Debian LinuxOS system downgrade was initated and the missing packages were found, downloaded from the correct wheezy repositories and all broken and missing dependencies packages were fixed !!! HOORAY IT WORKS AGAIN!!


Create dummy packages on Debian, Ubuntu, Mint Linux how to

Tuesday, September 26th, 2017

create-dummy-package-on-debian-ubuntu-mint-linux-how-to-equivs-equivs-control-equivs-build

Creating dummy packages on Debian, Ubuntu, Mint Linux in order to fulfill broken or missing package dependencies is a very useful thing to do as many third party vendor packages such as skype does provide software that is compiled against a certain set of libraries to a specific Linux distribution release and as the distribution versions evolve it is impossible to install because of missing dependencies.

Sadly the third party maintainer almost always did not compile / provide new .deb package of their software specific for the new or sometimes older Linux distribution release and did not consider that Linux versions change frequently every 6 months or a year.

Hence The precompiled proprietary version of program and deb package provided by them depends on libraries or tools (contained within packages) that are either obsolete or does not match the package name and versions of installed Linux / Ubuntu / Mint or other deb based distribution.

When this occurs once you try to install the third party software, you can't because of the missing or unavailable packages within the current installed Linux version.

Commonly the problem with the missing and unavailable packages are not due to the inability of software to run with the older or newer (or in other words different) version of a library or tool from the ones provided by apt repositories but just because the package was compiled by third party vendor to depend on a very specfic versions of libraries and tools from the one provided by the respective Linux repositories.instead of making it cross platform compatible.

Thus often the ugly work around to that is to simply install the package in question without regard for dependencies with dpkg, i.e run:
 

dpkg -i –force-all skype-install.deb


Though the package gets installed, that way the broken dependencies of it are still pending and the apt package (on top of dpkg) is aware of that and once you try to do to lets say patch server or laptop against newest security flaws the do a package update you will end in a broken package state with a bunch of dependency errors of the missing libraries / packages.

You might end up in such situation if you're using lets say unstable verson of Debian or just if you're mixing /etc/apt/sources.list from Stable version with unstable one

Here is few example of what you might be getting once you're trying to install a package and there is / are broken unmet (missing) (uninstallable dependencies) caused by a forcably installed 3rd party software:


# aptget install libmagickwanddev
libmagickwand-dev : Depends: libmagickwand5 (= 8:6.7.7.10-6ubuntu3.4) but it is not going to be installed
Depends: libmagickcore5-extra (= 8:6.7.7.10-6ubuntu3.4) but it is not going to be installed
Depends: libmagickcore-dev (= 8:6.7.7.10-6ubuntu3.4) but it is not going to be installed E: Unable to correct problems, you have held broken packages.

Above example indicates libmagickcore5-extra and libmagickcre-dev required version can't be installed because the provided packages from Ubuntu /etc/apt/sources.list defined package download location for (current installed Ubuntu Linux) is different from the one the libmagickwand-dev required, this is because I have extra package sources defined to /etc/apt/sources.list


So what is the solution workaround to a missing and unavailable packages due to missing dependency package requirements ?


The easiest and least "painful" way is to fool the package system by installing a dummy package with the name of the missing package requirement, so the next time, some installed package on your system depends on a missing :i386 / amd64 or i586 architecture package or some other weird older or newer package missing on the system you can emulate the package is present by:
 

Creating Dummy Package with equivs (equivs-build, equivs-control)


Lets say you want to install GXMame frontend package manually with dpkg which is now obsolete and no longer available for install across Linux distributions the package depends on xmame but xmame is not available in latest Linux deb distributions, so the only work around is to create the xmame package as a dummy package and install it so you fool deb package management system to thing it is there and not explode with errors on apt operations.

To create a dummy package use the equivs which is a tool used by Debian / Ubuntu developers to do the package packaging, here is how to do it:

root@jericho:/home/hipo# apt-get install –yes equivs
root@jericho:/home/hipo# equivs-control xmame


root@jericho:/home/hipo# cat xmame


Section: games
Priority: optional
Standards-Version: 2.5.5


Package: xmame
Version: 0.182-1
Section: games
Maintainer: Georgi Georgiev
Provides: mame
Architecture: all
Description: Dummy Xmame Arcade Emulator package


Edit xmame or whatever dummy package you have chosen to build and change the Priority / Section / Maintainer / Version / Provides / Description

Architecture: all is suitable if you want to build the dummy package be compatible with all architectures, if you need a specific CPU architecture i386, i586, amd64 armpc etc. just set the proper one
 

root@jericho:/home/hipo# vim xmame


root@jericho:/home/hipo# equivs-build xmame
dh_testdir
dh_testroot
dh_prep
dh_testdir
dh_testroot
dh_install
dh_install: Compatibility levels before 9 are deprecated (level 7 in use)
dh_installdocs
dh_installdocs: Compatibility levels before 9 are deprecated (level 7 in use)
dh_installchangelogs
dpkg-parsechangelog: warning:     debian/changelog(l5): badly formatted trailer line
LINE:  — Georgi Georgiev  Mon, 25 Sep 2017 12:55:27 +0300
dpkg-parsechangelog: warning:     debian/changelog(l5): found end of file where expected more change data or trailer
dh_installchangelogs: Compatibility levels before 9 are deprecated (level 7 in use)
dh_compress
dh_fixperms
dh_installdeb
dh_installdeb: Compatibility levels before 9 are deprecated (level 7 in use)
dh_gencontrol
dpkg-gencontrol: warning:     debian/changelog(l5): badly formatted trailer line
LINE:  — Georgi Georgiev  Mon, 25 Sep 2017 12:55:27 +0300
dpkg-gencontrol: warning:     debian/changelog(l5): found end of file where expected more change data or trailer
dh_md5sums
dh_builddeb
dpkg-deb: building package 'xmame' in '../xmame_0.182-1_all.deb'.


The package has been created.
Attention, the package has been created in the current directory,
not in ".." as indicated by the message above!


Historically a very common use of Dummy debian package creation was when installing Qmail Mail server instead of Postfix (because some of the binary packages such as bsd-mailx used to be dependent on Postfix

Here is how the dummy postfix package was generated once the real one was already removed (because its presence on system was intereferring with already installed Qmail mail agent)


root@jericho:/home/hipo# equivs-control postfix


Command would generate a default dummy package skele template such as below:


### Commented entries have reasonable defaults.
### Uncomment to edit them.
# Source: <source package name; defaults to package name>
Section: misc
Priority: optional
# Homepage: <enter URL here; no default>
Standards-Version: 3.9.2


Package: <package name; defaults to equivs-dummy>
# Version: <enter version here; defaults to 1.0>
# Maintainer: Your Name <yourname@example.com>
# Pre-Depends: <comma-separated list of packages>
# Depends: <comma-separated list of packages>
# Recommends: <comma-separated list of packages>
# Suggests: <comma-separated list of packages>
# Provides: <comma-separated list of packages>
# Replaces: <comma-separated list of packages>
# Architecture: all
# Multi-Arch: <one of: foreign|same|allowed>
# Copyright: <copyright file; defaults to GPL2>
# Changelog: <changelog file; defaults to a generic changelog>
# Readme: <README.Debian file; defaults to a generic one>
# Extra-Files: <comma-separated list of additional files for the doc directory>
# Files: <pair of space-separated paths; First is file to include, second is destination>
#  <more pairs, if there's more than one file to include. Notice the starting space>
Description: <short description; defaults to some wise words>
 long description and info
 .
 second paragraph


To make the postfix named package you can modify the equivs-control generated file postfix to look like so:


Section: misc
Priority: optional
Standards-Version: 2.3.3


Package: postfix-dummy
Version: 2.7.0
Section: mail
Maintainer: Eric Lubow
Provides: mail-transport-agent
Architecture: all
Description: Dummy Postfix package


root@jericho:/home/hipo# equivs-build postfix
dh_testdir
dh_testroot
dh_prep
dh_testdir
dh_testroot
dh_install
dh_install: Compatibility levels before 9 are deprecated (level 7 in use)
dh_installdocs
dh_installdocs: Compatibility levels before 9 are deprecated (level 7 in use)
dh_installchangelogs
dpkg-parsechangelog: warning:     debian/changelog(l5): badly formatted trailer line
LINE:  — Eric Lubow  Mon, 25 Sep 2017 12:52:46 +0300
dpkg-parsechangelog: warning:     debian/changelog(l5): found end of file where expected more change data or trailer
dh_compress
dh_fixperms
dh_installdeb
dh_installdeb: Compatibility levels before 9 are deprecated (level 7 in use)
dh_gencontrol
dpkg-gencontrol: warning:     debian/changelog(l5): badly formatted trailer line
LINE:  — Eric Lubow  Mon, 25 Sep 2017 12:52:46 +0300
dpkg-gencontrol: warning:     debian/changelog(l5): found end of file where expected more change data or trailer
dh_md5sums
dh_builddeb
dpkg-deb: building package 'postfix-dummy' in '../postfix-dummy_2.7.0_all.deb'.


The package has been created.
Attention, the package has been created in the current directory,
not in ".." as indicated by the message above!


Once you have all your dummy packages built, just install the packages in a standard way with dpkg to install below 2 generated packages xmame_0.182-1_all.deb and postfix-dummy_2.7.0_all.deb:


root@jericho:/home/hipo#  dpkg -i  xmame_0.182-1_all.deb; dpkg -i postfix-dummy_2.7.0_all.deb


Fix broken package dependencies on Debian GNU / Linux, Ubuntu, Mint with apt commands how to

Monday, September 25th, 2017

https://www.wzdftpd.net/images/debian_package

Deb based distributions are famous for their good binary package management system and great ability to fulfill package dependencies elegantly with the apt tool.

I personally have a long time in choosing what Linux distribution best fits me and the reason I preferred Debian over others was the simplicity in applying updates and the great number of provided prepackaged software and the easiness to manage.

However even though apt, apt-get and aptitude package management wrapper scripts work great most of the time – note that these 3 tools are just intelligent wrappers over the basis dpkg (the main install / remove / update etc. tool behind the surface), sometimes due to user stupidity or 3rd package installations with dpkg -i or a combined packages installed from various non-debian repositories or just user errors you might end up with perfectly working installed packages that depend on other packages installed from source or provided by already installed package under a different name than the installed package has a predefined dependencies, and in that case you end up with the so called Broken package Dependencies .


The problems with upgrading due to packages broken dependencies sometimes can be fixed with running below bunch of apt commands or – how to fix Debian / Ubuntu broken  dependencies and missing dependencies preventing you from Updating / Upgrading the system:


# Update the system installed package list


apt-get update


# That would delete old packages from /var/lib/cache/ so sometimes if apt-get install –reinstall packagename used to be failing due to the inconsistency of previous packagename.deb which is fetched from .deb package cache, on next apt-get install –reinstall a new copy of package will be downloaded either from internet or recopied from CD / DVD repository


apt-get autoclean


# to clean up any partial files


 apt-get clean


# to clean up apt cache


apt-get autoremove


# Sometimes if all else fails and you're forced to remove the broken package that is preventing you from normal package management operations to
remove it in a forceful way you can run


dpkg –remove -force –force-remove-reinstreq package name


# that command is saying apt to try its best to solve the broken / missing package dependencies problems sometimes it just removes the problematic package as a solution or tries to refetch the missing package from the internet but often when the dependency system is messed up due to 5 / 10 missing or broken packages this won't help and you can't afford to just remove MySQL server that has missing dependencies or LigHTTPD with reporting missing packages in package management system


apt-get update –fix-missing


# This might help you to completely the scripts being executed while a certain package was being installed with dpkg tool, for example sometimes it happens you start installing a package with apt-get install whatever-package-name and some extra package is being installed or to be remove which you don't want and you interrupt the process with CTRL+C and then the package that was being installed at the moment of interruption becomes in a bad broken state because of incompleted scripts on dpkg -i whatever-package-name to solve that below often helps


dpkg –configure -a


# In some circumstances below command that tries to install a package being interrupted with fix-missing helps solve dependency issues


apt-get install -f

To get a list of all packages that are little known to dpkg and not perfectly installed or have been removed but configuration left unpurged:


dpkg -l | grep -v '^ii'
 

Desired=Unknown/Install/Remove/Purge/Hold
| Status=Not/Inst/Conf-files/Unpacked/halF-conf/Half-inst/trig-aWait/Trig-pend
|/ Err?=(none)/Reinst-required (Status,Err: uppercase=bad)
||/ Name                                          Version                                     Architecture Description
+++-=============================================-===========================
rc  gufw                                          17.04.1-1.1                                 all          graphical user interface for ufw
rc  laptop-mode-tools                             1.71-2                                      all          Tools for Power Savings based on battery/AC status
rc  mgetty                                        1.1.36-3+b1                                 amd64        Smart Modem getty replacement
rc  ntopng                                        2.4+dfsg1-3                                 amd64        High-Speed Web-based Traffic Analysis and Flow Collection Tool
rc  opencubicplayer                               1:0.1.21-1.1                                amd64        UNIX port of Open Cubic Player
rc  snort                                         2.9.7.0-5                                   amd64        flexible Network Intrusion Detection System
rc  speechd-up                                    0.5~20110719-6+b1                           amd64        Interface between Speech Dispatcher and SpeakUp
rc  thinkfan                                      0.9.3-2                                     amd64        simple and lightweight fan control program
rc  ufw                                           0.35-4                                      all          program for managing a Netfilter firewall
rc  wicd-gtk                                      1.7.4+tb2-4                                 all          wired and wireless network manager – GTK+ client

To get all packages, that are half installed and half-configured run:


dpkg-query -f '${status} ${package}\n' -W | awk '$3 != "installed" {print $4}'
dpkg-query -f '${status} ${package}\n' -W | awk '$3 == "half-configured" {print $4}'

In some very badly messed packages that are in unrecoverably state, another useful trick is to completely wipe out information from the dpkg file with package installed statuses
 

/var/lib/dpkg/status


Open the file with favourit text editor (vim, nano etc.)
 

vim /var/lib/dpkg/status


Find the package name inside that is problematic by either scrolling or using search and delete all block records from file regarding the package


/var/cache/apt/lists/lock


Next delete

rm /var/cache/apt/lists/lock


A note to make here is in previous Debian 6 / 7, and Ubuntu version 12 and lower the location of lock file is in


/var/cache/apt/archives/lock


Talking about broken packages and how to fix them perhaps it is worthy to mention about one great feature of apt package manager (putting the packge on hold).

Marking a package with a hold flag is useful feature especially if you have installed on a server or Desktop with Linux a package that you want to be prevented from updating during the usual:
 

apt-get update && apt-get upgrade && apt-get dist-upgrade


Sometimes if you want a specific version of software to stay at the current installed version even though of if rest of software gets updated, it is useful to put this specific package on hold with dpkg, apt or aptitude.

That would prevent the set installed package program to update in future if you issue update – note that this includes preventing the programs set on hold from future security updates do issue:


Setting a package to hold / unhold with dpkg, apt, aptitude to prevent package from being updated on apt operations

Set Package Hold with dpkg:

echo " hold" | sudo dpkg –set-selections

Set package Hold with apt
 

apt-mark hold <package-name>


Set package Hold with aptitude


aptitude hold <package-name>


Keep in mind though that If you however do a Linux version major version upgrades, putting some packages on hold could cause you problems so if you do that make sure you unhold the packages .

Unhold a previously holded package with dpkg / apt / aptitude:

Set Package UnHold with dpkg:
 

echo " unhold" | sudo dpkg –set-selections


Set package UnHold with apt
 

apt-mark unhold <package-name>


Set package UnHold with aptitude


aptitude unhold <package-name>


Transfer Contacts Nokia to Iphone 3GS, 5, 6, 7 mobile phone for free without using paid application using Nokia PC Suit VCF file export and Email or with Gmail / iCloud Contacts Synchronization

Sunday, September 24th, 2017

how-to-transfer-phone-contacts-from-old-nokia-symbian-phone-to-apple-iphone-ios-mobile

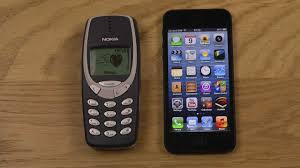
If you wonder how to transfer an old Nokia Mobile Contacts (with the already obsolete and unsupported "dumb" OS as well as the newer phones with Symbian – now abandoned mobile OS) and you need to transfer your contacts to iPhone (with iOS) easily, you can do that by backing up your Phone Contacts to a Windows 7,8, 10 PC and using the PC to transfer to Contacts to iPhone, either by email, through Google Mail Synchronization, (With Apple's iCloud) in case if you're using it, by importing to Outlook Express all the contacts once exported from Nokia Phone to PC and using iTunes to import to iPhone, or for the hardcore command line geeks to even use (WAB.EXE – Windows Address Book) command in conjunction with Apple iTunes to do the import.

Below described steps should be working on almost all Nokia mobile phones, such as Nokia 9300i, Nokia E, N, X and Nokia 6000, 7000, 8000 series as well, copying contacts from your Nokia to your iPhone Smart Phone works well across iPhone 3GS,4S,5, 6 and iPhone 7.

1. Backup Nokia Phone Contacts to Windows PC with Nokia PC Suite

Before proceeding with Nokia Contacts transfer to iPhone, make sure you create backup, just in case if something gets wrong, though this is not too likely it is always a good idea to take preventive measures, just to make sure your contacts doesn't disappear.

To backup your phone Contacts to ordinary PC with Windows, this is done via the good old Nokia PC Suite (Download it from here)

a. Install Nokia PC Suite run it and

b. connect your Nokia mobile phone with an USB Cable
, from the main menu choose Adress Book Icon, this is a small blue book icon in the Nokia PC Suite just like in the screenshot below:

c. A new window Nokia Communication Center will open Listing All Nokia phone existing contacts.

d. Go to the Windows PC to which you have just connected the Nokia Phone device and create somewhere lets say on Desktop (A new Windows folder called Nokia Contacts or whatever you like it to be called, we'll use this folder to transfer Nokia contacts there.

e.  Go back to Nokia Communication Center application, select a single contact (lets say the first one) and press CTRL + A to select all Nokia phone contacts

f. After selecting drag and drop selected contacts to just created Windows folder (Nokia Contacts)

That would output on your Windows PC under the folder all your Phone contacts in separete vCard format files (.VCF).

Now as we have all the Nokia Phone contacts stored each in a separate .VCF file in order to make the files easily importable, it is a very good idea to merge / combine all .VCF vCard files into a single .VCF vCard file.

So How to Merge All produced .VCF extension files into a single .VCF file?

Open Windows Command Prompt (Windows button + R) and type in (cmd.exe)

C:\Users\default>cd Desktop/"Nokkia Contacts"
C:Users\default> cp *.VCF ALL-Contacts.CVF

….

2. Import the Single .VCF Contacts file to Iphone by simply mailing it as attachment

The simplest way to import the just created above ALL-Contacts.VCF file is to simply mail it to yourself as an attachment, that works pretty well if your contacts list is not too big lets say 500-1000 contats, for really large contact lists, the Antivirus Software configured on mail servers might block the attachment, but in most cases just mailing the Single Merged .VCF file from the multiple .VCFs should be the best and easiest way to import Nokia Contacts without using a third party paid applications.

To import via email:

a. Send yourself email with the All-Contacts.VCF as attachment
b. Check your email with iPhone
c. Click on the attachment, once clicked iPhone will prompt you to import the CSV / .VCF Contacts, import them and you're done 🙂

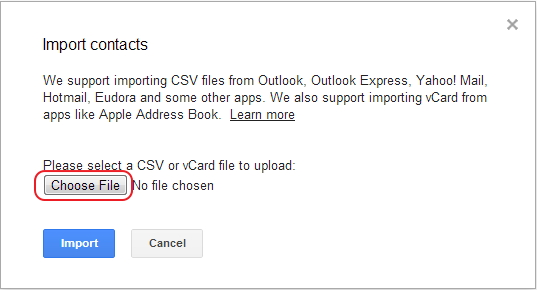
3. Perhaps the easiest way (in case if you have a Gmail account) is to just import all just exported .VCF files into gmail, once all the contacts are now into Gmail, you can use iTunes to synchronize Gmail contacts to your iPhone.

http://www.leawo.com/knowledge/wp-content/uploads/2013/07/import-contacts-to-google-gmail

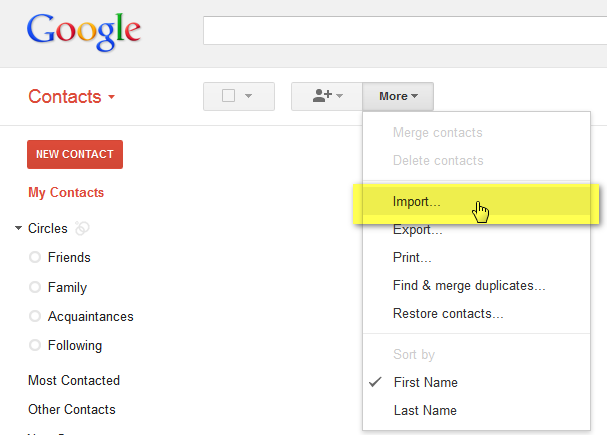
– Note that this method is a bad practise from security point of view as all your contacts will stay Synchronized into Gmail, well you have the option to delete them of course but still Google will have idea of which your contacts is, but anyways if you do it that way, once you have Phone contacts imported into Gmail:

port-contacts-to-google-email-gmail-screenshot-2how-to-import-contacts-to-google-email-gmail-screenshot-2

a) Launch iTunes on Win PC connect iPhone to the PC with USB data cable.

b) Select iPhone from iTunes under “Devices”, that is on the entry on the left sidebar of iTunes that will show the Summary page.

b) 5 Click "Info" tab on the right, and click "Sync Contacts with" checkbox,
– select "Google Contacts" from the drop-down menu
– click "Apply" or "Sync" button on the bottom-right corner of iTunes


iphone-import-nokia-contacts-from-google-gmail-contacts-itunes-screenshot

4. Import .VCF files directly into ICloud (if you're using iCloud) I hope you don't as this completely compromises your security and stores data on separate servers somewhere in a Clustered storage

import-vcard-to-icloud-screenshot

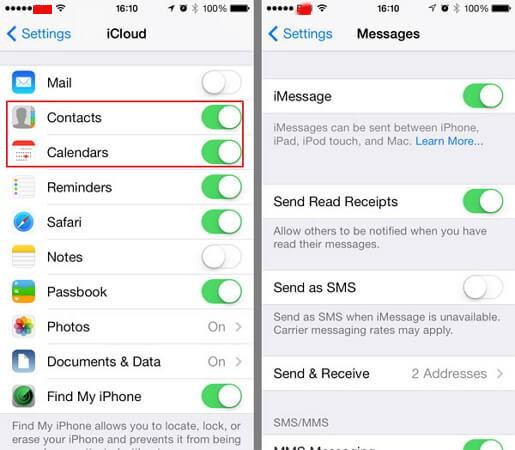
a. To import VCF to iPhone 5/4S/4/3GS via iCloud,  make sure the "Contacts" option of the iCloud on your iPhone is turned on by checking in:

Settings -> iCloud -> turn “Contacts” on.
 

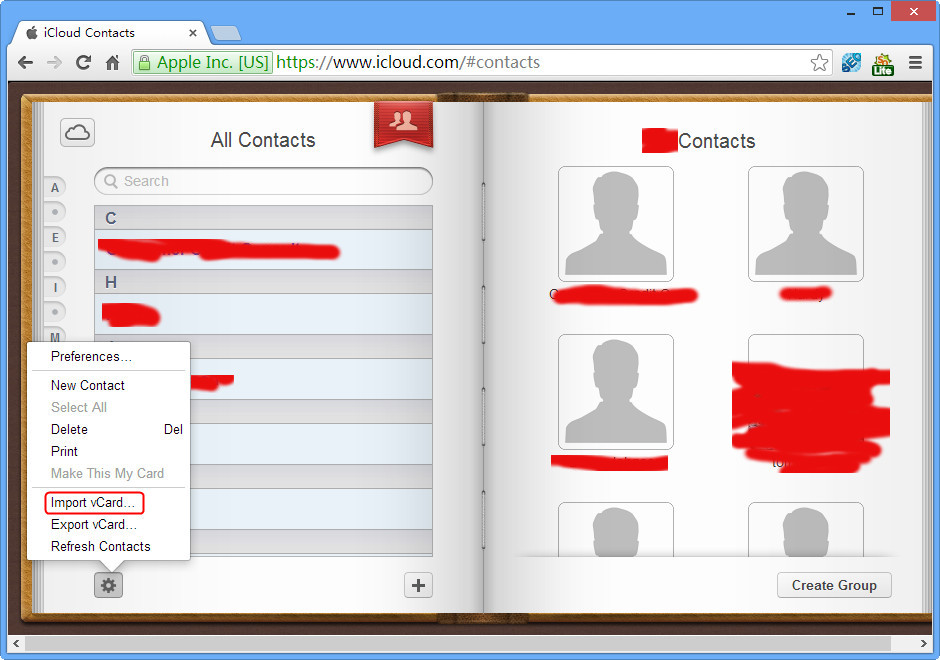
b. Go to www.icloud.com in a browser, log into your iCloud account with respetive Apple ID and password.
c. Click “Setting” button on the left corner and choose “Import vCard”
e To check the import is successful frm vCard files to iPhone, so go to your iPhone Address Book to check the contacts.

sync-icloud-with-iphone-contacts-howto-screenshot


Finally assuming that iCloud is enabled from within iPhone settings, make sure to turn off / turn on contacts synchronization to speed up the contacts transferred form iCloud to iPhone.

For the lazy ones who don't want to bother and just want to pay some cash and have the import painess, there is also paid softwares such as copytrans that can help you transfer contacts
 

Hope this helped someone out there,
For the rest Enjoy !

Why and How to Increase and decrease txqueuelen (Transmit Queue Lenght) in GNU / Linux

Friday, September 22nd, 2017

linuxnetworkingchangetxquelenincreasedecreasefornetworklatencyimprove

In GNU / Linux network routers and sometimes even home PCs it is mostly helpful to play with a TCP / IP stack Network Interface Card (NIC) value called (txqueuelen) in order to make the Network interface (Ethernet device) to work better with the type of network that is connected to it. On a slower LAN or Internet connections txqueuelen is better to be decreased whether on a high speed connections raising it will increase the performance of network traffic to perform large homogenous network transfers.

Therefore on a small private networks in many occasions (though it depends on the served services and exact type of network) it is more useful to decrease the txqueuelen Linux value whether on a High latency networks increasing it will reap a great benefits for your ISP or Hosting routers.

So what is txqueuelen value instructs the kernel on the largeness of transmit queue of the network interface device.
 

1. Decrease the number of txqueuelen in GNU / Linux on a slower networks (ADSL routers), Mobile networks etc to improve network latency


For a slower router devices be it WI-FI routers such as D-Link or any cheap chineese Wifi or LAN or Telephone or ISP compnay networks that provide internet via ADSL routers that run Linux or has access to Linux console with available access to ifconfig command or have an iproute2 Linux package installed (most of them have) it is very helpful to reduce its size for a smaller values in order to guarantee a network high latency.

Therefore reducing the txquelen value to a number like 200 for ADSL provided internet can benefit you.
Assuming that you know the NIC name in Linux the first one is usually eth0 in order to reduce this value to 200 issue:


ifconfig eth0 txqueuelen length
ifconfig eth0 txqueuelen 200


To do the same with iproute2 (ip) command in case if the router is missing ifconfig or you just prefer to use iproute2 (advanced and newer bunch of commands that improved the Linux networking functionalities thanks to Russian Alexei Kuznecov 15 years ago or so) run:


ip link set eth0 txqueuelen length
ip link set eth0 txqueuelen 200


To make it permanent you can either create a brand new rc. script lets say /etc/init.d/rc.queuelenght and add the commands or use the good old /etc/rc.local to make the commands get loaded on every GNU / linux or router boot time.

Above reducement will make your Network TCP stack more responsive.

2. Increase the number of txquelen in GNU / Linux to improve the network latency on a company NAT or other ISP routers

Depending on the scale of Internet bandwidth that is coming inside your router you should decide how much you would like to increase the txqueuelen value.
Generally speaking txqueuelen value could be played with on a Large IN / OUT Company Routers with values between 1000 and 20000

Most GNU / Linux distributions comes preconfigured as a default a value of 1000, so lets say you would like to raise the value to 5000 to improve network transfer latency, here is how to do it via ifconfig:


ifconfig eth0 txqueuelen length
ifconfig eth0 txqueuelen 5000


With IPRoute2 analogously run:


ip link set eth0 txqueuelen length
ip link set eth0 txqueuelen 5000


Of course the best way to figure out what will be the best value for your case is to experiment a little bit with the value and use some kind of speedtest (test bandwitdh service – this one is mine) from the many available online.
You have to consider the type of hardware of Server and most importantly the Network Card hardware (which vendor and what are the recommended ones from the vendor).

If the router is some Linux distribution lets say a Debian / Ubuntu Linux etc other deb based one, it is better to make the necessery permanent changes to make them be loaded on system boot not via /etc/rc.local but by adding to file /etc/network/interfaces:


vim /etc/network/interfaces


up ifconfig $IFACE txqueuelen 8000


Note that as network traffic processing depends on CPU power, decreasing the txqueuelen will add a little bit of extra load to the Central Processing Unit.


In RHEL / CentOS Linux and SuSE server a good way to increase txqueuelen network latency is by running:


# cat <> /etc/rules.d/71-net-txqueuelen.rules
SUBSYSTEM==”net”, ACTION==”add”, KERNEL==”eth*”, ATTR{tx_queue_len}=”10000″
EOF


udevadm trigger


I've red on the internet that a lot of people are reporting a very good results with a txqueuelen setting of 2000 as this value is said to give good results and not hammering the CPU too hardly, so it might be a good idea if you're experimenting with values to find out which one suits you better is to start with this one, e.g. run:
 

ifconfig eth0 txqueuelen 2000
echo 2000 > /proc/sys/net/core/netdev_max_backlog


Well of course keep in mind that sometimes increasing the txqueuelen to too large values will make you an easier target for Denial of Service Attack attempts, though most modern computer routers should be able to behave good even with the highest value like 10000.


How to install Google Chrome Web browser on deb based distributions Debian 9 Stretch, Ubuntu 16 and RPM based ones Fedora 26 and CentOS 7, RHEL 7.3 Linux

Wednesday, September 20th, 2017

install-google-chrome-on-debian-ubuntu-centos-howto-fedora-Google-Chrome-logo
I'm not a fan of Google Chrome as it is not respecting users freedom and compatible with Free Software Philosophy just like it is bad for Google does track all your requests from the browsers but as there is a very large chunk of computers from various Operating Systems on the Internet  that use it as a default Desktop browser it is a must in the arsenal of browsers to have,.

Hence Google Chrome is a necessery evil  for for those who use their computer for quality assurance QA of web based websites for those developers or web testers who have to make sure a developed website is to be perfectly visualizing across all major web browsers across one major concern is how website behaves with  Google Chrome.

1. Install Google Chrome web browser on Debian and Ubuntu Linux

In Debian GNU / Linux 9, Google Chrome browser is not among the non-free available and installable packages with apt-get

In order to have t installed, you have to manually download the debian .deb package distributed by Google, e.g.:
 

wget https://dl.google.com/linux/direct/google-chrome-stable_current_amd64.deb


Once downaloaded next step is to install using dpkg tool:


debian-linux:~# dpkg -i google-chrome-stable_current_amd64.deb
Selecting previously unselected package google-chrome-stable.
(Reading database … 300021 files and directories currently installed.)
Preparing to unpack google-chrome-stable_current_amd64.deb …
Unpacking google-chrome-stable (55.0.2883.87-1) …
Setting up google-chrome-stable (55.0.2883.87-1) …
update-alternatives: using /usr/bin/google-chrome-stable to provide /usr/bin/x-www-browser (x-www-browser) in auto mode
update-alternatives: using /usr/bin/google-chrome-stable to provide /usr/bin/gnome-www-browser (gnome-www-browser) in auto mode
update-alternatives: using /usr/bin/google-chrome-stable to provide /usr/bin/google-chrome (google-chrome) in auto mode
Processing triggers for menu (2.1.47) …
Processing triggers for man-db (2.7.6.1-2) …
Processing triggers for desktop-file-utils (0.23-1) …
Processing triggers for gnome-menus (3.13.3-8) …
Processing triggers for mime-support (3.60)

..


Note to make here is either you have to be root superuser as in above example, or you'll have to run it through sudo command to emulate administrator privileges


debian-linux:~$ sudo dpkg -i google-chrome-stable_current_amd64.deb


Once the Install completes, it will automatically add a Shortcut in your Gnome or KDE desktop start menus (in newer gnome versions that miss the standard start menu, but instead use the application dock, you can directly search it through the Unity dock search applet.

You can also manually run the browser in Gnome by pressing the good old (ALT+F2) to invoke the command run screen
or open gnome-terminal / konsole / xterm whatever terminal you prefer and run it with command:

debian-linux:~$ google-chrome


2. Installing Google Chrome on Fedora and CentOS Linux

There are available RPM packages in the Google provided RPM repository, so on Fedora and CentOS Linux fist thing to do is to add the necessery reposotiries to yum package manager:

For this you will need to have created file /etc/yum.repos.d/google-chrome.repo with a text editor and place inside:
 

[google-chrome]
name=google-chrome – $basearch
baseurl=http://dl.google.com/linux/chrome/rpm/stable/$basearch
enabled=1
gpgcheck=1
gpgkey=https://dl-ssl.google.com/linux/linux_signing_key.pub


You can also directly do it without using a text editor (this is especially) helpful if you need to deploy Google Chrome on a bunch of Linux computers lets say in university computer laboratory simultaneously by issuing with a script that is connecting to multiple hosts through ssh the following:
 

cat << EOF > /etc/yum.repos.d/google-chrome.repo
[google-chrome]
name=google-chrome – $basearch
baseurl=http://dl.google.com/linux/chrome/rpm/stable/$basearch
enabled=1
gpgcheck=1
gpgkey=https://dl-ssl.google.com/linux/linux_signing_key.pub
EOF


Next step is to install it with yum on the single or multiple hosts with:


[root@fedora:~ ]# yum update

[root@fedora:~ ]# yum install google-chrome-stable


This should deploy google chrome and from now on you can either look for to start it from Application menu or run it manually in terminal:


[hipo@fedora:~ ]$ google-chrome


Though above example to install is Fedora 21,22,23,24,25,26 versions specific, the install across different CentOS 6, 7 and Redhat Enterprise Linux (RHEL 7.3) versions is identical.

Block Web server over loading Bad Crawler Bots and Search Engine Spiders with .htaccess rules

Monday, September 18th, 2017

howto-block-webserver-overloading-bad-crawler-bots-spiders-with-htaccess-modrewrite-rules-file

In last post, I've talked about the problem of Search Index Crawler Robots aggressively crawling websites and how to stop them (the article is here) explaning how to raise delays between Bot URL requests to website and how to completely probhit some bots from crawling with robots.txt.

As explained in article the consequence of too many badly written or agressive behaviour Spider is the "server stoning" and therefore degraded Web Server performance as a cause or even a short time Denial of Service Attack, depending on how well was the initial Server Scaling done.

The bots we want to filter are not to be confused with the legitimate bots, that drives real traffic to your website, just for information

 The 10 Most Popular WebCrawlers Bots as of time of writting are:
 

1. GoogleBot (The Google Crawler bots, funnily bots become less active on Saturday and Sundays :))

2. BingBot (Bing.com Crawler bots)

3. SlurpBot (also famous as Yahoo! Slurp)

4. DuckDuckBot (The dutch search engine duckduckgo.com crawler bots)

5. Baiduspider (The Chineese most famous search engine used as a substitute of Google in China)

6. YandexBot (Russian Yandex Search engine crawler bots used in Russia as a substitute for Google )

7. Sogou Spider (leading Chineese Search Engine launched in 2004)

8. Exabot (A French Search Engine, launched in 2000, crawler for ExaLead Search Engine)

9. FaceBot (Facebook External hit, this crawler is crawling a certain webpage only once the user shares or paste link with video, music, blog whatever  in chat to another user)

10. Alexa Crawler (la_archiver is a web crawler for Amazon's Alexa Internet Rankings, Alexa is a great site to evaluate the approximate page popularity on the internet, Alexa SiteInfo page has historically been the Swift Army knife for anyone wanting to quickly evaluate a webpage approx. ranking while compared to other pages)

Above legitimate bots are known to follow most if not all of W3C – World Wide Web Consorium (W3.Org) standards and therefore, they respect the content commands for allowance or restrictions on a single site as given from robots.txt but unfortunately many of the so called Bad-Bots or Mirroring scripts that are burning your Web Server CPU and Memory mentioned in previous article are either not following /robots.txt prescriptions completely or partially.

Hence with the robots.txt unrespective bots, the case the only way to get rid of most of the webspiders that are just loading your bandwidth and server hardware is to filter / block them is by using Apache's mod_rewrite through


.htaccess


file

Create if not existing in the DocumentRoot of your website .htaccess file with whatever text editor, or create it your windows / mac os desktop and transfer via FTP / SecureFTP to server.

I prefer to do it directly on server with vim (text editor)


vim /var/www/sites/your-domain.com/.htaccess


RewriteEngine On

IndexIgnore .htaccess */.??* *~ *# */HEADER* */README* */_vti*

SetEnvIfNoCase User-Agent "^Black Hole” bad_bot
SetEnvIfNoCase User-Agent "^Titan bad_bot
SetEnvIfNoCase User-Agent "^WebStripper" bad_bot
SetEnvIfNoCase User-Agent "^NetMechanic" bad_bot
SetEnvIfNoCase User-Agent "^CherryPicker" bad_bot
SetEnvIfNoCase User-Agent "^EmailCollector" bad_bot
SetEnvIfNoCase User-Agent "^EmailSiphon" bad_bot
SetEnvIfNoCase User-Agent "^WebBandit" bad_bot
SetEnvIfNoCase User-Agent "^EmailWolf" bad_bot
SetEnvIfNoCase User-Agent "^ExtractorPro" bad_bot
SetEnvIfNoCase User-Agent "^CopyRightCheck" bad_bot
SetEnvIfNoCase User-Agent "^Crescent" bad_bot
SetEnvIfNoCase User-Agent "^Wget" bad_bot
SetEnvIfNoCase User-Agent "^SiteSnagger" bad_bot
SetEnvIfNoCase User-Agent "^ProWebWalker" bad_bot
SetEnvIfNoCase User-Agent "^CheeseBot" bad_bot
SetEnvIfNoCase User-Agent "^Teleport" bad_bot
SetEnvIfNoCase User-Agent "^TeleportPro" bad_bot
SetEnvIfNoCase User-Agent "^MIIxpc" bad_bot
SetEnvIfNoCase User-Agent "^Telesoft" bad_bot
SetEnvIfNoCase User-Agent "^Website Quester" bad_bot
SetEnvIfNoCase User-Agent "^WebZip" bad_bot
SetEnvIfNoCase User-Agent "^moget/2.1" bad_bot
SetEnvIfNoCase User-Agent "^WebZip/4.0" bad_bot
SetEnvIfNoCase User-Agent "^WebSauger" bad_bot
SetEnvIfNoCase User-Agent "^WebCopier" bad_bot
SetEnvIfNoCase User-Agent "^NetAnts" bad_bot
SetEnvIfNoCase User-Agent "^Mister PiX" bad_bot
SetEnvIfNoCase User-Agent "^WebAuto" bad_bot
SetEnvIfNoCase User-Agent "^TheNomad" bad_bot
SetEnvIfNoCase User-Agent "^WWW-Collector-E" bad_bot
SetEnvIfNoCase User-Agent "^RMA" bad_bot
SetEnvIfNoCase User-Agent "^libWeb/clsHTTP" bad_bot
SetEnvIfNoCase User-Agent "^asterias" bad_bot
SetEnvIfNoCase User-Agent "^httplib" bad_bot
SetEnvIfNoCase User-Agent "^turingos" bad_bot
SetEnvIfNoCase User-Agent "^spanner" bad_bot
SetEnvIfNoCase User-Agent "^InfoNaviRobot" bad_bot
SetEnvIfNoCase User-Agent "^Harvest/1.5" bad_bot
SetEnvIfNoCase User-Agent "Bullseye/1.0" bad_bot
SetEnvIfNoCase User-Agent "^Mozilla/4.0 (compatible; BullsEye; Windows 95)" bad_bot
SetEnvIfNoCase User-Agent "^Crescent Internet ToolPak HTTP OLE Control v.1.0" bad_bot
SetEnvIfNoCase User-Agent "^CherryPickerSE/1.0" bad_bot
SetEnvIfNoCase User-Agent "^CherryPicker /1.0" bad_bot
SetEnvIfNoCase User-Agent "^WebBandit/3.50" bad_bot
SetEnvIfNoCase User-Agent "^NICErsPRO" bad_bot
SetEnvIfNoCase User-Agent "^Microsoft URL Control – 5.01.4511" bad_bot
SetEnvIfNoCase User-Agent "^DittoSpyder" bad_bot
SetEnvIfNoCase User-Agent "^Foobot" bad_bot
SetEnvIfNoCase User-Agent "^WebmasterWorldForumBot" bad_bot
SetEnvIfNoCase User-Agent "^SpankBot" bad_bot
SetEnvIfNoCase User-Agent "^BotALot" bad_bot
SetEnvIfNoCase User-Agent "^lwp-trivial/1.34" bad_bot
SetEnvIfNoCase User-Agent "^lwp-trivial" bad_bot
SetEnvIfNoCase User-Agent "^Wget/1.6" bad_bot
SetEnvIfNoCase User-Agent "^BunnySlippers" bad_bot
SetEnvIfNoCase User-Agent "^Microsoft URL Control – 6.00.8169" bad_bot
SetEnvIfNoCase User-Agent "^URLy Warning" bad_bot
SetEnvIfNoCase User-Agent "^Wget/1.5.3" bad_bot
SetEnvIfNoCase User-Agent "^LinkWalker" bad_bot
SetEnvIfNoCase User-Agent "^cosmos" bad_bot
SetEnvIfNoCase User-Agent "^moget" bad_bot
SetEnvIfNoCase User-Agent "^hloader" bad_bot
SetEnvIfNoCase User-Agent "^humanlinks" bad_bot
SetEnvIfNoCase User-Agent "^LinkextractorPro" bad_bot
SetEnvIfNoCase User-Agent "^Offline Explorer" bad_bot
SetEnvIfNoCase User-Agent "^Mata Hari" bad_bot
SetEnvIfNoCase User-Agent "^LexiBot" bad_bot
SetEnvIfNoCase User-Agent "^Web Image Collector" bad_bot
SetEnvIfNoCase User-Agent "^The Intraformant" bad_bot
SetEnvIfNoCase User-Agent "^True_Robot/1.0" bad_bot
SetEnvIfNoCase User-Agent "^True_Robot" bad_bot
SetEnvIfNoCase User-Agent "^BlowFish/1.0" bad_bot
SetEnvIfNoCase User-Agent "^JennyBot" bad_bot
SetEnvIfNoCase User-Agent "^MIIxpc/4.2" bad_bot
SetEnvIfNoCase User-Agent "^BuiltBotTough" bad_bot
SetEnvIfNoCase User-Agent "^ProPowerBot/2.14" bad_bot
SetEnvIfNoCase User-Agent "^BackDoorBot/1.0" bad_bot
SetEnvIfNoCase User-Agent "^toCrawl/UrlDispatcher" bad_bot
SetEnvIfNoCase User-Agent "^WebEnhancer" bad_bot
SetEnvIfNoCase User-Agent "^TightTwatBot" bad_bot
SetEnvIfNoCase User-Agent "^suzuran" bad_bot
SetEnvIfNoCase User-Agent "^VCI WebViewer VCI WebViewer Win32" bad_bot
SetEnvIfNoCase User-Agent "^VCI" bad_bot
SetEnvIfNoCase User-Agent "^Szukacz/1.4" bad_bot
SetEnvIfNoCase User-Agent "^QueryN Metasearch" bad_bot
SetEnvIfNoCase User-Agent "^Openfind data gathere" bad_bot
SetEnvIfNoCase User-Agent "^Openfind" bad_bot
SetEnvIfNoCase User-Agent "^Xenu’s Link Sleuth 1.1c" bad_bot
SetEnvIfNoCase User-Agent "^Xenu’s" bad_bot
SetEnvIfNoCase User-Agent "^Zeus" bad_bot
SetEnvIfNoCase User-Agent "^RepoMonkey Bait & Tackle/v1.01" bad_bot
SetEnvIfNoCase User-Agent "^RepoMonkey" bad_bot
SetEnvIfNoCase User-Agent "^Zeus 32297 Webster Pro V2.9 Win32" bad_bot
SetEnvIfNoCase User-Agent "^Webster Pro" bad_bot
SetEnvIfNoCase User-Agent "^EroCrawler" bad_bot
SetEnvIfNoCase User-Agent "^LinkScan/8.1a Unix" bad_bot
SetEnvIfNoCase User-Agent "^Keyword Density/0.9" bad_bot
SetEnvIfNoCase User-Agent "^Kenjin Spider" bad_bot
SetEnvIfNoCase User-Agent "^Cegbfeieh" bad_bot


<Limit GET POST>
order allow,deny
allow from all
Deny from env=bad_bot
</Limit>


Above rules are Bad bots prohibition rules have RewriteEngine On directive included however for many websites this directive is enabled directly into VirtualHost section for domain/s, if that is your case you might also remove RewriteEngine on from .htaccess and still the prohibition rules of bad bots should continue to work
Above rules are also perfectly suitable wordpress based websites / blogs in case you need to filter out obstructive spiders even though the rules would work on any website domain with mod_rewrite enabled.

Once you have implemented above rules, you will not need to restart Apache, as .htaccess will be read dynamically by each client request to Webserver

2. Testing .htaccess Bad Bots Filtering Works as Expected


In order to test the new Bad Bot filtering configuration is working properly, you have a manual and more complicated way with lynx (text browser), assuming you have shell access to a Linux / BSD / *Nix computer, or you have your own *NIX server / desktop computer running
 

Here is how:


lynx -useragent="Mozilla/5.0 (compatible; MegaIndex.ru/2.0; +http://megaindex.com/crawler)" -head -dump http://www.your-website-filtering-bad-bots.com/


Note that lynx will provide a warning such as:

Warning: User-Agent string does not contain "Lynx" or "L_y_n_x"!

Just ignore it and press enter to continue.

Two other use cases with lynx, that I historically used heavily is to pretent with Lynx, you're GoogleBot in order to see how does Google actually see your website?
 

  • Pretend with Lynx You're GoogleBot


lynx -useragent="Mozilla/5.0 (compatible; Googlebot/2.1; +http://www.google.com/bot.html)" -head -dump http://www.your-domain.com/


  • How to Pretend with Lynx Browser You are GoogleBot-Mobile


lynx -useragent="Mozilla/5.0 (iPhone; U; CPU iPhone OS 4_1 like Mac OS X; en-us) AppleWebKit/532.9 (KHTML, like Gecko) Version/4.0.5 Mobile/8B117 Safari/6531.22.7 (compatible; Googlebot-Mobile/2.1; +http://www.google.com/bot.html)" -head -dump http://www.your-domain.com/


Or for the lazy ones that doesn't have Linux / *Nix at disposal you can use WannaBrowser website

Wannabrowseris a web based browser emulator which gives you the ability to change the User-Agent on each website req1uest, so just set your UserAgent to any bot browser that we just filtered for example set User-Agent to CheeseBot

The .htaccess rule earier added once detecting your browser client is coming in with the prohibit browser agent will immediately filter out and you'll be unable to access the website with a message like:
 

HTTP/1.1 403 Forbidden


Just as I've talked a lot about Index Bots, I think it is worthy to also mention three great websites that can give you a lot of Up to Date information on exact Spiders returned user-agent, common known Bot traits as well as a a current updated list with the Bad Bots etc.

Bot and Browser Resources information user-agents, bad-bots and odd Crawlers and Bots specifics

1. botreports.com
2. user-agents.org
3. useragentapi.com


An updated list with robots user-agents (crawler-user-agents) is also available in github here regularly updated by Caia Almeido

There are also a third party plugin (modules) available for Website Platforms like WordPress / Joomla / Typo3 etc.

Besides the listed on these websites as well as the known Bad and Good Bots, there are perhaps a hundred of others that might end up crawling your webdsite that might or might not need  to be filtered, therefore before proceeding with any filtering steps, it is generally a good idea to monitor your  HTTPD access.log / error.log, as if you happen to somehow mistakenly filter the wrong bot this might be a reason for Website Indexing Problems.

Hope this article give you some valueable information. Enjoy ! 🙂