Archive for October, 2013

Load Balancing with Nginx Webserver on GNU / Linux How to

Tuesday, October 29th, 2013

Basic load balancing with nginx how to do load balancing on linux howto

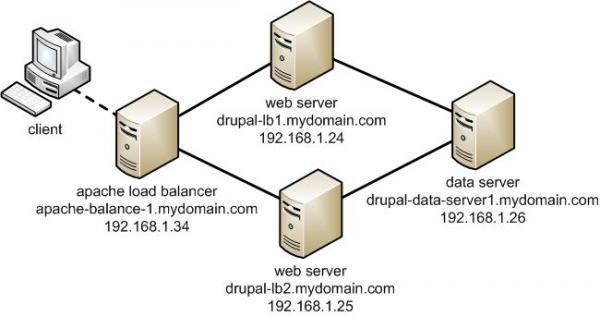
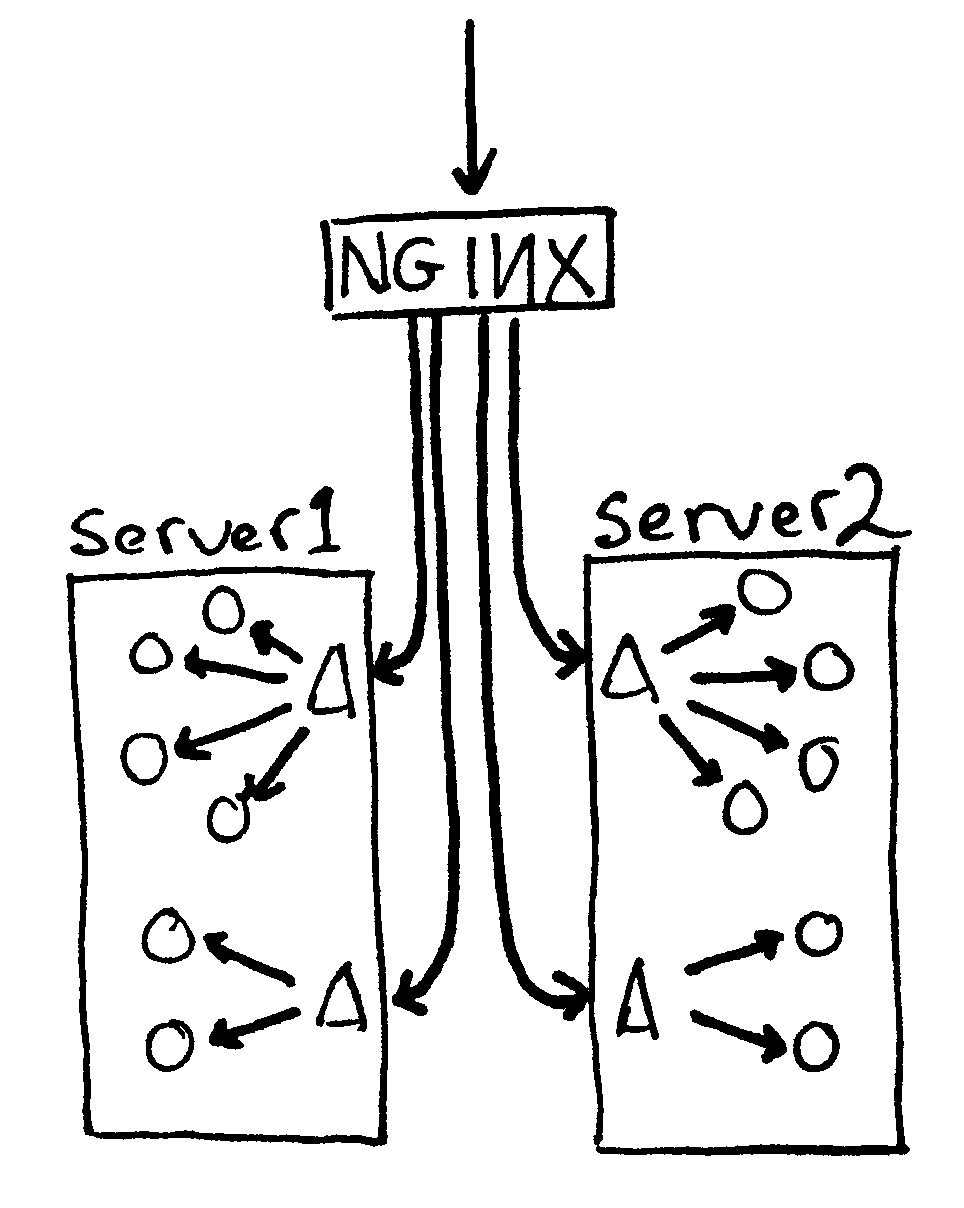
In previous article I explained how Load Balancing is done with Apache. Load balancing is distribution of Webserver incoming traffic to several Webservers behind the load balancer. Anyone who targets higher webserver availability application redundancy and fault tolerance should certainly start using Load Balancing immediately.Most common load balancing is Round Robin. Though Apache can be used for Load balancing it is not designed with Load balancing in mind thus using Apache for load balancing is probably not efficient. Actually Apache is not considered a standard solution for Load balancing. As I'm lately deepening my interest in balancers I decided to see how to configure Load balancing with Nginx Web Server. Nginx is known for its blazing speed and nowadays many Hosting providers prefer to use it fully instead of Apache. Thus I will explain herein how Load balancing can be configured with Nginx. For sake of installing Nginx I use Debian GNU / Linux.

1. Installing Nginx webserver

loadbalancer:~# apt-get install --yes nginx
....

Once installed we have to proceed with configuring Nginx to do Round Robin load balancing – for this NGINX has module handing it.
 

2. Configuring Nginx for load balancing

Next its necessary set all hosts between load balancing will be done through NGINX upstream load balancing module

a) Configuring Nginx to handle traffic equally between hosts

loadbalancer:~# vim /etc/nginx/sites-available/default
 

upstream backend   {
   server backend1.loadbalanced-server.com
   server backend2.loadbalanced-server.com
   server backend3.loadbalanced-server.com
   server backend4.loadbalanced-server.com
}

Upsing above configuration incoming HTTP traffic will be handled equally between backend1 … backend4 servers. This assumes the hosts running 4 balanced webservers are some similar or identical hardware configuration machines with identical file content. If this is not so and the 4 hosts differ in CPU power and server Memory. There is possibility to use machine weighting factor with weight variable;

b) Using weight factor to set different traffic distribution

To specify a proportion of traffic one of the 4 above hosts will get use;
 

upstream backend   {
   server backend1.loadbalanced-server.com weight=1
   server backend2.loadbalanced-server.com weight=2
   server backend3.loadbalanced-server.com weight=3
   server backend4.loadbalanced-server.com weight=4
}


weight=1 is default variable  the rest of weight set in example (weight=2,weight=3,weight=4) , meaning is as follows:

backend2.loadbalancer-server.com weight=2 – Webserver will receive 2 as much HTTP traffic as backend1
backend3.loadbalancer-server.com weight=3 – Webserver will receive 3 times the traffic of backend1
backend4.loadbalancer-server.com weight=3 – Webserver will get 4 times the traffic of backend1

In some cases it is better to supply IP addresses instead of backend1.loadbalanced-server.com … backend4, this will prevent any possible issues with DNS.
c)  Setting checks for balanced webserver to be considered unresponsive

Two very useful settings when configuring a group of webserver manging HTTP are;

  • max_fails

and

  • max_timeouts

This ones are good to be added in case if there is a chance that one or more of balanced servers dies / hangs up etc. for some unknown reason. If that happens part of HTTP traffic will continue to be handled to it and part of clients will not get responce sometimes. Configurations are useful if you happen to have a webserver which tend to be periodically dying for unknown reasons.
To avoid such situations use configuration like so:
 

upstream backend   {
   server backend1.loadbalanced-server.com max_fails=5   fail_timeout=15s
   server backend2.loadbalanced-server.com weight=2
   server backend3.loadbalanced-server.com weight=3
   server backend4.loadbalanced-server.com weight=4
}

max_fails=3 instructs Nginx balancer to make maximum 5 requests to backend1.loadbalancer-server.com each one active for maximum of 15 seconds. Whether this condition matches Nginx will consider backend1.loadbalanced-server.com as unresponsive ( down ) and will stop to deliver traffic further to it.

Then finally, we need to make load balancing active via proxy_pass by adding in config:
 

server   {
    location /  {
       proxy_pass http://backend;
     }
}


Well that's all though load balancing looks so complex and scary it turns it is a piece of cake. Of course there are plenty of things to learn in field especially if you have to manage behind the load balancer a large farm of Apache webservers. It is possible to also configure a second Nginx as load balancer to guarantee higher redundancy. 2 Nginx load balancer can be configured to work in Active load balancing mode or passive load balancing mode. Just for the curious difference between active load balancing and passive load balancing is;

  • Active load balancing the two load balancer webservers handle together incoming requests to load balancer
  • Passive load balancing only one load balancer handles HTTP traffic and in case it dies due to overload or hang up the second configured Nginx load balancer starts serving requests.

There pretty more to be said on Load balancing but I guess this article will be a good startup for people who want to start playing with Nginx load balancing. Enjoy!

How to configure Apache to serve as load balancer between 2 or more Webservers on Linux / Apache basic cluster

Monday, October 28th, 2013

Apache doing load balancer between Apache servers Apache basic cluster howto

Any admin somehow involved in sphere of UNIX Webhosting knows Apache pretty well. I've personally used Apache for about 10 years now and until now I always used it as a single installation on a Linux. Always so far whenever the requirements for more client connections raised up, web hosting companies I worked for did a migration of Website / websites on a newer better (quicker) server hardware configuration. Everyone knows keeping a site on a single Apache server poses great RISK if the machine hangs up for a reason or gets DoSed this makes websites unavailable until reboot and poses unwanted downtime. Though I know pretty well the concept of load balancing until today I never had configured Apache to serve as Load balancer between two or more identical machines set-upped to interpret PHP / Perl scripts. Amazingly load balancing users web traffic happened to be much easier than I supposed. All necessary is a single Apache configured with mod_proxy_balancer which acts as proxy and ships HTTP requests between two Apache servers. Logically its very important that the entry traffic host with Apache mod_proxy_balancer has to be configured to only run only mod_proxy_balancer otherwise it will be eating unnecessary server memory as with each unnecessary loaded Apache module usage of memory resources raise up.

The scenario of my load balancer and 2 webserver hosts behind it goes like this:

a. Apache with load balancer with external IP address – i.e. (83.228.93.76) with DNS record for ex. www.mybalanced-webserver.com
b. Normally configured Apache to run PHP scripts with internal IP address through NAT – (Network address translation) (on 10.10.10.1) – known under host JEREMIAH
c. Second identical Apache to above host running on 10.10.10.1 with IP 10.10.10.2. with internal host ISSIAH.

N.B.! All 3 hosts are running latest  Debian GNU / Linux 7.2 Wheezy
 
After having this in mind, I proceeded with installing the on 83.228.93.76 apache and removing all unnecessary modules.

!!! Important note is if you use some already existent Apache configured to run PHP or any other unnecessary stuff – make sure you remove this otherwise expect severe performance issues !!!
1. Install Apache webserver

loadbalancer:~# apt-get install --yes apache2

2. Enable mod proxy proxy_balancer and proxy_http
On Debian Linux modules are enabled with a2enmod command;

loadbalancer:~# a2enmod proxy
loadbalancer:~# a2enmod proxy_balancer
loadbalancer:~# a2enmod proxy_http

Actually what a2enmod command does is to make symbolic links from /etc/apache2/mods-available/{proxy,proxy_balancer,proxy_http} to /etc/apache2/mods-available/{proxy,proxy_balancer,proxy_http}

3. Configure Apache mod proxy to load balance traffic between JEREMIAH and ISSAIAH webservers

loadbalancer:~# vim /etc/apache2/conf.d/proxy_balancer

/etc/apache2/conf.d/proxy-balancer

Paste inside:

<Proxy balancer://mycluster> BalancerMember http://10.0.0.1 BalancerMember http://10.0.0.4 </Proxy> ProxyPass / balancer://mycluster – See more at: http://www.elastichosts.com/support/tutorials/add-a-front-end-apache-cloud-load-balancer/#sthash.29iPnZpz.dpuf

<Proxy balancer://mycluster>
BalancerMember http://10.10.10.1
BalancerMember http://10.10.10.2
</Proxy>
ProxyPass / balancer://mycluster

<Proxy balancer://mycluster> BalancerMember http://10.0.0.1 BalancerMember http://10.0.0.4 </Proxy> ProxyPass / balancer://mycluster – See more at: http://www.elastichosts.com/support/tutorials/add-a-front-end-apache-cloud-load-balancer/#sthash.29iPnZpz.dpuf

<Proxy balancer://mycluster> BalancerMember http://10.0.0.1 BalancerMember http://10.0.0.4 </Proxy> ProxyPass / balancer://mycluster – See more at: http://www.elastichosts.com/support/tutorials/add-a-front-end-apache-cloud-load-balancer/#sthash.29iPnZpz.dpuf

<Proxy balancer://mycluster> BalancerMember http://10.0.0.1 BalancerMember http://10.0.0.4 </Proxy> ProxyPass / balancer://mycluster – See more at: http://www.elastichosts.com/support/tutorials/add-a-front-end-apache-cloud-load-balancer/#sthash.29iPnZpz.dpuf

<Proxy balancer://mycluster> BalancerMember http://10.0.0.1 BalancerMember http://10.0.0.4 </Proxy> ProxyPass / balancer://mycluster – See more at: http://www.elastichosts.com/support/tutorials/add-a-front-end-apache-cloud-load-balancer/#sthash.29iPnZpz.dpuf


4. Configure Apache Proxy to access traffic from all hosts (by default it is configured to Deny from all)

<Proxy balancer://mycluster> BalancerMember http://10.0.0.1 BalancerMember http://10.0.0.4 </Proxy> ProxyPass / balancer://mycluster – See more at: http://www.elastichosts.com/support/tutorials/add-a-front-end-apache-cloud-load-balancer/#sthash.29iPnZpz.dpuf

loadbalancer:~# vim /etc/apache2/mods-enabled/proxy.conf

Change there Deny from all to Allow from all

Deny from all
/etc/apache2/mods-enabled/proxy.conf

5. Restart Apache

loadbalancer:~# /etc/init.d/apache2 restart

Once again I have to say that above configuration is actually a basic Apache cluster so hosts behind load balancer Apache there should be machines configured to interpret scripts identically. If one Apache server of the cluster dies, the other Apache + PHP host will continue serve and deliver webserver content so no interruption will happen. This is not a round robin type of load balancer. Above configuration will distribute Webserver load requested in ratio 3/4 3 parts will be served by First server and 4th parth will be delivered by 2nd Apache.
Well, that's all load balancer is configured! Now to test it open in browser www.mybalanacer-webserver.com or try to access it by IP in my case: 83.228.93.76

a2enmod proxy

On God and computers and how computers copy God’s creation

Friday, October 25th, 2013

People are copying Gods creation the-tree model people don't invent they copy

I've been thinking for a long time. How computers and involved technology copy God's creation. This kind of thoughts poped up in my mind right after I became a believer. As I'm having a strong IT background I tend to view thinks in world via the prism of my IT knowledge. If I have to learn a new science my mind tend to compare how this translates to my previous knowledge obtained in IT. Probably some other people out there has the same kind of thinking? I'm not sure if this is a geek thinking or it is usual and people from other fields of science tend to also understand the world by using accommodated knowledge in field of profession they practice. Anyways since my days I believed in Jesus Christ, I started to also to compare my so far knowledge with what I've red in Holy Bible and  in the book of The Living of Saints (which btw is unknown to most protestant world). It is very interesting that if you deeply look into how all Information Technology knowledge is organized you can see how Computers resembles the visible God's creation. In reality I came to realization how Moden Man self-deceives himself. We think with every new modern technology we achieved something new revolutionory which didn't existed before. But is it really true? Lets take some technology like Microsoft Active Directory (using LDAP) for example. LDAP structures data in a tree form where each branch could have a number of sub branches (variables). In reality it appears LDAP is not new it a translation of previous already existent knowledge in universe served in a different kind of form. Let me give some other examples, lets pick up the Internet, we claim its a new invention and from human point of view it is. But if we look on it via the prism of existing created world. It is just a interconnection between "BIG DATA" in real world it is absolutely the same latest researches already know all in world is data and all data in world is interconnected. So obviously the internet is another copying of the wonderful things God created in material and for those who can accept (the spiritual world) world. Many who are hard-core atheists will argue that we copy things in the world but all the material world is just a co-incidence. But having in mind that the world is so perfectly tuned "for living beings to exist" it is near to impossible that all this life and perfection emerged by random. The tree structure model is existing everywhere in OS and programming. We can see it in hiearchy of a file system, we can see it in hashes (arrays) in programming and all this just copies the over-simplified model of a real tree (which we know well from Biology is innemous times more complex). Probably the future of computing is in Biotechnologies and people's attempts to copy how living organism works. We know from well from science-fiction and cyberpunk the future should be mostly in Bio-technologies and computer as we know it but even this high-tech next generation technology will be based on existent things. Meaning man doesn't invent something so different he does copy a model and then modify the model according to environment or just makes a combination of a number of models to achieve a next one. Sorry for the rant post but I'm thinking on this for quite a while and I thought i should spit it here and interested to hear what people think and what are the arguments for or against my thesis?

FastStone nice alternative picture freeware viewer software to Windows Photo Viewer

Tuesday, October 22nd, 2013

Faststone Windows 7 Vista Win 8 free good picture iewer program logo
I'm forced to use Windows in my work place in HP and occasionally have to open pictures. Default Windows viewer Windows Photo Viewer is very limited in what it can do. It can't even Rotate a picture so I find it a good idea to find a good alternative. Historically I liked to use IrfanView Freeware but I saw a colleague to use FastStone Image Viewer and I decided to give it a try. It looks more function rich than IrfanView so I install it and intend to use it as primary picture viewer on HP work Elitebook 8470p with Windows 7

Irfanview windows 8 picture viewer alternative to default Microsoft Picture Viewer screenshot

I strongly recommend the program to anyone looking for a good alternative to 'woody' Windows Image Viewer and who for some reason wants alternative to Irfanview.

FastStone has all the basic features I need like Crop image, Rotate Image etc. by using it I don't have to run GIMP for simple image manipulations. Another good reason to use FastStone is many of well known shortcut keys are similar to Proprietary (Non-Free) ACDSee which I used to heavily used in old days when I was still using Windows 98 so it feels using it quite confortable. Other thing is FastStone manages quite well non-standard RAW formats from various Cameras.

FastStone image pictureviewer windows good windows Image Viewer alternative to Windows default image viewer program and IrfanView
 
FastStone has even a bunch of standard Effects to apply to a picture, play with Shadows Lightning and most of basic professional File manipulation embedded. Hope someone will benefit out of the post and will start using it.

Enjoy

A night vigil Holy Liturgy service in German Monastery near Sofia

Monday, October 21st, 2013

This Friday 18.10.2013 I was to a Night Vigil in German Monastery – Saint John of Rila Sofia,Bulgaria.

German monastery near Sofia Bulgaria picture

The reason for the Night Vigil was the Dormition of the Greatest Bulgarian hermit Saint – St. John of Rila (Mountain).

sveti Ioan Rilski Chudotvorets - The Miracle Maker Orthodox Christian holy icon

The whole Christiandome knows well about the reachless spiritual achievements of Saint John who become monk in 25 years of age. After spending few years in a monastery nearby his birth village Skrino. Soon after accepting monkship, the saint came out of the monastery and lived for over 30 years as Hermit in the Mountain of Rila, he lived in a small cave which nowadays is about 5 kilometers from the biggest active monastery in Bulgaria – Rila Monastery. Rila Monastery was established by direct followers of st. John of Rila. In the last days of his earthly live Saint John of Rila wrote a small testament to his followers, which is a great spiritual work and guidance for modern times Christians even to this day. The saint is highly venerated in Serbia, Macedonia, Croatia, Greece as well as Russia. A well known fact is the great love of one of the greatest new times Russian saint Saint John of Kronstadt for st. John of Rila and the Bulgarian lands. Its interesting and maybe less known fact by Russians that Saint John of Kronstadt's Christian name was given after saint John of Rila and not after Saint John the Baptist as many might thought.

sveti Ioan Kronstadtski snimka new times Russian saint

German Monastery is under official Governance of Bulgarian Zographus Monastery Saint George the Glory Bringer situated in Holy Mount Athos. German monastery is situated in 40 minutes walking from a small village near end of Sofia German after which the monastery is named. To reach the monastery the easiest way is to use Sofia's public bus transport and catch Bus Number 6 and go down of bus few meters away from beginning of German village. The Abbot of the monastery Hieromonk Father Pimen is part of the brotherhood of Zographus monastery and is leading German Monastery with Blessing of Abbot Amvrosij of Zographus monastery. The Night Vigil in venerance of Saint John Started around 21:00 and was a unique experience. Saint John of Rila Troparion and prayers were sung and recited many times. There was evening service as well as other prayers part of the Vigil I'm not aware of. Here in Sofia there is Orthodox Youth movement consisting of about 30 or 40 people and many of this people came for the Night Vigil. The little Church was full with people aging from 25 to around 60.

Seeing so many people who hunger for spiritual live here in Bulgaria was God's miracle which filled me with joy and hope that still the Bulgarian nation is not totally lost as many might think already. The Night Vigil continued until 04:30 early in the Morning the service was done only in Candles just like it used to be in the days of first Christians, just like it is served daily in Holy Mount Athos Zographus monastery. A Holy Liturgy only in Candles is something rare to experience these days so I'm very thankful I took part in it. I met a lot of young interesting people many of which was involved in IT (programmers, system admins) just like me also had a love for Christ. After the end of service there was an official festive dinner organized by the Abbot Father Pimen. Food consisted of Fish, Cabbage, Mixed cream-cheese with caviar lemon and bread and some waffles for dessert along with wine and juice. Like always in Churches in Monasteries blessed food is always mostly delicious. German monastery is situated near Mountain and there is no Mobile networks in it so being there you feel cut from the noisy quickly goign daily life and you can enjoy the silence. Near the monastery are woods and fresh clean air. Being there just makes you forget about all the stress and business and shrink in thoughts about life meaning. I highly recommend this blessed place to every Christian who somehow has a journey to Sofia. I'm thankful to God for giving me opportunity to visit this blessed place. This is second time I visit the monastery and hope in coming weeks I'll have opportunity to be there again.

Saving multiple passwords in Linux with Revelation and Keepass2 – Keeping track of multiple passwords

Thursday, October 17th, 2013

System Administrators who use MS Windows to access multiple hosts in big companies like HP or IBM certainly use some kind of multiple password manager like PasswordSafe.

Keep multiple passwords safe in Microsoft Windows 7 passwordsafe with masterpassword

When number of passwords you have to keep in mind grows significantly using something like PasswordSafe becomes mandatory. Same is valid also for valid for system administrators who use GNU / Linux as a Desktop environment to administer thousands or hundreds of servers. I'm one of those admins who for years use Linux and until recently I kept logging all my passwords in separate directory full with text files created with vim (text editor). As the number of passwords and accesses to servers and web interfaces grow up dramatically as well as my requirement for security raised up I wanted to have my passwords secured being kept encrypted on my hard drive. For those who never use PasswordSafe the idea of program is to store all passwords you have in encrypted database which can be only opened through PasswordSafe by providing a master password.

passwordsafe on microsoft windows keep in order multiple passwords manager

Of course having one master password imposes other security risks as someone who knows the MasterPass can easily access all your passwords anyways for now such level of security perfectly fits my needs.

PasswordSafe is since recently Open Source so there is a Linux port, but the port is still in beta and though I tried hard to install it using provided .deb binaries as well as compile from source, I finally give it up. And decided to review what kind of password managers are available in Debian Wheezy's ports.

Here are those I found with;

apt-cache search password|grep -i manager

cpm – Curses based password manager using PGP-encryption
fpm2 – password manager with GTK+ 2.x GUI
gringotts – secure password and data storage manager
kedpm – KED Password Manager
kedpm-gtk – KED Password Manager
keepass2 – Password manager
keepassx – Cross Platform Password Manager
kwalletmanager – secure password wallet manager
password-gorilla – cross-platform password manager
revelation – GNOME2 Password manager

I didn't have the time to test each one of them, so I installed and checked only those which seemed more reliable, i.e.:
keepass2 and revelation

# apt-get install –yes fpm2 keepass2 revelation

Below is screenshot of each one of managers:

Revelation Linux Gnome graphic password manager program

Revelation – GNOME Password Manager

keepass2 Linux gui password manager screenshot Debian - graphic manager for storing passwords

kde password safe gui program Linux Debian screenshot

KDE QT Interface Linux GUI Password Manager (KeePass2)

With one of this tools admin's life is much easier as you don't have to get crazy and remember thousands of passwords.
Hope this helps some admin out there! Enjoy ! 🙂
 

How to disable / block sites with Squid Proxy ACL rules on Debian GNU / Linux – Setup Transparent Proxy

Wednesday, October 16th, 2013

Squid transparant proxy disabling blocking websites with Squid proxy

Often when configuring new Firewall router for a network its necessary to keep log on HTTP (Web) traffic passing by the router. The best way to do this in Linux is by using Proxy server. There are plenty of different Proxy (Caching) servers for GNU / Linux. However the most popular one is Squid (WWW Proxy Cache). Besides this its often a requirement in local office networks that Proxy server is transparent (invisible for users) but checking each and every request originating from the network. This scenario is so common in middle sized and small sized organizations that its a must that every Linux admin is ready to easily configure it. In most of my experience so far I used Debian Linux, so in this post I will explain how to configure Transparent Squid Proxy with configured ACL block rules for employee's time wasting services like facebook / youtube / vimeo etc.

Here is diagram I found on a skullbox.net showing graphically below Squid setup:

Squid as transparent proxy behind nat firewall diagram

1. Install Squid Proxy Server

Squid is available as Debian package since a long time, so on Deb Linux installing Squid is a piece of cake.

debian-server:~# apt-get install --yes squid
...


2. Create /var/cache/proxy directory and set proper permissions necessary for custom config

debian-server:~# mkdir /var/cache/proxy
debian-server:~# chown -R proxy:proxy /var/cache/proxy

3. Configure Squid Caching Server

By default debian package extract script does include default squid.conf which should be substituted with my custom squid.conf. A Minor user changes has to be done in config, download my squid.conf from here and overwrite default squid.conf in /etc/squid/squid.conf. Quickest way to do it is through:

debian-server:~# cd /etc/squid
debian-server:/etc/squid# mv /etc/squid/squid.conf /etc/squid/squid.conf.orig
debian-server:/etc/squid# wget -q https://www.pc-freak.net/files/squid.conf
debian-server:/etc/squid# chown -R root:root squid.conf

Now open squid.conf and edit lines:

http_port 192.168.0.1:3128

Change 192.168.0.1 which is IP assigned to eth1 (internal NAT-ted interface) with whatever IP of local (internal network) is. Some admins prefer to use 10.10.10.1 local net addressing.
Below in configuration, there are some IPs from 192.168.0.1-255 network configured through Squid ACLs to have access to all websites on the Internet. To tune such IPs you will have to edit lines after (1395) after comment

# allow access to filtered sites to specific ips


4. Disabling sites that pass through the proxy server

Create file /etc/disabled-sites i.e.:

debian-server:~# touch /etc/disabled-sites

and place inside all siles that would like to be inaccessible for local office network either through text editor (vim / pico etc.) or by issuing:

debian-server:~# echo 'facebook.com' >> /etc/disabled-sites
debian-server:~# echo ''youtube.com' >> /etc/disabled-sites
debian-server:~# echo 'ask.com' >> /etc/disabled-sites

5. Restart Squid to load configs

debian-server:~# /etc/init.d/squid restart
[ ok ] Restarting Squid HTTP proxy: squid.

6. Making Squid Proxy to serve as Transparent proxy through iptables firewall Rules

Copy paste below shell script to lets say /etc/init.d/squid-transparent-fw.sh
 

#!/bin/bash
IPT=/sbin/iptables;

IN=INPUT;
OUT=OUTPUT;
FORW=FORWARD;

AC=ACCEPT;
REJ=REJECT;
DRP=DROP;
RED=REDIRECT;
MASQ=MASQUERADE;
POSTR=POSTROUTING;
PRER=PREROUTING;
OUT_IFACE=eth2;
OUT_B_IFACE=eth0;
IN_IFACE=eth1;
MNG=mangle;

ALL_NWORKS='0/0';
LOCALHOST='127.0.0.1';

# forward to squid.
$IPT -t nat -I $PRER -p tcp -s 192.168.0.0/24 -d ! 192.168.0.1 –dport www -j $RED –to 3128
$IPT -t nat -I $PRER -p tcp -s 192.168.0.0/24 -d ! 192.168.0.1 –dport 3128 -j $RED –to 3128

# Reject connections to squid from the untrusted world.
# rules for order.
$IPT -A $IN -p tcp -s 83.228.93.76 -d $ALL_NWORKS –dport 65221 -j $AC

$IPT -A $IN -p tcp -s $ALL_NWORKS –dport 65221 -j $REJ
$IPT -A $IN -i $OUT_B_IFACE -p tcp -s $ALL_NWORKS –dport 3128 -j $REJ

Easiest way to set up squid-transparent-fw.sh firewall rules is with:

debian-server:~# cd /etc/init.d/
debian-server:/etc/init.d# wget -q https://www.pc-freak.net/files/squid-transparent-fw.sh
debian-server:/etc/init.d# chmod +x squid-transparent-fw.sh
debian-server:/etc/init.d/# bash squid-transparent-fw.sh
Then place line /etc/init.d/squid-transparent-fw.sh into /etc/rc.local before exit 0
 

That's all now Squid Transparent Proxy will be up and running and the number of sites listed in disabled-sites will be filtered for Office employees returning a status of Access Denied.

Access Denied msg

Gets logged in /var/log/squid/access.log example of Denied access for Employee with IP 192.168.0.155 is below:

192.168.0.155 - - [16/Oct/2013:16:50:48 +0300] "GET http://youtube.com/ HTTP/1.1" 403 1528 TCP_DENIED:NONE

Various other useful information on what is cached is also available via /var/log/squid/cache.log and /var/log/squid/store.log

Another useful thing of using Transparent Squid Proxy is that you can always keep track on exact websites opened by Employees in Office so you can easily catch people trying to surf p0rn websites or some obscenity.

Hope this post helps some admin out there 🙂 Enjoy

How to disable ICMP ping protocol on Linux router with iptables to protect against ping Flood Denial of Service

Monday, October 14th, 2013

how to disable ping icmp protocol on linux server - how to drop incoming ping floods
Its useful to disable ICMP reply sometimes on Linux, especially if you have to deal with abusive script kiddies trying to DoS your host using ICMP Ping flood. Though ICMP Ping Flood is no longer so used as it used to be in past still there are some malicious users trying to use it to revenge a company for being mis-treated or simply because someone paid them to do financial loss to a company through DDoS-ing there internet portal or whatever …

From position of system administrator implementing a tiny one liner iptables rule protects severely against basic ICMP Ping Flood, the rule will not be hard to pass by experienced attacker but still will stop a lot of shit ICMP traffic:

Here is rule:

fw-server:~# iptables -I INPUT -j DROP -p icmp --icmp-type echo-request

Sometimes its necessary Filter IPs of certain hosts trying to DoS you to do so:

fw-server:~# iptables -I INPUT -s xxx.xxx.xxx.xxx -j DROP -p icmp --icmp-type echo-request

To disable ICMP ping requests on IPv6 protocol:

fw-server:~#ip6tables -I INPUT -p icmpv6 --icmp-type 8 -j DROP Note that above firewall rule does not drop all ICMP requests (as there are ICMP requests) necessary for standard TCP/IP or UDP applications to properly operate, but it DROPs packets of ICMP type (echo request).

If later its necessary to temporary enable ping on server quickest way is to FLUSH all INPUT chain temporary, i.e.:

fw-server:~# iptables -F INPUT

Whether necessary to just delete the PING echo-request DROP rule one can also use:

fw-server:~# iptables --list

and

fw-server:~# iptables -D INPUT 10

Here 10 number is the number of line number where DROP icmp rule is showing.

Well that's it now your server will be a bit more secure 😉 Enjoy

Windows equivalent to Linux’s grep command – findstr (find string)

Friday, October 11th, 2013

 Windows Linux grep equivalent command findstring findstr screenshot microsoft windows 7

Most of my last 13 years are spend working on Linux. Now in my new job in Hewlett Packard. I'm forced to work again on Microsoft Windows … Therefore I'm trying to refresh my Windows knowledge. One thing I've forgotten with the years is what is Windows command equivalent to Linux grep. On Windows there is a command FINDSTR (find string).

Way to use it is almost identical as GREP on Linux. Lets say I would like to grep all opened listening ports on port 445 (used for samba – SMB shares connections) on Linux command will be:

linux:~# netstat -ant|grep -i 445|grep -i listen
...

Windows equivalent to above grep would be:

C:\> netstat -an | findstr 445 | findstr /I listen
  TCP    0.0.0.0:445            0.0.0.0:0              LISTENING
  TCP    [::]:445               [::]:0                 LISTENING

As you can see findstr has the /I argument which instructs for case insesitive search.

FINDSTR has plenty of other useful options that are precious in BATCH scripting for more here is full list of arguments:

  TCP    0.0.0.0:445            0.0.0.0:0              LISTENING
  TCP    [::]:445               [::]:0                 LISTENING

C:\> FINDSTR /?

FINDSTR [/B] [/E] [/L] [/R] [/S] [/I] [/X] [/V] [/N] [/M] [/O] [/P] [/F:file]
        [/C:string] [/G:file] [/D:dir list] [/A:color attributes] [/OFF[LINE]]
        strings [[drive:][path]filename[ …]]

  /B         Matches pattern if at the beginning of a line.
  /E         Matches pattern if at the end of a line.
  /L         Uses search strings literally.
  /R         Uses search strings as regular expressions.
  /S         Searches for matching files in the current directory and all
             subdirectories.
  /I         Specifies that the search is not to be case-sensitive.
  /X         Prints lines that match exactly.
  /V         Prints only lines that do not contain a match.
  /N         Prints the line number before each line that matches.
  /M         Prints only the filename if a file contains a match.
  /O         Prints character offset before each matching line.
  /P         Skip files with non-printable characters.
  /OFF[LINE] Do not skip files with offline attribute set.
  /A:attr    Specifies color attribute with two hex digits. See "color /?"
  /F:file    Reads file list from the specified file(/ stands for console).
  /C:string  Uses specified string as a literal search string.
  /G:file    Gets search strings from the specified file(/ stands for console).
  /D:dir     Search a semicolon delimited list of directories
  strings    Text to be searched for.
  [drive:][path]filename
             Specifies a file or files to search.

Use spaces to separate multiple search strings unless the argument is prefixed
with /C.  For example, 'FINDSTR "hello there" x.y' searches for "hello" or
"there" in file x.y.  'FINDSTR /C:"hello there" x.y' searches for
"hello there" in file x.y.

Regular expression quick reference:
  .        Wildcard: any character
  *        Repeat: zero or more occurrences of previous character or class
  ^        Line position: beginning of line
  $        Line position: end of line
  [class]  Character class: any one character in set
  [^class] Inverse class: any one character not in set
  [x-y]    Range: any characters within the specified range
  \x       Escape: literal use of metacharacter x
  \<xyz    Word position: beginning of word
  xyz\>    Word position: end of word

For full information on FINDSTR regular expressions refer to the online Command
Reference.

Linux: how to Start multiple X sessions – Connect to remote Linux GNOME with no need for VNC by exporting display

Thursday, October 10th, 2013

start multiple X server Xorg sessions export graphic X display to use Linux gui from another Linux like dumb terminal
It is useful sometimes in Linux to run multiple Xservers and from there to start few Window Managers (lets say one with Window Maker and one with GNOME and FluxBox). Running second / 3rd etc. X session is nice especially when you you'd like to access remotely your Desktop (lets say from another Linux).

To start second Xsession with only terminal from which you can invoke any GUI environment use:

xinit -- :1

For third one do

xinit -- :2


First Xsession is working on screen :0 (e.g. xinit — :0). To access and navigate later via various X sessions depending on the Linux distribution and how it is configured to which console to start new sessions use

ALT + F5, ALT + F6, ALT + F7.

On GNU / Linux distributions where default Xorg server is running on TTY7 to switch to 2nd and 3rd Window Manager use instead:

ALT + F7, ALT + F8, ALT + F9

Alternative command to issue to launch multiple sessions with lets say GNOME (if that's default set GUI environment) use:
 

startx -- :1

and

startx -- :2

Whether you want to launch GUI environment from another Linux after connecting through SSH or telnet term client (i.e. you have old machine hardware with Linux with no graphical environment and would like to use 2nd machine with decent hardware and Xorg + GNOME running fine), way to do is via:

xhost +

and exporting DISPLAY to remote IP host.

Here is example how to launch second Xsession with GUI environment from remote Linux host.
For example we assume host which will host 2nd X session is 192.168.1.1 and host from which remote Xorg with GNOME will be accessed is 192.168.1.2.

a. Use ssh from 192.168.1.2 to 192.168.1.1

# ssh user@192.168.1.1
xorg-machine:~# xhost +

Above command allows all hosts to be able to connect to 192.168.1.1.

To enable just single host to be able to connect to Xorg server on 192.168.1.1:

xorg-machine:~# xhost +192.168.1.1

b. On xorg-machine (192.168.1.1) its necessary export display to 192.168.1.2

xorg-machine:~# export DISPLAY=192.168.1.2:0.0

To make Xorg + default GUI window manager popup then on 192.168.1.2

xorg-machine:~# startx