Archive for September, 2013

Set up Modsecurity on Debian 7 GNU / Linux to mitigate websites virus infections / Cross Site Scripting and SQL Injects

Friday, September 6th, 2013

mod security raise up your Apache webserver security and protect against cross site scripting javascript hacks and viruses

There are plenty of tutorials around on how to install and configure modsecurity  So This tutorial is nothing new, but I decided to write it since, I had to install mod_security on Debian Wheezy to protect a Debian Linux server websites from being periodically infected with Viruses / XSS / Backdoored Javascripts and Trojan horses.

Everyone who used Debian stable distribution knows the packages included in it are usually about 2 years older than latest available. Situation with latest Debian stable Wheezy  is same, but anyways even a bit outdated my experience so far is mod_security does a great job of protecting Apache sites …

1. Install libapache-mod-security and other libraries (not obligitory), but useful on most Apache + PHP servers

  Run below commands to add xml and rest of useful Apache stuff:


apt-get install libxml2 libxml2-dev libxml2-utils
apt-get install libaprutil1 libaprutil1-dev

Above commands will install a bunch of other dependency packages.

Next install mod-security deb. Run below command, to install and activate modsecurity. Note that installing libapache-mod-security will also automatically restart the Apache server.
 

apt-get install libapache-mod-security

Next to enable all functionality of modsecurity headers Apache module is required as well, activate it with:

 
a2enmod headers
service apache2 restart

2. Make sure mod_security Apache config looks like


<IfModule security2_module>
# Default Debian dir for modsecurity's persistent data
SecDataDir /var/cache/modsecurity
# Include all the *.conf files in /etc/modsecurity.
# Keeping your local configuration in that directory
# will allow for an easy upgrade of THIS file and
# make your life easier
Include "/etc/modsecurity/*.conf"
</IfModule>

Important part of conf is  "Include "/etc/modsecurity/*.conf"" line. /etc/modsecurity directory is main place to set up and configure modsecurity. This configuration file, combined with mod-security.load, do everything necessary to load the modsecurity into Apache server.

3.Enable and Load modsecurity default configuration rules:

So far, modsecurity is loaded into the apache server, but isn't stopping any attempts of hack scripts / Viruses / or automated tools to exploit Vulnerabilities in Web Applications. To make modsecurity start filtering requests, should activate  modsecurity specific configuration and load some regular expression rules.
First to do is enable "recommended" modsecurity configuration file:
 

Code:
cd /etc/modsecurity
mv modsecurity.conf-recommended modsecurity.conf

Default configuration from recommended conf enables modsecurity in an "examine only" mode. In order to make full use of the module, we have to make a few changes. With  favorite text editor open modsecurity.conf (mine is vim)and make the following change:

Code:
SecRuleEngine On

This makes modsecurity to block requests based on its (pre-written) developer rules. Other settings in this file that are useful to know about are the debug controls, very useful, whether you have to debug problems with sites not properly opening due to server enabled mod_security.
 

Code:
#SecDebugLog /opt/modsecurity/var/log/debug.log
#SecDebugLogLevel 3

This controls how much information is stored in modsecurity's "audit log as well as keeps track of attacks launched to server. Default debug level of 3 is pretty much and stores "everything". This is dangerous as a huge logs are produces on  busy servers.
 

Code:
SecAuditLogParts ABIJDEFHZ

4. Enable extra modsecurity prevention rules

Modsecurity works by using rules by pre-defined patterns used to recognize when your website/s is being probed or attacked. Once installed modsecurity base package as a dependency modsecurity-crs package is installed. modsecurity-crs contains addition free core rule set. Current Core rule from modsecurity.org are newer than version included with wheezy,  thus rules lack a bit behind but this is only option whether using default debian bundled packge otherwise manual modsecurity recompile is required. We all know how bad it is to custom compile software on production machines, so custom compile experiments are really bad idea.

CRS (Core Rule Set) is installed in /usr/share/modsecurity-crs. This directory contains an "activated_rules" directory present also in /etc/modsecurity

Quickest way to activate rules is by symlinking from the actual config and rule files into the /etc/modsecurity config directory.

We'll be making links from the /usr/share/modsecurity location into /etc/modsecurity to activate some other useful modsec useful rules. First link main crs config file:
 

ln -s /usr/share/modsecurity-crs/modsecurity_crs_10_setup.conf /etc/modsecurity/modsecurity_crs_10_setup.conf

This file provides some basic configuration directives for crs.

Futher on, link each rule file in the base_rules and optional_rules directories using 2 tiny bash loops.


cd /usr/share/modsecurity-crs/base_rules
for f in * ; do sudo ln -s /usr/share/modsecurity-crs/base_rules/$f /etc/modsecurity/$f ; done
cd /usr/share/modsecurity-crs/optional_rules
for f in * ; do sudo ln -s /usr/share/modsecurity-crs/optional_rules/$f /etc/modsecurity/$f ; done

With that done, there's one more edit to check if modsecurity blocking works as expected. Open the /etc/modsecurity/modsecurity.conf file and add the following lines at the end (this is from the free, modsecurity pdf book, link provided below)


SecRule ARGS "MY_UNIQUE_TEST_STRING"\
"phase:1,log,deny,status:503"

Finally after all configuration rules are loaded to modsec, Usual Apache restart is required:

 
/etc/init.d/apache2 restart

Whether no fatal errors pop up and Apache starts normally, now modsecurity should be properly running.

5. Verify if modsecurity is set-up and kicking ass

To verify installation, open a browser and access some of hosted websites  like this:
http://www.your-server-domain.com/?test=MY_UNIQUE_TEST_STRING

A sure sign that modsec works is  503 "Service Temporarily Unavailable" message from Apache. Alternatively  examine server's modsec audit log file (default location in /var/log/apache2/modsec_audit.log) (grep the string MY_UNIQUE_TEST_STRING. You should see full transcript of the communication between your browser and server logged. Depending on amount of site traffic gets make sure to monitor  size of file for some minutes to make sure it doesn't grow too big and it doesn't fill up quickly your HDD.

Well now all fine your Apache server security is better for sure and by God's grace you should not have to deal with hundreds of hours of sites recovery after a bunch of client's websites are hacked.

Feedback and comments are mostly welcome. Enjoy 😉

How to make VPN PPTP (Point to Point Tunnel) Server on Debian Wheezy GNU / Linux

Thursday, September 5th, 2013

VPN pptp server linux debian logo

Creating VPN server for allowing users to connect is as early practice as the internet was used over Dial-Up modems. PPTP Connections were useful for separating user accounts traffic and easily keeping an eye on who connects to a server via phone line. Besides that VPN tunnels allows the user to connect to every possible running service locally on the server, meaning whether a user opens a VPN (PoPTOP) connection to the VPN server there is no need for port forwarding to local running server services.

Other advantages of plain VPN connection is it is a good way to grant access of Remote host not belonging to a network to have access to a distant local network using the internet as well as it is ultra easy to configure and use.
Even better PPTP is supported by virtually almost any modern operating system including all versions of Microsoft Windows.

As connection between client -> server is insecure and only password is transferred securily there is no complexity of SSL Certificate generation and Exchange like for instance whether configuring to use OpenVPN tunnel, IPsec or L2TP+IPsec.

Besides the many upmentioned advantages, there are some disadvantages of PPTP as it is unsecurely transferring data between VPN Client and VPN server.

After this short intro, here is how easy is to configure PPTP.

1. Install pptpd deb package

apt-get install pptpd

2. Edit /etc/pptpd.conf

vim /etc/pptpd.conf

Place near end of file:

localip 10.10.10.1
remoteip 10.0.10.2-250

localip variable sets local VPN server main IP and remoteip sets range of IPs in which VPN clients will be assigned IPs. As you see clients IPs will be assigned from;
10.0.10.2 to 10.0.10.250 .

Some other reasonable values for localip and remoteip are:

localip 192.168.1.6
remoteip 192.168.1.150-183,192.168.1.244


As you see it is possible to set only a set of few ranges of IP in class C network to be assigned new IPs on connect to PPTPD server.


3. Modify /etc/ppp/pptpd-options configuration

ms-dns 8.8.8.8
ms-dns 8.8.4.4
nobsdcomp
noipx
mtu 1490
mru 1490

I prefer setting Google's Public DNS for VPN clients use (ms-dns 8.8.8.8 … etc.), as they are often more reliable than provided ones by ISPs, however others might be happier with custom ones as they might be quicker to resolve.

4. Edit chap-secrets to place client authentication usernames and passwords

File should look something like:

# Secrets for authentication using CHAP
# client           server         secret                          IP addresses
internet pptpd qwerty

For multiple VPN users just add all user usernames and passwords. If you want to assign certain username IPs from above pre-selected range put write it too.

5. Restart PPTPD server script

/etc/init.d/pptpd restart
Restarting PPTP:
Stopping PPTP: pptpd.
Starting PPTP Daemon pptpd.

By default PPTP server listens for network connections via port 1723. If server launches properly port 1723 should be listening for connections.

netstat -etna|grep -i 1723
tcp       0           0          0.0.0.0:1723                  0.0.0.0:*               LISTEN       0        32810

6. Enable VPN server access to all nodes on local network

Enabling PPTP Client to access the whole network is tricky and very bad security practice especially if VPN server is not behind DMZ. Anyways allowing a client to all local network computers is often needed. This is done via;

enabling IP Forwarding

To do so add in /etc/sysctl.conf

net.ipv4.ip_forward=1

i.e. exec:

echo 'net.ipv4.ip_forward=1' >> /etc/sysctl.conf

sysctl -p

That's all now PPTP is ready to accept connections. I will not get into details how to configure VPN PPTP Connection from Windows host as this is an easy task and there are plenty of good tutorials online.
Cheers 😉

How to install Google Chrome web browser on Debian 7 Wheezy Linux

Wednesday, September 4th, 2013

How to install Google Chrome web browser on Debian Gnu Linux Chrome and tux logo
Just installed Debian 7 Linux and wondered how to install Google Chrome Browser on Debian Wheezy. It took me a while until I figure it out, as direct download from Google after searching for Chrome Linux had library requirements which are missing from Debian 7 Wheezy repositories.
Here is how;

1. Add  Wheezy Backports and Google's Chrome Repository to /etc/apt/sources.list

echo 'deb http://ftp.debian.org/debian/ wheezy-backports main contrib non-free' >> /etc/apt/sources.list
echo 'deb http://dl.google.com/linux/chrome/deb/ stable main' >> /etc/apt/sources.list

2. Install Google Chrome with apt-get

Here you have few options install Google Chrome Beta (whether you prefer you're an innovator), install unstable – if you prefer latest functionality and don't count on stability or install stable version.

a) Install Google Chrome Beta

apt-get install --yes google-chrome-beta

b) Install Google Chrome Unstable

apt-get install --yes google-chrome-unstable

c) Install Google Stable

apt-get install --yes google-chrome-stable

I personally prefer always to keep stable so prefer to install google-chrome-stable.

Only reason I need Google-Chrome is for testing how websites looks with it. Otherwise I don't recommend this browser to anyone who cares for his security. Obviously as Chrome is product of Google it is almost certainly it keeps complete surveillance on what you do on the net.

That's all happy web development with Chrome on Debian 🙂
 

Windows 7: Change default language for logon screen howto

Tuesday, September 3rd, 2013

WINDOWS 7 LOGO HOW TO CHANGE DEFAULT INPUT LANGUAGE TO ENGLISH

I just installed Windows 7 on my notebook. I had a licensed version of Windows Vista, which kept on notebook unused for about 4 years. Vista was too slow and even though I didn't launch it for about 2 years after launching I figured out it is broken, it boots about 10 minutes and all the time tries read from notebook Hard Disk. After re-installing with Windows 7, and setting default environment Language setting to Bulgarian I figured, my default input language set it Bulgarian. As I use more latin than Cyrillic this made me crazy as in each Windows I had to press Alt + Shift to change language to EN.

Bulgarian language was set as default even on Windows logon (Welcome Screen).

 Here is how I managed to change Windows irritating behavior so my default input language is English:

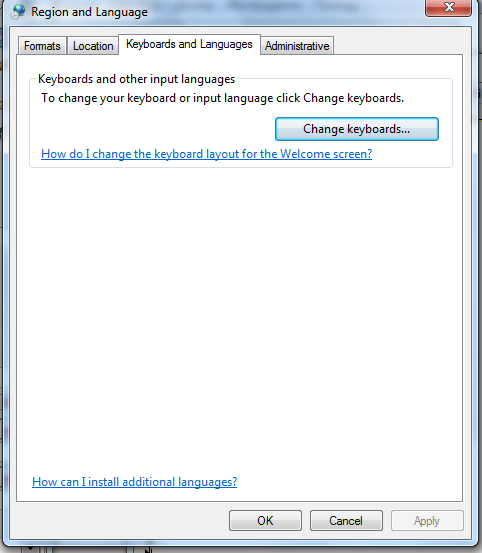
Start -> Control Panel -> Region and Language -> Keyboards and Languages

Region and language keyboards and languages windows 7 screenshot

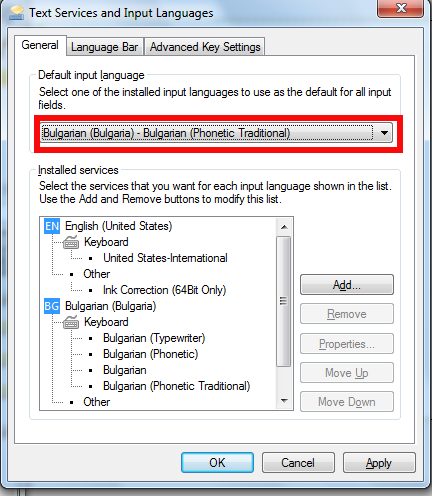
Windows 7 text services and input languages dialog screen

From there I changed language to English (UK) then retart and Hooray, default input language is English 🙂

Linux: How to change recursively directory permissions to executable (+x) flag

Monday, September 2nd, 2013

change recursively permissions of directories and subdirectories Linux and Unix with find command
I had to copy large directory from one Linux server to windows host via SFTP proto (with WinSCP). However some of directories to be copied lacked executable flag, thus WinSCP failed to list and copy them.

Therefore I needed way to set recursively, all sub-directories under directory /mirror (located on Linux server) to +x executable flag.

There are two ways to do that one is directly through find cmd, second by using find with xargs
Here is how to do it with find:

# find /mirror -type d -exec chmod 755 {} + Same done with find + xargs:

# find /path/to/base/dir -type d -print0 | xargs -0 chmod 755
To change permissions only to all files under /mirror server directory with find

# find /path/to/base/dir -type f -exec chmod 644 {} +

Same done with find + xargs:
# find /path/to/base/dir -type f -print0 | xargs -0 chmod 644

Also, tiny shell script that recursively changes directories permissions (autochmod_directories.sh) is here