Archive for August, 2011

How to make GRE tunnel iptables port redirect on Linux

Saturday, August 20th, 2011

I’ve recently had to build a Linux server with some other servers behind the router with NAT.
One of the hosts behind the Linux router was running a Window GRE encrypted tunnel service. Which had to be accessed with the Internet ip address of the server.
In order < б>to make the GRE tunnel accessible, a bit more than just adding a normal POSTROUTING DNAT rule and iptables FORWARD is necessery.

As far as I’ve read online, there is quite of a confusion on the topic of how to properly configure the GRE tunnel accessibility on Linux , thus in this very quick tiny tutorial I’ll explain how I did it.

1. Load the ip_nat_pptp and ip_conntrack_pptp kernel module

linux-router:~# modprobe ip_nat_pptp
linux-router:~# modprobe ip_conntrack_pptp

These two modules are an absolutely necessery to be loaded before the remote GRE tunnel is able to be properly accessed, I’ve seen many people complaining online that they can’t make the GRE tunnel to work and I suppose in many of the cases the reason not to be succeed is omitting to load this two kernel modules.

2. Make the ip_nat_pptp and ip_nat_pptp modules to load on system boot time

linux-router:~# echo 'ip_nat_pptp' >> /etc/modules
linux-router:~# echo 'ip_conntrack_pptp' >> /etc/modules

3. Insert necessery iptables PREROUTING rules to make the GRE tunnel traffic flow

linux-router:~# /sbin/iptables -A PREROUTING -d 111.222.223.224/32 -p tcp -m tcp --dport 1723 -j DNAT --to-destination 192.168.1.3:1723
linux-router:~# /sbin/iptables -A PREROUTING -p gre -j DNAT --to-destination 192.168.1.3

In the above example rules its necessery to substitute the 111.222.223.224 ip address withe the external internet (real IP) address of the router.

Also the IP address of 192.168.1.3 is the internal IP address of the host where the GRE host tunnel is located.

Next it’s necessery to;

4. Add iptables rule to forward tcp/ip traffic to the GRE tunnel

linux-router:~# /sbin/iptables -A FORWARD -p gre -j ACCEPT

Finally it’s necessery to make the above iptable rules to be permanent by saving the current firewall with iptables-save or add them inside the script which loads the iptables firewall host rules.
Another possible way is to add them from /etc/rc.local , though this kind of way is not recommended as rules would add only after succesful bootup after all the rest of init scripts and stuff in /etc/rc.local is loaded without errors.

Afterwards access to the GRE tunnel to the local IP 192.168.1.3 using the port 1723 and host IP 111.222.223.224 is possible.
Hope this is helpful. Cheers 😉

How to restart Microsoft IIS with command via Windows command line

Friday, August 19th, 2011

I'm tuning a Windows 2003 for better performance and securing it against DoS of service attacks. After applying all the changes I needed to restart the WebServer for the new configurations to take effect.
As I'm not a GUI kind of guy I found it handy there is a fast command to restart the Microsoft Internet Information Server. The command to restart IIS is:

c:> iisreset

Xtractor Extreme, Power Email Harvester and AMS (Advanced Mass Sender) three Windows programs to Beware of

Monday, August 15th, 2011

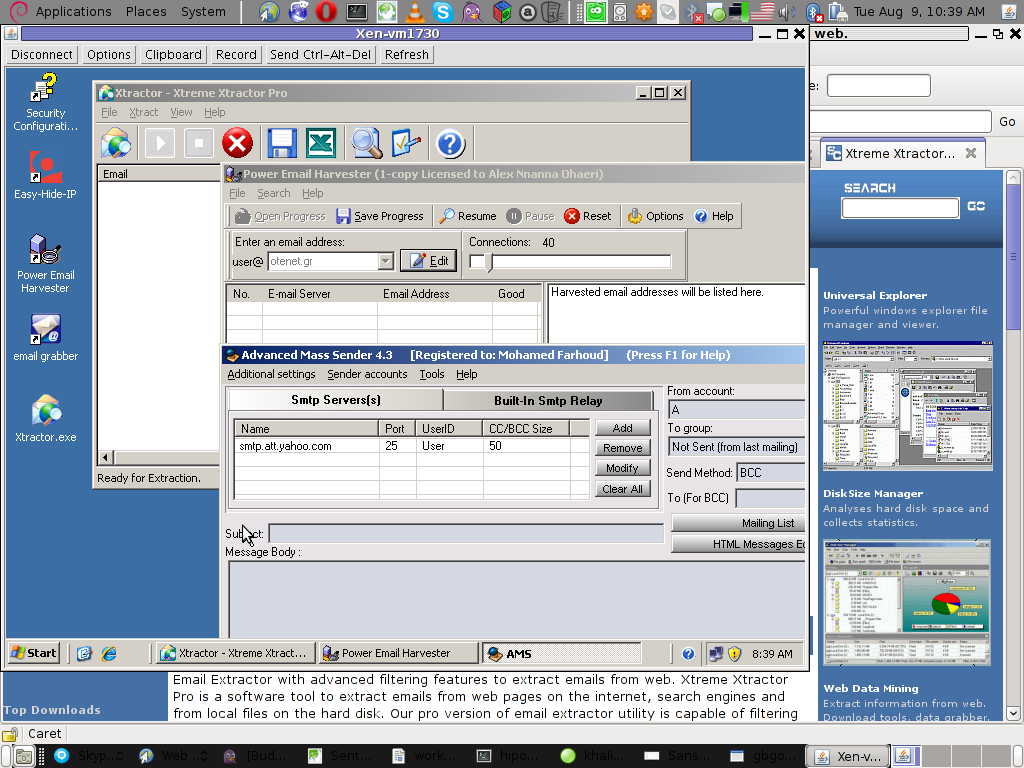
AMS (Advanced Mass Sender /Spammer) , POwer Email Harvester, Xtractor Extreme Pro Windows VPS screenshot

Few days ago, I’ve catch some Spammers on some of the servers running Windows inside Virtual Private Servers.

I was doubting if I want to write an article to mention about this 3 piece of software as it might be a bit boury however eventually I thought the goods of it will be better so I just took minutes and wrote it.

Back to the topic the three programs which the spammer was installed and prepare to do his spamming job on the VPS server was:
1. Xtractor Extreme

2. Power Email Harvester

3. Advanced Mass Sender

In order to hide his real IP address and prevent the IP he was spamming, he has also installed some anonyous proxy like Windows software called Hide My IP

The first program Xtractor is basicly an Email collector, the program crawls the net and searches to match email string on web pages.
It get target websites from major search engines.
You put an email like @gmail.com inside it and it starts spidering and grabs all email strings under the domain @gmail.com. Besides that Xtractor Extreme Pro is freeware and can be easily downloaded from many locations online.

Power Email Harvester‘s program name is also quite self-explanatory, what it does is it digs the net for email addresses and generates spam lists … This is the ultimate tool for a spammer, however the guys who create this piece of disruptive software has branded it as “a marketing tool” and even sold and advertised as a tool to help an e-marketing campaign.
This is of course just a word play and in fact in my viewe these program should be prohibited by international law.

Advanced Mass Sender is another piece of Spammer software which officially is tagged as marketing software and is sold and recommended as an useful tool for e-marketing.

I’ve take the time to take a quick and test the spammer installed AMS , honestly I’ve been amazed how far spamming has went during the last 5 years.

This AMS shit is capable of creating a target groups which could easily be spammed whether each group can contain up to 200000+ ! target emails
Advanced Mass Sender can even check if a certain email is present on the remote mail server and only then tries to deliver.
Besides that it even supports sending the spam mails via multiple mail servers (simultaneously) to increase the thoroughput as well as supports proxy servers…

I decided to write this few lines article to raise some awareness about this shitty sofware in a hope that somebody who is Administrating / Supporting client owned Windows servers or Virtual Private Servers will be able to read about this 3 ones and stop spammers before they succeed to create mail havoc with their ugly spam stuff.

Scanning shared hosting servers to catch abusers, unwanted files, phishers, spammers and script kiddies with clamav

Friday, August 12th, 2011

Clamav scanning shared hosting servers to catch abusers, phishers, spammers, script kiddies etc. logo

I’m responsible for some GNU/Linux servers which are shared hosting and therefore contain plenty of user accounts.
Every now and then our company servers gets suspended because of a Phishing websites, Spammers script kiddies and all the kind of abusers one can think of.

To mitigate the impact of the server existing unwanted users activities, I decided to use the Clamav Antivirus – open source virus scanner to look up for potentially dangerous files, stored Viruses, Spammer mailer scripts, kernel exploits etc.

The Hosting servers are running latest CentOS 5.5. Linux and fortunately CentOS is equipped with an RPM pre-packaged latest Clamav release which of the time of writting is ver. (0.97.2).

Installing Clamav on CentOS is a piece of cake and it comes to issuing:

[root@centos:/root]# yum -y install clamav
...

After the install is completed, I’ve used freshclam to update clamav virus definitions

[root@centos:/root]# freshclam
ClamAV update process started at Fri Aug 12 13:19:32 2011
main.cvd is up to date (version: 53, sigs: 846214, f-level: 53, builder: sven)
WARNING: getfile: daily-13357.cdiff not found on remote server (IP: 81.91.100.173)
WARNING: getpatch: Can't download daily-13357.cdiff from db.gb.clamav.net
WARNING: getfile: daily-13357.cdiff not found on remote server (IP: 163.1.3.8)
WARNING: getpatch: Can't download daily-13357.cdiff from db.gb.clamav.net
WARNING: getfile: daily-13357.cdiff not found on remote server (IP: 193.1.193.64)
WARNING: getpatch: Can't download daily-13357.cdiff from db.gb.clamav.net
WARNING: Incremental update failed, trying to download daily.cvd
Downloading daily.cvd [100%]
daily.cvd updated (version: 13431, sigs: 173670, f-level: 60, builder: arnaud)
Downloading bytecode.cvd [100%]
bytecode.cvd updated (version: 144, sigs: 41, f-level: 60, builder: edwin)
Database updated (1019925 signatures) from db.gb.clamav.net (IP: 217.135.32.99)

In my case the shared hosting hosted websites and FTP user files are stored in /home directory thus I further used clamscan in the following way to check report and log into file the scan results for our company hosted user content.

[root@centos:/root]# screen clamscan -r -i --heuristic-scan-precedence=yes --phishing-scan-urls=yes --phishing-cloak=yes --phishing-ssl=yes --scan-archive=no /home/ -l /var/log/clamscan.log
home/user1/mail/new/1313103706.H805502P12513.hosting,S=14295: Heuristics.Phishing.Email.SpoofedDomain FOUND/home/user1/mail/new/1313111001.H714629P29084.hosting,S=14260: Heuristics.Phishing.Email.SpoofedDomain FOUND/home/user1/mail/new/1305115464.H192447P14802.hosting,S=22663: Heuristics.Phishing.Email.SpoofedDomain FOUND/home/user1/mail/new/1311076363.H967421P17372.hosting,S=13114: Heuristics.Phishing.Email.SpoofedDomain FOUND/home/user1/mail/domain.com/infos/cur/859.hosting,S=8283:2,S: Heuristics.Phishing.Email.SSL-Spoof FOUND/home/user1/mail/domain.com/infos/cur/131.hosting,S=6935:2,S: Heuristics.Phishing.Email.SSL-Spoof FOUND

I prefer running the clamscan in a screen session, because it’s handier, if for example my ssh connection dies the screen session will preserve the clamscan cmd execution and I can attach later on to see how scan went.

clamscan of course is slower as it does not use Clamav antivirus daemon clamd , however I prefer running it without running the daemon, as having a permanently running clamd on the servers sometimes creates problems or hangs and it’s not really worthy to have it running since I’m intending to do a clamscan no more than once per month to see some potential users which might need to be suspended.

Also later on, after it finishes all possible problems are logged to /var/log/clamscan.log , so I can read the file report any time.

A good idea might also be to implement the above clamscan to be conducted, once per month via a cron job, though I’m still in doubt if it’s better to run it manually once per month to search for the malicious users content or it’s better to run it via cron schedule.

One possible pitfall with automating the above clamscan /home virus check up, might be the increased load it puts to the system. In some cases the Webserver and SQL server might be under a heavy load at the exactly same time the clamscan cron work is running, this might possible create severe issues for users websites, if it’s not monitored.
Thus I would probably go with running above clamscan manually each month and monitor the server performance.
However for people, who have “iron” system hardware and clamscan file scan is less likely to cause any issues, probably a cronjob would be fine. Here is sample cron job to run clamscan:

10 05 01 * * clamscan -r -i --heuristic-scan-precedence=yes --phishing-scan-urls=yes --phishing-cloak=yes --phishing-ssl=yes --scan-archive=no /home/ -l /var/log/clamscan.log >/dev/null 2>&1

I’m interested to hear if somebody already is using a clamscan to run on cron without issues, once I’m sure that running it on cron would not lead to server down-times, i’ll implement it via cron job.

Anyone having experience with running clamscan directory scan through crond? 🙂

How to compile latest qmailadmin (qmailadmin 1.2.15) on Debian Squeeze Linux

Thursday, August 11th, 2011

I’ve completed a qmail installation few days ago on a fresh installed Debian Squeeze 64 bit server. All is configured and works fine, except qmailadmin and vqadmin.
As the mail server was missing any kind of web mail administration panel, I needed to make at least one of the two above to make with qmail.

I decided to concentrate on qmailadmin and took the time to make it work. I used the following command lines and got the compile failure during make compilation:

debian:/usr/local/src/qmailadmin-1.2.15# ./configure --enable-cgibindir=/usr/lib/cgi-bin --enable-htmldir=/var/www/qmailadmin/ --enable-modify-quota
...
debian:/usr/local/src/qmailadmin-1.2.15# make
...

The source make failed with the following error:

In file included from template.c:45:
qmailadmin.h:37:1: warning: "MAX_FILE_NAME" redefined
In file included from template.c:28:
/home/vpopmail/include/vpopmail.h:146:1: warning: this is the location of the previous definition
template.c: In function "send_template_now":
template.c:505: error: "VERSION" undeclared (first use in this function)
template.c:505: error: (Each undeclared identifier is reported only once
template.c:505: error: for each function it appears in.)
make[1]: *** [template.o] Error 1
make[1]: Leaving directory `/usr/local/src/qmailadmin-1.2.15'
make: *** [all] Error 2

To workaround these compile issues, I’ve had to modify the C source file belonging to qmailadmin ( template.c ), e.g.:

debian:/usr/local/src/qmailadmin-1.2.15# vim template.c

In the file I had to add besides the line:

#include "util.h"

The code:

#define VERSION ""

Aterwards qmailadmin’s compile and install via make && make install-strip succeeded and now works perfectly fine 😉

How to auto restart CentOS Linux server with software watchdog (softdog) to reduce server downtime

Wednesday, August 10th, 2011

How to auto restart centos with software watchdog daemon to mitigate server downtimes, watchdog linux artistic logo

I’m in charge of dozen of Linux servers these days and therefore am required to restart many of the servers with a support ticket (because many of the Data Centers where the servers are co-located does not have a web interface or IPKVM connected to the server for that purpose). Therefore the server restart requests in case of crash sometimes gets processed in few hours or in best case in at least half an hour.

I’m aware of the existence of Hardware Watchdog devices, which are capable to detect if a server is hanged and auto-restart it, however the servers I administrate does not have Hardware support for Watchdog timer.

Thanksfully there is a free software project called Watchdog which is easily configured and mitigates the terrible downtimes caused every now and then by a server crash and respective delays by tech support in Data Centers.

I’ve recently blogged on the topic of Debian Linux auto-restart in case of kernel panic , however now i had to conifgure watchdog on some dozen of CentOS Linux servers.

It appeared installation & configuration of Watchdog on CentOS is a piece of cake and comes to simply following few easy steps, which I’ll explain quickly in this post:

1. Install with yum watchdog to CentOS

[root@centos:/etc/init.d ]# yum install watchdog
...

2. Add to configuration a log file to log watchdog activities and location of the watchdog device

The quickest way to add this two is to use echo to append it in /etc/watchdog.conf:

[root@centos:/etc/init.d ]# echo 'file = /var/log/messages' >> /etc/watchdog.conf
echo 'watchdog-device = /dev/watchdog' >> /etc/watchdog.conf

3. Load the softdog kernel module to initialize the software watchdog via /dev/watchdog

[root@centos:/etc/init.d ]# /sbin/modprobe softdog

Initialization of softdog should be indicated by a line in dmesg kernel log like the one above:

[root@centos:/etc/init.d ]# dmesg |grep -i watchdog
Software Watchdog Timer: 0.07 initialized. soft_noboot=0 soft_margin=60 sec (nowayout= 0)

4. Include the softdog kernel module to load on CentOS boot up

This is necessery, because otherwise after reboot the softdog would not be auto initialized and without it being initialized, the watchdog daemon service could not function as it does automatically auto reboots the server if the /dev/watchdog disappears.

It’s better that the softdog module is not loaded via /etc/rc.local but the default CentOS methodology to load module from /etc/rc.module is used:

[root@centos:/etc/init.d ]# echo modprobe softdog >> /etc/rc.modules
[root@centos:/etc/init.d ]# chmod +x /etc/rc.modules

5. Start the watchdog daemon service

The succesful intialization of softdog in step 4, should have provided the system with /dev/watchdog, before proceeding with starting up the watchdog daemon it’s wise to first check if /dev/watchdog is existent on the system. Here is how:

[root@centos:/etc/init.d ]# ls -al /dev/watchdogcrw------- 1 root root 10, 130 Aug 10 14:03 /dev/watchdog

Being sure, that /dev/watchdog is there, I’ll start the watchdog service.

[root@centos:/etc/init.d ]# service watchdog restart
...

Very important note to make here is that you should never ever configure watchdog service to run on boot time with chkconfig. In other words the status from chkconfig for watchdog boot on all levels should be off like so:

[root@centos:/etc/init.d ]# chkconfig --list |grep -i watchdog
watchdog 0:off 1:off 2:off 3:off 4:off 5:off 6:off

Enabling the watchdog from the chkconfig will cause watchdog to automatically restart the system as it will probably start the watchdog daemon before the softdog module is initialized. As watchdog will be unable to read the /dev/watchdog it will though the system has hanged even though the system might be in a boot process. Therefore it will end up in an endless loops of reboots which can only be fixed in a linux single user mode!!! Once again BEWARE, never ever activate watchdog via chkconfig!

Next step to be absolutely sure that watchdog device is running it can be checked with normal ps command:

[root@centos:/etc/init.d ]# ps aux|grep -i watchdog
root@hosting1-fr [~]# ps axu|grep -i watch|grep -v greproot 18692 0.0 0.0 1816 1812 ? SNLs 14:03 0:00 /usr/sbin/watchdog
root 25225 0.0 0.0 0 0 ? ZN 17:25 0:00 [watchdog] <defunct>

You have probably noticed the defunct state of watchdog, consider that as absolutely normal, above output indicates that now watchdog is properly running on the host and waiting to auto reboot in case of sudden /dev/watchdog disappearance.

As a last step before, after being sure its initialized properly, it’s necessery to add watchdog to run on boot time via /etc/rc.local post init script, like so:

[root@centos:/etc/init.d ]# echo 'echo /sbin/service watchdog start' >> /etc/rc.local

Now enjoy, watchdog is up and running and will automatically restart the CentOS host 😉

How to tune MySQL Server to increase MySQL performance using mysqltuner.pl and Tuning-primer.sh

Tuesday, August 9th, 2011

MySQL Easy performance tuning with mysqltuner.pl and Tuning-primer.sh scripts

Improving MySQL performance is crucial for improving a website responce times, reduce server load and improve overall work efficiency of a mysql database server.

I’ve seen however many Linux System administrators who does belittle or completely miss the significance of tuning a newly installed MySQL server installation.
The reason behind that is probably caused by fact that many people think MySQL config variables, would not significantly improve performance and does not pay back for optimization efforts. Moreover there are a bunch of system admins who has to take care for numerous services so they don’t have time to get good knowledge to optimize MySQL servers.
Thus many admins and webmasters nowdays, think optimizations depend mostly on the side of the website programmers.
It’s also sometimes falsely believed that optimizing a MySQL server could reduce the overall server stability.

With the boom of Internet website building and internet marketing, many webmasters emerged and almost anybody with almost no knowledge on GNU/Linux or minimal or no knowledge on PHP can start his Online store, open a blog or create a website powered by some CMS like joomla.
Thus nowdays many servers even doesn’t have a hired system administrators but are managed by people whose knowledge on *Nix is almost next to zero, this is another reason why dozens of MySQL installations online are a default ones and are not taking a good advantage of the server hardware.

The incrase of website visitors leads people servers expectations for hardware also to grow, thus many companies simply buy a new hardware instead of taking the few time to investigate on how current server hardware can be utilized better.
In that manner of thought I though it will be a good idea to write this small article on Tuning mysql servers with two scripts Tuning-primer.sh and mysqltuner.pl.
The scripts are ultra easy to use and does not require only a minimal knowledge on MySQL, Linux or (*BSD *nix if sql is running on BSD).
Tuning-primer.sh and mysqltuner.pl are therefore suitable for a quick MySQL server optimizations to even people who are no computer experts.

I use this two scripts for MySQL server optimizations on almost every new configured GNU/Linux with a MySQL backend.
Use of the script comes to simply download with wget, lynx, curl or some other web client and execute it on the server host which is already running the MySQL server.

Here is an example of how simple it is to run the scripts to Optimize MySQL:

debian:~# perl mysqltuner.pl
>> MySQLTuner 1.2.0 - Major Hayden >major@mhtx.net<
>> Bug reports, feature requests, and downloads at http://mysqltuner.com/
>> Run with '--help' for additional options and output filtering

——– General Statistics ————————————————–
[–] Skipped version check for MySQLTuner script
[OK] Currently running supported MySQL version 5.1.49-3
[OK] Operating on 64-bit architecture

——– Storage Engine Statistics ——————————————-
[–] Status: +Archive -BDB -Federated +InnoDB -ISAM -NDBCluster
[–] Data in MyISAM tables: 6G (Tables: 952)
[!!] InnoDB is enabled but isn’t being used
[!!] Total fragmented tables: 12

——– Security Recommendations ——————————————-
[OK] All database users have passwords assigned

——– Performance Metrics ————————————————-
[–] Up for: 1d 2h 3m 35s (68M q [732.193 qps], 610K conn, TX: 49B, RX: 11B)
[–] Reads / Writes: 76% / 24%
[–] Total buffers: 512.0M global + 2.8M per thread (2000 max threads)
[OK] Maximum possible memory usage: 6.0G (25% of installed RAM)
[OK] Slow queries: 0% (3K/68M)
[OK] Highest usage of available connections: 7% (159/2000)
[OK] Key buffer size / total MyISAM indexes: 230.0M/1.7G
[OK] Key buffer hit rate: 97.8% (11B cached / 257M reads)
[OK] Query cache efficiency: 76.6% (46M cached / 61M selects)
[!!] Query cache prunes per day: 1822075
[OK] Sorts requiring temporary tables: 0% (1K temp sorts / 2M sorts)
[!!] Joins performed without indexes: 63635
[OK] Temporary tables created on disk: 1% (26K on disk / 2M total)
[OK] Thread cache hit rate: 99% (159 created / 610K connections)
[!!] Table cache hit rate: 4% (1K open / 43K opened)
[OK] Open file limit used: 17% (2K/16K)
[OK] Table locks acquired immediately: 99% (36M immediate / 36M locks)

——– Recommendations —————————————————–
General recommendations:
Add skip-innodb to MySQL configuration to disable InnoDB
Run OPTIMIZE TABLE to defragment tables for better performance
Enable the slow query log to troubleshoot bad queries
Increasing the query_cache size over 128M may reduce performance
Adjust your join queries to always utilize indexes
Increase table_cache gradually to avoid file descriptor limits
Variables to adjust:
query_cache_size (> 256M) [see warning above] join_buffer_size (> 256.0K, or always use indexes with joins) table_cache (> 7200)

You see there are plenty of things, the script reports, for the unexperienced most of the information can be happily skipped without need to know the cryptic output, the section of importance here is Recommendations for some clarity, I’ve made this section to show up bold.

The most imporant things from the Recommendations script output is actually the lines who give suggestions for incrase of certain variables for MySQL.In this example case this are the last three variables:
query_cache_size,
join_buffer_size and
table_cache

All of these variables are tuned from /etc/mysql/my.cnf (on Debian) and derivatives distros and from /etc/my.cnf on RHEL, CentOS, Fedora and the other RPM based Linux distributions.

On some custom server installs my.cnf is also located in /usr/local/mysql/etc/ or some other a bit more unstandard location 😉

Anyways now having the Recommendation from the script, it’s necessery to edit my.cnf and try to double the values for the suggested variables.

First, I check if all the suggested variables are existent in my config with grep , if they’re not then I’ll simply add the variable with doubled size of the suggested values.
P.S: One note here is sometimes some values which are configured, are the default value for the MySQL server and does not have a record in my.cnf

debian:~# grep -E 'query_cache_size|join_buffer_size|table_cache' /etc/mysql/my.cnf table_cache = 7200
query_cache_size = 256M
join_buffer_size = 262144

All of my variables are in the config so, now edit my.cnf and set values to:
table_cache = 14400
query_cache_size = 512M
join_buffer_size = 524288

I always, however preserve the old variable’s value, because sometimes raising the value might create problem and the MySql server might be unable to restart properly.
Thus before going with adding the new values make sure the old ones are commented with # , e.g.:
#table_cache = 7200
#query_cache_size = 256M
#join_buffer_size = 262144

I would recommend vim as editor of choice while editing my.cnf as vim completely rox 😉 If you’re not acquainted to vim use nano or mcedit or your editor of choice 😉 :

debian:~# vim /etc/mysql/my.cnf
...

Assuming that the changes are made, it’s time to restart MySQL to make sure the new values are read by the SQL server.

debian:~# /etc/init.d/mysql restart
* Stopping MySQL database server mysqld [ OK ]
* Starting MySQL database server mysqld [ OK ]
Checking for tables which need an upgrade, are corrupt or were not closed cleanly.

If mysql server fails, however to restart, make sure immediately you reverse back the changed variables to the commented values and restart once again via mysql init script to make server load.

Afterwards start adding the values one by one until find out which one is causing the mysqld to fail.

Now the second script (Tuning-primer.sh) is also really nice for MySQL performance optimizations are necessery. However it’s less portable (as it’s written in bash scripting language).
Consider running this script among different GNU/Linux distributious (especially the newer ones) might produce errors.
Tuning-primer.sh requires some minor code changes to be able to run on FreeBSD, NetBSD and OpenBSD *nices.

The way Tuning-primer.sh works is precisely like mysqltuner.pl , one runs it it gives some info about current running MySQL server and based on certain factors gives suggestions on how increasing or decresing certain my.cnf variables could reduce sql query bottlenecks, solve table locking issues as well as generally improve INSERT, UPDATE query times.

Here is an example output from tuning-primer.sh run on another server:

server:~# wget https://www.pc-freak.net/files/Tuning-primer.sh
...
server:~# sh Tuning-primer.sh
-- MYSQL PERFORMANCE TUNING PRIMER --
- By: Matthew Montgomery -

MySQL Version 5.0.51a-24+lenny5 x86_64

Uptime = 8 days 10 hrs 19 min 8 sec
Avg. qps = 179
Total Questions = 130851322
Threads Connected = 1

Server has been running for over 48hrs.
It should be safe to follow these recommendations

To find out more information on how each of these
runtime variables effects performance visit:
http://dev.mysql.com/doc/refman/5.0/en/server-system-variables.html

SLOW QUERIES
Current long_query_time = 1 sec.
You have 16498 out of 130851322 that take longer than 1 sec. to complete
The slow query log is NOT enabled.
Your long_query_time seems to be fine

MAX CONNECTIONS
Current max_connections = 2000
Current threads_connected = 1
Historic max_used_connections = 85
The number of used connections is 4% of the configured maximum.
Your max_connections variable seems to be fine.

WORKER THREADS
Current thread_cache_size = 128
Current threads_cached = 84
Current threads_per_sec = 0
Historic threads_per_sec = 0
Your thread_cache_size is fine

MEMORY USAGE
Tuning-primer.sh: line 994: let: expression expected
Max Memory Ever Allocated : 741 M
Configured Max Memory Limit : 5049 M
Total System Memory : 23640 M

KEY BUFFER
Current MyISAM index space = 1646 M
Current key_buffer_size = 476 M
Key cache miss rate is 1 / 56
Key buffer fill ratio = 90.00 %
You could increase key_buffer_size
It is safe to raise this up to 1/4 of total system memory;
assuming this is a dedicated database server.

QUERY CACHE
Query cache is enabled
Current query_cache_size = 64 M
Current query_cache_used = 38 M
Current Query cache fill ratio = 59.90 %

SORT OPERATIONS
Current sort_buffer_size = 2 M
Current record/read_rnd_buffer_size = 256.00 K
Sort buffer seems to be fine

JOINS
Current join_buffer_size = 128.00 K
You have had 111560 queries where a join could not use an index properly
You have had 91 joins without keys that check for key usage after each row
You should enable “log-queries-not-using-indexes”
Then look for non indexed joins in the slow query log.
If you are unable to optimize your queries you may want to increase your
join_buffer_size to accommodate larger joins in one pass.

TABLE CACHE
Current table_cache value = 3600 tables
You have a total of 798 tables
You have 1904 open tables.
The table_cache value seems to be fine

TEMP TABLES
Current tmp_table_size = 128 M
1% of tmp tables created were disk based
Created disk tmp tables ratio seems fine

TABLE SCANS
Current read_buffer_size = 128.00 K
Current table scan ratio = 797 : 1
read_buffer_size seems to be fine

TABLE LOCKING
Current Lock Wait ratio = 1 : 1782
You may benefit from selective use of InnoDB.

As seen from script output, there are certain variables which might be increased a bit for better SQL performance, one such variable as suggested is key_buffer_size(You could increase key_buffer_size)

Now the steps to make the tunings to my.cnf are precisely the same as with mysqltuner.pl, e.g.:
1. Preserve old config variables which will be changed by commenting them
2. Double value of current variables in my.cnf suggested by script
3. Restart Mysql server via /etc/init.d/mysql restart cmd.
4. If mysql runs fine monitor mysql performance with mtop or mytop for at least 15 mins / half an hour.

if all is fine run once again the tuning scripts to see if there are no further improvement suggestions, if there are more follow the 4 steps described procedure once again.

It’s also a good idea that these scripts are periodically re-run on the server like once per few months as changes in SQL queries amounts and types will require changes in MySQL operational variables.
The authors of these nice scripts has done great job and have saved us a tons of nerves time, downtimes and money spend on meaningless hardware. So big thanks for the awesome scripts guys 😉
Finally after hopefully succesful deployment of changes, enjoy the incresed SQL server performance 😉

How to test if imap and pop mail server service is working with Telnet cmd

Monday, August 8th, 2011

test-if-imap-pop3-is-working-with-telnet-command-logo-imap
I’ve recently built new mail qmail server with vpopmail to serve pop3 connectins and courierimap and courierimaps to take care for IMAP IMAPS.

I further used telnet to test if the Linux server pop3 service on (110) and imap on (143) worked fine, straight after the completed qmail install.
Here is how to test mail server with vpopmail listening for connections on pop3 port :

debian:~# telnet mail.mymailserver.com 110
Trying 111.222.333.444...
Connected to mail.mymailserver.com.
Escape character is '^]'.
+OK <2813.1312745988@mymailserver.com>
USER hipo@mymailserver.com
+OK
PASS here_goes_my_secret_pass
+OK
LIST
1 309783
2 64053
3 2119
4 64357
5 317893
RETR 1
My first mail content retrieved with RETR commandgoes here ....
quit
+OK
Connection closed by foreign host.

You see I have 5 messages in my mailbox, as you can see I used RETR command to check the content of my mail, this is handy as I can read my mails straight with telnet (if the mail is in plain text), of course it’s a bit more complicated if I have to read encrypted or html mail, though still its easy to write a tiny parser and pipe the content produced by telnet command to lynx or some other text based browser.

Now another sys admin handy tip is the use of telnet to check my mail servers IMAP servers is correctly operating.
Here is how:

debian:~# telnet mail.mymailserver.com 143
Trying 111.222.333.444...
Connected to localhost.
Escape character is '^]'.
* OK [CAPABILITY IMAP4rev1 UIDPLUS CHILDREN NAMESPACE THREAD=ORDEREDSUBJECT THREAD=REFERENCES SORT QUOTA IDLE ACL ACL2=UNION STARTTLS] Courier-IMAP ready. Copyright 1998-2010 Double Precision, Inc. See COPYING for distribution information.
01 LOGIN hipo@mymailserver.com here_goes_my_secret_pass
A OK LOGIN Ok.
02 LIST "" *
* LIST (Unmarked HasNoChildren) "." "INBOX"
02 OK LIST completed
03 SELECT INBOX
* FLAGS (Draft Answered Flagged Deleted Seen Recent)
* OK [PERMANENTFLAGS (* Draft Answered Flagged Deleted Seen)] Limited
* 5 EXISTS
* 5 RECENT
* OK [UIDVALIDITY 1312746907] Ok
* OK [MYRIGHTS "acdilrsw"] ACL
03 OK [READ-WRITE] Ok
04 STATUS INBOX (MESSAGES)
* STATUS "INBOX" (MESSAGES 5)
04 OK STATUS Completed.
05 FETCH 1 ALL
...
06 FETCH 1 BODY
...
07 FETCH 1 ENVELOPE
...
As you can see according to standard to send commands to IMAP server from console after a telnet connection you will have to always include a command line number like 01, 02, 03 .. etc.

Using such a line numbering is not obligitory and also letters like A, B, C could be use still line numbering with numbers is generally a good idea since it’s easier for reading on the screen.

Now line 02 shows you available mailboxes, line 03 SELECT INBOX selects the imap Inbox to be further operated with, 04 STATUS INBOX cmd displays status about current mailboxes in folder.
FETCH 1 ALL instructs the imap server to get list of all IMAP message headers. Next command in line 05 FETCH 1 BODY will display the message body of the first message in list.
The 07 FETCH 1 ENVELOPE will display the mail headers for the 1 message.

Few other IMAP commands which might be helpfun on connection are:

08 FETCH 1 FULL
09 FETCH * FULL

First one would fetch complete content of a message numbered one from the imap server and the second one 09 FETCH * FULL will get all the mail content for all messages located on the remote IMAP server.

The STATUS command aforementioned earlier could take the following list of arguments:

MESSAGES, UNSEEN, RECENT UIDNEXT UIDVALIDITY

These commands are a gold mine for me as a sysadmin as it helps quickly solve problems, hope they would help to somebody out there as well 😉
This way is a way shorter than bothering each time to check, if some customer e-mail account is improperly configured by creating setting up a new account in Thunderbird.