Archive for July, 2011
Friday, July 22nd, 2011 
These days, I’m managing a number of OpenVZ Virtual Machine host servers. Therefore constantly I’m facing a lot of problems with users who run shit scripts inside their Linux Virtual Machines.
Commonly user Virtual Servers are used as a launchpad to attack hosts do illegal hacking activities or simply DDoS a host..
The virtual machines users (which by the way run on top of the CentOS OpenVZ Linux) are used to launch a Denial service scripts like kaiten.pl, trinoo, shaft, tfn etc.
As a consequence of their malicious activities, oftenly the Data Centers which colocates the servers are either null routing our server IPs until we suspend the Abusive users, or the servers go simply down because of a server overload or a kernel bug hit as a result of the heavy TCP/IP network traffic or CPU/mem overhead.
Therefore to mitigate this abusive attacks, I’ve written few bash shell scripts which, saves us a lot of manual check ups and prevents in most cases abusers to run the common DoS and “hacking” script shits which are now in the wild.
The first script I’ve written is kill_abusers.sh , what the script does is to automatically look up for a number of listed processes and kills them while logging in /var/log/abusers.log about the abusive VM user procs names killed.
I’ve set this script to run 4 times an hour and it currently saves us a lot of nerves and useless ticket communication with Data Centers (DCs), not to mention that reboot requests (about hanged up servers) has reduced significantly.
Therefore though the scripts simplicity it in general makes the servers run a way more stable than before.
Here is OpenVZ kill/suspend Abusers procs script kill_abusers.sh ready for download
Another script which later on, I’ve written is doing something similar and still different, it does scan the server hard disk using locate and find commands and tries to identify users which has script kiddies programs in their Virtual machines and therefore are most probably crackers.
The scripts looks up for abusive network scanners, DoS scripts, metasploit framework, ircds etc.
After it registers through scanning the server hdd, it lists only files which are preliminary set in the script to be dangerous, and therefore there execution inside the user VM should not be.
search_for_abusers.sh then logs in a files it’s activity as well as the OpenVZ virtual machines user IDs who owns hack related files. Right after it uses nail mailing command to send email to a specified admin email and reports the possible abusers whose VM accounts might need to either be deleted or suspended.
search_for_abusers can be download here
Honestly I truly liked my search_for_abusers.sh script as it became quite nice and I coded it quite quickly.
I’m intending now to put the Search for abusers script on a cronjob on the servers to check periodically and report the IDs of OpenVZ VM Users which are trying illegal activities on the servers.
I guess now our beloved Virtual Machine user script kiddies are in a real trouble ;P
Tags: admin job, bash scripts, bash shell scripts, CentOS, check ups, consequence, data, DDoS, Denial, denial service, download, host, host servers, job, kill, launchpad, Linux, log, malicious activities, network traffic, number, openvz, overhead, quot, script, script kiddies, Search, server overload, servers, Shell, shits, tcp ip network, tfn, ticket, trinoo, ups, Virtual, virtual machine, virtual machines, virtual servers, vm user
Posted in System Administration | 29 Comments »
Friday, July 22nd, 2011 
Lately, I’m basicly using htop‘s nice colourful advanced Linux top command frontend in almost every server I manage, therefore I’ve almost abondoned top usage these days and in that reason I wanted to have htop installed on few of the OpenVZ CentOS 5.5 Linux servers at work.
I looked online but unfortunately I couldn’t find any rpm pre-built binary packages. The source rpm package I tried to build from dag wieers repository failed as well, so finally I went further and decided to install htop from source
Here is how I did it:
1. Install gcc and glibc-devel prerequired rpm packages
[root@centos ~]# yum install gcc glibc-devel
2. Download htop and compile from source
[root@centos src]# cd /usr/local/src

[root@centos src]# wget "http://sourceforge.net/projects/htop/files/htop/0.9/htop-0.9.tar.gz/download"

Connecting to heanet.dl.sourceforge.net|193.1.193.66|:80... connected.

HTTP request sent, awaiting response... 200 OK

Length: 418767 (409K) [application/x-gzip]

Saving to: "download"
100%[======================================>] 418,767 417K/s in 1.0s
2011-07-22 13:30:28 (417 KB/s) – “download” saved [418767/418767]
[root@centos src]# mv download htop.tar.gz
[root@centos src]# tar -zxf htop.tar.gz
[root@centos src]# cd htop-0.9
[root@centos htop-0.9]# ./configure && make && make install
make install should install htop to /usr/local/bin/htop
That’s all folks! , now my OpenVZ CentOS server is equipped with the nifty htop tool 😉
Tags: amp, CentOS, colourful, command, dag wieers, devel, frontend, heanet, htop, HTTP, Install, Installing, Linux, linux servers, mv, OKLength, online, openvz, package, reason, repository, request, response, root, rpm, src, tar gz, tar zxf, tool, wget, yum, zxf
Posted in Linux, System Administration | No Comments »
Friday, July 22nd, 2011 There are few commands I usually use to track if my server is possibly under a Denial of Service attack or under Distributed Denial of Service
Sys Admins who still have not experienced the terrible times of being under a DoS attack are happy people for sure …
1. How to Detect a TCP/IP Denial of Service Attack This are the commands I use to find out if a loaded Linux server is under a heavy DoS attack, one of the most essential one is of course netstat.
To check if a server is under a DoS attack with netstat, it’s common to use:
linux:~# netstat -ntu | awk '{print $5}' | cut -d: -f1 | sort | uniq -c | sort -n|wc -l
If the output of below command returns a result like 2000 or 3000 connections!, then obviously it’s very likely the server is under a DoS attack.
To check all the IPS currently connected to the Apache Webserver and get a very brief statistics on the number of times each of the IPs connected to my server, I use the cmd:
linux:~# netstat -ntu | awk '{print $5}' | cut -d: -f1 | sort | uniq -c | sort -n

221 80.143.207.107 233 145.53.103.70 540 82.176.164.36
As you could see from the above command output the IP 80.143.207.107 is either connected 221 times to the server or is in state of connecting or disconnecting to the node.
Another possible way to check, if a Linux or BSD server is under a Distributed DoS is with the list open files command lsof
Here is how lsof can be used to list the approximate number of ESTABLISHED connections to port 80.
linux:~# lsof -i TCP:80

litespeed 241931 nobody 17u IPv4 18372655 TCP server.www.pc-freak.net:http (LISTEN)

litespeed 241931 nobody 25u IPv4 18372659 TCP 85.17.159.89:http (LISTEN)

litespeed 241931 nobody 30u IPv4 29149647 TCP server.www.pc-freak.net:http->83.101.6.41:54565 (ESTABLISHED)

litespeed 241931 nobody 33u IPv4 18372647 TCP 85.17.159.93:http (LISTEN)

litespeed 241931 nobody 34u IPv4 29137514 TCP server.www.pc-freak.net:http->83.101.6.41:50885 (ESTABLISHED)

litespeed 241931 nobody 35u IPv4 29137831 TCP server.www.pc-freak.net:http->83.101.6.41:52312 (ESTABLISHED)

litespeed 241931 nobody 37w IPv4 29132085 TCP server.www.pc-freak.net:http->83.101.6.41:50000 (ESTABLISHED)
Another way to get an approximate number of established connections to let’s say Apache or LiteSpeed webserver with lsof can be achieved like so:
linux:~# lsof -i TCP:80 |wc -l

2100
I find it handy to keep track of above lsof command output every few secs with gnu watch , like so:
linux:~# watch "lsof -i TCP:80"
2. How to Detect if a Linux server is under an ICMP SMURF attack
ICMP attack is still heavily used, even though it’s already old fashioned and there are plenty of other Denial of Service attack types, one of the quickest way to find out if a server is under an ICMP attack is through the command:
server:~# while :; do netstat -s| grep -i icmp | egrep 'received|sent' ; sleep 1; done

120026 ICMP messages received

1769507 ICMP messages sent

120026 ICMP messages received

1769507 ICMP messages sent
As you can see the above one liner in a loop would check for sent and recieved ICMP packets every few seconds, if there are big difference between in the output returned every few secs by above command, then obviously the server is under an ICMP attack and needs to hardened.
3. How to detect a SYN flood with netstat
linux:~# netstat -nap | grep SYN | wc -l

1032
1032 SYNs per second is quite a high number and except if the server is not serving let’s say 5000 user requests per second, therefore as the above output reveals it’s very likely the server is under attack, if however I get results like 100/200 SYNs, then obviously there is no SYN flood targetting the machine 😉
Another two netstat command application, which helps determining if a server is under a Denial of Service attacks are:
server:~# netstat -tuna |wc -l

10012
and
server:~# netstat -tun |wc -l

9606
Of course there also some other ways to check the count the IPs who sent SYN to the webserver, for example:
server:~# netstat -n | grep :80 | grep SYN |wc -l
In many cases of course the top or htop can be useful to find, if many processes of a certain type are hanging around.
4. Checking if UDP Denial of Service is targetting the server
server:~# netstat -nap | grep 'udp' | awk '{print $5}' | cut -d: -f1 | sort |uniq -c |sort -n
The above command will list information concerning possible UDP DoS.
The command can easily be accustomed also to check for both possible TCP and UDP denial of service, like so:
server:~# netstat -nap | grep 'tcp|udp' | awk '{print $5}' | cut -d: -f1 | sort |uniq -c |sort -n

104 109.161.198.86

115 112.197.147.216

129 212.10.160.148

227 201.13.27.137

3148 91.121.85.220
If after getting an IP that has too many connections to the server and is almost certainly a DoS host you would like to filter this IP.
You can use the /sbin/route command to filter it out, using route will probably be a better choice instead of iptables, as iptables would load up the CPU more than simply cutting the route to the server.
Here is how I remove hosts to not be able to route packets to my server:
route add 110.92.0.55 reject
The above command would null route the access of IP 110.92.0.55 to my server.
Later on to look up for a null routed IP to my host, I use:
route -n |grep -i 110.92.0.55
Well hopefully this should be enough to give a brief overview on how, one can dig in his server and find if he is under a Distributed Denial of Service, hope it’s helpful to somebody out there.
Cheers 😉
Tags: apache webserver, approximate number, awk print, BSD, checking, cmd, command, course, Denial, denial of service, denial of service attack, Detect, difference, dos attack, ESTABLISHED, freak, How to, HTTP, ICMP, ips, Linux, linux server, linux webserver, LISTEN, litespeed, netstat, nobody, node, ntu, number, server pc, Service, sleep, statistics, SYN, SYNs, sys admins, tcp, terrible times, Watch
Posted in Linux, System Administration | 5 Comments »
Thursday, July 21st, 2011 
It’s again 20th of July and we in the Bulgarian Orthodox Church, celebrate the Holy memory of st. Prophet Elijah (Elias
St. Elijah is among the greatest Old Testamental prophets. He lived before the birth of our saviour Jesus Christ in a time when apostacy from true faith was severe.
In Elias’s time (few centuries B.C.), there used to be also a severe hunger on the land.
Elias was among the little number of Jews who did continued to honour the True God creator of Heaven and of Earth instead of turning to false religious teachings inspired by demons, like it’s the Baal’s cult which was widely spread among Jews back in the time.
Because of his faith in the true God, st. Prophet Elijah was hunted by the king’s wife Jezabel and he was forced to escape from Bersheeba and went alone in the wilderness and sat down in despondency under a juniper tree.
As he slept, an angel touched him, and said unto him, “Arise and eat; because the journey is too great for thee.” He arose and found a cake and a cruse of water. Having partaken of the provision, he went forward on his way for forty days to Horeb, where he took residence in a cave. Here God appeared to him and said, “What dost thou here, Elijah?” In answer to Elijah’s despondent words God manifests to him his glory, and then directs him to return to Damascus and anoint Hazael king over the Arameans (Syria), Jehu king over Israel, and Elisha to be prophet in his room (1 Kings 19:13-21; compare 2 Kings 8:7-15; 9:1-10).
Some six years after this he prophecised and warned by God’s commandment Ahab and Jezebel of the violent deaths they would die (1 Kings 21:19-24; 22:38)
The reason for the great hunger at this times was the fact that no rain has fallen down to the land for two years, as Elias prayed to God that no rain will be given to the people of Israel until they turn back to their true God.
One of the most notable moments of st. Elias’s earhtly living was the great miracle he performed by God’s providence which proofed that only the God of Israel is the true God of heaven and earth.
This happened while he was still in desolation on mount Carmel, it came to pass that Elijah met Obadiah, one of king Ahab’s officers (the king at that time of Israel).
Obadiah was he sent out at this time to seek for pasturage for the cattle (as the hunger on the land was so severe that even pastures for animals was obscure).
Elias’s by God’s word bade him go and tell his master that Elijah was there. King Ahab came forth and met Elias and accused him to be the “Trouble of Israel” as, he thought that his lands troubles are because Elias did not turns to Baal as the the king himself and most of the Jews at that time.
It was then proposed by Elias, that sacrifices should be publicly offered (to determine whose God is in control of taking out the hunger – e.g. Elias’s God of Israel or Baal to whom has many falsely turned.
, for the purpose of determining whether Baal or the Israelite’s God is the one’s master of the Universe.
The competition was accepted by Ahab and many of the prophets of Baal gathered together to “beg” his God for a miracle.
Baal’s false manu prophets gathered around the sacrifice place and started Begging Baal to send fire and burn the sacrificial altar.
Nomatter how hard they screamed, nothing happened so eventually they started cutting their bodies pouring blood in a hope to catch baal’s attention and make him have mercy on them.
As long time passed on and no miracle happened Elias told baal’s worshippers to step back from the sacrificial calf on the built altar and ordered some of the king’s servants to spill water over the calf (three times).
The water brought was so much that the whole altar trench was over-filled with water.
Then saint Elias begged to God: “Oh Lord, God of Abraham, Isaac and Jacob, please hear me! Let oh God this people recognize that You Lord is God and please oh Lord turn the people’s hearts towards you.”, he was still praying when fire came down from heaven and burnt the stones, the water in and the trench itself.
When all the gathered people around saw this great miracle of God, they bowed down and confessed the One and only God.
By Elias’s order the Baal’s false priests has been killed.
After this great miracle, Elias said to Ahab to came back home, before the rain has followed him.
The saint prophet climbed to the mountain top and prayed for a very long time.
After the holy man of God completed his prayers a powerful wind started blowing and the sky has filled with big clouds and a pouring rain come down to the overdried earth.
The king’s wife Jezabel, still kept her stubborness and continued severely hunting for st. Elias and even gave a vow to kill him because all her prophets were killed.
But God again was with st. Elias and saved him by warning him to run away in the wilderness.
Elias was in a big sorrow, here because many of the people still continued to honour the false god baal even though all the great heavenly signs.
God however by a great miracles, has once again shown the prophet he should be of a good spirit always and always to trust in God as he even send his Angel to give Elijah food in the desert.
Elias was among the only 7000 of Israelish man who does rejected to venerate the false god Baal.
By God’s providence st. Elias had a pupil prophet called Elijah.
The time now drew near when he was to be taken up into heaven (2 Kings 2:1-12). He went down to Gilgal, where there was a school of prophets, and where his successor Elisha, whom he had anointed some years before, resided.
Elisha was distraught by the thought of his master’s leaving him, and refused to be parted from him. The two went on and came to Bethel and Jericho, and crossed the Jordan, the waters of which were “divided hither and thither” when smitten with Elijah’s mantle.
Upon arriving at the borders of Gilead, which Elijah had left many years before, it “came to pass as they still went on and talked” they were suddenly separated by a chariot and horses of fire; and “Elijah went up by a whirlwind into heaven,” Elisha receiving his mantle, which fell from Elijah as he ascended.
Elijah’s chosen successor was the prophet Elisha; Elijah designated Elisha as such by leaving his mantle with him (2 Kings 2:13-15), so that his wish for “a double portion” of the older prophet’s spirit (2:9)
Later on in New Testamential time it was again st. prophet Elias, who appearance in glory on Mount Tabor and talked with our Saviour Christ at the Son of God’s Glorious Transfiguration.
An interesting fact is that Elias and Enoch are the only two people who according to the Holy writtings were taken by God straight to heaven. No other mortal man has been taken that way in flesh.
According to Orthodox Church’s tradition, Elias and Enoch will be brought back to earth again by God in the last days of the anti-christ, when they will again testify about our Lord Jesus Christ’s being the truth God and will also expose the anti-christ who will falsely pretend as being the true god of Israel and a true saviour of mankind.
Again according to this church history this two prophets at this last days, will be given an enormous power from God, even a power to stop the rain to come down to earth and the power to command the rivers to stop.
Oh Holy Prophet Elias, let God have mercy on us the sinners by your Holy prayers and save us, give us grace and always show us His great mercies.
Amen!
Tags: Ahab, ahab and jezebel, angel, apostacy, arameans, baal, birth, bulgarian orthodox church, cake, cave, cruse, cult of elias heterodox islam, despondency, eliajah, elias taken to haven, EliasSt, feast, forty days, great hunger, hazael, Heaven, Holy, hunger, jehu, jezabel, journey, juniper, juniper tree, Lord, number, Old, prophet elias, prophet elijah, religious teachings, saviour, saviour jesus christ, st elias, time, tree, true faith, true god, violent deaths
Posted in Christianity | No Comments »
Wednesday, July 20th, 2011 Have you, ever thought of refreshing your VIM knowledge obtained back in the days reading the vimtutorial available straight in vim via the:
vimtutor comand?
I asked few vim related question today in #vim in irc freenode and I was referred to one mate to the following picture:

VIM QUICK Tutorial Sheet Picture ! 😉 Nice ! Aint’t it? 🙂
Tags: admin, Aint, Cheat, cheat sheet, comand, freenode, guy, irc, knowledge, mate, picture, question, Quick, Sheet, sys, today, tutorial, vim, vimtutor, vimtutorial
Posted in Everyday Life, Linux, Programming, System Administration, Various | No Comments »
Tuesday, July 19th, 2011 
Yesterday I was at a friend of mine who has recently installed Ubuntu 11.04 to his already oldish Desktop computer.
The system was 1.4Ghz (amd) with 512 RAM and some kind of Dell Trinitron 19 inch monitor
Even though he tried hard to make his NVIDIA GeForce FX 5500 ‘s drive to work properly with Ubuntu Natty Narwhal, he just has messed it even more.
As I always like helping people and I’m joyful for people who want to migrate to Linux, I took some time to make his NVIDIA GeForce work with this Ubuntu release.
First I tried to make it work by using some of the official NVIDIA Linux drivers located on nvidia.com following some online tutorial for Ubuntu claiming that it works but actually it didn’t, so finally after a bit of experimentation I found a way to make this video card work.
Here is how:
1. Install the following Ubuntu packages
root@ubuntu:~# apt-get install nouveau-firmware nvidia-173 nvidia-173-kernel-source

nvidia-cg-toolkit nvidia-common nvidia-current nvidia-glx-173 nvidia-settings

...
2. Load in the kernel and set to be auto loaded on boot nvidia’s driver kernel module nvidia-173
root@ubuntu:~# depmod -a;

root@ubutnu:~# modprobe nvidia-173

root@ubuntu:~# echo nvidia-173 >> /etc/modules
3. Stop temporary (Gnome dipsplay manager) gdm
root@ubuntu:~# service gdm stop

...
4. Use nvidia-xconfig to generate a working version of /etc/X11/xorg.conf for Nvidia
root@ubuntu:~# nvidia-xconfig

..
nvidia-xconfig will generate new /etc/X11/xorg.conf configuration corresponding to the Nvidia GeForce Fx 5500 and will move the old xorg.conf to xorg.conf.backup.
5. Start the gdm manager to be running again
root@ubuntu:~# service gdm start

...
Now the Xserver will start in a terrible mode of 640×480, probably because Ubuntu was unable to define correct VerticalSync and HorizontalSync for the 19 inch Dell Trinitron monitor or for some other weird reason, to fix this it’s quite easy though.
The fix to the NVIDIA GeForce 5500 running in 640×480 mode is done straigh via Gnome menus.
6. Use Gnome’s System -> Preferences -> Monitors to set raise up the Xserver resolution
Navigate to Gnome’s menus:
System -> Preferences -> Monitors
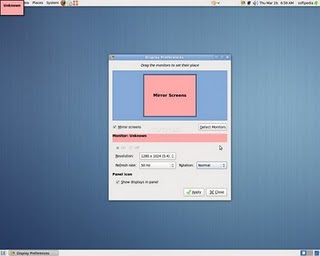
Here you will have to select more appropriate resolution and a different refresh rate, which in my case was 1024×768 and further on to store the settings press the Apply button.
One oddity here was that according to the Monitor Preferences the refresh rate was running on 54 Hz which I don’t believe was the case as I guess it’s some kind of Gnome or Ubuntu bug. I changed the 54 Hz Refresh Rate to 50 Hz as using the 54 Hz refresh rate as the screen had a minor vibrations observable if one takes a thorough look on the screen.
Setting the NVIDIA GeForce 5500 driver to work with 50 Hz Refresh Rate in Gnome loooked like the Windows’s 85 Hz RR and looked quite nice so I left it this way.
Finally to test the newly installed driver 3D acceleration I used glxgears.
7. Install glxgears in order to be able to test that 3D acceleration on Nvidia works fine
root@ubuntu:~# apt-get install mesa-utils
After installing mesa-utils which nowdays contains glxgears executable one needs to execute the glxgears binary.
root@ubuntu:~# glxgears
Immediately after a window containing the glxgears should popup on the screen, like shown in below screenshot

glxgears showed 3d acceleration works fine as the performance for 3d rendering shown was quite good and therefore 3D acceleration was running fine.
And that was it now the video works like and my friends, can enjoy the fun to have a generally virus Free OS 😉
Tags: amd, card, com, dell trinitron monitor, Desktop, desktop computer, drive, firmware nvidia, geforce 5500, geforce fx 5500, Gnome, Install, kernel module, kernel source, Linux, linux drivers, Load, manager, monitorEven, narwhal, nvidia, nvidia geforce fx 5500, packagesroot, RAM, root, s driver, screen, time, toolkit, Ubuntu, ubutnu, video, video card, weird reason, work, xconfig, Xorg, xserver
Posted in Linux and FreeBSD Desktop, Linux Audio & Video | 1 Comment »
Monday, July 18th, 2011 Recently I had the task to add a range of few IP addresses to as a virtual interface IPs.
The normal way to do that is of course using the all well known ifconfig eth0:0, ifconfig eth0:1 or using a tiny shell script which does it and set it up to run through /etc/rc.local .
However the Redhat guys could omit all this mambo jambo and do it The Redhat way TM 😉 by using a standard method documented in CentOS and RHEL documentation.
Here is how:
# go to network-script directory[root@centos ~]# cd /etc/sysconfig/network-scripts

# create ifcfg-eth0-range (if virtual ips are to be assigned on eth0 lan interface[root@centos network-scripts]# touch ifcfg-eth0-range
Now inside ifcfg-eth0-range, open up with a text editor or use the echo command to put inside:
IPADDR_START=192.168.1.120

IPADDR_END=192.168.1.250

NETMASK=255.255.255.25

CLONENUM_START=0
Now save the /etc/sysconfig/network-scripts/ifcfg-eth0-range file and finally restart centos networking via the network script:
[root@centos network-scripts]# service network restart
That’s all now after the network gets reinitialized all the IPs starting with 192.168.1.120 and ending in 192.168.1.250< will get assigned as virtual IPs for eth0 interface
Cheers 😉
Tags: CentOS, CLONENUM, command, course, directory root, echo, echo command, eth, fedora linux, file, ifconfig eth0, ip addresses, ips, jambo, lan, lan interface, Linux, mambo jambo, Netmask, network, network scripts, Networking, range, rangeNow, Redhat, root, script directory, Shell, shell script, sysconfig, task, text, tiny shell, virtual interface, way
Posted in Linux and FreeBSD Desktop, System Administration | No Comments »
Sunday, July 17th, 2011 It seems Skype has troubles installing on 64 bit Ubuntu via Ubuntu’s Graphical Package Install manager which in Ubuntu 11.04 is called (Ubuntu Software Center)
During my attempt to take advantage of the nice GUI apt frontend, I encontered the error:
Wrong Architecture amd64
And Skype install failed, as you see in below’s picture (which you might be unable to read since it’s stating the error in Bulgarian 😉
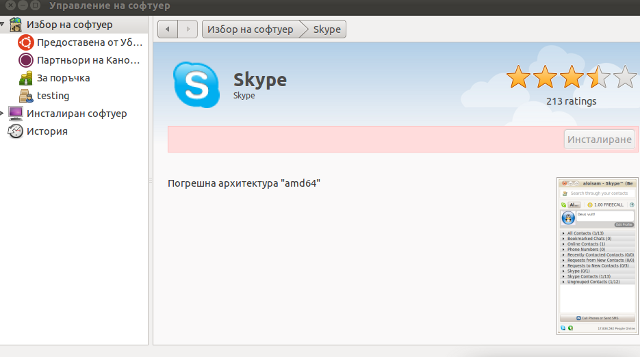
The error is quite understandable, since the Skype deb package which tried to install was built for the i386 architecture.
Since the Software Center was not intelligent enough to work around the issue, I finally fixed it myself using the good old apt-get in terminal, like so:
root@ubuntu:~# apt-get install skype

...
apt did not even complain that the package had a different architecture for i386 and installed skype without any errors as well Skype worked immediately even though the arthictural difference.
This is probably because even though it’s a amd64 Ubuntu it has a kernel module loaded to support i386 binaries 😉
Now my sister can enjoy her skype on the shiny Ubuntu 😉
Tags: amd, apt frontend, architecture, arthictural, attempt, binaries, center, deb, deb package, ERROR, frontend, Graphical, graphical package, Install, issue, kernel, manager, Module, package, root, sister, Skype, software, software center, terminal, Ubuntu
Posted in Linux and FreeBSD Desktop, Linux Audio & Video, Skype on Linux | No Comments »
Saturday, July 16th, 2011 
It was necessery to clean up some squid cache for some proxy users on a Debian host. Until now I’ve used to run only custom build Squid server on Slackware Linux.
Thus I was curious if Debian guys were smart enough to implement a proxy cache cleaning option as an option to be passed on to squid’s init script.
Honestly I was quite suprised squid clear cache option is not there;
squid-cache:~# /etc/init.d/squid3

Usage: /etc/init.d/squid3 {start|stop|reload|force-reload|restart}

squid-cache:/#
As it was not embedded into init script I still hoped, there might be some Debian way to do the proxy cache clearing, so I spend some 10 minutes checking online as well as checked in squid3‘s manual just to find there is no specific command or Debian accepted way to clean squid’s cache.
Since I couldn’t find any Debian specific, way I did it the old fashioned way 😉 (deleted directory/file structures in /var/spool/squid3/* and used squid’s -z option, to recreate the swap directories.
Here is how:
squid-cache:~# /etc/init.d/squid3 stop;

squid-cache:~# rm -Rf /var/spool/squid3/*;

squid-cache:~# squid3 -z; /etc/init.d/squid3 start
Finally I was quite amazed to realize, there was not even a crontab script to periodically clear and re-create proxy cache.
My previous experience with maintaning an office Squid proxy cache has prooved, that periodic cache clean ups are very helpful, especially to resolve issues with cached unreslovable DNS entries in the server.
Clearing up squid cache every week or something, guarantees that failure to resolve certain hosts at certain times would not stay unresolvable like forever 😉
In that manner of thougths, I decided to put the following crontab which will twice a month clear up proxy’s cache, to possibly solve some failed squid DNS issues.
squid-cache:~# crontab -u root -l > file;

echo '00 04 12,26 * * /etc/init.d/squid3 stop; rm -Rf /var/spool/squid3/*; squid3 -z; /etc/init.d/squid3 start >/dev/null 2>&1'

>> file; crontab file
By the way, implementing the squid clear cache in Debian and Ubuntu ‘s init scripts and putting a periodic proxy clear up cron, seems like a feature worthy to be proposed to the distro developers and hopefully be embbed in some of the upcoming distro releases 😉
Tags: amp, cache option, clear cache, clearing, command, cron, crontab script, dev, DNS, dns entries, experience, failure, feature, fi, fil, file, file structures, guarantees, Honestly, hosts, init script, Linux, necessery, online, option, proxy, proxy cache, proxy users, rf, root, something, specific, spool, squid, squid cache, Stop, thougths, Ubuntu, ups, Usage, var, way
Posted in Linux, System Administration | No Comments »
Friday, July 15th, 2011 At the company where I administrate some servers, they’re running Nagios to keep track of the servers status and instantly report if problems with connectivity to certain servers occurs.
Now one of the servers which had configured UP host checks is up, but because of heavy ICMP denial of service attacks to the servers the ICMP protocol ping is completely disabled.
In Nagios this host was constantly showing as DOWN in the usual red color, so nagios reported issue even though all services on the client are running fine.
As this is quite annoying, I checked if Nagios supports host checking without doing the ICMP ping test. It appeared it does through something called in nagios Submit passive check result for host
Enabling the “Submit passive check result for this host” could be done straight from Nagios’s web interface (so I don’t even have to edit configurations! ;).
Here is how I did it. In Nagios I had to navigate to:
Hosts -> Click over my host (hosting1) which showed in red as down

You see my down host which I clicked over showing in red in above pic.
On next Nagios screen I had to select, Disable active checks of this host
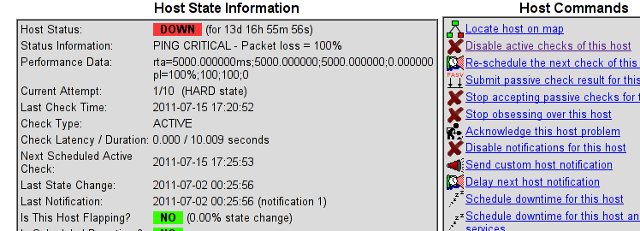
and press on the Commit button.
Next following text appears on browser:
Your command request was successfully submitted to Nagios for processing.
Note: It may take a while before the command is actually processed.
Afterwards I had to click on Submit passive check result for this host and in:
Check Output to type in:
check_tcp -p 80
Here is the Screenshot of the Command Options dialog:
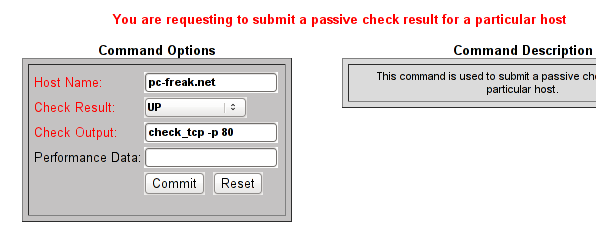
That’s all now Nagious should start checking the down host by doing a query if the webserver on port 80 is up and running instead of pinging it.
As well as the server is no longer shown in the Nagio’s Down host list.
Tags: Button, check result, checks, client, command options, command request, Commit, company, connectivity, denial of service, denial of service attacks, downYou, host, host list, hosts, ICMP, icmp ping, icmp protocol, Nagio, nagios, Output, ping, ping test, processing, request, screen, screenshot, servers, something, status, Submit, test, text, type, web interface
Posted in Linux, System Administration | 4 Comments »


