Did you have the need to sometimes split an SQL extra large files to few pieces in order to be able to later upload it via phpmyadmin? Did you needed an extra large video or data file to be cut in few pieces in order to transfer it in few pieces over an USB stick? Or just to give you an another scenario where I sometimes need to have an enormous file let’s say 3G split in few pieces, in order to later read it in vim or mcedit . I sometimes need to achieve this on FreeBSD and Linux hosts thus I thought it will be helpful to somebody to give a very quick tutorial on the way large files can be cut in pieces on Linux and BSD hosts.
GNU/Linux and FreeBSD are equipped with the split command. The purpose of this command is exactly the cutting of a file to a number of pieces.
On Linux the split command comes by default install to the system with the coreutils package on most Debian (deb) based and Redhat based (rpm) distributions, theerefore Linux’s version of split is GNU/split since it’s part of the GNU Coreutils package. An interesting fact about Linux split is that one of the two programmers who has coded it is Richard Stallman 😉
On BSD Unix split is the AT&T UNIX (BSD) split
In the past splitting files in pieces was much more needed than today, as people used floppy drives to transfer data, though today with the bloom of Internet and the improve of the data carriers transferring even an extra large files from one place to another is a way more trivial task still at many occasions splitting it in pieces is needed.
Even though today splitting file is very rarely required, still there are times when being able to split a file in X number of parts is very much needed. Maybe the most common use of splitting a file today is necessery when a large SQL file dumps, like let’s say 200 MBytes of info database needs to be moved from ane hosting provider to another one. Many hosting providers does disallow direct access with standard mySQL client programs to the database directly and only allow a user to connect only via phpMyAdmin or some other web interface like Cpanel to improve data into the SQL or PostgreSQL server.
In such times, having knowledge on the Unix split command is a priceless asset.
Even though on Linux and BSD the code for the split command is not identical and GNU/split and BSD/split has some basic differences, the use of split on both of these Unices is identical. The way to split a file in few pieces using on both Linux and BSD OSes is being done with one and the same command, here is how:
The Second argument the split command takes is actually called a prefix, the prefix is used as a basis name for the creation of the newly generated files cut in pieces file based on SQL-Backup-Data.sql.
As I said identical command will split the SQL-Backup-Data.sql files in a couple of parts which of it will be sized 40 megas.
These command will generate few files output like:
freebsd# ls -1 SQL-Backup-Dat*SQL-Backup-Data.sql

SQL-Backup-Dataa

SQL-Backup-Dataab

SQL-Backup-Dataac

SQL-Backup-Dataad

SQL-Backup-Dataae
As you see the SQL-Backup-Data.sql with size 200MB is being split in four files each of which is sized 40mbytes.
After the files are transfered to another Linux or BSD host, they can easily be again united in the original file with the command:
linux:~# for i in $(ls -1 SQL-Backup-Data_split*); echo $i >> SQL-Backup-Data.sql
Alternatively in most Unices also using cat should be enough to collect back the pieces into the original file, like so:
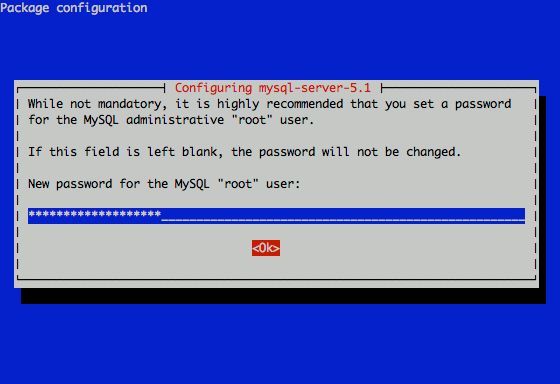
I had to change my mysql root password for one of the servers since during the install I mispasted the password in the MySQL password prompt I needed the pwd to be changed.
Changing the MySQL password is also possible with mysql cli, after connecting to the sql server, though this method is a bit more time consuming. Here is how to do it from mysql console:
linux:~# mysql -u root -p

Server version: 5.1.49-3 (Debian)
Copyright (c) 2000, 2010, Oracle and/or its affiliates. All rights reserved. This software comes with ABSOLUTELY NO WARRANTY. This is free software, and you are welcome to modify and redistribute it under the GPL v2 license
Type ‘help;’ or ‘h’ for help. Type ‘c’ to clear the current input statement. mysql> use mysql; mysql> update user set password=PASSWORD(“NEW_PASSWORD”) where User=’root’;mysql> flush privileges;
Of course it’s possible to do change the root pass via phpmyadmin Cheers 😉
The broadcast and gateway configuration lines are not obligitory. dns-nameservers would re-create /etc/resolv.conf file with the nameserver values specified which in these case are Google Public DNS servers and OpenDNS servers.
Very important variable is allow-hotplug eth0 If these variable with eth0 lan interface is omitted or missing (due to some some weird reason), the result would be the output you see from the command below:
debian:~# /etc/init.d/networking restart

Running /etc/init.d/networking restart is deprecated because it may not enable again some interfaces ... (warning).

Reconfiguring network interfaces...
Besides the /etc/init.d/networking restart is deprecated because it may not enable again some interfaces … (warning). , if the allow-hotplug eth0 variable is omitted the eth0 interface would not be brough up on next server boot or via the networking start/stop/restart init script.
My first reaction when I saw the message was that probably I’ll have to use invoke-rc.d, e.g.: debian:~# invoke-rc.d networking restart
Running invoke-rc.d networking restart is deprecated because it may not enable again some interfaces ... (warning).
However as you see from above’s command output, running invoke-rc.d helped neither.
I was quite surprised with the inability to bring my network up for a while with the networking init script. Interestingly using the command:
debian:~# ifup eth0
was able to succesfully bring up the network interface, whether still invoke-rc.d networking start failed.
After some wondering I finally figured out that the eth0 was not brought up by networking init script, because auto eth0 or allow-hotplug eth0 (which by the way are completely interchangable variables) were missing.
I added allow-hotplug eth0 and afterwards the networking script worked like a charm 😉
I’ve noticed some IPs which had a kind of too agressive behaviour towards my Apache webserver and thus decided to filter them out with the Firewall. As the server is running FreeBSD and my firewall choise is bsd’s pf I added the following lines to my /etc/pf.conf to filter up the abiser IP:
table  persist file "/etc/pf.blocked.ip.conf"
EXT_NIC="ml0" # interface connected to internet
block drop in log (all) quick on $EXT_NIC from  to any
echo '123.123.123.123' >> /etc/pf.blocked.ip.conf
As you see I’m adding the malicious IP to /etc/pf.blocked.ip.conf, if I later decide to filter some other IPs I can add them up there and they will be loaded and filtered by pf on next pf restart.
Next I restarted my pf firewall definitions to make the newly added rules in pf.conf to load up.
There are also logs stored about pf IP blocking as well as the other configured firewall rules in /var/log/pflog file. Hope this is helpful to somebody.
If you have used KVM, before you certainly have faced the requirement asked by many Dedicated Server Provider, for establishment of a PPTP (mppe / mppoe) or the so called Microsoft VPN tunnel to be able to later access via the tunnel through a Private IP address the web based Java Applet giving control to the Physical screen, monitor and mouse on the server.
This is pretty handy as sometimes the server is not booting and one needs a further direct access to the server physical Monitor. Establishing the Microsoft VPN connection on Windows is a pretty trivial task and is easily achieved by navigating to:
However achiving the same task on Linux seemed to be not such a trivial, task and it seems I cannot find anywhere information or precise procedure how to establish the necessery VPN (ptpt) ms encrypted tunnel.
Thanksfully I was able to find a way to do the same tunnel on my Debian Linux, after a bunch of experimentation with the ppp linux command.
To be able to establish the IPMI VPN tunnel, first I had to install a couple of software packages, e.g.:
I’ve also enabled the modules to be loading up during my next Linux boot with /etc/modules to not be bother to load up the same modules after reboot manually:
This command, brings up the ppp interface and makes the tunnel between my IP and the remote VPN target host.
Info about the tunnel could be observed with command:
ifconfig -a ppp

ppp0 Link encap:Point-to-Point Protocol

inet addr:10.20.254.32 P-t-P:10.20.0.1 Mask:255.255.255.255

UP POINTOPOINT RUNNING NOARP MULTICAST MTU:1496 Metric:1

RX packets:7 errors:0 dropped:0 overruns:0 frame:0

TX packets:12 errors:0 dropped:0 overruns:0 carrier:0

collisions:0 txqueuelen:3

RX bytes:70 (70.0 B) TX bytes:672 (672.0 B)
One more thing before I could finally access the IPMI’s web interface via the private IP was to add routing to the private IP address via the tunnel other side IP address:
# 10.20.0.1 P-t-P IP address

ip route add 10.20.1.124/32 dev ppp0
Now logically one would thing the Web interface to login and use the Java Applet to connect to the server would be accessible but no IT wasn’t !
It took me a while to figure out what is the problem and if not the guys in irc.freenode.net ##networking helped me I would never really find out why http://10.20.1.124/ and https://10.20.1.124/ were inaccessible.
Strangely enough both ports 80 and 443 were opened on 10.20.1.124 and it seems like working, however though I can ping both 10.20.1.124 and 10.20.0.1 there was no possible way to access 10.20.1.124 with TCP traffic.
Routing to the Microsoft Tunnel was fine as I’ve double checked all was fine except whether I tried accessing the IPMI web interface the browser was trying to open the URL and keeps opening like forever.
Thanksfully after a long time of futile try outs, a tip was suggested by a good guy in freenode nick named ne2k
To make the TCP connection in the Microsoft Tunnel work and consequently be able to access the webserver on the remote IPMI host, one needs to change the default MTU set for the ppp0 tunnel interface. Here is how:
ip link set ppp0 mtu 1438
And tadam! It’s done now IPKVM is accessible via http://10.20.1.124 or https://10.20.1.124 web interface. Horay ! 🙂
If you have to use Skype as a mean to call your employers and you do some important talks related work via Skype it might be a good idea to keep a voice logs of Skype peer to peer calls or the conferent ones.
On Windows it’s pretty easy to achieve voice skype calls recording as there is a plenty of software. However on Linux I can find only one application called skype-call-recorder
As I’m running Debian Squeeze/Wheeze (testing unstable) on my notebook, I decided to give skype-call-recorder a try: I’m using a 64 bit release of Debian, so first I tried installing the only available version for Debian which is natively prepared to run on a i386 Debian, however I hoped it will run out as I have emulation support for i386 applications. Thus I proceeded further downloadded and installed with the force-all dpkg optionskype-call-recorder-debian_0.8_i386.deb
However installing the debian i386 version of skyp-call-recorder seemed to not be starting due to problems with missing /usr/lib/libmp3lame.so.0 and /usr/lib/libaudid3tag.so libraries.
Thus I decided to give a try to the skype-call-recorder amd65 version which is natively aimed to be installed on Ubuntu release 8/9.
Installation of skype-call-recorder with this package went smoothly on Debian, the only issue I had with it is that I couldn’t easily find/launch the program via Gnome Application menu. To work around this I immediately edited /usr/local/share/applications/skype-call-recorder.desktop e.g.:
root@noah:~# vim /usr/local/share/applications/skype-call-recorder.desktop
In skype-call-recorder.desktop I substituted the line:
A consequent quick Gnome logout and login again and now I have the program launchable via the menus: Application -> Sound and Video -> Skype Call Recorder
The only thing I dislike about Skype Call Recorder is that the program current interface is build based on QT KDE library and thus when I launch it, the program launches a number of KDE related daemones like DCOP which eat my system an extra memory, still I’m happy even though the bit high load I can record the skype voice sessions on my Debian GNU/Linux.
My sister has forgotten the administrator account for her wordpress blog as she did not blogged for a while. I decided to help her and reset the WORDPRESS blog password to another one. The easiest way of course in normal circumstances is to use wordpress's Lost your password password reset via email.
However with this blog it seems I used an email address which I forgot so I couldn't really use this as a mean to reset the blog password.
Therefore as I'm addicted to command line 😉 I decided to do it straight via connecting to mysql server with mysql cli and change the encrypted password value directly there. Here is how I did it:
1. First I logged in to the mysql server with my root user/pass
pcfreak# mysql -u root -p

Enter password: Welcome to the MySQL monitor. Commands end with ; or \g.

Your MySQL connection id is 39263

Server version: 5.0.83-log FreeBSD port: mysql-server-5.0.83
Type 'help;' or '\h' for help. Type '\c' to clear the current input statement.
2. Then I checked current set user and password for the wp-admin admin user
mysql> use wordpress1;

mysql> select * from wp_users where user_login like '%admin%';

+----+------------+--------------+---------------------+-------------+--------------+

| ID | user_login | user_pass | user_nicename | user_email | user_url | user_registered | user_activation_key | user_status | display_name |

+----+------------+------------------------------------+---------------+----------------+----------+---------------------+----

| 1 | admin | $P$BG9eMoysG8ztywLp25AOpJSkWlRZMu. | admin | invoke@emailaddress.com | | 2011-03-10 13:44:26 |

| 0 | admin | +----+------------+------------------------------------+---------------+----------------+----------+---------------------+---

1 row in set (0.25 sec)
3. Used a query to reset the current encrypted password you see below shown under the user_pass column
mysql> UPDATE wp_users SET user_pass= MD5('my_new_wordpress_password_to_reset') where ID = '1';
4. I've changed the email set for user_email to which mail is sent, in case of forgotten password again
I've done this to prevent my sister to bother me again, if she forgets her password once again 😉
mysql> UPDATE wp_users SET user_email='invoke_@abv.bg' where ID = '1';
One important note here is that in step 3 I've used the MD5(); mysql embedded function to generate the MD5 crypted password which is inserted in above's sql query, however the MD5 function is only available in MySQL servers version 5.x, therefore in older releases of MySQL e.g. ver 4.x, one will have to first generate the md5 password with let's say md5sum linux command or bsd's md5 cmd like so:
a. On Linux hipo@noah:~$ echo 'my_new_wordpress_password_to_reset' | md5sum
f0ed1489e6d9e7eae8b363b1b5e4a864 -
I’ve been in a situation today, where one Linux server’s hard drive SCSI driver or the physical drive is starting to break off where in dmesg kernel log, I can see a lot of errors like:
I tried a number of things to remount the hdd which was throwing out errors in read only mode, but almost all commands I typed on the server were either shown as missng or returning an error: Input/output error
Just ot give you an idea what I mean, here is a paste from the shell:
linux-server:/# vim /etc/fstab

-bash: vim: command not found

linux-server:/# vi /etc/fstab

-bash: vi: command not found

linux-server:/# mcedit /etc/fstab

-bash: /usr/bin/mcedit: Input/output error

linux-server:/# fdisk -l

-bash: /sbin/fdisk: Input/output error
After I’ve tried all kind of things to try to diagnose the server and all seemed failing, I thought next a reboot might help as on server boot the filesystems will get checked with fsck and fsck might be able to fix (at least temporary) the mess.
I went on and tried to restart the system, and guess what? I got:
/sbin/reboot init Input/output error
I hoped that at least /sbin/shutdown or /sbin/init commands might work out and since I couldn’t use the reboot command I tried this two as well just to get once again:
You see now the situation was not pinky, it seemed there was no way to reboot the system … Moreover the server is located in remote Data Center and I the tech support there is conducting assigned task with the speed of a turtle. The server had no remote reboot, web front end or anything and thefore I needed desperately a way to be able to restart the machine.
A bit of research on the issue has led me to other people who experienced the /sbin/reboot init Input/output error error mostly caused by servers with failing hard drives as well as due to HDD control driver bugs in the Linux kernel.
As I was looking for another alternative way to reboot my Linux machine in hope this would help. I came across a blog post Rebooting the Magic Way – http://www.linuxjournal.com/content/rebooting-magic-way
As it was suggested in Cory’s blog a nice alternative way to restart a Linux machine without using reboot, shutdown or init cmds is through a reboot with the Magic SysRQ key combination
The only condition for the Magic SysRQ key to work is to have enabled the SysRQ – CONFIG_MAGIC_SYSRQ in Kernel compile time. As of today luckily SysRQ Magic key is compiled and enabled by default in almost all modern day Linux distributions in this numbers Debian, Fedora and their derivative distributions.
To use the sysrq kernel capabilities as a mean to restart the server, it’s necessery first to activate the sysrq through sysctl, like so:
I found enabling the kernel.sysrq = 1 permanently in the kernel is also quite a good idea, to achieve that I used:
echo 'kernel.sysrq = 1' >> /etc/sysctl.conf
Next it’s wise to use the sync command to sync any opened files on the server as well stopping as much of the server active running services (MySQL, Apache etc.).
linux-server:~# sync
Now to reboot the Linux server, I used the /proc Linux virtual filesystem by issuing:
linux-server:~# echo b > /proc/sysrq-trigger
Using the echo b > /proc/sysrq-trigger simulates a keyboard key press which does invoke the Magic SysRQ kernel capabilities and hence instructs the kernel to immediately reboot the system. However one should be careful with using the sysrq-trigger because it’s not a complete substitute for /sbin/reboot or /sbin/shutdown -r commands. One major difference between the standard way to reboot via /sbin/reboot is that reboot kills all the running processes on the Linux machine and attempts to unmount all filesystems, before it proceeds to sending the kernel reboot instruction.
Using echo b > /proc/sysrq-trigger, however neither tries to umount mounted filesystems nor tries to kill all processes and sync the filesystem, so on a heavy loaded (SQL data critical) server, its use might create enormous problems and lead to severe data loss!
SO BEWARE be sure you know what you’re doing before you proceed using /proc/sysrq-trigger as a way to reboot ;).


 My sister has forgotten the administrator account for her wordpress blog as she did not blogged for a while.