Archive for March 19th, 2011

Install (Compile) PHP5 from deb source to increase php performance on Debian Lenny Linux / Install php from source the debian way

Saturday, March 19th, 2011

If you’re looking for one further way to increase your Apache+PHP performance. You should definitely think about recompiling the lib php from the php’s source code.
Building from source your php library is a great way to decrease your php scripts execution time and therefore increase the responce time of your webserver server.
Recompiling will speed up your websites and make the user feel more interactivity when using them.

Of course there are two ways to go to compile a php library on your node. One is to install it directly downloading the latest source from php.net which if you’re on a Debian Linux platform is not recommended and the other method is to use the debian provided source bundled package (e.g. deb package) – the recommended one

As I prefer to do my system installs the straight debian way I choose the path to build and install the php library from a previously prepared version with build scripts for Debian, (e.g. to compile and install the php library from source the debian way.)

Here is exactly what commands you need to issue to properly build a php library from the php sources;
First you need to install the pre-requirement packages which will be further necessary for the php library compliation;

1. Install the build-essential debhelper and fakeroot through apt debian:~# apt-get install build-essential debhelper fakeroot

If you have the above 3 packages already installed you can skip further to the next step.

2. Use apt-get to fetch all the required libraries and programs necessary for the php compilation

debian:~# apt-get build-dep php5

The build-dep apt option causes apt-get to install/remove packages in an attempt to satisfy the build dependencies for a source package.

3. Download the php5 source code with apt-get debian:~# cd /usr/src/
debian:~# apt-get source php5

After the completion of apt-get source php5, you should have the php5 programming language source code, stored in /usr/src;

The files which should reside in /usr/src are:

php5_5.2.6.dfsg.1-1+lenny9.diff.gz
php5_5.2.6.dfsg.1-1+lenny9.dsc
php5_5.2.6.dfsg.1.orig.tar.gz

apt-get source php5 command will also extract the php from php5_5.2.6.dfsg.1.orig.tar.gz and apply the php5_5.2.6.dfsg.1-1+lenny9.diff.gz patch file.

4.cd to the php directory;

debian:~# cd php5-5.2.6.dfsg.1/

5. Now let’s compile the php library the debian way

debian:~# dpkg-buildpackage -rfakeroot
....

Now go and make yourself a coffee and have a cigarette if you’re a smoker. In about 10/20 minutes (depending on your computer CPU) your php should have been built.

You should have the php packages now built, if you get any error messages, don’t blame me. Blame Microsoft! 🙂

6. Switch back one directory back

debian:~# cd ../

You should have the following debian packages built and ready to be installed;

libapache2-mod-php5_5.2.6.dfsg.1-1+lenny9_amd64.deb
libapache2-mod-php5filter_5.2.6.dfsg.1-1+lenny9_amd64.deb
php5_5.2.6.dfsg.1-1+lenny9_all.deb
php5-cgi_5.2.6.dfsg.1-1+lenny9_amd64.deb
php5-cli_5.2.6.dfsg.1-1+lenny9_amd64.deb
php5-common_5.2.6.dfsg.1-1+lenny9_amd64.deb
php5-curl_5.2.6.dfsg.1-1+lenny9_amd64.deb
php5-dbg_5.2.6.dfsg.1-1+lenny9_amd64.deb
php5-dev_5.2.6.dfsg.1-1+lenny9_amd64.deb
php5-gd_5.2.6.dfsg.1-1+lenny9_amd64.deb
php5-gmp_5.2.6.dfsg.1-1+lenny9_amd64.deb
php5-imap_5.2.6.dfsg.1-1+lenny9_amd64.deb
php5-interbase_5.2.6.dfsg.1-1+lenny9_amd64.deb
php5-ldap_5.2.6.dfsg.1-1+lenny9_amd64.deb
php5-mcrypt_5.2.6.dfsg.1-1+lenny9_amd64.deb
php5-mhash_5.2.6.dfsg.1-1+lenny9_amd64.deb
php5-mysql_5.2.6.dfsg.1-1+lenny9_amd64.deb
php5-odbc_5.2.6.dfsg.1-1+lenny9_amd64.deb
php5-pgsql_5.2.6.dfsg.1-1+lenny9_amd64.deb
php5-pspell_5.2.6.dfsg.1-1+lenny9_amd64.deb
php5-recode_5.2.6.dfsg.1-1+lenny9_amd64.deb
php5-snmp_5.2.6.dfsg.1-1+lenny9_amd64.deb
php5-sqlite_5.2.6.dfsg.1-1+lenny9_amd64.deb
php5-sybase_5.2.6.dfsg.1-1+lenny9_amd64.deb
php5-tidy_5.2.6.dfsg.1-1+lenny9_amd64.deb
php5-xmlrpc_5.2.6.dfsg.1-1+lenny9_amd64.deb
php5-xsl_5.2.6.dfsg.1-1+lenny9_amd64.deb
php-pear_5.2.6.dfsg.1-1+lenny9_all.deb

7. Install the newly built php libraries

debian:/usr/src# for i in *.deb; do dpkg -i $i; done

Now if you need something to be configured in the way your apache interprets php scripts go and edit your /etc/php5/apache2/php.ini

Now as you should have installed and configured your libapache2-mod-php5 from source, the last thing to do before you can benefit from the improved performance is to restart apache.
8. Restart Apache server

debian:~# /etc/init.d/apache2 restart

I hope my article is helpful to somebody. If it works for you or it doesn’t give me your feedback 😉

Howto add adsense ads to Elgg user blog/s

Saturday, March 19th, 2011

I wanted to add google adsense on my Elgg powered experimental social network mockateacher.com

There are plenty of ways described which enables a user to add a google adsense code to elgg, however none of the ones I've red online worked for me for my elgg site user blog section

One of the promising ways to add the adsense code to all sections of an elgg enpowered website is described to be achieved through Elgg Google Adverts in the spotlight plugin.
I gave this suggested method for adsense inclusion to elgg by installing and setting it up but it worked not.

There was a blog which described a procedure which gaves a possibility the adsense code to be embedded on every user dashboard's right widget right below the elgg's Edit Page

This method seems to work but wasn't exactly enabling me to place google advertisements only on the elgg's blogs and therefore was useless to me.

Thus I played a bit with the files in the mod/blog located under the elgg's install root directory and hooray I found out a way to add my adsense code to my elgg user blog section.

Here is how:

1. Edit the file mod/blog/views/default/blog/object/blog.php

In the file look for the line:

<div class="blog_post">

This is located nearbly line 51 in the file on my elgg version 1.7.7, with latest available blog plugin at this time, on prior version this might be located on different line.

After this line just place your Adsense code obtained from your Adsense Google account and you're done.
The google adsense advertisements will start appearing in the head of your elgg's users blog pages 😉

Tracking graphically MySQL, Apache and Network performance in web with Munin on Debian Linux

Saturday, March 19th, 2011

munin_monitor_cpu_network_hard_drive_apache_mysql_performance-in-web-on-linux_logo

Munin is great software for surveillance software for your MySQL, Apache, Qmail, Postfix and many other of the classical daemon services which most of the Linux, BSD servers online are running on.

1. Munin on Debian Linux is really easy to be installed and comes to executing:

debian:~# apt-get install munin munin-node munin-plugins-extra

2. Link /var/www/munin/ to some VirtualHost or ServerHost
For instance if your munin is to be placed on the domain www.pc-freak.net.net which has the DocumentRoot of /var/www

debian:~# cd /var/www
debian:/var/www# ln -sf /var/www/munin munin

3. Add some extra MySQL related plugins

To check whole list of pmunin plugins you can enable check in /etc/munin/plugins directory

Lets say our Munin will be providing statistics mainly for MySQL, enable this bunch of plugins:

cd /etc/munin/plugins
ln -s /usr/share/munin/plugins/mysql_ mysql_
ln -s /usr/share/munin/plugins/mysql_bytes mysql_bytes
ln -s /usr/share/munin/plugins/mysql_innodb mysql_innodb
ln -s /usr/share/munin/plugins/mysql_isam_space_ mysql_isam_space_
ln -s /usr/share/munin/plugins/mysql_queries mysql_queries
ln -s /usr/share/munin/plugins/mysql_slowqueries mysql_slowqueries
ln -s /usr/share/munin/plugins/mysql_threads mysql_threads


Though above command would enable mysql monitoring it will be not working out of the box. You will find in munin logs error like:

Missing dependency Cache::Cache at /usr/share/munin/plugins/mysql_ line 716."

To fix this install libcache-perl and libcache-cache-perl

apt-get install --yes libcache-perl libcache-cache-perl
 

Then regenerate munin plugin configuration issue cmd:

munin-node-configure --suggest --shell | sh

and restart Munin-node server

service munin-node restart
 

Munin Node should be able login to the MySQL server using the Debian System Maintenance user however if you should need to create a custom user you can add the following configuration to:
 

/etc/munin/plugin-conf.d/munin-node


[mysql*]
    user root
    env.mysqluser muninmonitor
    env.mysqlpassword Your-Secret-Password

4. Edit Munin config

Make sure you have at least the following variables enabled in /etc/munin/munin.conf
 

 dbdir  /var/lib/munin
 htmldir /var/cache/munin/www
 logdir /var/log/munin
 rundir  /var/run/munin

 tmpldir    /etc/munin/templates

includedir /etc/munin/munin-conf.d

[localhost.localdomain]
    address 127.0.0.1
    use_node_name yes


5. Add Munin Alias or Virtualhost

To make Munin Accessible from Webserver you need to at least add an alias create a file
/etc/apache2/conf.d/munin with following content:

vim /etc/apache2/conf.d/munin

Alias /munin /var/cache/munin/www

<Directory /var/cache/munin/www>
        Order allow,deny
        #Allow from localhost 127.0.0.0/8 ::1
        Allow from all
        Options None
        php_value engine off

    <IfModule mod_expires.c>
        ExpiresActive On
        ExpiresDefault M310
    </IfModule>

</Directory>


If you want to access Munin from Apache subdomain create it lets say you want to access it via stats.www.pc-freak.net, use following config file:

vi /etc/apache2/sites-enabled/stats.www.pc-freak.net
 

<VirtualHost *>
   ServerAdmin hipo@www.pc-freak.net
   ServerName stats.www.pc-freak.net
   DocumentRoot /var/cache/munin/www
   <Directory />
       Options FollowSymLinks
       #AllowOverride All
       php_value engine off
   </Directory>
   LogLevel debug
   CustomLog /var/log/apache2/munin/access.log combined
   ErrorLog /var/log/apache2/munin/error.log
   ServerSignature On
<Directory /var/cache/munin/www>
        Order allow,deny
        #Allow from localhost 127.0.0.0/8 ::1
        Allow from all
        Options FollowSymlinks
        #AllowOverride All
        php_value engine off

</Directory>

</VirtualHost>


6. Restart Apache;

debian:~# /etc/init.d/apache2 restart

Now to access the newly installed munin point your favorite browser to (either the subdirectory configured for access or the Virtualhost subdomain):

https://www.pc-freak.net/munin/
or
http://munin.www.pc-freak.net

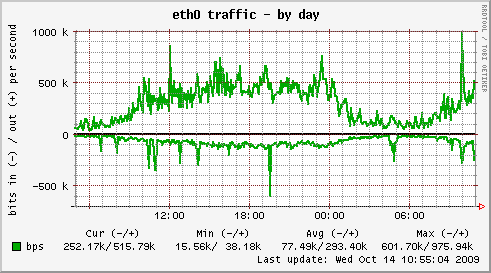
eth0-network-traffic-munin-server-statistics

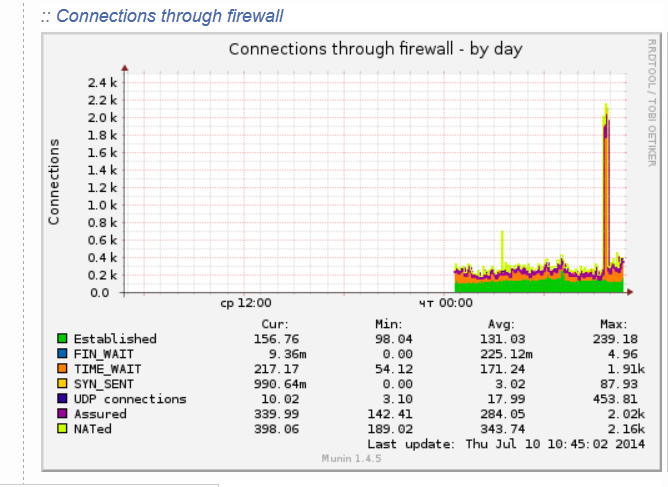
connections_through_firewall-statistics-munin-debian-linux
7. Protecting Munin with a password

As it could be a security leak to expose statistics regarding your server (Disk I/O, Memory, Load Avarage, Apache, MySQL Postfix) operations it is good security practice to protect munin with a password.

I've earlied blogged on how to protect your server munin web-statistics wtih an htaccess password (read it here)


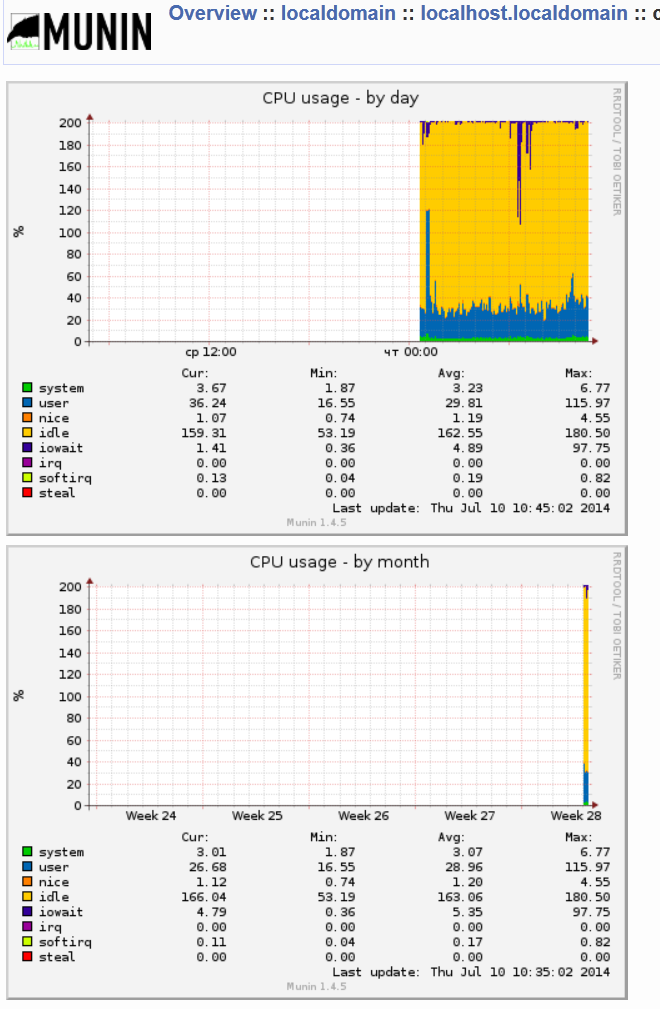
munin-cup-statistics-by-day-and-by-month-screenshot

Happy Monitoring