Archive for July, 2010

The Glorious Prophet Elijah (Elias) taking to heaven – the feast in the Orthodox Church – St. Elijah’s day

Wednesday, July 21st, 2010

The Orthodox Old Testament Prophet Elijah icon

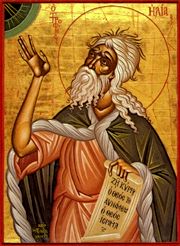
It’s the feast of the glorious prophet Elijah in the Orthodox Church. Every year on the 20-th of June we do celebrate the feast whether we commemorate in short the glorious life of the prophet with which the mercyful God has bestowed the prophet.
Elijah is actually considered the greatest old testament prophet before the coming of our Lord and Saviour Jesus Christ.
St. Prophet Elias is among the two people who did not died but was taken to heaven, the first one that has not faced physical death but by God’s mercy because of his great righteousness has been taken to heaven is Enoch.
The whole short version of saint Elijah’s life is availabe for reading here

Elijah is very famous for his God inspired “contest” against the Baal Prophets whether he has shown the idolaters who the real Living God is.

Here are a few interesting extracts from the Saint’s Living:

During these two years a famine prevailed in the land. At the close of this period of retirement and of preparation for his work, Elijah met Obadiah, one of Ahab’s officers, whom he had sent out to seek for pasturage for the cattle, and bade him go and tell his master that Elijah was there. The king came and met Elijah, and reproached him as the “troubler of Israel.” It was then proposed that sacrifices should be publicly offered, for the purpose of determining whether Baal or the Israelite God was the true God. This was done on Mount Carmel; the result was that a miracle took place convincing those watching that Baal was false and that the Israelite God was real. The prophets of Baal were then put to death by the order of Elijah.

Another very notable moment (and marvelous God’s manifestation in Elijah’s life) is his Glorious take into haven by God Almighty. God taking Prophet Elijah to Heaven with a Chariot of Fire
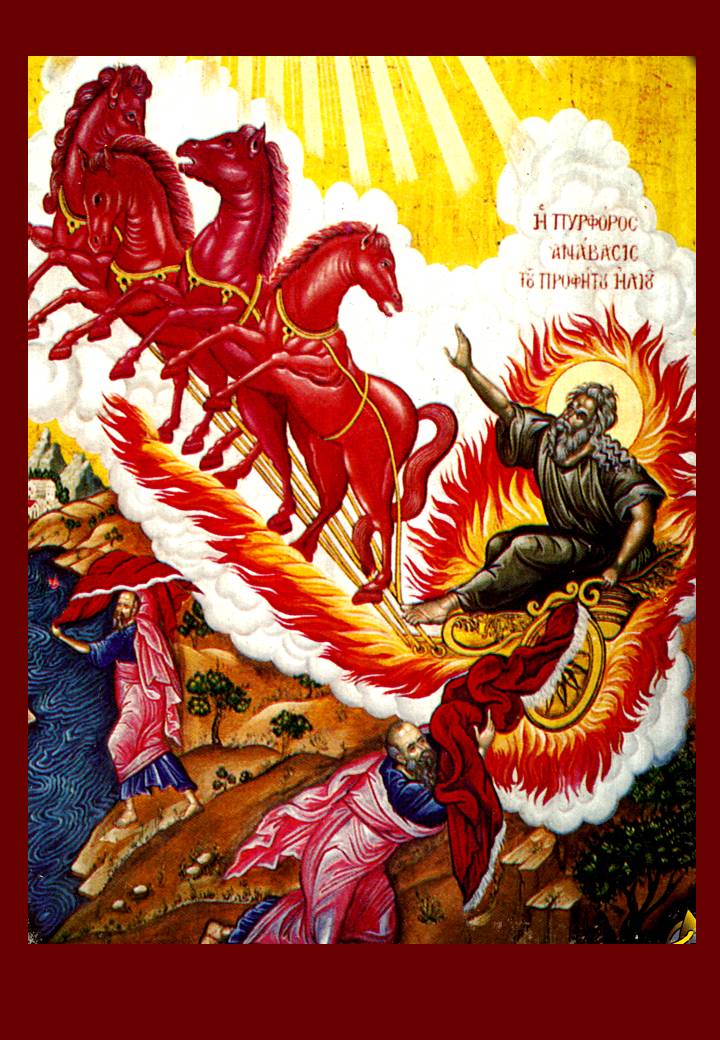
God taking Elijah to heaven in a whirlwind by a chariot and horses of fire.

Read the short revised version below:

The time now drew near when he was to be taken up into heaven (2 Kings 2:1-12). He went down to Gilgal, where there was a school of prophets, and where his successor Elisha, whom he had anointed some years before, resided. Elisha was distraught by the thought of his master’s leaving him, and refused to be parted from him. The two went on and came to Bethel and Jericho, and crossed the Jordan, the waters of which were “divided hither and thither” when smitten with Elijah’s mantle. Upon arriving at the borders of Gilead, which Elijah had left many years before, it “came to pass as they still went on and talked” they were suddenly separated by a chariot and horses of fire; and “Elijah went up by a whirlwind into heaven,” Elisha receiving his mantle, which fell from Elijah as he ascended.Elijah’s chosen successor was the prophet Elisha; Elijah designated Elisha as such by leaving his mantle with him (2 Kings 2:13-15), so that his wish for “a double portion” of the older prophet’s spirit (2:9), an allusion to the preference shown the first-born son in the division of the father’s estate (Deuteronomy 21:17), had been fulfilled.

How to redirect certain pages to https using Zend Framework, how to properly add redirects to the default Zend Framework (ZF) .htaccess file

Tuesday, July 20th, 2010

Most Zend Framework users and consuers would admint that Using Zend Framework is quite handy for creating large long term projects in PHP.
However probably almost every starter with ZF like me would face enormous problems before he understand how to manage properly mod_rewrite basedcustom redirects in Zend Framework.

Recently I had a task to create a ZF mod_rewrite custom redirect , the task consisted in that some specific urls passed to the webserverhad to be forwarded to another SSL protected (https) locations
An example of what I had to do is for instance you need to redirect all your incoming requests to a page login section like let’s sayhttp://www.yourpage.com/login/ to https://www.yourpage.com/login/

There is plenty of mod rewrite examples and documents writtin which are able to achieve the up-mentioned rewrite rule, yet trying toapply them putting a mod_rewrite redirect rules in Zend’s default .htaccess failed to create the desired redirect.

Some of the tutorials on the subject of URL rewritting with mod_rewrite I’ve read and tried without success was:

Redirecting URLs with Apache’s mod_rewrite
.htaccess tricks and tips .. part two: url rewritting with mod rewrite
mod_rewrite, a beginner’s guide (with examples
Using Apache’s RewriteEngine to redirect requests to other URLS and to https://
apache htaccess rewrite rules make redirection loop

After an overall time of 4 hours or so and many failed tries I finally was able to determine why none of the straight ways to url redirect http://to https:// urls worked. By default my installed zend framework .htaccess had the following content

SetEnv APPLICATION_ENV development

RewriteEngine On
RewriteCond %{REQUEST_FILENAME} -s [OR]
RewriteCond %{REQUEST_FILENAME} -l [OR]
RewriteCond %{REQUEST_FILENAME} -d

RewriteRule ^.*$ – [NC,L]
RewriteRule ^.*$ index.php [NC,L]

I have tried to edit the below rules adding new mod_rewrite RewriteCond(itions) and RewriteRule(s) after the RewriteCond %{REQUEST_FILENAME} -d code.

Like so:

SetEnv APPLICATION_ENV development

RewriteEngine On
RewriteCond %{REQUEST_FILENAME} -s [OR]
RewriteCond %{REQUEST_FILENAME} -l [OR]
RewriteCond %{REQUEST_FILENAME} -d

RewriteCond %{HTTPS} !=on
RewriteRule ^login(.*) https://%{SERVER_NAME}/login$1 [R,L]
RewriteRule ^.*$ – [NC,L]
RewriteRule ^.*$ index.php [NC,L]

Nevertheless the rewriterules to achieve the desired url rewrite included after the RewriteEngine On I used I received a 404 errors instead of the expected results.

I realized that it’s very likely the default zf rules being loaded in the .htaccess are standing the way of the other rules and some kindof interference occurs.
Therefore subsequently I decided to change the order of the mod rewrite rules e.g. to look like in the .htaccess code I present below:

SetEnv APPLICATION_ENV development

RewriteEngine On
RewriteCond %{HTTPS} !=on
RewriteRule ^login(.*) https://%{SERVER_NAME}/login$1 [R,L]

RewriteCond %{REQUEST_FILENAME} -s [OR]
RewriteCond %{REQUEST_FILENAME} -l [OR]
RewriteCond %{REQUEST_FILENAME} -d

RewriteRule ^.*$ – [NC,L]
RewriteRule ^.*$ index.php [NC,L]

And oh Good heavens that piece of code finally worked and the http to https redirect for the web site folder
http://mywebsite.com/login/*
started being forwarded to
https://mywebsite.com/login/*

How to Redirect to www with (301 redirect) using mod_rewrite for a better web site SEO

Monday, July 19th, 2010

For a better website SEO it’s recommended that you think of rewritting all your incoming http://yourdomain.com to http://www.yourdomain.com. That way you will escape from having a duplicate webpage content.
Still many websites online are not aware that having their website content available twice whenever accessing both http://yourdomain.com and http://www.yourdomain.com is a terrible practice since it’s very likely that (Google, MSN, Bing) Web Crawlers will crawl and try to index the content of the website, seing that the content is twice available, they will rank the website as a website with a duplicate content and that will have a direct influence on the overall site pagerank.
One of the possible ways to redirect your incoming requests to yourdomain.com to go to www.yourdomain.com is via a mod rewrite rule within your .htaccess file
For the rule to work make sure that the <Directory> for the VirtualHost of your website has in it included the Apache directives

AllowOverride All

As you assure yourself mod rewrite is correctly enabled for your domain then edit your .htaccess and place in it:

RewriteEngine On
RewriteCond %{HTTP_HOST} ^www.pc-freak.netRewriteRule (.*) https://www.pc-freak.net/$1 [R=301,L]

Of course you will have to replace the www.pc-freak.net domain in above example with the your custom domain name.
Now all your incoming Apache requests for domain www.pc-freak.net will be automatically using the 301 Redirect

Here it is important to explain that the 301 redirect is the most efficient and Search Engine Friendly redirect option for a webpage redirect.

The code “301” is interpreted by the web crawlers as “moved permanently”. In other words the content of the previous website is moved permanently to the one where the redirect leads.
Of course there are many other possible ways to implement the 301 redirect, however using mod_rewrite potential is probably the most efficient one for a dynamic site content.

How to make sure your Linux system users won’t hide or delete their .bash_history / Securing .bash_history file – Protect Linux system users shell history

Monday, July 19th, 2010

linux-bin-bash-600x600logo
If you're running multi user login Linux system, you have probably realized that there are some clever users that prefer to prevent their command line executed commands to be logged in .bash_history.
To achieve that they use a number of generally known methodologist to prevent the Linux system from logging into their $HOME/.bash_history file (of course if running bash as a default user shell).
This though nice for the user is a real nightmare for the sysadmin, since he couldn't keep track of all system command events executed by users. For instance sometimes an unprivilegd user might be responsible for executing a malicious code which crashes or breaks your server.
This is especially unpleasent, because you will find your system crashed and if it's not some of the system services that causes the issue you won’t even be able to identify which of all the users is the malicious user account and respectively the code excecuted which fail the system to the ground.
In this post I will try to tell you a basic ways that some malevolent users might use to hide their bash history from the system administrator.
I will also discuss a few possible ways to assure your users .bash_history keeps intact and possibly the commands executed by your users gets logged in in their.
The most basic way that even an unexperienced shell user will apply if he wants to prevent his .bash_history from sys admins review would be of directly wiping out the .bash_history file from his login account or alternatively emptying it with commands like:

malicious-user@server:~$ rm -f. bash_history
ormalicious-user@server:~# cat /dev/null > ~/.bash_history

In order to prevent this type of attack against cleaning the .bash_history you can use the chattr command.
To counter attack this type of history tossing method you can set your malicious-user .bash_history’s file the (append only flag) with chattr like so:

root@server:~# cd /home/malicious-user/
root@server:~# chattr +a .bash_history

It’s also recommended that the immunable flag is placed to the file ~/.profile in user home

root@server:~# chattr +i ~/.profile

It would be probably also nice to take a look at all chattr command attributes since the command is like swiss army knife for the Linux admin:
Here is all available flags that can be passed to chattr
append only (a)
compressed (c)
don~@~Yt update atime (A)
synchronous directory updates (D)
synchronous updates (S)
data journalling (j)
no dump (d)
top of directory hierarchy (T)
no tail-merging (t)
secure deletion (s)
undeletable (u)
immutable (i)

It’s also nice that setting the “append only” flag in to the user .bash_history file prevents the user to link the .bash_history file to /dev/null like so:

malicious-user@server:~$ ln -sf /dev/null ~/.bash_history
ln: cannot remove `.bash_history': Operation not permitted

malicious-user@server:~$ echo > .bash_history
bash: .bash_history: Operation not permitted

However this will just make your .bash_history append only, so the user trying to execute cat /dev/null > .bash_history won’t be able to truncate the content of .bash_history.

Unfortunately he will yet be able to delete the file with rm so this type of securing your .bash_history file from being overwritten is does not completely guarantee you that user commands will get logged.
Also in order to prevent user to play tricks and escape the .bash_history logging by changing the default bash shell variables for HISTFILE an d HISTFILESIZE, exporting them either to a different file location or a null file size.
You have to put the following bash variables to be loaded in /etc/bash.bashrc or in /etc/profile
# #Prevent unset of histfile, /etc/profile
HISTFILE=~/.bash_history
HISTSIZE=10000
HISTFILESIZE=999999
# Don't let the users enter commands that are ignored# in the history file
HISTIGNORE=""
HISTCONTROL=""
readonly HISTFILE
readonly HISTSIZE
readonly HISTFILESIZE
readonly HISTIGNORE
readonly HISTCONTROL
export HISTFILE HISTSIZE HISTFILESIZE HISTIGNORE HISTCONTROL

everytime a user logs in to your Linux system the bash commands above will be set.
The above tip is directly taken from Securing debian howto which by the way is quite an interesting and nice reading for system administrators 🙂

If you want to apply an append only attribute to all user .bash_history to all your existing Linux server system users assuming the default users directory is /home in bash you can execute the following 1 liner shell code:

#Set .bash_history as attr +a
2. find /home/ -maxdepth 3|grep -i bash_history|while read line; do chattr +a "$line"; done

Though the above steps will stop some of the users to voluntary clean their .bash_history history files it won’t a 100% guaranttee that a good cracker won’t be able to come up with a way to get around the imposed .bash_history security measures.

One possible way to get around the user command history prevention restrictions for a user is to simply using another shell from the ones available on the system:
Here is an example:

malicious-user:~$ /bin/csh
malicious-user:~>

csh shell logs by default to the file .history

Also as far as I know it should be possible for a user to simply delete the .bash_history file overwritting all the .bash_history keep up attempts up-shown.
If you need a complete statistics about accounting you’d better take a look at The GNU Accounting Utilities

In Debian the GNU Accounting Utilities are available as a package called acct, so installation of acct on Debian is as simple as:

debian:~# apt-get install acct

I won’t get into much details about acct and would probably take a look at it in my future posts.
For complete .bash_history delete prevention maybe the best practice is to useg grsecurity (grsec)

Hopefully this article is gonna be a step further in tightening up your Server or Desktop Linux based system security and will also give you some insight on .bash_history files 🙂 .

Redirect http URL folder to https e.g. redirect (http:// to https://) with mod_rewrite – redirect port 80 to port 443 Rewrite rule

Saturday, July 17th, 2010

There is a quick way to achieve a a full url redirect from a normal unencrypted HTTP request to a SSL crypted HTTPS

This is achieved through mod_rewrite using the RedirectMatch directive.

For instance let’s say we’d like to redirect https://www.pc-freak.net/blog to https://www.pc-freak.net/blog.
We simply put in our .htacess file the following rule:

Redirect permanent /blog https://www.cadiabank.com/login

Of course this rule assumes that the current working directory where the .htacess file is stored is the main domain directory e.g. / .
However this kind of redirect is a way inflexible so for more complex redirect, you might want to take a look at mod rewrite’s RedirectMatch directive.

For instance if you inted to redirect all urls (https://www.pc-freak.net/blog/something/asdf/etc.) which as you see includes the string blog/somestring/asdf/etc. to (https://www.pc-freak.net/blog/something/asdf/etc then you might use some htaccess RedirectMatch rule like:

RedirectMatch permanent ^/blog/(.*)$ https://www.pc-freak.net.net$1
or
RedirectMatch permanent ^/blog/(.*)$ https://www.pc-freak.net.net/$1

Hopefully your redirect from the http protocol to https protocol with mod_rewrite rule should be completed.
Also consider that the Redirect directive which by the way is an Apache directive should be faster to process requests, so everywhere you can I recommend using instead of RedirectMatch which calls the external Apache mod_rewrite and will probably be times slower.

Create a license agreement accept form checkout field within a Subform with Zend Framework

Friday, July 16th, 2010

After numerous of experiments because I had some issues caused by “bug” in Zend Framework Zend_Form_Element_Checkbox which prevents a selected checkbox to be submitted I finally was able to create a working Zend_Form_Element_Checkbox, below you will see the exact code of the working code which I create within a subform and does the trick of an Accept Agreement checkbox field which is a perfect suit for a Registration Form being prepared with ZF.

$risk_statement_full = 'something';
$accept_disclaimerOptions='I accept';
$accept_disclaimer = new Zend_Form_SubForm();
$accept_disclaimer>addElements(array(

$disclaimer = new Zend_Form_Element_Checkbox(‘accept_disclaimer’, array(
‘label’ > “$risk_statement_full”,
‘description’ > $accept_disclaimerOptions,
‘uncheckedvalue’ > ”,
‘checkedvalue’ > ‘1’,
‘value’ > 1,
‘required’ > true,

)),

));

I have to express my thanks to a bunch of guys who gave me big help in irc.freenode.net in #zftalk – which by the way is the official Zend Framework IRC Channel.
The guy that helped the most was with a nickname Bittarman thanks man!

The solution to the * Value is required and can’t be empty error message which appeared all the time nomatter if the form checkbox is selected or not was through using the Zend_Form_Element_Checkbox options:

‘uncheckedvalue’ => ”
and
‘checkedvalue’ => ’1′
there is also a separate Zend Methods to be used like so:

$disclaimer>setCheckedValue(''); $disclaimer&t;setUnchedkValue('');

This stupidity took me like 2 hours of googling and testing … finally though the above solution worked for me it appeared like non-working because my Iceweasel browser has cached the webpage … If you still can’t solve the issue using the above solution, cleanse your browser cache!

How to check to which package an installed file belongs to in Debian, Ubuntu, Redhat, CentOS and FreeBSD

Thursday, July 15th, 2010

Every now and then every system administrator has to determine to which installed package a certain file belongs.
This small article is about to give some few basics which will help you to achieve the task on Linux and Unix/BSD operating system.
Often times whenever we administrate a system we are required to list the content of a certain installed package below you will see a very basic ways to determine which file belongs to which package on Linux and BSD as well as how to list a file content on a few different *nix based operating systems. Of course there are numerous ways to achieve this operation so this examples are definitly not the only ones:

1. Determining a file belongs to which (.deb) package on Debian Linux
– The straight way to determine a file belongs to which package is:

debian:~# dpkg -S coreutils: /bin/ls

– Let’s say you would like to check every installed package on your Debian or Ubuntu Linux for a file name related to a certain file or binary. To do so on this distros you might use apt-file (by default not included in debian and ubuntu), so install it and use it to find out a binary is adherent to which package.

ubuntu:~# apt-get install apt-file
ubuntu:~# apt-get update

ubuntu:~# apt-file search cfdisk
dahb-html: /usr/share/doc/dahb-html/html/bilder/betrieb/cfdisk.png
doc-linux-html: /usr/share/doc/HOWTO/en-html/IBM7248-HOWTO/cfdisk.html
gnu-fdisk: /sbin/cfdisk
gnu-fdisk: /usr/share/info/cfdisk.info.gz
gnu-fdisk: /usr/share/man/man8/cfdisk.8.gz
manpages-fr-extra: /usr/share/man/fr/man8/cfdisk.8.gz
manpages-ja: /usr/share/man/ja/man8/cfdisk.8.gz
mtd-utils: /usr/sbin/docfdisk
util-linux: /sbin/cfdisk
util-linux: /usr/share/doc/util-linux/README.cfdisk
util-linux: /usr/share/man/man8/cfdisk.8.gz

– A good possible tip if you’re on a Debian or Ubuntu Linux is to list a certain package directly from the packages repository, e.g. without having it installed locally on your Linux.

This is done through:

debian:~# apt-file list fail2ban
fail2ban: etc/default/fail2ban
fail2ban: etc/fail2ban/action.d/hostsdeny.conf
fail2ban: etc/fail2ban/action.d/ipfw.conf
fail2ban: etc/fail2ban/action.d/iptables.conf
fail2ban: etc/fail2ban/action.d/iptables-multiport.conf
...

– Another possible way to find out which package a file belongs is via dlocate . Dlocate is probably be the tool of choice if you won’t to automate the process of finding to which package a file belongs in a shell script or smth.

Here is dlocate’s description

uses GNU locate to greatly speed up finding out which package a file belongs to (i.e. a very fast dpkg -S). many other uses, including options to view all files in a package, calculate disk space used, view and check md5sums, list man pages, etc.
Debian and Ubuntu are not bundled by default with it so you will have to install it separately.

ubuntu:~# apt-get install dlocate

Let’s say you would like to check where does the awk binary belongs, issue:

ubuntu:~# dlocate -S /usr/bin/fdisk
testdisk: /usr/share/doc/testdisk/html/microsoft_fdisk_de.html
testdisk: /usr/share/doc/testdisk/html/microsoft_fdisk_fr.html
testdisk: /usr/share/doc/testdisk/html/fdisk_de_microsoft.html
testdisk: /usr/share/doc/testdisk/html/microsoft_fdisk.html
util-linux: /sbin/sfdisk
util-linux: /sbin/cfdisk
util-linux: /sbin/fdisk
util-linux: /usr/share/man/man8/cfdisk.8.gz
util-linux: /usr/share/man/man8/sfdisk.8.gz
util-linux: /usr/share/man/man8/fdisk.8.gz
util-linux: /usr/share/doc/util-linux/README.cfdisk
util-linux: /usr/share/doc/util-linux/README.fdisk.gz
util-linux: /usr/share/doc/util-linux/examples/sfdisk.examples.gz

– Now sometimes you will have to list the content of a package binary, in Debian this is easily done with:

debian:~# dpkg -L bsdgames
...
var/games/bsdgames/hack
/var/games/bsdgames/hack/save
/var/games/bsdgames/sail
/usr/share/man/man6/teachgammon.6.gz
/usr/share/man/man6/rot13.6.gz
/usr/share/man/man6/snscore.6.gz
/usr/share/man/man6/morse.6.gz
/usr/share/man/man6/cfscores.6.gz
/usr/share/man/man6/ppt.6.gz
...

2. Here is also how o check which binary belongs to which package on FreeBSD here

freebsd# pkg_info -W /usr/local/bin/moon-buggy
/usr/local/bin/moon-buggy was installed by package moon-buggy-1.0.51_1

– Also you might need to list a binary package content in FreeBSD, here is how:

freebsd# pkg_info -L bsdtris-1.1
Information for bsdtris-1.1:

Files:
/usr/local/man/man6/bsdtris.6.gz
/usr/local/bin/bsdtris

2. To check a package belongs to which package on Fedora, Redhat, CentOS with rpm

[root@centos]# rpm -qf /bin/ls
coreutils-5.97-23.el5_4.2

Below command is above to show you all files which are contained in the sample package mysql-5.0.77-4.el5_5.3

[root@centos]# rpm -ql mysql-5.0.77-4.el5_5.3

/etc/my.cnf
/usr/bin/msql2mysql
/usr/bin/my_print_defaults
/usr/bin/mysql
/usr/bin/mysql_config
/usr/bin/mysql_find_rows
/usr/bin/mysql_tableinfo
/usr/bin/mysql_waitpid
/usr/bin/mysqlaccess
/usr/bin/mysqladmin
/usr/bin/mysqlbinlog
/usr/bin/mysqlcheck
/usr/bin/mysqldump
/usr/bin/mysqlimport
/usr/bin/mysqlshow
/usr/lib64/mysql
/usr/lib64/mysql/libmysqlclient.so.15

Install Google Sitemap Generator beta1 on Debian x86_64 Lenny GNU/Linux

Wednesday, July 14th, 2010

Did you look up a good quick way to have an automatically generated sitemaps on a number of websites?
If you do as I have, then what you’re looking for is probably Google Sitemap Generator .

Though the software is yet in beta stage it looks promising and could be used to automatically generated sitemaps for your websites using the access logs of each of the websites as a basis for the links to be included in your sitemap.xml and from thence to sitemap.xml.gz

I decided to explain about my hurdles and pains throughout installing and configuring Google Sitemap Generator.
Since officially there is no explanation on how to install Google Sitemap Genreator beta1 on Debian Lenny Linux andpossibly some other Debian based distributions like Ubuntu.

So here is the exactly how I installed googlesitemapgenerator

1. Download the sitemap_linux beta for x86_64 if you’re running an amd64 server architecture as I am :

– Be sure to be running with a super user, otherwise the install won’t proceed

linux-server:~# wget http://googlesitemapgenerator.googlecode.com/files/sitemap_linux-x86_64-beta1-20091231.tar.gz

2. Untar the archive

linux-server:~# tar -zxvf sitemap_linux-x86_64-beta1-20091231.tar.gz
drwxrwxrwx maoyq/eng 0 2009-12-31 01:24 sitemap-install/
-rwxrwxrwx maoyq/eng 5530 2009-12-31 01:24 sitemap-install/apache.sh
-rwxrwxrwx maoyq/eng 1218 2009-12-31 01:24 sitemap-install/autostart.sh
-rwxrwxrwx maoyq/eng 1145 2009-12-31 01:24 sitemap-install/google-sitemap-generator-ctl
...

linux-server:~# mv sitemap-install/ /usr/local/src
linux-server:~# cd /usr/local/src/sitemap-install/

3. Launch the google sitemap generator installer script

linux-server:/usr/local/src# ./install.sh

Next few you will be required to answer few trivial questions.

************************************************************
Welcome to Google Sitemap Generator (Beta)!

For more information, please visit:
http://code.google.com/p/googlesitemapgenerator/
************************************************************
PRIVACY WARNINGAny Sitemap information that you send to Google, including Sitemaps created
using the Sitemap Generator, should be consistent with commitments you make to
your users in your site’s privacy policy. If your site contains or generates
URLs that contain user information, you must filter the user information out of
the data that you send to Google. Instructions for filtering such information
can be found in the Sitemap Generator configuration instructions.

In addition, you must add language to your privacy policy substantially similar
to the following: “This site uses a tool that collects your requests for pages and passes elements of them to search engines to assist them in indexing this site. We control the configuration of the tool and are responsible for any information sent to the search engines.”
The product Terms of Service follows. …………………………

now press q

Do you agree with the Terms of Service? [N/y] y
This installation updates the Apache configuration file. To find that file,the installer needs the location of the Apache binary (httpd) or controlscript (apachectl). The binary or control script that you specify mustsupport the -V option.

What is the location of the Apache binary or control script? [/usr/sbin/apache2]/usr/sbin/apache2ctl
Can’t determine Group directive for Apache./usr/sbin/apache2ctl is not a supported Apache binary or control script.Do you want to enter a different location for the Apache binary or control script? [Y/n]

This warning is about to prevent you of properly installing the google sitemap generator on Debian Lenny or Debian Testing / Unstable Linux.

– To get around the issue and continuing with the installation, you will have to edit google sitemap generator install.sh script

Therein set or change the following variables in install.sh:

HTTPD_CONF="/etc/apache2/apache2.conf"
arg_apache_binary="/usr/sbin/apache2"
arg_apache_group="www-data"
arg_apache_conf="/etc/apache2/apache2.conf"
arg_apache_ctl="/usr/sbin/apache2ctl"

For your convenience I’ve also provided the working copy of google sitemap generator install.sh you can just download the install.sh and overwrite the original install.sh bundled with google sitemap generator beta1.

Further on start it up again and answer the required questions, from thence the install should succeed.

Afterwards be sure to enable port 8181 in your firewall, otherwise you won’t be able to access “googlesitemap generator web interface”.
Thereon to access google sitemap generator web interface and configure it for which domain names I desire to generate sitemaps as well as some other data relating the automated sitemap generations for my websites I pointed my IceWeasel browser to:

http://my-server.net:8181

Instead of a the nice login interface of google sitemap generator I faced:

Remote access is denied.

Make sure https is used if you want to access Google Sitemap Generator from remote IP. You can go to help center for how to enable https.

If you are on local machine, make sure you are not using proxy.

After some research online I was able to enable the remote access to Google Sitemap Generator web interface, I achieved that following the prescriptions in:
googlesitemapgenerator’s documentation Enable Google sitemap generator remote access

I have enabled the remote access to googlesitemapgenerator on Debian Lenny Linux via the command: linux-server:~# /usr/local/google-sitemap-generator/bin/sitemap-daemon remote_admin enable

– Now access again the Google Sitemap Generator web interface, I’m convinced you will love it, since it’s heavily “google unified”.
I suggest you also take a look at a nice similar article to this one called Easy Google Sitemap Generation with SitemapGen

Hopefully this article is about to shed you some further light on how googlesitemapgenerator works and will help you to better understand Google’s program’s web interface.

A year has passed without our beloved friend Nikolay Paskalev (Shanar)

Tuesday, July 13th, 2010

A whole sad year has passed without our beloved friend and brother in Christ, Nikolay Paskalev on 13.07.2010 !
Recently some of the people who loved or knew Niki in his earth life, gathered together to remember him.
The people who attended were no more than 10, quite modest as the whole earthly life of Niki …

Nikolay Paskalev – Shanar also known under the pseudonim (LunarStill)

Recently some of the people who loved or knew Niki in his earth life, gathered together to remember him.
The people who attended were no more than 10, quite modest as the whole earthly life of Niki …
Nick as I used to call me often was a big fan of computers, technology, all kind of SCI-FI movies.
A true IT Geek an unique close friend. He was also a notable joker, he always knew how to make somebody laugh.
I also remember his wild fantasies and his sharp mind. Niki was also a Christian and we every now and then talked about our common faith and hope in God, he was also a great and glorious gamer !
He spend some two years time or even more playing World of Warcraft
Though he was pissed off of WoW at the end of his wordly life.
He also loved to drink beer every now and then and was absolutely crazy about pop corns 🙂

I sometimes regret that I didn’t took more of my personal time to spend with him.
His sudden departure was a big and unexpected loss for all of us who loved him and still loves him.
I believe now he is in a better place in Heaven with God.

Let all of us his friends and relatives remember his memory and his gracious light he has shed on all of us while he was on earth.
Let us who know him pray to God that the Lord Jesus Christ has mercy on Nikolay’s soul and grant him rest and eternal bliss in the Kingdon of Heaven.
Will be seing you again someday dear Niki! 🙁

What causes the “421 Cannot connect to SMTP server” error and a quick work around

Monday, July 12th, 2010

A colleague of mine has encounters errors like:

An unknown error has occurred. Account: ‘mail.different.bg’, Server: ‘mail.different.bg’, Protocol: SMTP, Server Response: ‘421 Cannot connect to SMTP server 212.70.124.241 (212.70.124.241:25), connect error 10060’, Port: 25, Secure(SSL): No, Server Error: 421, Error Number: 0x800CCC67

while he was trying to send some emails with his Outlook Express mail client on his desktop computer running Windows XP, since he is not too much computer literate he contacted me for help on what is causing the error and how he can get through the issue and send the prepared emails to the destinations ASAP.

After I have asked him a few questions necessary to better understand the status of the problem and where does it originated I have come to the conclusion that it’s very likely that his outgoing SMTP port (25) outgoing TCP/IP traffic passing through the Internet Service Provider is filtered.
When the 421 Cannot connect to SMTP server problem occured, he was actually in his parents house provided with an internet connection through a BTC ADSL see BTC (Vivacom)’s ADSL page for reference

I have instructed my friend to try connecting to the SMTP (25) port of the questionable email server using window’s telnet client i order to check if my assumption that the outoging SMTP 25 port traffic is filtered.

I instructed him to issue a command like which is so common this days and it’s not news to the Sysadmins out there:

cmd> telnet mail.server.net 25

This prooved my theory that the 421 Cannot connect to SMTP server was caused by a filtered traffic on the outgoing network STMP port (25).

Some Internet Providers out there has that annoying practice of filtering the outgoing SMTP connections, because they couldn’t deal with infected Windows computers who start acting as a SPAM networks in another more clever way, however I should admit this is pretty dumb, since it creates numerous problems to the end user like in this particular case.

The temporary work around for him that I suggested was to use the mail server Webmail Interface before he moves back with his notebook back to his ISP at home which doesn’t include such a foolish way to filter spammers.