If you haven't worked for a while with Windows (since the days when XP was standard modern OS) you might be amazed that Windows like me. You might feel pretty unconfortable to work with Windows 7's "dock style" taskbar – showing application icons instead of buttons.

People who are traditionalist like me would definitely prefer to change this stupid behavior to "Windows Classic". Here is how to do it:
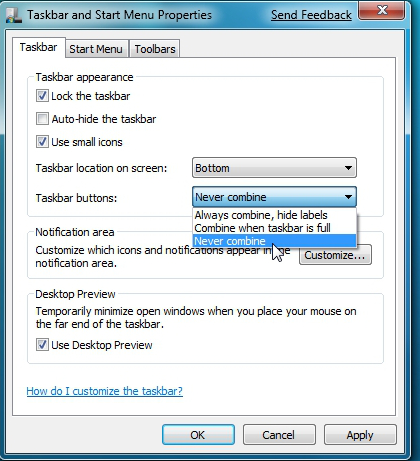
1. Right click on any open area on taskbar and choose Properties

2. From Taskbar -> Taskbar Buttons choose (Never Combine).
Never Combine – option makes every new Window to show as a separate one instead of Grouping the Windows by application.
In some cases choosing (Combine when TaskBar) is full is nice new option, so you might want to check it out for a while and see if you can get used to it.
3. Make Windows Start menu panel look like Windows 2000 (clear up unnecessary mambo-jumbo design)
I very much like simplicity thus I don't like Microsoft's choise to make Start Menu panel look like a Christmas Tree. To revert back:
On any empty space on the Desktop press Right Mouse button (Choose Personalize); Scroll down and choose (Windows Classic theme)
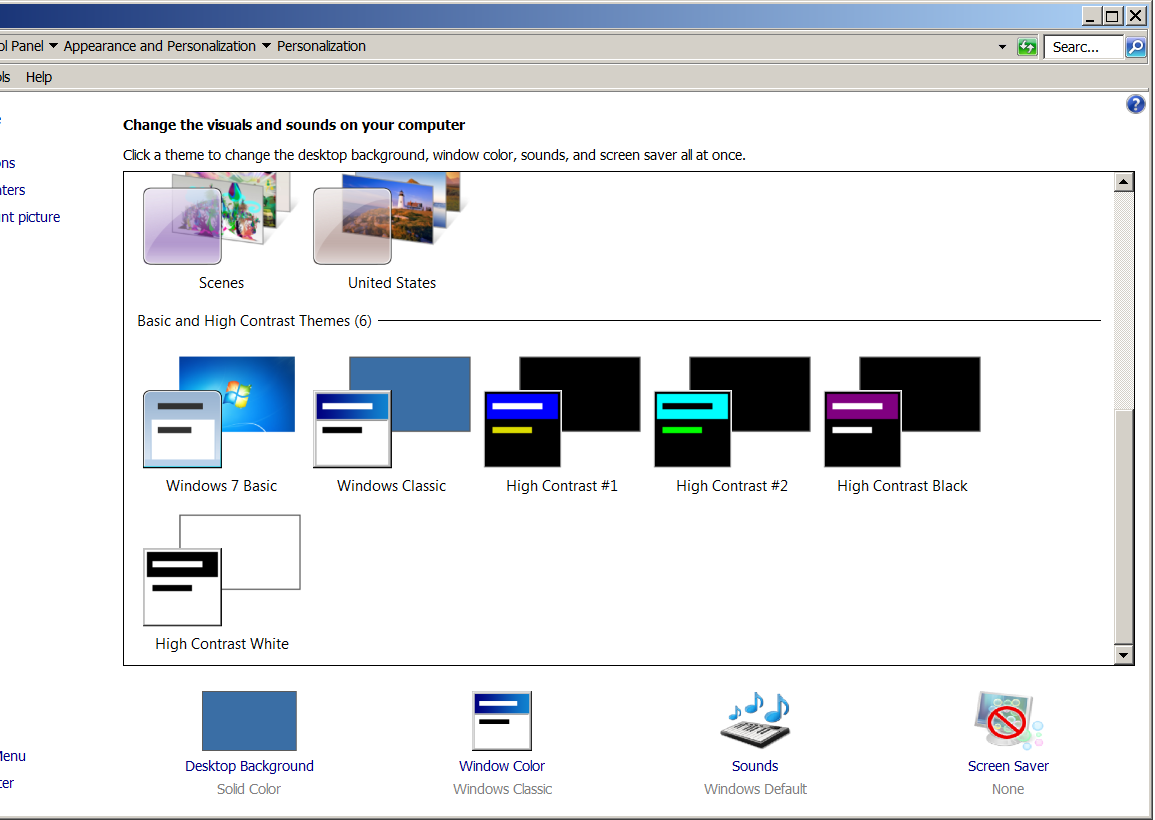
That will change Windows to look normal again 🙂

Cheers 🙂


More helpful Articles

Tags: application, change, change windows, com, look, make, Make Windows Start, panel, Right Mouse, Windows, Windows Classic, windows xp, work, www, XP


Mozilla/5.0 (Windows NT 6.1; rv:37.0) Gecko/20100101 Firefox/37.0
One good tip to make your start menu status bar (task bar) show more programs is to press with right button on menu and then remove the Lock and put the cursor at some edge somewhere until it shows with up / down arrow then just stretch it and double its size.
View CommentView CommentHere is a tutotrial how to resize taskbar. – http://windows.microsoft.com/en-us/windows/resize-taskbar#1TC=windows-7
Enjoy
Mozilla/5.0 (Windows NT 6.1; WOW64; rv:47.0) Gecko/20100101 Firefox/47.0
Another very useful tip is to use Quick launch button:
In a previous TR Dojo Challenge question, I asked TechRepublic members TR Dojo Challenge: How do you enable the Quick Launch toolbar on Windows 7? And several members were quick to answer the call. Here are the steps.
Right click on an empty space on the Windows 7 taskbar and make sure “Lock the taskbar” is NOT checked. This will allow us to move the Quick Launch bar once we reactivate it.Restore the Quick Launch toolbar in Windows 7
Right click on an empty space on the Windows 7 taskbar and from the resulting Context Menu, click Toolbars and then New Toolbar.Restore the Quick Launch toolbar in Windows 7
When the New Toolbar – Choose a folder window appears, paste the following path into the location bar:
%appdata%\Microsoft\Internet Explorer\Quick LaunchRestore the Quick Launch toolbar in Windows 7
Once you’re certain that the path shows AppData | Roaming | Microsoft | Internet Explorer | Quick Launch, click Select Folder.Restore the Quick Launch toolbar in Windows 7The Quick Launch toolbar will now appear on the Windows 7 taskbar, but it will be on the right side of the screen next to the System Tray. Let’s move it back to the left side where the toolbar should be.
Click on the left edge (dotted lines) of the new Quick Launch toolbar, and drag it over to the left as far as it will go.Restore the Quick Launch toolbar in Windows 7
To remove the text labels shown on the Quick Launch toolbar, right-click on the left edge of the toolbar (dotted lines) and from the resulting Context Menu, uncheck both “Show Text and “Show Title. At this point, the Quick Launch toolbar looks like it did in Windows XP and Vista, but it’s still on the wrong side of the taskbar.Restore the Quick Launch toolbar in Windows 7
Click and drag the left edge of the regular Windows taskbar toolbar (dotted lines to the right of the Start button) to the left of the taskbar, over the new Quick Launch toolbar. This will move the main area of the taskbar to the right of your new Quick Launch bar and place the Quick Launch bar next to the Start button. Stop when both toolbars are the size you want.Restore the Quick Launch toolbar in Windows 7
You can now drag and drop your favorite applications or shortcuts onto the new Quick Launch toolbar and “unpin” the default applications from the regular taskbar.
Restore the Quick Launch toolbar in Windows 7
Once you finished adding things to the Quick Launch toolbar, right-click a blank space on the taskbar and click “Lock the taskbar”.
I also like to enable “Use small icons” under the Taskbar and Start Menu Properties menu.
With the new Quick Launch toolbar in place, no applications “pinned” to the regular taskbar, small icons in use, and the taskbar locked, my Desktop is just the way I like it.
And the TechRepublic swag goes to…
This week’s coffee mugs and laptop stickers to ak87, who was first to describe the process through Step 5, robert.johnson2, who provided the first complete answer, and to Samuel Leung, who submitted a well-written answer and links to a YouTube video that demonstrates the process.
Thanks to everyone who submitted an answer.
You can also sign up to receive the latest from the TR Dojo through one or more of the following methods:
Article taken from techrepublic:
View CommentView Commenthttp://www.techrepublic.com/blog/tr-dojo/restore-the-quick-launch-toolbar-in-windows-7/