Posts Tagged ‘Xorg’

xorg on Toshiba Satellite L40 14B with Intel GM965 video hangs up after boot and the worst fix ever / How to reinstall Ubuntu by keeping the old personal data and programs

Wednesday, April 27th, 2011

black screen ubuntu troubles

I have updated Ubuntu version 9.04 (Jaunty) to 9.10 and followed the my previous post update ubuntu from 9.04 to Latest Ubuntu

I expected that a step by step upgrade from a release to release will work like a charm and though it does on many notebooks it doesn't on Toshiba Satellite L40

The update itself went fine, whether I used the update-manager -d and followed the above pointed tutorial, however after a system restart the PC failed to boot the X server properly, a completely blank screen with blinking cursor appeared and that was all.

I restarted the system into the 2.6.35-28-generic kernel rescue-mode recovery kernel in order to be able to enter into physical console.

Logically the first thing I did is to check /var/log/messages and /var/log/Xorg.0.log but I couldn't find nothing unusual or wrong there.

I suspected something might be wrong with /etc/X11/xorg.conf so I deleted it:

ubuntu:~# rm -f /etc/X11/xorg.conf

and attempted to re-create the xorg.conf X configuration with command:

ubuntu:~# dpkg-reconfigure xserver-xorg

This command was reported to be the usual way to reconfigure the X server settings from console, but in my case (for unknown reasons) it did nothing.

Next the command which was able to re-generate the xorg.conf file was:

ubuntu:~# X -configure

The command generates a xorg.conf sample file in /root/xorg.conf.* so I used the conf to put it in /etc/X11/xorg.conf X's default location and restarted in hope that this would fix the non-booting issue.

Very sadly again the black screen of death appeared on the notebook toshiba screen.
I further thought of completely wipe out the xorg.conf in hope that at least it might boot without the conf file but this worked out neither.

I attempted to run the Xserver with a xorg.conf configured to work with vesa as it's well known vesa X server driver is supposed to work on 99% of the video cards, as almost all of them nowdays are compatible with the vesa standard, but guess what in my case vesa worked not!

The only version of X I can boot in was the failsafe X screen mode which is available through the grub's boot menu recovery mode.

Further on I decided to try few xorg.conf which I found online and were reported to work fine with Intel GM965 internal video , and yes this was also unsucessful.

Some of my other futile attempts were: to re-install the xorg server with apt-get, reinstall the xserver-xorg-video-intel driver e.g.:

ubuntu:~# apt-get install --reinstall xserver-xorg xserver-xorg-video-intel

As nothing worked out I was completely pissed off and decided to take an alternative approach which will take a lot of time but at least will probably be succesful, I decided to completely re-install the Ubuntu from a CD after backing up the /home directory and making a list of available packages on the system, so I can further easily run a tiny bash one-liner script to install all the packages which were previously existing on the laptop before the re-install:

Here is how I did it:

First I archived the /home directory:

ubuntu:/# tar -czvf home.tar.gz home/
....

For 12GB of data with some few thousands of files archiving it took about 40 minutes.

The tar spit archive became like 9GB and I hence used sftp to upload it to a remote FTP server as I was missing a flash drive or an external HDD where I can place the just archived data.

Uploading with sftp can be achieved with a command similar to:

sftp user@yourhost.com
Password:
Connected to yourhost.com.
sftp> put home.tar.gz

As a next step to backup in a file the list of all current installed packages, before I can further proceed to boot-up with the Ubuntu Maverich 10.10 CD and prooceed with the fresh install I used command:

for i in $(dpkg -l| awk '{ print $2 }'); do
echo $i; done >> my_current_ubuntu_packages.txt

Once again I used sftp as in above example to upload my_current_update_packages.txt file to my FTP host.

After backing up all the stuff necessery, I restarted the system and booted from the CD-rom with Ubuntu.
The Ubuntu installation as usual is more than a piece of cake and even if you don't have a brain you can succeed with it, so I wouldn't comment on it 😉

Right after the installation I used the sftp client once again to fetch the home.tar.gz and my_current_ubuntu_packages.txt

I placed the home.tar.gz in /home/ and untarred it inside the fresh /home dir:

ubuntu:/home# tar -zxvf home.tar.gz

Eventually the old home directory was located in /home/home so thereon I used Midnight Commander ( the good old mc text file explorer and manager ) to restore the important user files to their respective places.

As a last step I used the my_current_ubuntu_packages.txt in combination with a tiny shell script to install all the listed packages inside the file with command:

ubuntu:~# for i in $(cat my_current_ubuntu_packagespackages.txt); do
apt-get install --yes $i; sleep 1;
done

You will have to stay in front of the computer and manually answer a ncurses interface questions concerning some packages configuration and to be honest this is really annoying and time consuming.

Summing up the overall time I spend with this stupid Toshiba Satellite L40 with the shitty Intel GM965 was 4 days, where each day I tried numerous ways to fix up the X and did my best to get through the blank screen xserver non-bootable issue, without a complete re-install of the old Ubuntu system.
This is a lesson for me that if I stumble such a shitty issues I will straight proceed to the re-install option and not loose my time with non-sense fixes which would never work.

Hope the article might be helpful to somebody else who experience some problems with Linux similar to mine.

After all at least the Ubuntu Maverick 10.10 is really good looking in general from a design perspective.
What really striked me was the placement of the close, minimize and maximize window buttons , it seems in newer Ubuntus the ubuntu guys decided to place the buttons on the left, here is a screenshot:

Left button positioning of navigation Buttons in Ubuntu 10.10

I believe the solution I explain, though very radical and slow is a solution that would always work and hence worthy 😉
Let me hear from you if the article was helpful.
In Rusalka a.k.a. Marmayed and Shabla Camping

Monday, September 3rd, 2007

I spend the weekend with Megi, Niki and Nomen in Rusalka (we beached there), although there was no sun at allthe water was warm and it was good experience (this happened in the late evening). In 06:00 or 07:00 o’clock.We decided to go to Tulenovo’s caves and stay there and make a wood fire. But the caves were already taken by others.So in the end we went to Shablenska Tuzla. We stretch the 2 tents and fired a firewood on the beach and started having a supper, unfortunately a rain started and we have to gather the 2 tents and the food and go to the car. We waited to see ifthe rain would stop but it was raining and we went to a near family hotel where Mitko, Megi and Niki slept into a room and slept in the car (this is the first time I have to sleep in a car). In the morning we went to the beach I stayed out of the sea because there was wind and I was scared of getting sick again. Around 12:30 we were in Dobrich. So this is how most of the weekend passed in the night we went to my Grandma and Grandpa’s (Peace be upon him) village with my father and we stayed there for 30 minutes or so. During the weekend I successfully made a binary upgrade of my xorg 6.9 -> 7.2 (it was a full mess), it took me 2 days! As usual the upgrades under FBSD are a real nightmare. Speaking about faith I’m not sure what do I believe anymore I still hope that God would fix my health issues, but I’m tired of waiting really :[ The bad thing about the weekend was that one more time I felt like not being on my right place. I realized soon that I can’t hear the voice of God. And currently I’m praying that God would give me this ability. But ofcourse only time will show.END—–

Alternative way to kill X in Linux with Alt + Printscreen + K

Sunday, October 31st, 2010

I’ve recently realized that the CTRL + ALT + BACKSPACE keyboard combination is no longer working in Debian unstable.

This good old well known keyboard combination to restart X is not working with my xorg 7.5+8 under my Gnome 2.30 desktop
However thanksfully there is another combination to kill the X server if for instance if your Gnome desktop hangs.

If that happens simply press ALT + PRINTSCREEN + K this will kill your X and then reload the (Gnome Display manager) gdm.

Another suggestion I’ve red in the forums of a way to enable back CTRL+ALT+BACKSPACE is to put in either .bashrc or .xinitrc the following command

setxkbmap -option terminate:ctrl_alt_bksp

BTW It’s better that the above command is placed in ~/.xinitrc.

I’ve also red on some forums that in newer releases of Ubuntu. The CTRL+ALT+BACKSPACE can be enabled using a specific command, e.g. with:

dontzap -disable
 

How to change GNOME Resolution with a command using terminal or console on Debian GNU / Linux and FreeBSD

Friday, January 6th, 2012

I'm testing some old school arcade games, available from Debian's package repositories and quitting one of the games ended me up with a GNOME Screen Resolution of 640×480 pixels.

I wanted to revert back to the Classics resolution, so what I would normally do to do that is use >GNOME menus:

System -> Preferences -> Monitors

In that huge screen resolution on my 14 inch lenovo notebook screen, however the System menu cannot fit in 640×480 resolution. You can see the non-screen fitting System on the screenshot below:

Screenshot Debian GNU / Linux Squeeze GNOME Desktop 640x480

Having this situation, I needed a way to change back to my normal daily used 1024x768px screen resolution to continue my daily work by some other way.
One possible solution I thought of was Logging Off Gnome and logging again. Loggig off and log on again would usually restart the initiated GNOME session and therefore will reset the screen resolution to my default 1024×768 / 32 bit color.

Having the unobservable System gnome panel menu on my screen however made using the usual Log off procedure via System -> Log Out myusername impossible…

Another possible way to actually restart my screen and hence revert back to my original resolution is achiavable using the classical restart X server key switch CTRL + ALT + backspace (bckspc) . Though this was a possible approach to the situation, I had a bunch of programs already running on my desktop and I did not wanted to interrupt my desktop session, what I was looking for is simply change the screen resolution size .

With all said I had to look up for alternative way (preferably easy) way, to revert back my screen resolution to my desired 1024×768.

As a console guy, I was interested if there is some kind of possibility to change my GNOME resolution directly using xterm or gnome-terminal , after a bit of check up online, I've found few threads started by people who were looking just like me for a way to change GNOME / KDE screen resolution size on various distributions Linux desktops as well on Free/Net/Open/BSDs. The answer to the question on few places was the command xrandr which I had used some few years ago to initiate remote X server connections via SSH

xrandr is actually a great tool part of the x11-xserver-utils

Actually xrandr is capable of doing a few things besides setting the screen resolution size, just to name a few it supports change the screen orientation, reflection of the output of the screen, adjust brightness, set color gamma etc. etc.

It is good to mention that xrandr changes the resolution not on a GNOME level but on Xorg server level.

Using xrandr to change the screen resolution appeared to be very easy.

1. First I issued xrandr to check all the supported xrandr resolutions by my X server hipo@noah:~/Desktop$ xrandr Screen 0: minimum 320 x 200, current 1024 x 768, maximum 8192 x 8192VGA1 disconnected (normal left inverted right x axis y axis)LVDS1 connected 1024x768+0+0 (normal left inverted right x axis y axis) 304mm x 228mm 1024x768 60.0*+ 50.0 800x600 60.3 56.2 640x480 60.0 59.9 TV1 disconnected (normal left inverted right x axis y axis)hipo@noah:~/Desktop$

From the output you can see I have 3 basic resolutions configured in my Xorg, I can switch between.

2. To switch to my previous default screen resolution

hipo@noah:~/Desktop$ xrandr -s 1024x768

After using xrandr command to revert back to my default screen size, I realized there is two other (partially command line partially gui) way to change to 1024×768 pixels.3. Through launching gnome Control Center and searching for Monitors menu.

If one prefers this way he can;

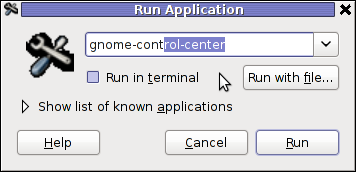
i) press ALT+F2 to invoke Gnome's Run Application dialog

ii) issue gnome-control-center command:

GNOME run application Dialog GNOME Control Center cmd debian GNU / Linux

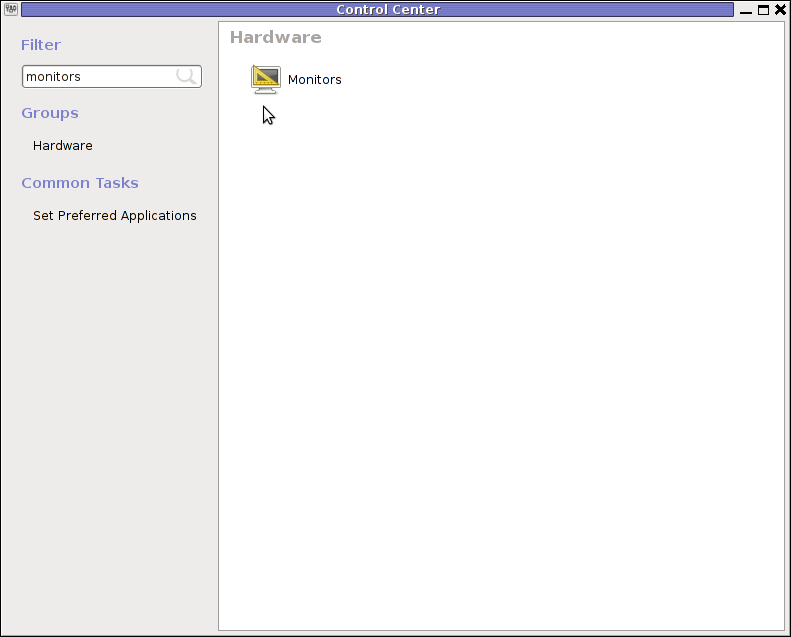
GNOME Control Center search Monitors menu debian GNU / Linux

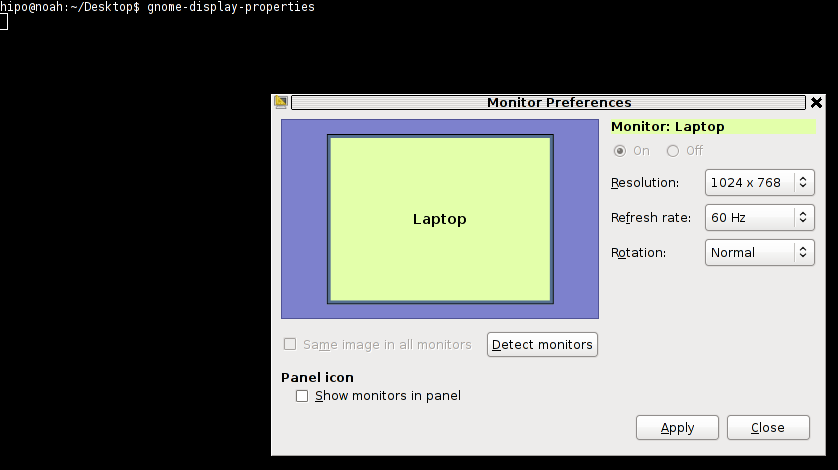
4. By invoking gnome's Control Panel -> Monitors settings window by a command

hipo@noah:~/Desktop$ gnome-display-properties

GNOME display properties command to launch monitors screen resolution settings
 

How to install Nvidia GeForce FX 5500 on Ubuntu 11.04

Tuesday, July 19th, 2011

Nvidia Tux GeForce GNU / Linux

Yesterday I was at a friend of mine who has recently installed Ubuntu 11.04 to his already oldish Desktop computer.

The system was 1.4Ghz (amd) with 512 RAM and some kind of Dell Trinitron 19 inch monitor
Even though he tried hard to make his NVIDIA GeForce FX 5500 ‘s drive to work properly with Ubuntu Natty Narwhal, he just has messed it even more.
As I always like helping people and I’m joyful for people who want to migrate to Linux, I took some time to make his NVIDIA GeForce work with this Ubuntu release.

First I tried to make it work by using some of the official NVIDIA Linux drivers located on nvidia.com following some online tutorial for Ubuntu claiming that it works but actually it didn’t, so finally after a bit of experimentation I found a way to make this video card work.
Here is how:

1. Install the following Ubuntu packages

root@ubuntu:~# apt-get install nouveau-firmware nvidia-173 nvidia-173-kernel-source
nvidia-cg-toolkit nvidia-common nvidia-current nvidia-glx-173 nvidia-settings
...

2. Load in the kernel and set to be auto loaded on boot nvidia’s driver kernel module nvidia-173

root@ubuntu:~# depmod -a;
root@ubutnu:~# modprobe nvidia-173
root@ubuntu:~# echo nvidia-173 >> /etc/modules

3. Stop temporary (Gnome dipsplay manager) gdm

root@ubuntu:~# service gdm stop
...

4. Use nvidia-xconfig to generate a working version of /etc/X11/xorg.conf for Nvidia

root@ubuntu:~# nvidia-xconfig
..

nvidia-xconfig will generate new /etc/X11/xorg.conf configuration corresponding to the Nvidia GeForce Fx 5500 and will move the old xorg.conf to xorg.conf.backup.

5. Start the gdm manager to be running again

root@ubuntu:~# service gdm start
...

Now the Xserver will start in a terrible mode of 640×480, probably because Ubuntu was unable to define correct VerticalSync and HorizontalSync for the 19 inch Dell Trinitron monitor or for some other weird reason, to fix this it’s quite easy though.
The fix to the NVIDIA GeForce 5500 running in 640×480 mode is done straigh via Gnome menus.

6. Use Gnome’s System -> Preferences -> Monitors to set raise up the Xserver resolution

Navigate to Gnome’s menus:

System -> Preferences -> Monitors

Gnome System Preferences Monitors Nvidia GeForce 5500 Ubuntu

Here you will have to select more appropriate resolution and a different refresh rate, which in my case was 1024×768 and further on to store the settings press the Apply button.

One oddity here was that according to the Monitor Preferences the refresh rate was running on 54 Hz which I don’t believe was the case as I guess it’s some kind of Gnome or Ubuntu bug. I changed the 54 Hz Refresh Rate to 50 Hz as using the 54 Hz refresh rate as the screen had a minor vibrations observable if one takes a thorough look on the screen.

Setting the NVIDIA GeForce 5500 driver to work with 50 Hz Refresh Rate in Gnome loooked like the Windows’s 85 Hz RR and looked quite nice so I left it this way.

Finally to test the newly installed driver 3D acceleration I used glxgears.

7. Install glxgears in order to be able to test that 3D acceleration on Nvidia works fine

root@ubuntu:~# apt-get install mesa-utils

After installing mesa-utils which nowdays contains glxgears executable one needs to execute the glxgears binary.

root@ubuntu:~# glxgears

Immediately after a window containing the glxgears should popup on the screen, like shown in below screenshot
Benchmark 3d Acceleration Linu glxgears

glxgears showed 3d acceleration works fine as the performance for 3d rendering shown was quite good and therefore 3D acceleration was running fine.

And that was it now the video works like and my friends, can enjoy the fun to have a generally virus Free OS 😉

What is Xorg’s server DPMS module for? And how to use it to reduce your computer power consumption

Thursday, April 21st, 2011

As I’m manually configuring a Xserver via xorg.conf I have noticed a block of code in:

Section "Monitor"
Identified "Generic Monitor"
Option "DPMS"
EndSection
That triggered my curiousity to research further what is DPMS . A very quick google search revealed that DPMS’s purpose is to communicate to communicate between the monitor and the computer, to make the computer turn off the (CRT or LED) based monitor if the computer is not used

Thus in short to rephrase DPMS is a power saving handy Xorg feature. I many custom configured xorg.conf like the mine I’m building right now does not include DPMS as many people doesn’t have idea what DPMS is and how to enable it.

DPMS is also an interface to the Energy start power-saving capability if not all, most of the modern day monitor screens.

DPMS enables the Xserver to control automatically the computer screen and thus reduces the overall computer power consumption.

To enable the use of DPMS on my Linux, all I had to do is place a couple of configuration directives in my xorg.conf .:
Here is how I enabled DPMS in my Xorg server:

1. Edit with a text editor /etc/X11/xorg.conf

2. Find the Monitor Section , e.g.:

Section "Monitor"
....
EndSection

3. Add inside the Monitor Section Options "DPMS" "true"

4. Lookup for the ServeryLayout section , e.g.:

Section "ServerLayout"
...
EndSection

5. Place inside the ServerLayout section For instance the following options:

Option "StandbyTime" "20"
Option "SuspendTime" "10"
Option "OffTime "25"

You might like to change the options StandbyTime, SuspendTIme or OffTime to match your likings.
6. As a last step restart the Xorg server.

Press Ctrl+Alt+BackSpace or by issuing:

host:~# pkill -HUP X

Test that DPMS is loaded properly by reviewing /var/log/Xorg.0.log for example:

host:~# grep -i /var/log/Xorg.0.log
(II) Loading extensions DPMS