Posts Tagged ‘ubuntu linux’

Fixing insserv: warning: script ‘…’ missing LSB tags and overrides on Debian and Ubuntu Linux

Friday, April 12th, 2013

apt-get f install logo fixing warning script missing LSB tags Debian Ubuntu Linux
 

Some of packages I just tried to install on one of the Debian servers I admin failed during package (set up) configuration stage. Here is little paste with the errors due to it dpkg-reconfigure on each of newly set-up packages failed:

Setting up acct (6.5.4-2.1) ...
insserv: warning: script 'K02courier-imap' missing LSB tags and overrides
insserv: warning: script 'courier-imapd' missing LSB tags and overrides
insserv: warning: script 'iptables' missing LSB tags and overrides
insserv: warning: script 'courier-imap' missing LSB tags and overrides 

Because of this whole package install failed and the usual

# apt-get -f install

supposed to fix mess with packages end up with same errors:

insserv: warning: script 'K02courier-imap' missing LSB tags and overrides
insserv: warning: script 'iptables' missing LSB tags and overrides
insserv: warning: script 'courier-imap' missing LSB tags and overrides
insserv: There is a loop between service watchdog and iptables if stopped
insserv:  loop involving service iptables at depth 2
insserv:  loop involving service watchdog at depth 1
insserv: Stopping iptables depends on watchdog and therefore on system facility `$all' which can not be true!
insserv: exiting now without changing boot order!
update-rc.d: error: insserv rejected the script header
dpkg: error processing acct (--configure):
 subprocess installed post-installation script returned error exit status 1

T
he scripts in question iptables / courier-imap / K02courier-imap were custom created  scripts by me earlier and I have completely forgot about it. In Debian 5 and earlier I used the same scripts to make system load custom services not installed through a standard Debian package. After a bit of research, I've noticed in newer Debian / Ubuntu release, new Commented tags are included in all Debian belonging packages init scripts. Thus the reason for failing package configuration, were my custom scripts were missing those tags. To get around the situation I had to open manually each of the scripts missing init script LSB tags i.e. ( iptables / courier-imap / K02courier-imap ) and add after
#! /bin/sh

shebang;

### BEGIN INIT INFO
# Provides:          skeleton
# Required-Start:    $remote_fs $syslog
# Required-Stop:     $remote_fs $syslog
# Default-Start:     2 3 4 5
# Default-Stop:      0 1 6
# Short-Description: Example initscript
# Description:       This file should be used to construct scripts to be
#                    placed in /etc/init.d.
### END INIT INFO

Once those "boilerplate", skele comments are included to solve the mess I had to run again:

# apt-get -f install

This solves it. Enjoy :)


Share this on

How to change hostname permanently on Debian and Ubuntu Linux

Thursday, March 14th, 2013

Change hostname on Debian and Ubuntu Linux terminal hostname screenshot

I had to configure a newly purchased dedicated server from UK2. New servers cames shipped with some random assigned node hostname  like server42803. This is pretty annoying, and has to be changed especially if your company has a naming server policy in some format like; company-s1#, company-s2#, company-sN#.

Changing hostname via hosts definition file /etc/hosts to assign the IP address of the host to the hostname is not enough for changing the hostname shown in shell via SSH user login.

To display full hostname on Debian and Ubuntu, had to type:

server42803:~# hostname
server42803.uk2net.com

To change permanently server host to lets say company-s5;

server42803:~# cat /etc/hostname | \
sed -e 's#server42803.uk2net.com#company-s5#' > /etc/hostname

To change for current logged in SSH session:

server42803:~# hostname company-s5
company-s5:~#

Finally because already old hostname is red by sshd, you have to also restart sshd for new hostname to be visible on user ssh:

company-s5:~# /etc/init.d/ssh restart
...

As well as run script:

company-s5:~# /etc/init.d/hostname.sh

Mission change host accomplished, Enjoy :)

Share this on

How to disable PC Spaker on Debian and Ubuntu Linux

Sunday, May 13th, 2012


How to disable pc-speaker on Linux / PC-Speaker Old Desktop Computer picture

A PC Speaker is helpful as it could be used as a tool for diagnosing system hardware failures (different systems produce different beep sequences depending on the machine BIOS type).
Using the instructions for the respective BIOS vendor and version one could determine the type of problem experienced by a machine based on the sequence and frequency of sounds produced by the SPEAKER.
Lets say a hardware component on a server is down with no need for a monitor or screen to be attached you can say precisely if it is the hard drive, memory or fan malfunctioning…

Generally speaking historically embedded PC Speaker was inseparatable part of the Personal Computers, preceding the soundblasters, now this is changing but for compitability sake many comp equipment vendors still produce machines with pc-speaker in.
Some newer machines (mostly laptops) are factory produced with no PC-SPEAKER component anymore.
For those who don't know what is PC SPEAKER, it is a hardware device capable of emitting very simple short beep sounds at certain system occasions.

Talking about PC-Speaker, it reminds me of the old computer days, where we used pc-speakers to play music in DOS quite frequently.
It was wide practice across my friends and myself to use the pc-speaker to play Axel Folly and other mod files because we couldn't afford to pay 150$ for a sound cards. Playing a song over pc-speaker is quite a nice thing and it will be a nice thing if someone writes a program to be able to play songs on Linux via the pc-speaker for the sake of experiment.

As of time of writting, I don't know of any application capable of playing music files via the pc-speaker if one knows of something like this please, drop me a comment..

As long as it is used for hardware failure diagnosis the speaker is useful, however there are too many occasions where its just creating useless annoying sounds.
For instance whether one uses a GUI terminal or console typing commands and hits multiple times backspace to delete a mistyped command. The result is just irritating beeps, which could be quite disturbing for other people in the room (for example if you use Linux as Desktop in heterogeneous OS office).
When this "unplanned" glitchering beeps are experienced 100+ times a day you really want to break the computer, as well as your collegues are starting to get mad (if not using their headphones) :)

Hence you need sometimes to turn off the pc-speaker to save some nerves.

Here is how this is done on major Linux distros.

On Debian and most other distros, the PC SPEAKER is controlled by a kernel module, so to disable communication with the speaker you have to remove the kernel module.

On Debian and Fedora disabling pcspeaker is done with:

# modprobe -r pcspkr

Then to permanently disable load of the pcspkr module on system boot:

debian:~# echo 'blacklist pcspkr' >> /etc/modprobe.d/blacklist.conf

On Ubuntu to disable load on boot /etc/modprobe.d/blacklist, file should be used:

ubuntu:~# echo 'blacklist pcspkr' >> /etc/modprobe.d/blacklist
Well that's all folks …

Share this on

How to make screenshot in /dev/tty console on GNU / Linux – Taking picture JPEG / PNG snapshot of text console in systems without graphical environment

Monday, April 30th, 2012

I'm used to making picture screenshots in GNOME desktop environment. As I've said in my prior posts, I'm starting to return to my old habits of using console ttys for regular daily jobs in order to increase my work efficiency. In that manner of thoughts sometimes I need to take a screenshot of what I'm seeing in my physical (TTY consoles) to be able to later reuse this. I did some experimenting and this is how this article got born.

In this post, I will shortly explain how a picture of a command running in console or terminal in GNU / Linux can be made

Before proceeding to the core of the article, I will say few words on ttys as I believe they might be helpful someone.
The abbreviation of tty comes after TeleTYpewritter phrase and is dating back somewhere near the 1960s. The TTY was invented to help people with impaired eyesight or hearing to use a telephone like typing interface.

In Unix / Linux / BSD ttys are the physical consoles, where one logs in (typing in his user/password). There are physical ttys and virtual vtys in today *nixes. Today ttys, are used everywhere in a modern Unixes or Unix like operating system with or without graphical environments.
Various Linux distributions have different number of physical consoles (TTYs) (terminals connected to standard output) and this depends mostly on the distro major contributors, developers or surrounding OS community philosophy.
Most modern Linux distributions have at least 5 to 7 physical ttys. Some Linux distributions like Debian for instance as of time of writting this, had 7 active by default physical consoles.
Adding 3 more ttys in Debian / Ubuntu Linux is done by adding the following lines in /etc/inittab:
 

7:23:respawn:/sbin/getty 38400 tty7
8:23:respawn:/sbin/getty 38400 tty8
9:23:respawn:/sbin/getty 38400 tty9

On some Linux distributions like Fedora version 9 and newer ones, new ttys can no longer be added via /etc/inittab,as the RedHat guys changed it for some weird reason, but I guess this is too broad issue to discuss ….

In graphical environments ttys are called methaphorically "virtual". For instance in gnome-terminal or while connecting to a remote SSH server, a common tty naming would be /dev/pts/8 etc.

tty command in Linux and BSDs can be used to learn which tty, one is operating in.

Here is output from my tty command, issued on 3rd TTY (ALT+F3) on my notebook:
 

noah:~# tty
/dev/tty3

A tty cmd output from mlterm GUI terminal is like so:
 

hipo@noah:~$ tty/dev/pts/9

Now as mentioned few basic things on ttys I will proceed further to explain how I managed to:

a) Take screenshot of a plain text tty screen into .txt file format
b) take a (picture) JPG / PNG screenshot of my Linux TTY consoles content

1. Take screenshot of plain text tty screen into a plain (ASCII) .txt file:

To take a screenshot of tty1, tty2 and tty3 text consoles in a txt plain text format, cat + a standard UNIX redirect is all necessery:
 

noah:~# cat /dev/vcs1 > /home/hipo/tty1_text_screenshot.txt
noah:~# cat /dev/vcs2 > /home/hipo/tty2_text_screenshot.txt
noah:~# cat /dev/vcs3 > /home/hipo/tty3_text_screenshot.txt

This will dump the text content of the console into the respective files, if however you try to dump an ncurses library like text interactive interfaces you will end up with a bunch of unreadable mess.
In order to read the produced text 'shots' onwards less command can be used …
 

noah:~# less /home/hipo/tty1_text_screenshot.txt
noah:~# less /home/hipo/tty2_text_screenshot.txt
noah:~# less /home/hipo/tty3_text_screenshot.txt

2. Take picture JPG / PNG snapshot of Linux TTY console content

To take a screenshot of my notebook tty consoles I had to first install a "third party program" snapscreenshot . There is no deb / rpm package available as of time of writting this post for the 4 major desktop linux distributions Ubuntu, Debian, Fedora and Slackware.
Hence to install snapscreenshot,I had to manually download the latest program tar ball source and compile e.g.:
 

noah:~# cd /usr/local/src
noah:/usr/local/src# wget -q http://bisqwit.iki.fi/src/arch/snapscreenshot-1.0.14.3.tar.bz2
noah:/usr/local/src# tar -jxvvvf snapscreenshot-1.0.14.3.tar.bz2

noah:/usr/local/src# cd snapscreenshot-1.0.14.3
noah:/usr/local/src/snapscreenshot-1.0.14# ./configure && make && make install
Configuring…
Fine. Done. make.
make: Nothing to be done for `all'.
if [ ! "/usr/local/bin" = "" ]; then mkdir –parents /usr/local/bin 2>/dev/null; mkdir /usr/local/bin 2>/dev/null; \
for s in snapscreenshot ""; do if [ ! "$s" = "" ]; then \
install -c -s -o bin -g bin -m 755 "$s" /usr/local/bin/"$s";fi;\
done; \
fi; \
if [ ! "/usr/local/man" = "" ]; then mkdir –parents /usr/local/man 2>/dev/null; mkdir /usr/local/man 2>/dev/null; \
for s in snapscreenshot.1 ""; do if [ ! "$s" = "" ]; then \
install -m 644 "$s" /usr/local/man/man"`echo "$s"|sed 's/.*\.//'`"/"$s";fi;\
done; \
fi

By default snapscreenshot command is made to take screenshot in a tga image format, this format is readable by most picture viewing programs available today, however it is not too common and not so standartized for the web as the JPEG and PNG.
Therefore to make the text console tty snapshot taken in PNG or JPEG one needs to use ImageMagick's convert tool. The convert example is also shown in snapscreenshot manual page Example section.

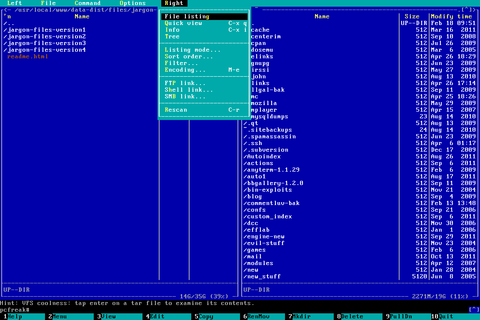
To take a .png image format screenshot of lets say Midnight Commander interactive console file manager running in console tty1, I used the command:
 

noah:/home/hipo# snapscreenshot -c1 -x1 > ~/console-screenshot.tga && convert ~/console-screenshot.tga console-screenshot.png

Linux text console tty mc screenshot with snapscreenshot terminal / console snapshotting program

Note that you need to have read/write permissions to the /dev/vcs* otherwise the snapscreenshot will be unable to read the tty and produce an error:
 

hipo@noah:~/Desktop$ snapscreenshot -c2 -x1 > snap.tga && convert snap.tga snap.pngGeometry will be: 1x2Reading font…/dev/console: Permission denied

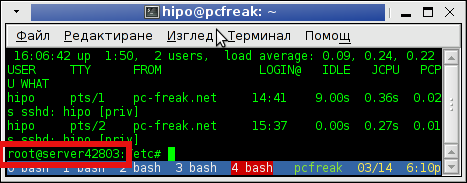
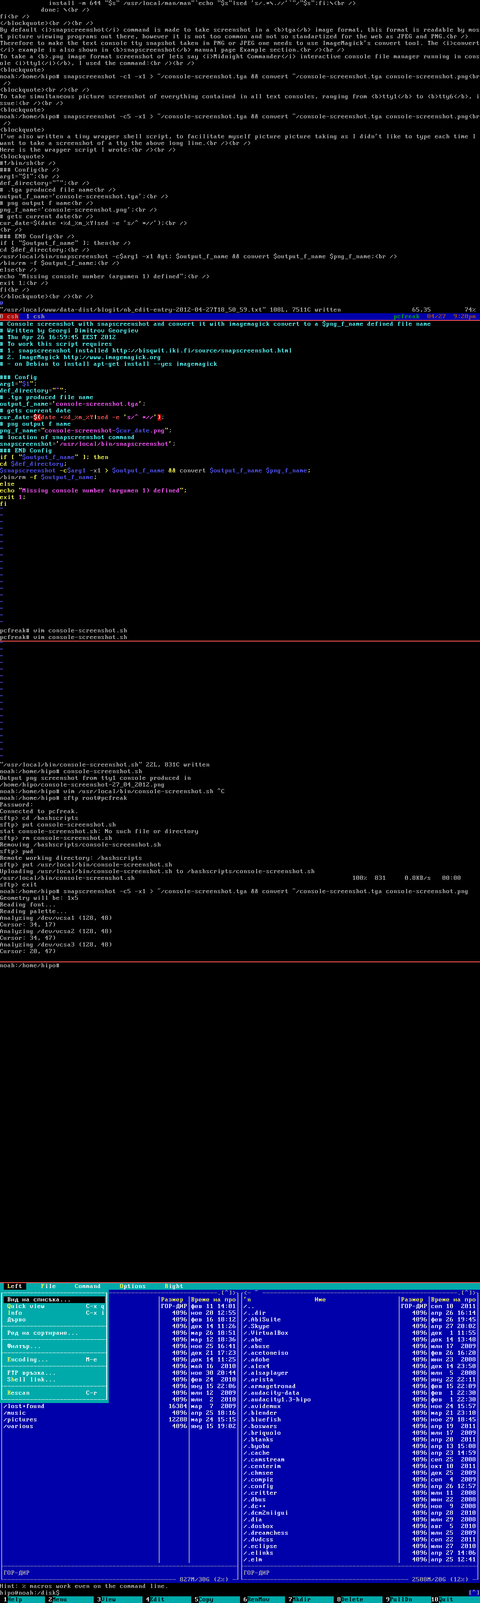
To take simultaneous picture screenshot of everything contained in all text consoles, ranging from tty1 to tty5, issue:
 

noah:/home/hipo# snapscreenshot -c5 -x1 > ~/console-screenshot.tga && convert ~/console-screenshot.tga console-screenshot.png

Here is a resized 480×320 pixels version of the original screenshot the command produces:

All text Consoles tty1 to tty5 merged screenshot png image with snapscreenshot taken on Debian GNU / Linux

Storing a picture shot of the text (console) screen in JPEG (JPG) format is done analogously just the convert command output extension has to be changed to jpeg i.e.:
 

noah:/home/hipo# snapscreenshot -c5 -x1 > ~/console-screenshot.tga && convert ~/console-screenshot.tga console-screenshot.jpeg

I've also written a tiny wrapper shell script, to facilitate myself picture picture taking as I didn't like to type each time I want to take a screenshot of a tty the above long line.

Here is the wrapper script I wrote:
 

#!/bin/sh
### Config
# .tga produced file name
output_f_name='console-screenshot.tga';
# gets current date
cur_date=$(date +%d_%m_%Y|sed -e 's/^ *//');
# png output f name
png_f_name="console-screenshot-$cur_date.png";
### END Config
snapscreenshot -c$arg1 -x1 > $output_f_name && convert $output_f_name $png_f_name;
echo "Output png screenshot from tty1 console produced in";
echo "$PWD/$png_f_name";
/bin/rm -f $output_f_name;

You can also download my console-screenshot.sh snapscreenshot wrapper script here

The script is quite simplistic to use, it takes just one argument which is the number of the tty you would like to screenshot.
To use my script download it in /usr/local/bin and set it executable flag:
 

noah:~# cd /usr/local/bin
noah:/usr/local/bin# wget -q http://www.pc-freak.net/~bshscr/console-screenshot.sh
noah:/usr/local/bin# chmod +x console-screenshot.sh

Onwards to use the script to snapshot console terminal (tty1) type:
 

noan:~# console-screenshot.sh

I've made also mirror of latest version of snapscreenshot-1.0.14.3.tar.bz2 here just in case this nice little program disappears from the net in future times.


Share this on

How to upgrade single package with their dependencies on Debian and Ubuntu Linux

Friday, March 16th, 2012

Debian GNU / Linux apt-get upgrade a package selection of a whole bunch of packages ready to upgrade apt artistic logo

Are you a Debian System Administrator and you recently run apt-get upgrade && apt-get upgrade finding out there are plenty of new packagesfor upgrade? Do you need only a pre-selected number of packages to upgrade with apt?
I run apt-get update && apt-get upgrade on one of our company Debian servers, just to see there are a number of packages to be upgraded among which there was some I didn't wanted to upgrade. Here is a little paste output from apt-get upgrade:

debian:~# apt-get update && apt-get upgrade
Hit http://security.debian.org squeeze/updates Release.gpg
...
Hit http://security.debian.org squeeze/updates/main amd64 Packages
Fetched 128 kB in 0s (441 kB/s)
Reading package lists... Done
Building dependency tree
Reading state information... Done
The following packages will be upgraded:
at imagemagick libdbd-pg-perl libfreetype6 libmagickcore3 libmagickcore3-extra libmagickwand3 libmysqlclient16 mysql-client
mysql-client-5.1 mysql-common mysql-server mysql-server-5.1 mysql-server-core-5.1
Do you want to continue [Y/n]
14 upgraded, 0 newly installed, 0 to remove and 0 not upgraded.

From first sight it seems logical to issue apt-get upgrade packagename to upgrade only single package with its package dependencies, instead of the whole group the above packs. However doing:
apt-get upgrade imagemagick will still try to upgrade all the packages instead of just imagemagick and its dependency package deb libmagickcore3

debian:~# apt-get upgrade imagemagick
Reading package lists... Done
Building dependency tree
Reading state information... Done
The following packages will be upgraded:
at imagemagick libdbd-pg-perl libfreetype6 libmagickcore3 libmagickcore3-extra libmagickwand3 libmysqlclient16 mysql-client
mysql-client-5.1 mysql-common mysql-server mysql-server-5.1 mysql-server-core-5.1
14 upgraded, 0 newly installed, 0 to remove and 0 not upgraded.
Do you want to continue [Y/n]

Doing all package,upgrade is not a good idea in my case, since upgrading mysql-server will require a MySQL server restart (something which we cannot afford to do right now) on this production server.
MySQL server restart during upgrade is never a good idea especially on productive busy (heavy loaded) SQL servers.
A restart of the MySQL server serving thousands of requests per second could lead often to crashed tables and hence temporary server downtime etc.

Still it is a good idea to upgrade the rest of packages with their newer versions. For exmpl. to upgrade; imagemagick, at , libfreetype6 and so on.

In order to upgrade only this 3 ones and their respective package dependencies, issue:

debian:~# apt-get --yes install imagemagick at libfreetype6

Repeat the apt-get install command with passing all the single package name you want to be upgraded and voila you're done :) .
Be sure the apt-get install packagename upgrade doesn't require also upgrade of myssql-server, mysql-client, mysql-common or mysql-server-core-5.1 or any of the package name you want to preserve from upgrading.

Share this on

How to add extra plugins, effects, brushes and functionality to GIMP on GNU / Linux

Tuesday, February 28th, 2012

How to add extra plugins, effects brushes and functionality to GIMP on Debian and Ubuntu Linux / GIMP logo head pictureThese days, I'm playing with The GIMP. I've been a GNU / Linux, FreeBSD user for already 11 years now but as I'm doing mostly system administration and I don't have much expertise in Panting or Computer Graphical Design, I've never put much time to learn more in the interesting area of graphical design. Hence until just recently, Just until now, I've never spend time with the GIMP (GNU Image Manipulation Program) and never realized how powerful this great program is. The more I learn about GIMP functionalities and how it works the more it makes me determined to learn some basic web design :)

The functionality which The GIMP offers in a basic install is quite rich, however by default on most Debian and Ubuntu installations many of the great plugins which easifies the way to edit pictures is missing.

Example for a very valuable functionality which is not present with standard gimp package installed on Debian and Ubuntu are:
 

Here I will mention here few words on:

  • GIMP FX-Foundry Collection

GIMP FX-Foundry is a thoroughful collection of GIMP scripts (addon plugins), that automates many of the operations which requires a professional web design skills and gives an easy intuitive interface through which very robust "high level" graphic design can be accomplished. This additional GIMP extensions helps to create very unique design in just few simple steps, as well as gives multiple tools for the sake of easy pro design creation. For anyone looking for quick edit of images with GIMP FX-Foundry is a must have GIMP plugins extension. The script pack is located on http://gimpfx-foundry.sourceforge.net/

To install FX-Foundry scripts collection on Debian / Ubuntu / Linux Mint and other based Linux distributions:

debian:~# apt-get install --yes gimp-plugin-registry
...

gimp-plugin-registry package name is based on GIMP Plugin registry's website
. Gimp plugin registry contains many helpful design goodies :)

Once installed you will notice GIMP with a new menu on the main menus bar reading FX-Foundry :

GIMP Screenshot GNU Linux Debian additional FX Foundry menu

GIMP FX Foundry extensionos package contains 124 scripts for additional graphics manipulation. The collection contains less scripts than the ones provided by gimp-plugin-registry. package has 156 scripts inside.

One of the most helpful GIMP addition from the package is the inclusion of Save for Web button under:

File -> Save for Web

GIMP Save for Web menu suitable for reduced size images for HTML image producing on Debian GNU / Linux screenshot

Another very helpful .deb package which adds up to GIMP's design possibilities is gimp-data-extras .

gimp-data-extras adds 111 new GIMP Fill in Patterns , which can be used through the Blend Tool to Fill selected areas with color gradients.

To install gimp-data-extras on Debian:

debian:~# apt-get install --yes gimp-data-extras
...

Generally once installed this package will add to GIMP – an extra set of brushes, palettes, and gradients for The GIMP as you can read in the package description.

I was also quite stunned to find out the good old GIMP is capable of basic Video editting!!

On Debian and Ubuntu there is a package called gimp-gap which once installed adds an extra Video menu.

GIMP Screenshot GNU Debian linux adding GIMP extra Video editting capabilities

I've not tested the GIMP video editting capabilities yet, however I intend to learn something about it immediately when I have some free time left. You see the enormous list of Video editting possibilities GIMP obtaines with gimp-gap which btw stands for (The GIMP Animation Package).

To install gimp-gap:

debian:~# apt-get install --yes gimp-gap

I've noticed also the following list of others useful GIMP additions (mainly helpful in Web, Brochure and Logo Graphic Design) to install them:

debian:~# apt-get --yes install gimp-gmic gimp-ufraw gtkam-gimp gimp-gluas \gimp-dimage-color gimp-dds gimp-dcraw gimp-cbmplugs flegita-gimp gimp-texturize \gimp-resynthesizer gimp-lensfun gimp-gutenprint gtkam-gimp mrwtoppm-gimp

Here is the package description of the packages above command will install:

  • gimp-cbmplugs – plugins for The GIMP to import/export Commodore 64 files
  • gimp-data-extras – An extra set of brushes, palettes, and gradients for The GIMP
  • gimp-dcraw – GIMP plug-in for loading RAW digital photos
  • gimp-dds – DDS (DirectDraw Surface) plugin for the gimp
  • gimp-dimage-color – GIMP plugin to convert Minolta DiMAGE pictures to sRGB colour space
  • gimp-gap – The GIMP Animation Package
  • gimp-gluas – Lua environment plug-in for GIMP
  • gimp-gmic – GIMP plugin for GREYC's Magic Image Converter
  • gimp-gutenprint – print plugin for the GIMP
  • gimp-lensfun – Gimp plugin to correct lens distortion using the lensfun library
  • gimp-normalmap – Normal map plugin for GIMP
  • gimp-plugin-registry – repository of optional extensions for GIMP
  • gimp-resynthesizer – Gimp plugin for texture synthesis
  • gimp-texturize – generates large textures from a small sample
  • gimp-ufraw – gimp importer for raw camera images
  • flegita-gimp – Gnome Gimp scan plugin.
  • gtkam-gimp – gtkam gimp plugin to open digital camera pictures
  • mrwtoppm-gimp – GIMP-plugin to support Minolta DiMAGE 5/7/7i RAW images

Now after installing all this plugins and seeing all GIMP's power, I'm starting to wonder why are still people ranting Adobe PhotoShop is feature rich.
That's all, enjoy the great new GIMP features. Happy picture editting ;)

Share this on

How to fix upside-down / inverted web camera laptop Asus K51AC issue on Ubuntu Linux and Debian GNU / Linux

Monday, February 13th, 2012

Skype Video Inverted bat like linux screenshot

Does your camera show video correctly in cheese but shows captured video upside-down (inverted) in skype ?
This is an issue a friend of mine experienced on his Asus K51AC-SX037D laptop on both Ubuntu and Debian Linux.
As you can see in the picture above it is funny as with this bug the person looks like a batman ;)
As the webcam upside-down issue was present on both latest Ubuntu 11.10 and latest stable Debian Squeeze 6.02, my guess was other GNU / Linux rpm based distro like Fedora might have applied a fix to this weird Skype inverted video (bat human like) issue.
Unfortunately testing the webcam with Skype on latest both Fedora 16 and Linux Mint 12 appeared to produce the same webcam bug.

A bit of research for the issue online and try outs of a number of suggested methods to resolve the issue led finally to a work around, thanks to this post
Here is few steps to follow to make the webcam show video like it should:

1. Install libv4l-0 package

root@linux:~# apt-get --yes install libv4-0
...

Onwards to start skype directly from terminal and test the camera type:

hipo@linux:~$ LD_PRELOAD=/usr/lib/libv4l/v4l1compat.so skype

This is the work around for 32 bit Linux install, most people however will probably have installed 64 bit Linux, for 64bit Linux installs the above command should be little different:

hipo@linux:~$ LD_PRELOAD=/usr/lib32/libv4l/v4l1compat.so skype

Once skype is launched test the camera and see if the camera capture is now uninverted, through menus:

S -> Options -> Video Devices -> Test

Skype Options Video devices screenshot

2. Create a skype Wrapper script Launcher

To make skype launch everytime with exported shell variable:
LD_PRELOAD=/usr/lib32/libv4l/v4l1compat.so

A new skype wrapper bash shell script should be created in /usr/local/bin/skype , the file should contain:

#!/bin/sh
LD_PRELOAD=/usr/lib32/libv4l/v4l1compat.so
/usr/bin/skype

To create the script with echo in a root terminal issue;

root@linux:~# echo '#!/bin/sh' >> /usr/local/bin/skype
root@linux:~# echo 'LD_PRELOAD=/usr/lib32/libv4l/v4l1compat.so' >> /usr/local/bin/skype
root@linux:~# echo '/usr/bin/skype' >> /usr/local/bin/skype
root@linux:~# chmod +x /usr/local/bin/skype

3. Edit the Skype gnome menu to substitute /usr/bin/skype Skype Launcher with /usr/local/bin/skype

Gnome 2 has a handy menu launcher, allowing to edit and add new menus and submenus (menus and items) to the Application menu, to launch the editor one has to click over Applications with last mouse button (right button) and choose Edit Menus

GNOME Edit menus screenshot

The menu editor like the one in the below screenshot will appear:

GNOME 2 Menu Editor Screenshot

In the preceeding Launcher properties window, Command: skype has to be substituted with:

GNOME2 Skype screenshot Launcher properties

Command: /usr/local/bin/skype

For console freaks who doesn't want to bother in editting Skype Launcher via GUI /usr/share/applications/skype.desktop file can be editted in terminal. Inside skype.desktop substitute:

Exec=skype

with

Exec=/usr/local/bin/skype

Skype fixed inverted bat like screenshot

As one can imagine the upside-down video image in Skype is not a problem because of Linux, but rather another bug in Skype (non-free) software program.
By the way everyone, who is using his computer with Free Software operating system FreeBSD, Linux etc. knows pretty well by experience, that Skype is a very problematic software; It is often a cause for system unexpected increased system loads, problems with (microphone not capturing), camera issues, issues with pulseaudio, problem with audio playbacks … Besides the long list of bugs there are unexpected display bugs in skype tray icon, bugs in skype messanger windows and at some rare occasions the program completely hangs and had to be killed with kill command and re-launched again.

Another worrying fact is Skype's versions available for GNU / Linux and BSD is completely out of date with its "competitor" operating systems MS Windows, MacOS X etc.
For people like me and my friend who want to use free operating system the latest available skype version is not even stable … current version fod download from skype's website is (Skype 2.2Beta)!

On FreeBSD the skype situation is even worser, freebsd have only option to run Skype ver 1.3 or v. 2.0 at best, as far as I know skype 2.2 and 2.2beta is not there.

Just as matter of comparison the latest Skype version on Windows is 5.x. Windows release is ages ahead its Linux and BSD ver. From a functional point of view the difference between Linux's 2.x and Windows 5.x is not that much different, what makes difference is is the amount of bugs which Linux and BSD skype versions contain…
Skype was about 6 months ago bought by Microsoft, therefore the prognosis for Skype Linux support in future is probably even darker. Microsoft will not probably bother to release new version of Skype for their competitor free as in freedom OSes.

I would like to thank my friend and brother in Christ Stelian for supplying me with the Skype screenshots, as well as for being kind to share how he fixed his camera with me.

Share this on

Non-free packages to install to make Ubuntu Linux Multimedia ready / Post install packages for new Ubuntu installations

Monday, January 23rd, 2012

1. Add Medibuntu package repository

root@ubuntu:~# wget --output-document=/etc/apt/sources.list.d/medibuntu.list \
http://www.medibuntu.org/sources.list.d/$(lsb_release -cs).list \
&& apt-get --quiet update \
&& apt-get --yes --quiet --allow-unauthenticated install medibuntu-keyring \
&& apt-get --quiet update
2. Enable Ubuntu to play Restricted DVD
root@ubuntu:~# apt-get install --yes libdvdread4
...
root@ubuntu:~# /usr/share/doc/libdvdread4/install-css.sh

After that VLC will be ready to play DVDs for some programs which was compiled without DVD, source rebuilt is required.

If DVDs hang you might need to set a Region Code with regionset:

# regionset

3. Install non-free codecs

root@ubuntu:~# apt-get install non-free-codecs

4. Install Chromium ffmpeg nonfree codecs

root@ubuntu:~# apt-get install chromium
root@ubuntu:~# apt-get install chromium-codecs-ffmpeg-nonfree

5. Install w32codecs / w64codecs

Depending on the Ubuntu Linux installation architecture 32/64 bit install w32codecs or w64codecs

For 32 bit (x86) Ubuntu install w32codecs:

root@ubuntu:~# apt-get install w32codecs

For 64 bit arch Ubuntu:

root@ubuntu:~# apt-get install w64codecs

6. Install ubuntu-restricted-extras meta package

root@ubuntu:~# apt-get install ubuntu-restricted-extras

7. Install cheese for webcam picture/video snapshotting

root@ubuntu:~# apt-get install cheese

8. Install GIMP, Inkscape, xsane,sane, shotwell etc.

root@ubuntu:~# apt-get --yes install sane xsane gimp inkscape gimp-data-extras gimp-plugin-registry \
blender gcolor2 showtwell bluefish kompozer

9. Install multimedia Sound & Video utilities

Install Subtitle editor, video editiking , sound editing, mp3 player, iso mounters, DVD/CD Burners

root@ubuntu:~# apt-get install rhythmbox banshee smplayer mplayer \
realplayer audacity brasero jokosher istanbuk gtk-recordMyDesktop \acetoneisohexedit furiusisomount winff fala audacious dvdstyler lives hydrogen
subtitleeditor gnome-subtitles electricsheep k3b

10. Install CD / DVD RIP tools

root@ubuntu:~# apt-get install acidrip sound-juicer ogmrip thoggen
11. Install chat messanger programs, Browsers, mail pop3 clients, torrent, emulators, ftp clients etc.

apt-get install seamonkey thunderbird transmission transmission-gtk gbgoffice kbedic \
pidgin openoffice.org gxine mozilla-plugin-vlc wine dosbox samba filezilla amsn ntp \epiphany-browser ntpdate desktop-webmail alltray chmsee gftp xchat-gnome ghex \gnome-genius bleachbit arista

12. Install Non-Free Flash Player

Unfortunately Gnash is not yet production ready and crashes in many websites …

root@ubuntu:~# apt-get install flashplugin-nonfree flashplugin-nonfree-extrasound swfdec-gnome

13. Install Archive / Unarchive management programs

root@ubuntu:~# apt-get install unace unrar zip unzip p7zip-full p7zip-rar sharutils rar uudeview \
mpack lha arj cabextract file-roller

15. Install VirtualBox and QEmu

root@ubuntu:~# apt-get install qemu-launcher qemu-kvm-extras virtualbox virtualbox-ose \
virtualbox-ose-guest-dkms virtualbox-ose-guest-dkms

This should be enough to use Ubuntu normally for multimedia Desktop just as MS Windows for most of the daily activities.
Am I missing some important program?

Share this on

Geki2 and Geki3 a Xenon 2 Megablast like games for GNU / Linux and FreeBSD

Thursday, December 22nd, 2011

Do you remember the old arcade spaceship shooter Xenon 2 Megablast? I do ;) For all those who are too young to remember, here are two screenshots:

Xenon2 Main game Screen PC DOS ver

Xenon 2 megablast PC DOS level screenshot

Even though Xenon 2 Megablast original can now be played using dosbox DOS emulator. Its interesting to mention I've found two Linux games that more or less can be qualitified to resemble Xenon 2.
The games are Native Free Software games and existing in package repositories of most Linux distributions and *BSD port trees.

Geki 2 and Geki 3 are of a less quality to Xenon but still, the game experience is nice and is among the Arcade shooter games to bring you fun in the boring days if you're on GNU / Linux or FreeBSD Free OS platforms.

Installing Geki2 and Geki3 on Debian and Ubuntu Linux is standard with apt:

debian:~# apt-get install geki2 geki3
...

On Debian GNU / Linux , after installed the games would not create GNOME Applications -> Games -> game startup shortcuts, however the game startups will get added in GNOME Applications Menu under:

Applications -> Debian -> Games -> Action -> Geki 2
and
Applications -> Debian -> Games -> Action -> Geki 3

The games can be launched also manually with commands:

geki2

Geki 2 Linux Xenon 2 like game Main Menu

or

geki3
Geki3 gameplay screenshot Debian Linux

Geki 2 is a way closer to Xenon 2 as it has similar look and feel and the same vertical direction the spaceship is navigated.
In Geki 3 still the shoot 'em' up spaceship like arcade is present, however instead of penguin you have to fly a flying penguin, as well as the spaceship move direction is horizontal.

 Both the games have the same sound and music effects. The game music and effects are not of top quality but are not bad. In general  the games surely gives some of the arcade atmosphere.

Geki 2 GNU Linux Xenon 2 like vertical shooter arcade
Geki 2 Xenon 2 Megablast like on Debian Linux

In the tradition of the arcade games at the end of each level in both games you face the Level Boss Enemy, you should destroy.

Geki3 Level boss Debian Linux Screenshot
As you can see in below's screenshot the overall graphics of GEKI 3 is poorer while compared to GEKI 2

still GEKI 2 gampley is fun and addictive and I would say not less enjoyable than GEKI 2.
 At times I even think that Geki 3 is more fun because it is more dynamic.

 Maybe other reason, why I enjoyed more Geki 3 is also the fact that Geki 2 is a way harder to play. Dying only 3 times in the game you get  GAME OVER  and the next game you're started from the beginning of the same level you died in …

Geki2 Linux different shooting Screenshot

 Something really annoying that affects both the games; there is no option to play them in Fullscreen mode! ARGH!

Game controls for Geki2 and Geki3 are identical as follows:

Up - Arrow up key
Down - Down arrow key
Right - Right arrow key
left - Left arrow key
Shoot - z or Space
Pause - s

Geki2 and Geki3 are fun and can kill some time, but definitely aren't that (professional) as other spaceship shoot'em'up arcades for Linux and BSD. Games like Starfighter , Critical Mass or  powermanga .
 Lest that they are two worthy to install and play on your Free Software OS.

Share this on