Posts Tagged ‘snapshot’

KVM Creating LIVE and offline VM snapshot backup of Virtual Machines. Restore KVM VM from backup. Delete old KVM backups

Tuesday, January 16th, 2024

kvm-backup-restore-vm-logo

For those who have to manage Kernel-Based Virtual Machines it is a must to create periodic backups of VMs. The backup is usually created as a procedure part of the Update plan (schedule) of the server either after shut down the machine completely or live.

Since KVM is open source the very logical question for starters, whether KVM supports Live backups. The simple answer is Yes it does.

virsh command as most people know is the default command to manage VMs on KVM running Hypervisor servers to manage the guest domains.

KVM is flexible and could restore a VM based on its XML configuration and the VM data (either a static VM single file) or a filesystem laying on LVM filesystem etc.

To create a snapshot out of the KVM HV, list all VMs and create the backup:

# export VM-NAME=fedora;
# export SNAPSHOT-NAME=fedora-backup;
# virsh list –all


It is useful to check out the snapshot-create-as sub arguments


# virsh help snapshot-create-as

 OPTIONS
    [–domain] <string>  domain name, id or uuid
    –name <string>  name of snapshot
    –description <string>  description of snapshot
    –print-xml      print XML document rather than create
    –no-metadata    take snapshot but create no metadata
    –halt           halt domain after snapshot is created
    –disk-only      capture disk state but not vm state
    –reuse-external  reuse any existing external files
    –quiesce        quiesce guest's file systems
    –atomic         require atomic operation
    –live           take a live snapshot
    –memspec <string>  memory attributes: [file=]name[,snapshot=type]
    [–diskspec]  disk attributes: disk[,snapshot=type][,driver=type][,file=name]


# virsh shutdown $VM_NAME
# virsh snapshot-create-as –domain $VM-NAME –name "$SNAPSHOT-NAME"


1. Creating a KVM VM LIVE (running machine) backup
 

# virsh snapshot-create-as –domain debian \
–name "debian-snapshot-2024" \
–description "VM Snapshot before upgrading to latest Debian" \
–live

On successful execution of KVM Virtual Machine live backup, should get something like:

Domain snapshot debian-snapshot-2024 created


2. Listing backed-up snapshot content of KVM machine
 

# virsh snapshot-list –domain debian


a. To get more extended info about a previous snapshot backup

# virsh snapshot-info –domain debian –snapshotname debian-snapshot-2024


b. Listing info for multiple attached storage qcow partition to a VM
 

# virsh domblklist linux-guest-vm1 –details

Sample Output would be like:

 Type   Device   Target   Source
——————————————————————-
 file   disk     vda      /kvm/linux-host/linux-guest-vm1_root.qcow2
 file   disk     vdb      /kvm/linux-host/linux-guest-vm1_attached_storage.qcow2
 file   disk     vdc      /kvm/linux-host/guest01_logging_partition.qcow2
 file   cdrom    sda      –
 file   cdrom    sdb      


3. Backup KVM only Virtual Machine data files (but not VM state) Live


# virsh snapshot-create-as –name "mint-snapshot-2024" \
–description "Mint Linux snapshot" \
–disk-only \
–live
–domain mint-home-desktop


4. KVM restore snapshot (backup)
 

To revert backup VM state to older backup snapshot:
 

# virsh shutdown –domain manjaro
# virsh snapshot-revert –domain manjaro –snapshotname manjaro-linux-back-2024 –running


5. Delete old unnecessery KVM VM backup
 

# virsh snapshot-delete –domain dragonflybsd –snapshotname dragonfly-freebsd


How to dump and restore Zabbix database to do monitoring database snapshot, PostGreSQL continuous archiving Point in time recovery setup

Monday, November 21st, 2022

postgresql-db-backup-and-continuous-archiving-on-linux-keep-zabbix-backup-regularly

If you have set up a Zabbix server that is using as a database storage postgresql at home or company, then you will need to make sure you don’t loose any data by producing regular postgresql backups. This small article will show how to do the db backup in conventional way with pg_dump / pg_restore as well as how to set the continuous archiving point in time recovery end point recovery so called PITR..
 

1. Connect to the database and some postgres very basics

-bash-4.2$ psql DBNAME USERNAME
 
-bash-4.2$ psql zabbix zabbix
 

After you access a PostgreSQL database, you can run SQL queries and more. Here are some common psql commands:
 
•    To view help for psql commands, type \?.
•    To view help for SQL commands, type \h.
•    To view information about the current database connection, type \conninfo.
•    To list the database's tables and their respective owners, type \dt.
•    To list all of the tables, views, and sequences in the database, type \z.
•    To exit the psql program, type \q.

       Fundamental backup approaches with postgres

As with everything that contains valuable data, PostgreSQL databases should be backed up regularly. While the procedure is essentially simple, it is important to have a clear understanding of the underlying techniques and assumptions.
 
There are three fundamentally different approaches to backing up PostgreSQL data:
 
•    SQL dump
•    File system level backup
•    Continuous archiving

 
Each has its own strengths and weaknesses; each is discussed in turn in the following sections.
 

2.    Creating SQL Dump of postgresql target database

2.1 Manual SQL dump (custom dump format)

 
Use pg_dump's custom dump format. If PostgreSQL was built on a system with the zlib compression library installed, the custom dump format will compress data as it writes it to the output file.
This will produce dump file sizes similar to using gzip, but it has the added advantage that tables can be restored selectively.
The following command dumps a database using the custom dump format:
 

# sudo su – postgres
-bash-4.2% cd  /var/lib/pgsql/9.5/backups/
 
-bash-4.2$  pg_dump -Fc zabbix > /var/lib/pgsql/9.5/backups/zabbixdbdump`date "+%d%m%y%H%M%S"`.gz

2.2 Schedule backups with cron job

To automate the job schedule a cron job to do the work, somethjing like below:
 

# Minute   Hour   Day of Month       Month          Day of Week        Command
# (0-59)  (0-23)     (1-31)    (1-12 or Jan-Dec)  (0-6 or Sun-Sat)

 
@daily  pg_dump -Fc zabbix > /var/lib/pgsql/9.5/backups/Zabbix_db_dump`date "+\%d\%m\%y\%H\%M\%S"`.gz

3. Restore a database from the dump file

3.1. Restoring a database using pg_restore (usually used)

A custom-format dump is not a script for psql, but instead must be restored with pg_restore, for example:
 

# pg_restore -d zabbix /var/lib/pgsql/9.5/backups/Zabbix_db_dump281118151005.gz

3.2. Second Option restoing with psql after creating a restore database

 
# su postgres

-bash-4.2$ psql template1
 
CREATE DATABASE zabbix OWNER zabbix ENCODING 'UTF8';
\q

-bash-4.2$ psql zabbix < /var/lib/pgsql/9.5/backups/zabbixdbdump291117151002.gz
exit

 
NOTE: if you get a permission denied error when trying to restore, check the Unix permissions on the backup file and all the parent directories.

4.    Continuous Archiving and Point-in-Time Recovery (PITR) backups

At all times, PostgreSQL maintains a write ahead log (WAL) in the pg_xlog/ subdirectory of the cluster's data directory. The log records every change made to the database's data files. This log exists primarily for crash-safety purposes: if the system crashes, the database can be restored to consistency by "replaying" the log entries made since the last checkpoint. However, the existence of the log makes it possible to use a third strategy for backing up databases: we can combine a file-system-level backup with backup of the WAL files. If recovery is needed, we restore the file system backup and then replay from the backed-up WAL files to bring the system to a current state. This approach is more complex to administer than either of the previous approaches, but it has some significant benefits:

           Setting Up the WAL Archiving

In an abstract sense, a running PostgreSQL system produces an indefinitely long sequence of WAL records. The system physically divides this sequence into WAL segment files, which are normally 16MB a piece (although the segment size can be altered when building PostgreSQL). The segment files are given numeric names that reflect their position in the abstract WAL sequence. When not using WAL archiving, the system normally creates just a few segment files and then "recycles" them by renaming no-longer-needed segment files to higher segment numbers. It's assumed that segment files whose contents precede the checkpoint-before-last are no longer of interest and can be recycled.
 
When archiving WAL data, we need to capture the contents of each segment file once it is filled, and save that data somewhere before the segment file is recycled for reuse.
Depending on the application and the available hardware, there could be many different ways of "saving the data somewhere": we could copy the segment files to an NFS-mounted directory on another machine, write them onto a tape drive (ensuring that you have a way of identifying the original name of each file), or batch them together and burn them onto CDs, or something else entirely. To provide the database administrator with flexibility, PostgreSQL tries not to make any assumptions about how the archiving will be done. Instead, PostgreSQL lets the administrator specify a shell command to be executed to copy a completed segment file to wherever it needs to go. The command could be as simple as a cp, or it could invoke a complex shell script — it's all up to you.
 
To enable WAL archiving, set the wal_level configuration parameter to archive or higher, archive_mode to on, and specify the shell command to use in the archive_command configuration parameter.

In practice these settings will always be placed in the postgresql.conf e.g. (/etc/postgresql/12/main/postgresql.conf) file.

In archive_command, %p is replaced by the path name of the file to archive, while %f is replaced by only the file name. (The path name is relative to the current working directory, i.e., the cluster's data directory.)

Use %% if you need to embed an actual % character in the command.

The simplest useful command to enable PITR would, be something like:
 

# – Archiving config setction
 
archive_mode = on                    # enables archiving; off, on, or always
# (change requires restart)
 
archive_command = '/bin/xz -2 -z < %p > /var/lib/pgsql/9.5/archivedir/%f'               # command to use to archive a logfile segment
 
archive_timeout = 1h            # force a logfile segment switch after this
                                                   # number of seconds; 0 disables

Create Easy Data Backups with Rsnapshot back-up tool on GNU / Linux

Monday, April 15th, 2013


rsnapshot Linux and FreeBSD easy data backup tool logo
Backing up information on Linux servers is essential part of routine system adminsitrator job. Thus I decided to write for those interested in how one can easily create backups of important data through a tiny tool called rsnapshot which I prior used to make periodic data incremental backups on few of Debian Linux servers I manage. In case you wonder why use rsnapshot and not just rsync – the reasons are 2.
a. Rsnapshot is very easy to configure and use and you don't need to have deep understanding on  rsync numerous options to use it.
b. Rsnapshot does support incremental data backups – saving a lot of disk space on backup host.


Mentioning  incremental data backups for some those term might be a news so I will in short explain here what is Incremental Data Backups?

Incremental Data Backups are such backups which only create new backup of system scheduled files to backup only whether there are changes in files to backup or new ones are added to directory/directories set to be routinely backed up. Incremental backups are often desirable as they consume minimum storage space and are quicker to perform than normal periodic whole data archiving (differential backups). rsync has also support for incremental backups but configuring it to do so takes time and requires extra time on reading and understanding how they work, so I personally prefer simplicity rsnapshot brings.

1. Installing rsnapshot with apt-get

Here is rsnapshot debian package description;

debian:~#  apt-cache show rsnapshot|grep -i description -A 5


Description: local and remote filesystem snapshot utility
 rsnapshot is an rsync-based filesystem snapshot utility. It can take
 incremental backups of local and remote filesystems for any number of
 machines. rsnapshot makes extensive use of hard links, so disk space is
 only used when absolutely necessary.
Homepage: http://www.rsnapshot.org/

As you can read from description, rsnapshot is a frontend command using rsync to make data backups.

Install of rsnapshot is done through;

 debian:~# apt-get install --yes rsnapshot

Reading package lists… Done
Building dependency tree      
Reading state information… Done
The following NEW packages will be installed:
  rsnapshot
0 upgraded, 1 newly installed, 0 to remove and 0 not upgraded.
Need to get 0 B/140 kB of archives.
After this operation, 598 kB of additional disk space will be used.
Selecting previously deselected package rsnapshot.
(Reading database … 87026 files and directories currently installed.)
Unpacking rsnapshot (from …/rsnapshot_1.3.1-1_all.deb) … –
Processing triggers for man-db …
Setting up rsnapshot (1.3.1-1) …

2. Rsnapshot  package content and Documentation

Once installed here is file content of rsnapshot deb package;

debian:~# dpkg -L rsnapshot


/.
/usr
/usr/share
/usr/share/doc-base
/usr/share/doc-base/rsnapshot
/usr/share/doc
/usr/share/doc/rsnapshot
/usr/share/doc/rsnapshot/TODO
/usr/share/doc/rsnapshot/changelog.gz
/usr/share/doc/rsnapshot/Upgrading_from_1.1.gz
/usr/share/doc/rsnapshot/examples
/usr/share/doc/rsnapshot/examples/rsnapshot.conf.default.gz
/usr/share/doc/rsnapshot/examples/utils
/usr/share/doc/rsnapshot/examples/utils/backup_mysql.sh
/usr/share/doc/rsnapshot/examples/utils/mysqlbackup.pl
/usr/share/doc/rsnapshot/examples/utils/random_file_verify.sh
/usr/share/doc/rsnapshot/examples/utils/rsnapreport.pl.gz
/usr/share/doc/rsnapshot/examples/utils/make_cvs_snapshot.sh
/usr/share/doc/rsnapshot/examples/utils/backup_pgsql.sh
/usr/share/doc/rsnapshot/examples/utils/rsnapshotdb
/usr/share/doc/rsnapshot/examples/utils/rsnapshotdb/CHANGES.txt
/usr/share/doc/rsnapshot/examples/utils/rsnapshotdb/rsnapshotDB.pl.gz
/usr/share/doc/rsnapshot/examples/utils/rsnapshotdb/INSTALL.txt
/usr/share/doc/rsnapshot/examples/utils/rsnapshotdb/TODO.txt
/usr/share/doc/rsnapshot/examples/utils/rsnapshotdb/rsnapshotDB.xsd
/usr/share/doc/rsnapshot/examples/utils/rsnapshotdb/rsnapshotDB.conf.sample
/usr/share/doc/rsnapshot/examples/utils/rsnapshotdb/README.txt
/usr/share/doc/rsnapshot/examples/utils/rsnapshot-copy
/usr/share/doc/rsnapshot/examples/utils/backup_rsnapshot_cvsroot.sh
/usr/share/doc/rsnapshot/examples/utils/backup_dpkg.sh
/usr/share/doc/rsnapshot/examples/utils/sign_packages.sh
/usr/share/doc/rsnapshot/examples/utils/mkmakefile.sh
/usr/share/doc/rsnapshot/examples/utils/rsnaptar
/usr/share/doc/rsnapshot/examples/utils/rsnapshot_invert.sh
/usr/share/doc/rsnapshot/examples/utils/rsnapshot_if_mounted.sh
/usr/share/doc/rsnapshot/examples/utils/README
/usr/share/doc/rsnapshot/examples/utils/debug_moving_files.sh
/usr/share/doc/rsnapshot/examples/utils/backup_smb_share.sh
/usr/share/doc/rsnapshot/README.gz
/usr/share/doc/rsnapshot/changelog.Debian.gz
/usr/share/doc/rsnapshot/copyright
/usr/share/doc/rsnapshot/README.Debian
/usr/share/doc/rsnapshot/html
/usr/share/doc/rsnapshot/html/rsnapshot-HOWTO.en.html
/usr/share/doc/rsnapshot/NEWS.Debian.gz
/usr/share/lintian
/usr/share/lintian/overrides
/usr/share/lintian/overrides/rsnapshot
/usr/share/man
/usr/share/man/man1
/usr/share/man/man1/rsnapshot.1.gz
/usr/share/man/man1/rsnapshot-diff.1.gz
/usr/bin
/usr/bin/rsnapshot-diff
/usr/bin/rsnapshot
/var
/var/cache
/var/cache/rsnapshot
/etc
/etc/cron.d
/etc/cron.d/rsnapshot
/etc/rsnapshot.conf
/etc/logrotate.d
/etc/logrotate.d/rsnapshot

To get basic idea, on rsnapshot and how it can be configured and run manually as well as how it can be set-up to run periodic via a cronjob README shipped with package is a good start point.

debian:~# zless /usr/share/doc/rsnapshot/README.gz
....

It is also useful to check program documentation in HTML, whether you have some text browser installed – i.e. lynx or links:

debian:~# links /usr/share/doc/rsnapshot/html/rsnapshot-HOWTO.en.html

Note that many of information in rsnapshot-HOWTO is related to how rsnapshot is installed manually from source, so for Deb based distro users reading these sections can be safely skipped. For Debian users hence it is useful to read howto from section 4.A onwards. man rsnapshot's Examle section is very good reading too as it gives a lot of use scenarios necessary in more complicated backup situations.

3. Configuring Rsnapshot – Setting Data Directories to Backup

Configuration of Rsnapshot is done through /etc/rsnapshot.conf file. There is plenty of comments in file, so opening in text editor and taking few minutes to read commented lines is necessery. Configuration options just like with most Linux tool config files is done through config directives, not commented.

debian:~# cat /etc/rsnapshot.conf |grep -v "#"|uniq


config_version    1.2

snapshot_root    /var/cache/rsnapshot/

cmd_rm        /bin/rm

cmd_rsync    /usr/bin/rsync

cmd_logger    /usr/bin/logger

interval    hourly    6
interval    daily    7
interval    weekly    4

verbose        2

loglevel    3

lockfile    /var/run/rsnapshot.pid

backup    /home/        localhost/
backup    /etc/        localhost/
backup    /usr/local/    localhost/


Above config options are clear to understand, there is interval of backups to set (hourly, daily, weekly), verbose level of rsnapshot backup operation log file, lockfile which will be used by rsnapshot to prevent duplicate rsnapshot runs and last backup directive in which you need to specify what needs to be backed up. In config file there is also commented variable for creating rsnapshot backup once a month

#interval   monthly 3

If you need to create backups once a month uncomment it.

In backup directive add all directories from filesystem which need to have routine backup, for example I keep my Apache Web server files in /var/www/, store various install software in
/root/

and keep backup of Qmail (Vpopmail) old emails kept in
/var/vpopmail
.
To make rsnapshot backup those I add after rest of backup directives:

backup  /var/www/   localhost/
backup  /var/vpopmail/  localhost/
backup  /root/  localhost/


It is good practice to change snapshot_root directive to /root/.backups or whether you prefer to keep snapshot_root to default /var/cache/rsnapshot at least link with ln command /root/.backups to -> /root/.backups.

debian:~# ln -sf /var/cache/rsnapshot /root/.backups

If you change snapshot_root to /root/.backups, don't forget to create /root/.backups and set chmod  dir persmissions only readable to owner, i.e.:

debian:~# mkdir /root/.rsnapshot
debian:~# chmod -R 700 /root/.backups

Note that, it is important to use tab delimiters, everywhere in /etc/rsnapshot.conf, if you use space key delimiter instead of Tab you will end up with errors preventing rsnapshot to run.

4. Testing rsnapshot configuration and launching it first time

I will say it once again use Tab key for delimiters in config. It was my mistake on first time Rsnapshot launch to use spaces to delimiter my config options, thus testing my configuration, rsnapshot print an error and failed:

debian:~# rsnapshot configtest


———————————————————
rsnapshot encountered an error! The program was invoked with these options: /usr/bin/rsnapshot configtest ———————————————————
ERROR: /etc/rsnapshot.conf on line 199: ERROR: backup /var/www/ localhost/
ERROR: ———————————————————
ERROR: Errors were found in /etc/rsnapshot.conf, ERROR: rsnapshot can not continue. If you think an entry looks right, make
ERROR: sure you don't have spaces where only tabs should be.  

After changing, Space delimiters with Tabs and re-running rsnapshot configtest if all fine you get:

debian:~# rsnapshot configtest
Syntax OK

Once all good with config to launch Rsnapshot do its first complete incremental data backup, to display what rsnapshot will backup and what exact rsync invocations will it use type:


debian:~# rsnapshot -t hourly

echo 5644 > /var/run/rsnapshot.pid
mv /var/cache/rsnapshot/hourly.2/ /var/cache/rsnapshot/hourly.3/
mv /var/cache/rsnapshot/hourly.1/ /var/cache/rsnapshot/hourly.2/
native_cp_al("/var/cache/rsnapshot/hourly.0", \
    "/var/cache/rsnapshot/hourly.1")
/usr/bin/rsync -a –delete –numeric-ids –relative –delete-excluded /home \
    /var/cache/rsnapshot/hourly.0/localhost/
/usr/bin/rsync -a –delete –numeric-ids –relative –delete-excluded /etc \
    /var/cache/rsnapshot/hourly.0/localhost/
/usr/bin/rsync -a –delete –numeric-ids –relative –delete-excluded \
    /usr/local /var/cache/rsnapshot/hourly.0/localhost/
/usr/bin/rsync -a –delete –numeric-ids –relative –delete-excluded \
    /var/www /var/cache/rsnapshot/hourly.0/localhost/
/usr/bin/rsync -a –delete –numeric-ids –relative –delete-excluded \
    /var/vpopmail /var/cache/rsnapshot/hourly.0/localhost/
/usr/bin/rsync -a –delete –numeric-ids –relative –delete-excluded /root \
    /var/cache/rsnapshot/hourly.0/localhost/
touch /var/cache/rsnapshot/hourly.0/

To launch backup first time manually:

debian:~# rsnapshot hourly

Depending on backupped data (Mega/Giga/Terabytes) size and the number of files which had to be backed up, backup takes from minutes to hours.
Note that it is always good idea to create backups on separate hard disk configured in some kind of RAID array, preferrably (RAID 1 or RAID 5). Creating backups on separate hard disk has numerous advantages, the most important one is it doesn't put too much Input / Output (I/O) stress on hard disk and thus will not create server downtimes on High traffic – Busy servers slow old Hard Disks or servers with Big amount of I/O HDD read/writes .

5. Enabling Rsnapshot to create backups via scheduled cron job

On package install Rsnapshot creates a skele file for running via cronjob in /etc/cron.d/rsnapshot.

debian:~# cat /etc/cron.d/rsnapshot


# This is a sample cron file for rsnapshot.
# The values used correspond to the examples in /etc/rsnapshot.conf.
# There you can also set the backup points and many other things.
#
# To activate this cron file you have to uncomment the lines below.
# Feel free to adapt it to your needs.

# 0 */4        * * *        root    /usr/bin/rsnapshot hourly
# 30 3      * * *        root    /usr/bin/rsnapshot daily
# 0  3      * * 1        root    /usr/bin/rsnapshot weekly
# 30 2      1 * *        root    /usr/bin/rsnapshot monthly
 

To make hourly, daily, weekly, monthly backup uncomment one of above 4 lines. For paranoid admins scared to loose even a bit of data, hourly data is a good solution. For me personally I prefer configuring weekly backups for the reason I routinely monitor servers – keeping an eye regularly on dmesg and checking Linux smard / smartmontools logs to find out whether a hard disk or RAID has bad blocks

6. Checking backup size / backup difference and backup structure

Checking size of backups can be done by using standard du command on backup directory:

debian:~# du -hsc /var/cache/rsnapshot/*
4.3G /var/cache/rsnapshot/hourly.0
4.5M /var/cache/rsnapshot/hourly.1
68M /var/cache/rsnapshot/hourly.2
4.4G total

rsnapshot also has du argument via which backup size can be viewed:

debian:~# rsnapshot du 4.3G /var/cache/rsnapshot/hourly.0/
4.5M /var/cache/rsnapshot/hourly.1/
68M /var/cache/rsnapshot/hourly.2/
4.4G total

As you can see each new incremental backup is with new number after hourly{0,1,2} etc.

To check difference between two different backups:

debian:~# rsnapshot diff /var/cache/rsnapshot/hourly.0/ /var/cache/rsnapshot/hourly.1/
Comparing /var/cache/rsnapshot/hourly.1 to /var/cache/rsnapshot/hourly.0
Between /var/cache/rsnapshot/hourly.1 and /var/cache/rsnapshot/hourly.0:
660 were added, taking 3728377727 bytes;
492 were removed, saving 17623 bytes;

Structure of backed up files is identical to normal copy of files without any compression:

debian:~# cd /root/.backups/hourly.0/localhost/
debian:~/.backups/hourly.0/localhost# ls

etc/ home/ root/ usr/ var/


7. Restoing files or directory from rsnapshot backup

To restore lets say /var directory cd into it:

debian:~/.backups/hourly.0/localhost# cd var
debian:~/.backups/hourly.0/localhost/var#

Then use rsync as follows:

debian:~/.backups/hourly.0/localhost/var# rsync -avr * /


8. Creating rsnapshot backups from remote server via SSH protocol

In /etc/rsnapshot.conf you should have set SSH port on which remote server is accepting SSH connections. Standard port is 22, however it is wise to configure on backup server SSH to listen to some other non standard port.

In config variables to look on are:

ssh_args -p 22

and

Onwards to enable remote login via ssh uncomment in /etc/rsnapshot.conf :

# cmd_ssh /usr/bin/ssh

to

cmd_ssh /usr/bin/ssh

Before starting rsnapshot to create backups on remote host2 you need to Configure automatic SSH passwordless login by generating DSA or RSA key pair between host1 and host2. Where host1 is machine on which rsnapshot is run and to which backups will be copied from host2
Once passwordless ssh to remote host is active, to force rsnapshot create backups from host1 you will need to add near end of /etc/rsnapshot.conf .

backup  root@host2.com:/root/ host2.com/

The same way you can add a number of remote hosts from which periodic backups will be created to central host1. Only condition is on each node – host3, host4, host5.

backup  root@host3.com:/root/root/ host3.com
backup  root@host4.com:/home/ host4.com
backup  root@host4.com:/var/ host4.com

To create on host1 public key (id_dsa.pub) file with command:

debian:~# ssh-keygen -t dsa
...
....
debian:~# ssh-copy-id -i ~/.ssh/id_dsa.pub root@host3

Once all hosts that needs to get backed up to central backup host – host1. To test if backups gets uploaded manually issue:

debian:~# rsnapshot -v hourly
...

Rsnapshot has a number of other scripts which can be easily integrated with it in /usr/share/doc/rsnapshot/examples/utils.
Inside you can find example scripts on how to create MySQL / PostgreSQL database backup, Samba Share backups, backup CVS repositories and so on. The scripts can be easily modified and work with mostly any data or protocol with a bit of tweaking. Short description of each of example scripts can be found in /usr/share/doc/rsnapshot/examples/utils/README

How to take area screenshots in GNOME – Take quick area selection screenshots in G* / Linux and BSD

Thursday, March 15th, 2012

Quick Area screenshot in GNOME how to make quick area selection screenshots in Linux and FreeBSD gnome-screenshot shot

Often when, you do something on your PC, you need to make a quick screenshot of a screen area.. Yes GNOME's feature to take complete screenshots of Screen with Print Screen SysRQ and consequential picture edit with GIMP is one way, but this is far away from quick. This method to chop out of a complete display screenshot usually takes from 40 secs to 1 minute to properly cut and save a selection of the whole picture.
Another common use, that I love in GNOME is the ALT + Print Screen SysRQ key combination. alt+ print scr sysrq is handy while taking a single window screenshot is desired. Anyways often you only need to make a screenshot of a tiny area of the screen. Many people might think this is not possible currently in GNOME, but they will be wrong as there are no impossible but hard things to achieve on Linux / FreeBSD 😉

There are at least two ways using a predefined command for taking quick area screen snapshot.

1. Taking quick area screenshot by using ImageMagick's import command

To use import you will need to have installed ImageMagickswiss army knife of command line image manipulation 😉
For area screenshot with import, press ALT+F2 and type inside Run Application box:
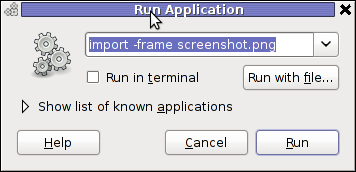
Screenshot GNOME run application GNU / Linux Debian ImageMagick import area screenshot

import -frame screenshot.png

Now make the selection of the exact screen area you would like to screeshot in file screenshot.png
Note that screenshot.png file will be saved by default in your home directory as it is read from $HOME shell variable:

hipo@noah:~$ echo $HOME/home/hipo
hipo@noah:~$ ls -al screenshot.png
-rw-r--r-- 1 hipo hipo 4950 Mar 14 21:11 screenshot.png

You see my $HOME equals /home/hipo, therefore screenshot.png just grabbed is saved in there.

One downside of taking the screenshot with import is that picture snapshot is not further edittable, if it has to be further processed with GIMP or some other graphic editor program.

In the screenshot, below I show you one screen area of my XMMS taken with import -frame screenshot.png cmd:
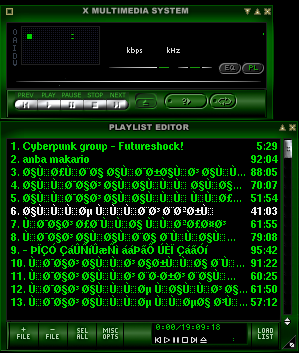
XMMS Screen Area Screenshot import screenshot

Trying to open the screenshot.png, file with GIMP displays the following error in GIMP:
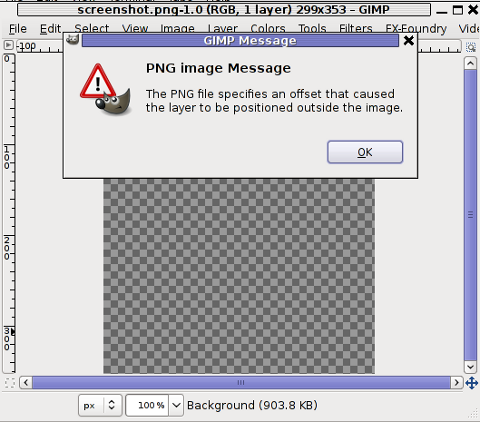
PNG image message PNG the file specifies offset that caused the layer to be positioned outiside image GIMP screenshot

Not all area snapshots taken with import -frame, create this issue sometimes screenshots are opening in GIMP but only area of the screenshot.png is visible in gimp.

Thanksfull, there is work around to this issue by converting the import generated PNG format picture to JPEG with ImageMagick's convert and then edit the .JPEG with GIMP etc.:

hipo@noah:~$ convert screenshot.png screenshot.jpg

Hence to permanently work around it, in case you intend to apply (GIMP modifications), once area snapshot is made instruct import to save its output picture in .jpeg, e.g.:

hipo@noah:~$ import -frame screenshot.jpeg

2. Taking quick area screenshot using gnome-screenshot cmd

Once again invoke the GNOME command Launcher by pressing Alt+F2 (holding alt and pressing F2) and type in the launch box:

gnome-screenshot -a
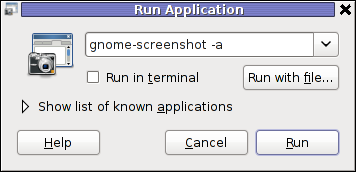
gnome-screenshot Run Application in GNOME 2.30 on Debian GNU / Linux

Below is a small area from my desktop, chopped with gnome-screenshot 🙂

GNOME desktop area chop screenshot with gnome-screenshot on my home Debian Linux

You see on above screenshot a tiny (picture) icon one of the greatest, if not the greatest bulgarian saint – saint John of Rila. St. John's lived as hermit for many years in Rila mountain and by God's grace possessed incorruptable body. His incorruptable body is still kept and can be venerated in Rila Monastery. The monastery is located 160 km from Bulgaria's capital city Sofia

St. Johns first Bulgarian established monastery Rila Monastery is currently the biggest functioing monastery in Bulgaria. The saints monastery is considered one of the most holy places in Bulgaria. If you have a travel or plan a holiday in Bulgaria, I warmly recommend you go there and venerate the saint incorruptable relics.

3. Binding keys to allow quick area screenshot taking with gnome-screenshot in GNOME

This configuration is for GNOME 2.x and is tested to work on my Debian (Squeeze 6.0), GNOME ver. 2.30.2, it should work in earlier Ubuntu versions shipped with GNOME 2.2.xx too. As I've red on the Internet it works well with Ubuntu 10.10Binding a key for screenshot area grab, should be working properly also on any GNOME 2.2.x supporting OS, including the BSD family OSes (FreeBSD, OpenBSD, NetBSD)

a) setting gnome-screenshot key binding for interactive screenshot area grab

Navigate the mouse cursor to GNOME main menus panel in left top, where you see (Applications, Places, System).
Therein use menus:

System -> Preferences -> Keybord Shortcuts -> Add ->

Alternatively if you prefer you can directly invoke the Keyboard Shortcuts configuration with command:

hipo@noah:~$ gnome-keybinding-properties

Further on, assign a shortcut by filling in something like:

name: grab-screen-area
command: gnome-screenshot -i -a
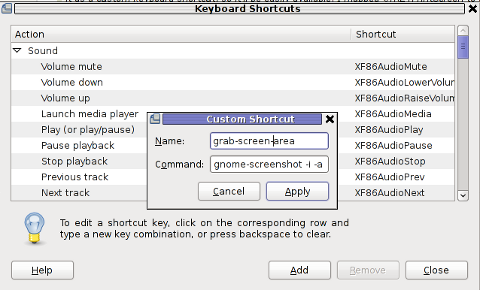
GNOME add keyboard shortcut map key for area interactive screenshot

press Apply and next map a key to the new defined key binding:
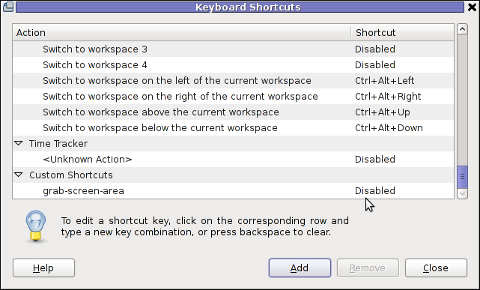
GNOME add keyboard shortcut map key

Under the Shortcut column click on Disabled and assign some key combination to invoke the cmd for example Ctrl+F4

The command gnome-screenshot -i makes gnome-screenshot, show interactive make screenshot dialog like the one in below screenshot.
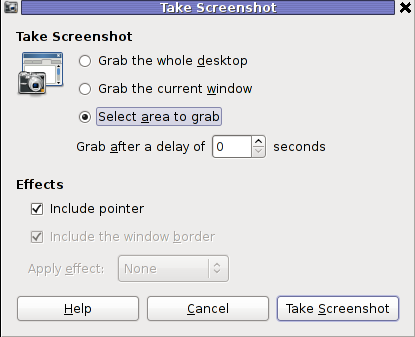
GNOME screenshot interactive screenshot select area grab shot

b) creating gnome-screenshot -a area screenshot key binding for quick area screenshots "on the fly"

The procedure is precisely the same as with adding interactive screenshot; Under Keyboard Shortcuts GNOME config assign new key binding by pressing Add button and adding:

name: grab-screen-area1
command: gnome-screenshot -a

Once again in Shortcut column in line starting with grab-screen-area1 add your desired key switch. I personally like Ctrl+Print Screen SysRQ as it is close to the default GNOME key combination assigned for taking screenshot for a Windows Alt+Print SysRq

It was logical, that this key binding should work and a direct selection mouse cursor to appear once Alt+Print SysRQ is pressed, however for some reason this is not working (hmm, maybe due to bug) ??

Thanksfully it is always possible to substitute the just assigned gnome-screenshot -a key binding with import -frame /home/hipo/Desktop/screenshot.png

If you have followed literally my article so far and you did tried to place a bind for gnome-screenshot -a, modifty grab-screen-area1 to be something like:

name: grab-screen-area1
command: import -frame /home/hipo/Desktop/screenshot.png

Where modify the path /home/hipo/Desktop/screenshot.png, to wherever you prefer the region screep capture to be stored.

c) bind keys for delayed screenshot

This also a handy binding, especially if you every now and then need to make screenshots of screen with a few secs interval.
Add one more keyboard shortcut;

name: grab-screen-area2
command: gnome-screenshot -d 5

Assign a key to make a screenshot of the active display after a delay of 5 seconds. I prefer Ctrl+F5

Onwards every time you would like to make an area screenshot, just use the defined keys:

Ctrl+F4 - will prompt you interactively for the precise type of screenshot you would like to take
Ctrl+Print SysRQ - will prompt you for a direct area to select and once selected will immediately screenshot it
Ctrl+F5 - would do delayed screenshot of entire screen after a delay of 5 seconds

4. Adding border and drop shadow effects with gnome-screenshot Actually, there is plenty of interesting things to do with Screenshots which I never thought were possible.
While reading gnome-screenshot's man page, I've stumbled to an interesting argument:

-e, --effect=EFFECT,
Add an effect to the outside of the screenshot border. EFFECT can be ``shadow'' (adding drop shadow), ``border'' (adding
rectangular space around the screenshot) or ``none'' (no effect). Default is ``none''.

This would have been a nice feature but as of time of writting this article, untofrtunately it is not working in GNOME 2.30.2. I'm not sure if this is a local Debian bug, however I suspect on other Linux distributions with different GNOME build configuration, this features might be working well. My guess here is drop shadow effect and border effect are not working because, gnome-screenshot was compiled without (support for ImageMagick?).
Anyways the way the feature is supposed to be work is by invoking commands:
:

hipo@noah:~$ gnome-screenshot --border-effect=shadow
hipo@noah:~$ nome-screenshot --border-effect=border

The same basic effects, are also available through GIMP's menus:

Image -> Effects

5. Setting default behaviour of gnome-screenshot in gconf-editor GConf (Gnome config registry db)

Experienced, GNOME users should already know about the existence of gconf-editor and the gnome registry database. For those who have don't, coming from MS-Windows background gconf-editor is GNOME (graphical environment) equivalent to Microsoft Windows registry regedit command

gconf-editor can be used to atune the way the screenshots are taken by default. To do so, launch gconf-editor cmd and follow to sub-structure:

/ -> apps -> gnome-screenshot
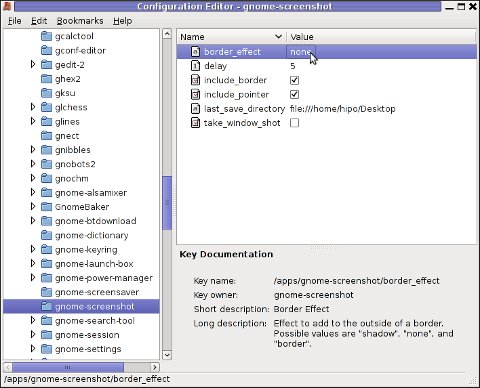
gconf-editor GNOME screenshot border effect none default gnome-screenshot gnome behaviour

The settings in above screenshot are configurations which are used by default by gnome-screenshot, right after install.
You can play with the options to change the default way PrintScreen SysRQ key press will take screenshots.
Here is one example for changing the gnome-screenshot default GNOME behaviour:
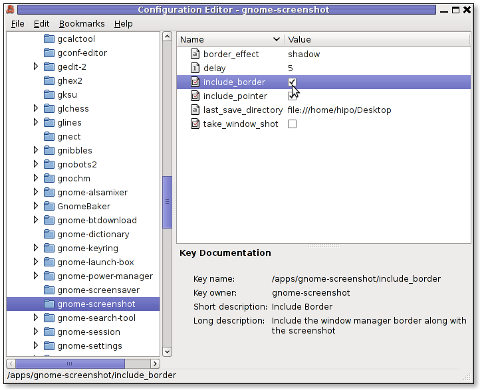
GConf Editor GNOME screenshot, border effect drop shadow and include border option set on Linux Debian

As you can see in above screenshot, I've changed my default gnome-screenshot snap taking to include a drop shadow effect:
Name | Value
border_effect | shadow include_border | (tick on)
last_save_directory | file://home/hipo/Desktop

As you see you can also control, where by default gnome-screenshot will save its screenshots, by default, its saved in $HOME/Desktop
. If you prefer some custom directory to only contain Screenshots taken for instance $HOME/Screenshots, create the directory:
hipo@noah:~$ mkdir ~/Screenshots

and then change the value for last_save_directory gconf var:

last_save_directory | file://home/hipo/Screenshots

Once settings are applied screenshots with Print Screen SysRQ key will be made with Shadow Border effect and saved in /home/hipo/Screenshots

Strangely enough, changing gnome-screenshot default screenshotting values to include screenshot effects like drop shadow or screenshot border effect works just fine.
Even though gnome-screenshot –border-effect=shadow and gnome-screenshot –border-effect=border doesn't directly affect the current screenshot to be made, I've later noticed writting this two commands in the gnome-terminal, does change the border settings for gconf-editor screenshot border.

If you enjoyed, this article and you intend to become "a professional screnshotter" :), you might also enjoy my two other articles:

Happy screenshotting 😉

How to make screenshots on Slackware Linux with XFCE graphical environment

Thursday, February 23rd, 2012

1. Install the slackware binary package xfce4-screenshooter.

For the latest Slackware Linux release which as of time of writting is 13.37 xfce4-screenshooter-1.7.9-i486-3sl.txz can be download from here

Install of xfce4-screenshooter-1.7.9-i486-3sl.txz is done with slackware's usual installpkg package manager command:

bash-4.1# /sbin/installpkg xfce4-screenshooter-1.7.9-i486-3sl.txz

By the way, I haven't used slackware for a long time so in the mean time since Slackware 13, the default slackware packages format .tgz is now substituted with the newer .txz (better compressed .txz). The old .tgz was simply a tar archive with DEFLATE gzip. The newer .txz packages bundled with newer slackware releases are using the LZMA2 (XZ) chain algorithm for compression. LZMA implies higher compression than even bzip2 and this is the reason why Patrick Volkerding – the one man army man behind Slackware decided to use it.
The reason Vollerding choose using .txz is slackware network distribution will load up less the networks and will take less time for downloading extra slackware packages via the internet. The .txz also reduces slackware main CD size so more packages can be contained in the same 700MB sized slack install CD.

Anyways now back to the installation of xfce-screenshooter.

Once installed to runit use the Xfce menus:

Xfce Menu -> Accesories -> Screenshot

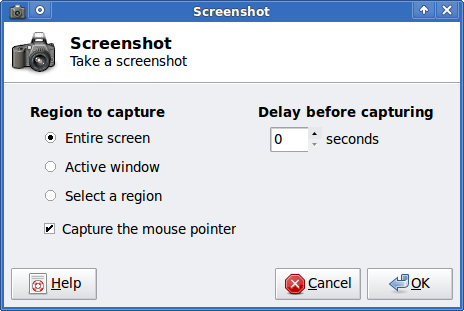
Next you will see the xfce-screenshooter program to pop-up:

To take a snapshot of the screen use:

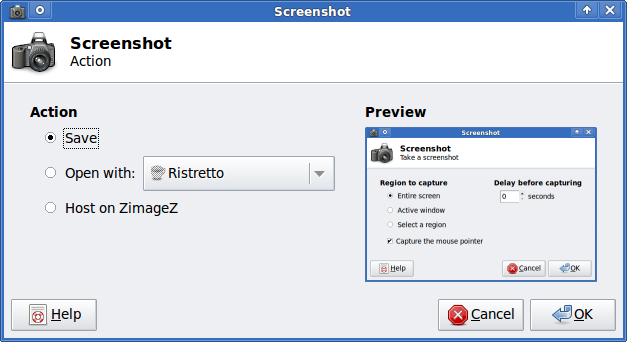
Entire Screen -> Save

XFCE screenshooter Slackware Linux take a screenshot dialog

XFCE screenshooter Slackware Linux action Save
 

How to Screenshot single Windows on GNU / Linux GNOME Desktop

Friday, October 28th, 2011

Every now and then I have to screenshot particular windows positioned on the screen on my GNOME Desktop envronment
Recently I was happy to find there is a very easy way to do this with the default Screenshotting program that is bundled with gnome gnome-screenshot

To screenshot a particular window using gnome-screenshot , its quite easy all one has to do is point the mouse cursor to the window he wants to snapshot and press:

Alt + PrtScr (Print Screen)

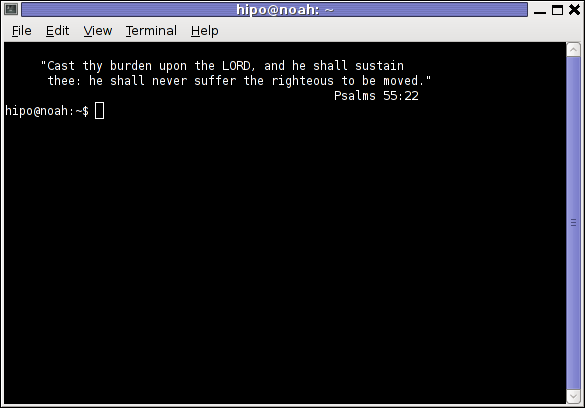
Here is a screenshot, I’ve taken of my gnome-terminal using the above command:

Particular window Screenshot Window screenshotting using GNOME gnome-screenshot

One can do it also via the command line using the /usr/bin/gnome-screenshot , by pressing Alt + F2 to invoke the run application and type in:

/usr/bin/gnome-screenshot -w


I was quite happy to find out that this is possible on Linux inside gnome without bothering to run GIMP or use any external programs for the cause. Hope this helps someone 😉 

How to convert any internet Webpage to PDF from command line on GNU/Linux

Friday, September 30th, 2011

Linux webpage html to pdf command line convertor wkhtmltopdf

If you're looking for a command line utility to generate PDF file out of any webpage located online you are looking for Wkhtmltopdf
The conversion of webpages to PDF by the tool is done using Apple's Webkit open source render.
wkhtmltopdf is something very useful for web developers, as some webpages has a requirement to produce dynamically pdfs from a remote website locations.
wkhtmltopdf is shipped with Debian Squeeze 6 and latest Ubuntu Linux versions and still not entered in Fedora and CentOS repositories.

To use wkhtmltopdf on Debian / Ubuntu distros install it via apt;

linux:~# apt-get install wkhtmltodpf
...

Next to convert a webpage of choice use cmd:

linux:~$ wkhtmltopdf www.pc-freak.net www.pc-freak.net_website.pdf
Loading page (1/2)
Printing pages (2/2)
Done

If the web page to be snapshotted in long few pages a few pages PDF will be generated by wkhtmltopdf
wkhtmltopdf also supports to create the website snapshot with a specified orientation Landscape / Portrait

-O Portrait options to it, like so:

linux:~$ wkhtmltopdf -O Portrait www.pc-freak.net www.pc-freak.net_website.pdf

wkhtmltopdf has many useful options, here are some of them:
 

  • Javascript disabling – Disable support for javascript for a website
  • Grayscale pdf generation – Generates PDf in Grayscale
  • Low quality pdf generation – Useful to shrink the output size of generated pdf size
  • Set PDF page size – (A4, Letter etc.)
  • Add zoom to the generated pdf content
  • Support for password HTTP authentication
  • Support to use the tool over a proxy
  • Generation of Table of Content based on titles (only in static version)
  • Adding of Header and Footers (only in static version)

To generate an A4 page with wkhtmltopdf:

wkhtmltopdf -s A4 www.pc-freak.net/blog/ www.pc-freak.net_blog.pdf

wkhtmltopdf looks promising but seems a bit buggy still, here is what happened when I tried to create a pdf without setting an A4 page formatting:

linux:$ wkhtmltopdf www.pc-freak.net/blog/ www.pc-freak.net_blog.pdf
Loading page (1/2)
OpenOffice path before fixup is '/usr/lib/openoffice' ] 71%
OpenOffice path is '/usr/lib/openoffice'
OpenOffice path before fixup is '/usr/lib/openoffice'
OpenOffice path is '/usr/lib/openoffice'
** (:12057): DEBUG: NP_Initialize
** (:12057): DEBUG: NP_Initialize succeeded
** (:12057): DEBUG: NP_Initialize
** (:12057): DEBUG: NP_Initialize succeeded
** (:12057): DEBUG: NP_Initialize
** (:12057): DEBUG: NP_Initialize succeeded
** (:12057): DEBUG: NP_Initialize
** (:12057): DEBUG: NP_Initialize succeeded
Printing pages (2/2)
Done
Printing pages (2/2)
Segmentation fault

Debian and Ubuntu version of wkhtmltopdf does not support TOC generation and Adding headers and footers, to support it one has to download and install the static version of wkhtmltopdf
Using the static version of the tool is also the only option for anyone on Fedora or any other RPM based Linux distro.

Recovering long lost website information (data) with wayback machine

Monday, May 9th, 2011

Wayback machine, see 2 years old website from cache service

I needed a handy way to recover some old data of an expired domain containing a website, with some really imprtant texts.
The domains has expired before one year and it was not renewed for the reason that it’s holder was not aware his website was gone. In the meantime somebody registered this domain as a way to generate ads profit from it the website was receiving about 500 to 1000 visitors per day.
Now I have the task to recover this website permanently lost from the internet data. I was not able to retrieve anything from the old domain name be contained via google cache, yahoo cache, bing etc.
It appears most of the search engines store a cached version of a crawled website for only 34 months. I’ve found also a search engine gigablast which was claimed to store crawled website data for 1 year, but unfortunately gigablast contained not any version of the website I was looking for.Luckily (thanks God) after a bit of head-banging there I found a website that helped me retrieve at least some parts from the old lost website.

The website which helped me is called WayBack Machine

The Wayback Machine , guys keeps website info snapshots of most of the domain names on the internet for a couple of years back, here is how wayback machine website describes its own provided services:

The Internet Archive's Wayback Machine puts the history of the World Wide Web at your fingertips.

Another handy feature wayback machine provides is checking out how certain websites looked like a couple of years before, let’s say you want to go back in the past and see how yahoo’s website looked like 2 years ago.

Just go to web.archive.org and type in yahoo and select a 2 years old website snapshot and enjoy 😉

It’s really funny how ridiculous many websites looked like just few years from now 😉