Posts Tagged ‘Shell’

How to automate open xen Hypervisor Virtual Machines backups shell script

Tuesday, June 22nd, 2021

openxen-backup-logo As a sysadmin that have my own Open Xen Debian Hypervisor running on a Lenovo ThinkServer few months ago due to a human error I managed to mess up one of my virtual machines and rebuild the Operating System from scratch and restore files service and MySQl data from backup that really pissed me of and this brought the need for having a decent Virtual Machine OpenXen backup solution I can implement on the Debian ( Buster) 10.10 running the free community Open Xen version 4.11.4+107-gef32c7afa2-1. The Hypervisor is a relative small one holding just 7 VM s:

HypervisorHost:~#  xl list
Name                                        ID   Mem VCPUs      State   Time(s)
Domain-0                                     0 11102    24     r—–  214176.4
pcfrxenweb                                  11 12288     4     -b—-  247425.5
pcfrxen                                     12 16384    10     -b—-  1371621.4
windows7                                    20  4096     2     -b—-   97887.2
haproxy2                                    21  4096     2     -b—-   11806.9
jitsi-meet                                  22  2048     2     -b—-   12843.9
zabbix                                      23  2048     2     -b—-   20275.1
centos7                                     24  2040     2     -b—-   10898.2

HypervisorHost:~# xl list|grep -v 'Name ' |grep  -v 'Domain-0'  |wc -l
7


The backup strategy of the script is very simple to shutdown the running VM machine, make a copy with rsync to a backup location the image of each of the Virtual Machines in a bash shell loop for each virtual machine shown in output of xl command and backup to a preset local directory in my case this is /backups/ the backup of each virtual machine is produced within a separate backup directory with a respective timestamp. Backup VM .img files are produced in my case to mounted 2x external attached hard drives each of which is a 4 Terabyte Seagate Plus Backup (Storage). The original version of the script was made to be a slightly different by Zhiqiang Ma whose script I used for a template to come up with my xen VM backup solution. To prevent the Hypervisor's load the script is made to do it with a nice of (nice -n 10) this might be not required or you might want to modify it to better suit your needs. Below is the script itself you can fetch a copy of it /usr/sbin/xen_vm_backups.sh :

#!/bin/bash

# Author: Zhiqiang Ma (http://www.ericzma.com/)
# Modified to work with xl and OpenXen by Georgi Georgiev – https://pc-freak.net
# Original creation dateDec. 27, 2010
# Script takes all defined vms under xen_name_list and prepares backup of each
# after shutting down the machine prepares archive and copies archive in externally attached mounted /backup/disk1 HDD
# Latest update: 08.06.2021 G. Georgiev – hipo@pc-freak.net

mark_file=/backups/disk1/tmp/xen-bak-marker
log_file=/var/log/xen/backups/bak-$(date +%Y_%m_%d).log
err_log_file=/var/log/xen/backups/bak_err-$(date +%H_%M_%Y_%m_%d).log
xen_dir=/xen/domains
xen_vmconfig_dir=/etc/xen/
local_bak_dir=/backups/disk1/tmp
#bak_dir=xenbak@backup_host1:/lhome/xenbak
bak_dir=/backups/disk1/xen-backups/xen_images/$(date +%Y_%m_%d)/xen/domains
#xen_name_list="haproxy2 pcfrxenweb jitsi-meet zabbix windows7 centos7 pcfrxenweb pcfrxen"
xen_name_list="windows7 haproxy2 jitsi-meet zabbix centos7"

if [ ! -d /var/log/xen/backups ]; then
echo mkdir -p /var/log/xen/backups
 mkdir -p /var/log/xen/backups
fi

if [ ! -d $bak_dir ]; then
echo mkdir -p $bak_dir
 mkdir -p $bak_dir

fi


# check whether bak runned last week
if [ -e $mark_file ] ; then
        echo  rm -f $mark_file
 rm -f $mark_file
else
        echo  touch $mark_file
 touch $mark_file
  # exit 0
fi

# set std and stderr to log file
        echo mv $log_file $log_file.old
       mv $log_file $log_file.old
        echo mv $err_log_file $err_log_file.old
       mv $err_log_file $err_log_file.old
        echo "exec 2> $err_log_file"
       exec 2> $err_log_file
        echo "exec > $log_file"
       exec > $log_file


# check whether the VM is running
# We only backup running VMs

echo "*** Check alive VMs"

xen_name_list_tmp=""

for i in $xen_name_list
do
        echo "/usr/sbin/xl list > /tmp/tmp-xen-list"
        /usr/sbin/xl list > /tmp/tmp-xen-list
  grepinlist=`grep $i" " /tmp/tmp-xen-list`;
  if [[ “$grepinlist” == “” ]]
  then
    echo $i is not alive.
  else
    echo $i is alive.
    xen_name_list_tmp=$xen_name_list_tmp" "$i
  fi
done

xen_name_list=$xen_name_list_tmp

echo "Alive VM list:"

for i in $xen_name_list
do
   echo $i
done

echo "End alive VM list."

###############################
date
echo "*** Backup starts"

###############################
date
echo "*** Copy VMs to local disk"

for i in $xen_name_list
do
  date
  echo "Shutdown $i"
        echo  /usr/sbin/xl shutdown $i
        /usr/sbin/xl shutdown $i
        if [ $? != ‘0’ ]; then
                echo 'Not Xen Disk image destroying …';
                /usr/sbin/xl destroy $i
        fi
  sleep 30

  echo "Copy $i"
  echo "Copy to local_bak_dir: $local_bak_dir"
      echo /usr/bin/rsync -avhW –no-compress –progress $xen_dir/$i/{disk.img,swap.img} $local_bak_dir/$i/
     time /usr/bin/rsync -avhW –no-compress –progress $xen_dir/$i/{disk.img,swap.img} $local_bak_dir/$i/
      echo /usr/bin/rsync -avhW –no-compress –progress $xen_vmconfig_dir/$i.cfg $local_bak_dir/$i.cfg
     time /usr/bin/rsync -avhW –no-compress –progress $xen_vmconfig_dir/$i.cfg $local_bak_dir/$i.cfg
  date
  echo "Create $i"
  # with vmmem=1024"
  # /usr/sbin/xm create $xen_dir/vm.run vmid=$i vmmem=1024
          echo /usr/sbin/xl create $xen_vmconfig_dir/$i.cfg
          /usr/sbin/xl create $xen_vmconfig_dir/$i.cfg
## Uncomment if you need to copy with scp somewhere
###       echo scp $log_file $bak_dir/xen-bak-111.log
###      echo  /usr/bin/rsync -avhW –no-compress –progress $log_file $local_bak_dir/xen-bak-111.log
done

####################
date
echo "*** Compress local bak vmdisks"

for i in $xen_name_list
do
  date
  echo "Compress $i"
      echo tar -z -cfv $bak_dir/$i-$(date +%Y_%m_%d).tar.gz $local_bak_dir/$i-$(date +%Y_%m_%d) $local_bak_dir/$i.cfg
     time nice -n 10 tar -z -cvf $bak_dir/$i-$(date +%Y_%m_%d).tar.gz $local_bak_dir/$i/ $local_bak_dir/$i.cfg
    echo rm -vf $local_bak_dir/$i/ $local_bak_dir/$i.cfg
    rm -vrf $local_bak_dir/$i/{disk.img,swap.img}  $local_bak_dir/$i.cfg
done

####################
date
echo "*** Copy local bak vmdisks to remote machines"

copy_remote () {
for i in $xen_name_list
do
  date
  echo "Copy to remote: vm$i"
        echo  scp $local_bak_dir/vmdisk0-$i.tar.gz $bak_dir/vmdisk0-$i.tar.gz
done

#####################
date
echo "Backup finishes"
        echo scp $log_file $bak_dir/bak-111.log

}

date
echo "Backup finished"


Things to configure before start using using the script to prepare backups for you is the xen_name_list variable

#  directory skele where to store already prepared backups
bak_dir=/backups/disk1/xen-backups/xen_images/$(date +%Y_%m_%d)/xen/domains

# The configurations of the running Xen Virtual Machines
xen_vmconfig_dir=/etc/xen/
# a local directory that will be used for backup creation ( I prefer this directory to be on the backup storage location )
local_bak_dir=/backups/disk1/tmp
#bak_dir=xenbak@backup_host1:/lhome/xenbak
# the structure on the backup location where daily .img backups with be produced with rsync and tar archived with bzip2
bak_dir=/backups/disk1/xen-backups/xen_images/$(date +%Y_%m_%d)/xen/domains

# list here all the Virtual Machines you want the script to create backups of
xen_name_list="windows7 haproxy2 jitsi-meet zabbix centos7"

If you need the script to copy the backup of Virtual Machine images to external Backup server via Local Lan or to a remote Internet located encrypted connection with a passwordless ssh authentication (once you have prepared the Machines to automatically login without pass over ssh with specific user), you can uncomment the script commented section to adapt it to copy to remote host.

Once you have placed at place /usr/sbin/xen_vm_backups.sh use a cronjob to prepare backups on a regular basis, for example I use the following cron to produce a working copy of the Virtual Machine backups everyday.
 

# crontab -u root -l 

# create windows7 haproxy2 jitsi-meet centos7 zabbix VMs backup once a month
00 06 1,2,3,4,5,6,7,8,9,10,11,12 * * /usr/sbin/xen_vm_backups.sh 2>&1 >/dev/null


I do clean up virtual machines Images that are older than 95 days with another cron job

# crontab -u root -l

# Delete xen image files older than 95 days to clear up space from backup HDD
45 06 17 * * find /backups/disk1/xen-backups/xen_images* -type f -mtime +95 -exec rm {} \; 2>&1 >/dev/null

#### Delete xen config backups older than 1 year+3 days (368 days)
45 06 17 * * find /backups/disk1/xen-backups/xen_config* -type f -mtime +368 -exec rm {} \; 2>&1 >/dev/null
How to calculate connections from IP address with shell script and log to Zabbix graphic

Thursday, March 11th, 2021

We had to test the number of connections incoming IP sorted by its TCP / IP connection state.

For example:

TIME_WAIT, ESTABLISHED, LISTEN etc.


The reason behind is sometimes the IP address '192.168.0.1' does create more than 200 connections, a Cisco firewall gets triggered and the connection for that IP is filtered out. To be able to know in advance that this problem is upcoming. a Small userparameter script is set on the Linux servers, that does print out all connections from IP by its STATES sorted out.


The script is calc_total_ip_match_zabbix.sh is below:

#!/bin/bash
#  check ESTIMATED / FIN_WAIT etc. netstat output for IPs and calculate total
# UserParameter=count.connections,(/usr/local/bin/calc_total_ip_match_zabbix.sh)
CHECK_IP='192.168.0.1';
f=0; 


for i in $(netstat -nat | grep "$CHECK_IP" | awk '{print $6}' | sort | uniq -c | sort -n); do

echo -n "$i ";
f=$((f+i));
done;
echo
echo "Total: $f"


root@pcfreak:/bashscripts# ./calc_total_ip_match_zabbix.sh 
1 TIME_WAIT 2 ESTABLISHED 3 LISTEN 

Total: 6


root@pcfreak:/bashscripts# ./calc_total_ip_match_zabbix.sh 
2 ESTABLISHED 3 LISTEN 
Total: 5


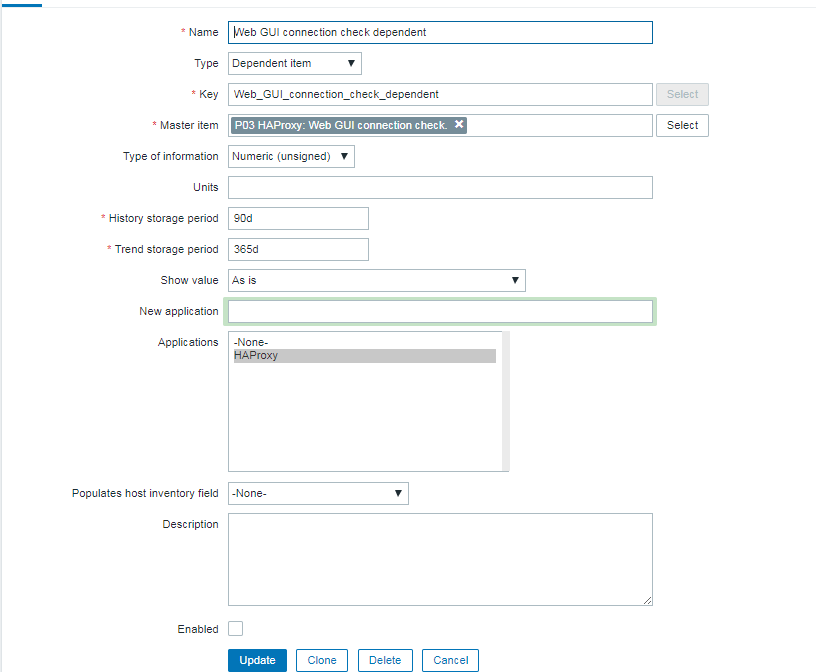
To make process with Zabbix it is necessery to have an Item created and a Depedent Item.

images/zabbix-webgui-connection-check1


webguiconnection-check1

webguiconnection-check1
 

webgui-connection-check2-item

images/webguiconnection-check1

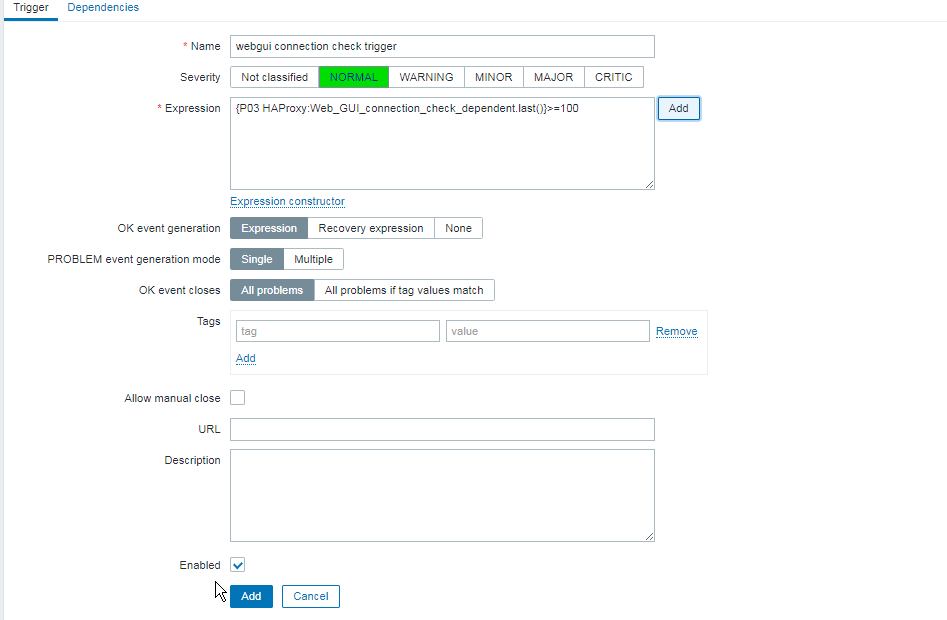
Finally create a trigger to trigger alarm if you have more than or eqaul to 100 Total overall connections.


images/zabbix-webgui-connection-check-trigger

The Zabbix userparameter script should be as this:
cat /etc/zabbix/zabbix_agentd.d/userparameter_webgui_conn.conf
UserParameter=count.connections,(/usr/local/bin/webgui_conn_track.sh)
 

Some collleagues suggested more efficient shell script solution for suming the overall number of connections, below is less time consuming version of script, that can be used for the calculation.
 

#!/bin/bash -x
# show FIN_WAIT2 / ESTIMATED etc. and calcuate total
count=$(netstat -n | grep "192.168.0.1" | awk ' { print $6 } ' | sort -n | uniq -c | sort -nr)
total=$((${count// /+}))
echo "$count"
echo "Total:" "$total"


      2 ESTABLISHED
      1 TIME_WAIT
Total: 3


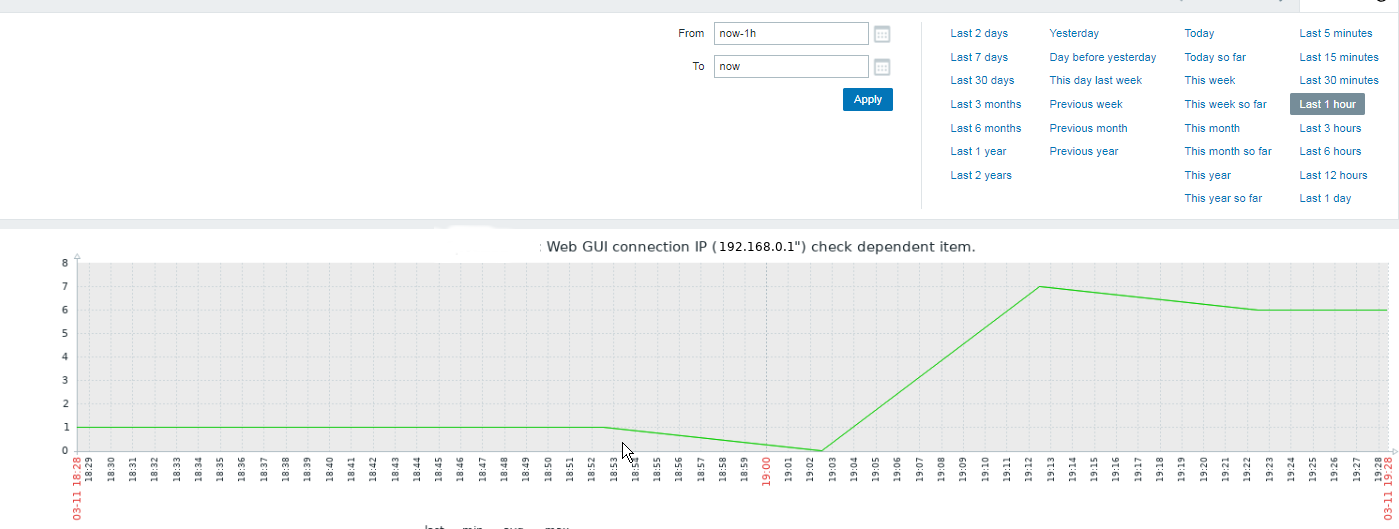
Below is the graph built with Zabbix showing all the fluctuations from connections from monitored IP.
ebgui-check_ip_graph

Fix KDE Plasma fails to load: “All shell packages missing. This is an installation issue, please contact your distribution” in Kubuntu Linux

Friday, September 27th, 2019

Kubuntu_Linux-logo_and_wordmark-fix-plasma-graphical-environment

I've been called yesterday by a friend who has referred me to a friend of him Zvezdomir from Gabrovo who had installation of Kubuntu Desktop Linux by some other colleague but then suddenly the colleague decided to leave the country thus the Kubuntu become completely unmanaged.
In the spirit of Murphy's laws soon after it broke and as the HDD was filled with a lot of important pictures data I received the call with a beseech to help him fix his existing broken Kubuntu installation on the relatively old IBM thinkpad notebook. 
No problem,  I switched the role of a Linux Desktop user tech support  as it is part of daily job of every system admini to be on the hotline for computer medication and never say no to incoming requests 🙂

It seems the guy had messed up his Graphical Environment when as a Linux novice user decided to experiment with changing environments, he used to be using GNOME and then due to some issues with some of the Image Viewer eog – Eye of Gnome / Shotwell / Gpaint whose borders was not showing properly or something he decided to Switch to KDE Plasma. This was successful but as he continued to try out things on the Linux he broke it up badly so after the machine booted he was getting the error after boot of Xorg  Plasma was producing below error.

All-shell-packages-missing-This-is-an-installation-issue-please-contact-your-distribution

"All shell packages missing. This is an installation issue, please contact your distribution"


After spending about 30 minutes on the phone explaining him how to switch to Console as he had even no basic concepts about how to manage his Linux box, the problem was solved below are few steps taken to fix All shell packages missing issue

1. Press Ctrl + Alt + F2 Simultaneously

Usually historically switching to console on GNU / Linux was possible with CTRL + ALT + F1 but this was changed as often newer Linux distros do use TTY1 console to launch the X GUI environment.
Here we had some struggles to explain him where F1 as he thought he is supposed to press CTRL + ALT + S + 2 (perhaps misheard on the phone …) and was panicing how he is supposed to press 4 buttons simultaneously after a while it was cleared it is CTRL + ALT + F2 …
PS. In some of the other Ubuntus Lubuntu or older Ubuntus if CTRL + ALT + F2 doesn't work,

some of the other Virtual Text Consoles should be accessible with CTRL + ALT + F3CTRL + ALT + F4 etc.

2.  Login with your user login name

Once the login: field appears I had to explain him about 10 times how he should type his non-privileged user as it is always the case with computer novice. I had to stress here he should press Enter after the username / login is typed …

3. Become root (superuser) after standard login with:


sudo su


3. If the machine is not connected to internet (this might be the case if errors are produced on below 4. 5. steps)

Assuming you're already superuser (root) and you have no internet because the Network Manager is unable to connect due to failure of KDE Plasma to start, in order to connect to lets say already configured WI-Fi home wireless router,
restart networking with


service NetworkManager restart


Since internet connectivity will be required in order to be able to install the missing packages and update the package repositories, next test whether internet is reachable.


ping google.com
PING google.com (172.217.169.110) 56(84) bytes of data.
64 bytes from sof02s31-in-f14.1e100.net (172.217.169.110): icmp_seq=1 ttl=56 time=15.2 ms
64 bytes from sof02s31-in-f14.1e100.net (172.217.169.110): icmp_seq=2 ttl=56 time=11.5 ms
64 bytes from sof02s31-in-f14.1e100.net (172.217.169.110): icmp_seq=3 ttl=56 time=6.00 ms
^C
— google.com ping statistics —
3 packets transmitted, 3 received, 0% packet loss, time 5ms
rtt min/avg/max/mdev = 6.003/10.892/15.220/3.783 ms

N.B.! We had stumble blocks here too, as the Wi-Fi router seemed to be far away from the room where the PC was, after he moved to the other room where Signal was fine and re-issuing the service NetworkManager restart ping worked.

4. Next to get the latest list with available installable packages on the Ubuntu run the usual


apt-get update


5. Do install / reinstall kubuntu-desktop meta package


Finally to Fix the broken desktop GUI (that is not appearing instead of the Plasma login


apt-get install –yes kubuntu-desktop


Finally reboot the Laptop with reboot cmd:

reboot

On next boot Kubuntu's usual login screen should be as it used to be until you have broken your package system with tampering with the packages.

And Hooray ! It works again 🙂

By the way as I googled a bit to investigate futher, the problem seems to be common and the solution with a lot of fuzzling is given also pointed as an bug in Ubuntu's launchpad here


How to disown a process once it is running on Linux – old but useful trick

Thursday, December 20th, 2018

how-to-disown-a-shell-running-process-on-linux-trick

There is one very old but  gold useful UNIX / Linux trick, I remembered which will be interesting to share it's called  it is called disowning.


Lets say you run execution of a job an rsync job or a simple copy job of a very large file, but in the middle of the copy you remembered you need to do something else and thus want to switch back to shell (without opening a new ssh if on remote server) or a new console if on a local machine.
Then how can you background the copy process and move the process to the rest of long running process system list e.g. "disown" it from yourself so the process continues its job in the background just like of the rest of the backgrounded running processes on the system.

Here is the basic syntax of the disown command:
 

help disown
disown: disown [-h] [-ar] [jobspec …]
    By default, removes each JOBSPEC argument from the table of active jobs.
    If the -h option is given, the job is not removed from the table, but is
    marked so that SIGHUP is not sent to the job if the shell receives a
    SIGHUP.  The -a option, when JOBSPEC is not supplied, means to remove all
    jobs from the job table; the -r option means to remove only running jobs.


Here is a live example of what I meant by above lines and actual situation where disown comes super useful.

The 'disown' command/builtin (this is in bash), which will disassociate the process from the shell and not send the HUP signal to the process on exit.

root@linux:~# cp -rpf SomeReallyLargeFile1 SomeReallylargeFile2

[1]+  Stopped                 cp -i -r SomeReallyLargeFile SomeReallylargeFile2
root@linux:~#  bg %1
[1]+ cp -i -r SomeReallyLargeFile SomeReallylargeFile2 &
root@linux:~#  jobs
[1]+  Running                 cp -i -r testLargeFile largeFile2 &
root@linux:~# disown -h %1
root@linux:~# ps -ef |grep largeFile2
root      5790  5577  1 10:04 pts/3    00:00:00 cp -i -rpf SomeReallyLargeFile SomeReallylargeFile2
root      5824  5577  0 10:05 pts/3    00:00:00 grep largeFile2
root@linux:~#


Of course you can always use something like GNU screen (VT100/ ANSI Terminal screen manager) or tmux (terminal multiplexer) to detach the process but you will have to have run the screen  / tmux session in advance which you might haven't  yet as well as it is  required one of the 2 to be present on a servers and on many servers in complex client environments this might be missing and hard to install (such as server is behind a firewall DMZ-ed (Demilitirezed Zoned) network and no way to install extra packages), the disown command makes sense.

Another useful old tip, that new Linux users might not konw is the nohup command (which runs a command immune to hangups with output to a non-tty), nohup's main use is if you want to run process in background with (ampersand) from bash / zsh / tcsh etc. and keep the backgrounded process running even once you've exited the active shell, to do so run the proc background as follows:
 

$ nohup command-to-exec &


Hope this helps someone, Enjoy!


How to configure VIVACOM 3g USB ( internet ) modem HUAWEI Mobile broadband E173 on Debian and Ubuntu GNU / Linux

Wednesday, July 4th, 2012

sakis3g-configure-usb-modem-kdialog-shot

I've been given a HUAWEI Mobile Broadband E173 USB 3g model. The USB modem contains a flash USB Storage segment storing a little install program dedicated to make the modem work fine on Microsoft Windows XP / Vista / 7 and probably other M$ OSes. I'm a long time DebianGNU / Linux user and as a free software enthusiast I ofcourse wanted to be able to use Vivacom's 3G USB Modem on my Linux powered notebook.

Thanksfully as I've red on Vivacom's website the modem supports Linux OS 🙂

For those unaware in Bulgaria there are currently 3 major GSM network providers providing 3G internet this are;;;
 

  • VIVACOM – The ex Government ran national company BTC (Bulgarian Telecommunication Company)
  • M-Tel – The first GSM network provider that entered Bulgaria around year 1995
  • GLOBUL – The 3rd and last GSM mobile and net provider entered last and not so much used by Bulgarians today

Until today I had no experience in running any 3G modems on Linux, neither I had used the 3 networks 3G internet to determine which one is best, however I've been given for temporal use a VIVACOM 3G internet modem today so I proceeded to try installing it on my Debian host.

My Linux system is a bit strangely configured as I use wicd network connection manager -( wicd-gtk ) to manage wireless and LAN connections instead of the standard installed GNOME network manager – available through package ( network-manager-gnome ).

The reason I use wicd is not that it is so much better than GNOME network manger but rather for historical reasons because few years past I had impression it works better in connecting me to wireless networks. Another reason why I choosed wicd back then was the nice looking stats …

I tried plugging in the Vivacom USB 3G modem stick and checked in wicd to see if I can see a possibility to connect to the mobile opeartor 3G network but unfortunately nothing appeared.

Though the 3G adsl modem was unavailable straing in wicd, checking about it in the list of attached USB devices I could see it detected, e.g.:

noah:~# lsusb |grep -i huawei
Bus 001 Device 007: ID 12d1:1c05 Huawei Technologies Co., Ltd.

This was at least a good sign pointing me to the thoughts that the modem is probably gonna work.

I did a quick Google search to see if other people succeded running the device on a Linux host and came across a few blog posts in Bulgarian explaining a "success story" on Ubuntu Linux through using a tweakened shell script – sakis3g. For more on how the script works and script download check out Sakis3g

Here is a quote from sakis3g's website describing the script:
 

It automagically setups your USB or Bluetooth™ modem, and may even detect operator settings.
You should try it when anything else fails!

Sakis3g has different versions designed for for plenty of spacific hware architectures i.e. for (i386, amd64, armv4t, armv5t).
There is also a version of the script which by the way contains a combination of bash shell scripting instruction and some binary exec data.

To run sakis3g on my laptop I did:

1. Download sakis3g

My notebook architecture is 64 bit so I download and used the amd64 version of the script;;;

hipo@noah:~$ mkdir sakis3g
hipo@noah:~$ cd sakis3g
hipo@noah:~/sakis3g$ wget http://www.sakis3g.org/versions/latest/amd64/sakis3g.gz

I've made also a mirror of sakis3g i386, 64 bit and all architecture the mirrors just in case it disappears in future. The mirror versions of sakis3g are here:

a. sakis3g i386 b. sakis3g amd64 c. sakis3g all architectures source

2. Unarchive and make it executable

After downloading it as it is in gzip I had to do the usual de-gzipping and making the file executable;;;

hipo@noah:~/sakis3g$ /bin/gzip -d sakis3g.gz
hipo@noah:~/sakis3g$ chmod +x sakis3g

The script is then ready to run by either clicking twice on it or (as I prefer for debugging reasons to run it in terminal):

hipo@noah:~$ ./sakis3g

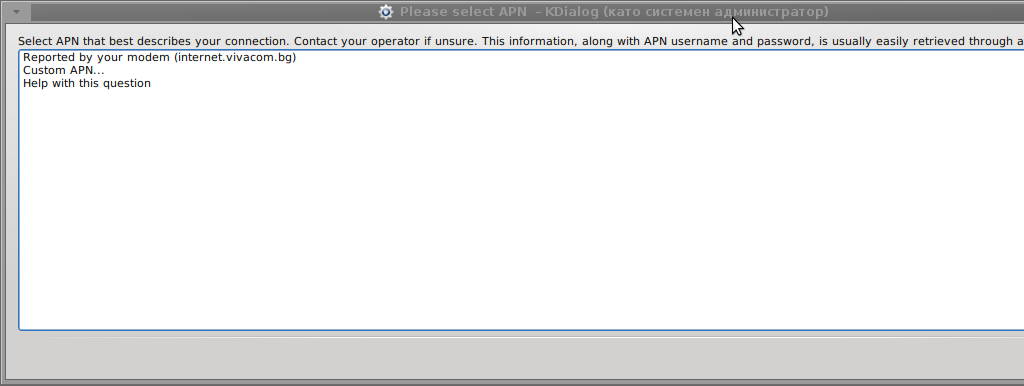
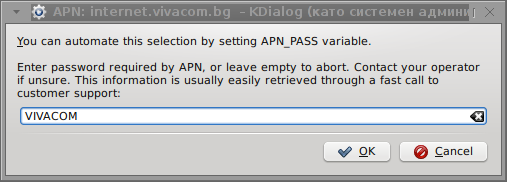
Something that I have wondered a bit was the dialog where I had to fill in some data of some variable APN abbreviation for – (Access Point Name)

The APN host for VIVACOM mobile internet is;;;
APN: internet.vivacom.bg

I've used the Windows configuration progrma to gather also the following data that I thought might be important for configuring the 3G adsl modem on the Linux host;;;

Auth: *99#
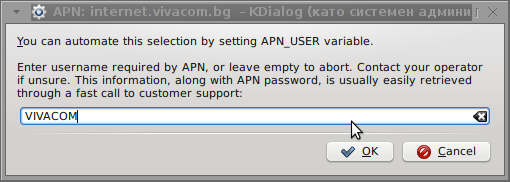
User: VIVACOM
pass: VIVACOM

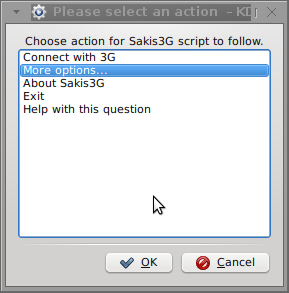
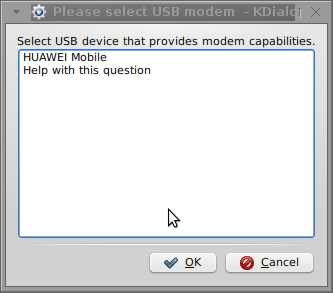
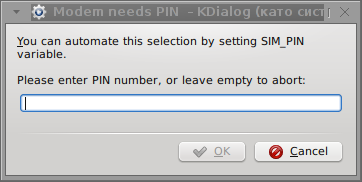
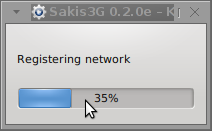
Here are all the configuration screenshots I've taken from sakis3g and all the data that I filled in.
Next the following tiny window appeared on screen:

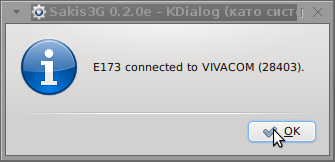
Sakis3g configure usb modem kdialog shot 1 VIVACOM USB Modem Sakis 3g Shot 2 sakis 3g usb modem vivacom connect screenshot 2 vivacom 3g modem linux sakis3g enter pin dialog shot 4 Sending pin screenshot 5 sakis3g APN Dialog sakis3g screenshot 6sakis3g Internet Linux VIVACOM screenshot 7sakis3g Debian GNU Linux VIVACOM 3g Internet screenshot 8sakis3g initializing modem screenshot 9sakis3g successful connect to VIVACOM mobile 3g usb adls modem shot 10

Well that's all folks, now sakis3g succesfully connected to the I_net via an (PPP) VPN connection tunnel here is data from ifconfig command showing the succesful 3G connection to VIVACOM;;;

noah:~# /sbin/ifconfig ppp0
ppp0 Link encap:Point-to-Point Protocol
inet addr:10.58.146.232 P-t-P:10.64.64.64 Mask:255.255.255.255
UP POINTOPOINT RUNNING NOARP MULTICAST MTU:1500 Metric:1
RX packets:2066 errors:1 dropped:0 overruns:0 frame:0
TX packets:1609 errors:0 dropped:0 overruns:0 carrier:0
collisions:0 txqueuelen:3
RX bytes:2232058 (2.1 MiB) TX bytes:341693 (333.6 KiB)

The internet via the 3G connection is not blazing fast but good enough to check your mail or read some webpages. VIVACOM currently has different (traffic limited packages) for their 3G internet, I'm not sure which package exactly is the 3G USB stick modem but probably the "quick" internet connection that is now would slow down once the traffic limit is reached …
Hope this post helps someone to configure 3G internet on VIVACOM in Debian and Ubuntu Linux. Though I've tested sakis3g on Debian it should work with no hassles on any other GNU Linux distribution that has bash installed.

How to disable tidy HTML corrector and validator to output error and warning messages

Sunday, March 18th, 2012

I've noticed in /var/log/apache2/error.log on one of the Debian servers I manage a lot of warnings and errors produced by tidy HTML syntax checker and reformatter program.

There were actually quite plenty frequently appearing messages in the the log like:

...
To learn more about HTML Tidy see http://tidy.sourceforge.net
Please fill bug reports and queries using the "tracker" on the Tidy web site.
Additionally, questions can be sent to html-tidy@w3.org
HTML and CSS specifications are available from http://www.w3.org/
Lobby your company to join W3C, see http://www.w3.org/Consortium
line 1 column 1 - Warning: missing <!DOCTYPE> declaration
line 1 column 1 - Warning: plain text isn't allowed in <head> elements
line 1 column 1 - Info: <head> previously mentioned
line 1 column 1 - Warning: inserting implicit <body>
line 1 column 1 - Warning: inserting missing 'title' element
Info: Document content looks like HTML 3.2
4 warnings, 0 errors were found!
...

I did a quick investigation on where from this messages are logged in error.log, and discovered few .php scripts in one of the websites containing the tidy string.
I used Linux find + grep cmds find in all php files the "tidy "string, like so:

server:~# find . -iname '*.php'-exec grep -rli 'tidy' '{}' ;
find . -iname '*.php' -exec grep -rli 'tidy' '{}' ; ./new_design/modules/index.mod.php
./modules/index.mod.php
./modules/index_1.mod.php
./modules/index1.mod.php

Opening the files, with vim to check about how tidy is invoked, revealed tidy calls like:

exec('/usr/bin/tidy -e -ashtml -utf8 '.$tmp_name,$rett);

As you see the PHP programmers who wrote this website, made a bigtidy mess. Instead of using php5's tidy module, they hard coded tidy external command to be invoked via php's exec(); external tidy command invocation.
This is extremely bad practice, since it spawns the command via a pseudo limited apache shell.
I've notified about the issue, but I don't know when, the external tidy calls will be rewritten.

Until the external tidy invocations are rewritten to use the php tidy module, I decided to at least remove the tidy warnings and errors output.

To remove the warning and error messages I've changed:

exec('/usr/bin/tidy -e -ashtml -utf8 '.$tmp_name,$rett);

exec('/usr/bin/tidy --show-warnings no --show-errors no -q -e -ashtml -utf8 '.$tmp_name,$rett);

The extra switches meaning is like so:

q – instructs tidy to produce quiet output
-e – show only errors and warnings
–show warnings no && –show errors no, completely disable warnings and error output

Onwards tidy no longer logs junk messages in error.log Not logging all this useless warnings and errors has positive effect on overall server performance especially, when the scripts, running /usr/bin/tidy are called as frequently as 1000 times per sec. or more