Posts Tagged ‘processing’

Monitor cluster heartbeat lines IP reahability via ping ICMP protocol with Zabbix

Wednesday, April 12th, 2023

https://pc-freak.net/images/zabbix-monitoring-icmp-ping-on-application-crm-clusters-with-userparameter-script-howto

Say you're having an haproxy load balancer cluster with two or more nodes and you are running the servers inside some complex organizational hybrid complex network that is a combination of a local DMZ lans, many switches, dedicated connectivity lines and every now and then it happens for the network to mysteriously go down. Usually simply setting monitoring on the network devices CISCO itself or the smart switches used is enough to give you an overview on what's going on but if haproxy is in the middle of the end application servers and in front of other Load balancers and network equipment sometimes it might happen that due to failure of a network equipment / routing issues or other strange unexpected reasons one of the 2 nodes connectivity might fail down via the configured dedicated additional Heartbeat lines that are usually configured in order to keep away the haproxy CRM Resource Manager cluster thus ending it up in a split brain scenarios.

Assuming that this is the case like it is with us you would definitely want to keep an eye on the connectivity of Connect Line1 and Connect Line2 inside some monitoring software like zabbix. As our company main monitoring software used to monitor our infrastructure is Zabbix in this little article, I'll briefly explain how to configre the network connectivity status change from haproxy node1 and haproxy node2 Load balancer cluster to be monitored via a simple ICMP ping echo checks.

Of course the easies way to configure an ICMP monitor via Zabbix is using EnableRemoteCommands=1 inside /etc/zabbix/zabbix-agentd.conf but if your infrastructure should be of High Security and PCI perhaps this options is prohibited to be used on the servers. This is why to achieve still the ICMP ping checks with EnableRemoteCommands=0 a separate simple bash user parameter script could be used. Read further to find out one way ICMP monitoring with a useparameter script can be achieved with Zabbix.


1. Create the userparameter check for heartbeat lines

root@haproxy1 zabbix_agentd.d]# cat userparameter_check_heartbeat_lines.conf
UserParameter=heartbeat.check,\
/etc/zabbix/scripts/check_heartbeat_lines.sh

root@haproxy2 zabbix_agentd.d]# cat userparameter_check_heartbeat_lines.conf
UserParameter=heartbeat.check,\
/etc/zabbix/scripts/check_heartbeat_lines.sh

2. Create check_heartbeat_lines.sh script which will be actually checking connectivity with simple ping

root@haproxy1 zabbix_agentd.d]# cat /etc/zabbix/scripts/check_heartbeat_lines.sh
#!/bin/bash
hb1=haproxy2-lb1
hb2=haproxy2-lb2
if ping -c 1 $hb1  &> /dev/null
then
  echo "$hb1 1"
else
  echo "$hb1 0"
fi
if ping -c 1 $hb2  &> /dev/null
then
  echo "$hb2 1"
else
  echo "$hb2 0"
fi

[root@haproxy1 zabbix_agentd.d]#

root@haproxy2 zabbix_agentd.d]# cat /etc/zabbix/scripts/check_heartbeat_lines.sh
#!/bin/bash
hb1=haproxy1-hb1
hb2=haproxy1-hb2
if ping -c 1 $hb1  &> /dev/null
then
  echo "$hb1 1"
else
  echo "$hb1 0"
fi
if ping -c 1 $hb2  &> /dev/null
then
  echo "$hb2 1"
else
  echo "$hb2 0"
fi

[root@haproxy2 zabbix_agentd.d]#


3. Test script heartbeat lines first time

Each of the nodes from the cluster are properly pingable via ICMP protocol

The script has to be run on both haproxy1 and haproxy2 Cluster (load) balancer nodes

[root@haproxy-hb1 zabbix_agentd.d]# /etc/zabbix/scripts/check_heartbeat_lines.sh
haproxy2-hb1 1
haproxy2-hb2 1

[root@haproxy-hb2 zabbix_agentd.d]# /etc/zabbix/scripts/check_heartbeat_lines.sh
haproxy1-hb1 1
haproxy1-hb2 1


The status of 1 returned by the script should be considered remote defined haproxy node is reachable / 0 means ping command does not return any ICMP status pings back.

4. Restart the zabbix-agent on both cluster node machines that will be conducting the ICMP ping check

[root@haproxy zabbix_agentd.d]# systemctl restart zabbix-agentd
[root@haproxy zabbix_agentd.d]# systemctl status zabbix-agentd

[root@haproxy zabbix_agentd.d]# tail -n 100 /var/log/zabbix_agentd.log


5. Create Item to process the userparam script

Create Item as follows:

6. Create the Dependent Item required
 

zabbix-heartbeat-check-screenshots/heartbeat-line1-preprocessing

For processing you need to put the following simple regular expression

Name: Regular Expression
Parameters: hb1(\s+)(\d+)
Custom on fail: \2

zabbix-heartbeat-check-screenshots/heartbeat-line2-preprocessing1

zabbix-heartbeat-check-screenshots/heartbeat-lines-triggers


7. Create triggers that will be generating the Alert

Create the required triggers as well

zabbix-heartbeat-check-screenshots/heartbeat2-line
Main thing to configure here in Zabbix is below expression

Expression: {FQDN:heartbeat2.last()}<1

triggers_heartbeat1

You can further configure Zabbix Alerts to mail yourself or send via Slack / MatterMost or Teams alarms in case of problems.

How to build Linux logging bash shell script write_log, logging with Named Pipe buffer, Simple Linux common log files logging with logger command

Monday, August 26th, 2019

how-to-build-bash-script-for-logging-buffer-named-pipes-basic-common-files-logging-with-logger-command

Logging into file in GNU / Linux and FreeBSD is as simple as simply redirecting the output, e.g.:
 

echo "$(date) Whatever" >> /home/hipo/log/output_file_log.txt


or with pyping to tee command


echo "$(date) Service has Crashed" | tee -a /home/hipo/log/output_file_log.txt


But what if you need to create a full featured logging bash robust shell script function that will run as a daemon continusly as a background process and will output
all content from itself to an external log file?
In below article, I've given example logging script in bash, as well as small example on how a specially crafted Named Pipe buffer can be used that will later store to a file of choice.
Finally I found it interesting to mention few words about logger command which can be used to log anything to many of the common / general Linux log files stored under /var/log/ – i.e. /var/log/syslog /var/log/user /var/log/daemon /var/log/mail etc.
 

1. Bash script function for logging write_log();


Perhaps the simplest method is just to use a small function routine in your shell script like this:
 

write_log()
LOG_FILE='/root/log.txt';
{
  while read text
  do
      LOGTIME=`date "+%Y-%m-%d %H:%M:%S"`
      # If log file is not defined, just echo the output
      if [ “$LOG_FILE” == “” ]; then
    echo $LOGTIME": $text";
      else
        LOG=$LOG_FILE.`date +%Y%m%d`
    touch $LOG
        if [ ! -f $LOG ]; then echo "ERROR!! Cannot create log file $LOG. Exiting."; exit 1; fi
    echo $LOGTIME": $text" | tee -a $LOG;
      fi
  done
}


  •  Using the script from within itself or from external to write out to defined log file


echo "Skipping to next copy" | write_log


2. Use Unix named pipes to pass data – Small intro on what is Unix Named Pipe.


Named Pipe –  a named pipe (also known as a FIFO (First In First Out) for its behavior) is an extension to the traditional pipe concept on Unix and Unix-like systems, and is one of the methods of inter-process communication (IPC). The concept is also found in OS/2 and Microsoft Windows, although the semantics differ substantially. A traditional pipe is "unnamed" and lasts only as long as the process. A named pipe, however, can last as long as the system is up, beyond the life of the process. It can be deleted if no longer used.
Usually a named pipe appears as a file, and generally processes attach to it for IPC.


Once named pipes were shortly explained for those who hear it for a first time, its time to say named pipe in unix / linux is created with mkfifo command, syntax is straight foward:
 

mkfifo /tmp/name-of-named-pipe


Some older Linux-es with older bash and older bash shell scripts were using mknod.
So idea behind logging script is to use a simple named pipe read input and use date command to log the exact time the command was executed, here is the script.


#!/bin/bash
named_pipe='/tmp/output-named-pipe';
output_named_log='
/tmp/output-named-log.txt ';

if [ -p $named_pipe ]; then
rm -f $named_pipe
fi
mkfifo $named_pipe

while true; do
read LINE <$named_pipe
echo $(date): "$LINE" >>/tmp/output-named-log.txt
done


To write out any other script output and get logged now, any of your output with a nice current date command generated output write out any output content to the loggin buffer like so:


echo 'Using Named pipes is so cool' > /tmp/output-named-pipe
echo 'Disk is full on a trigger' > /tmp/output-named-pipe

  • Getting the output with the date timestamp

# cat /tmp/output-named-log.txt
Mon Aug 26 15:21:29 EEST 2019: Using Named pipes is so cool
Mon Aug 26 15:21:54 EEST 2019: Disk is full on a trigger


If you wonder why it is better to use Named pipes for logging, they perform better (are generally quicker) than Unix sockets.


3. Logging files to system log files with logger


If you need to do a one time quick way to log any message of your choice with a standard Logging timestamp, take a look at logger (a part of bsdutils Linux package), and is a command which is used to enter messages into the system log, to use it simply invoke it with a message and it will log your specified output by default to /var/log/syslog common logfile


root@linux:/root# logger 'Here we go, logging'
root@linux:/root # tail -n 3 /var/log/syslog
Aug 26 15:41:01 localhost CRON[24490]: (root) CMD (chown qscand:qscand -R /var/run/clamav/ 2>&1 >/dev/null)
Aug 26 15:42:01 localhost CRON[24547]: (root) CMD (chown qscand:qscand -R /var/run/clamav/ 2>&1 >/dev/null)
Aug 26 15:42:20 localhost hipo: Here we go, logging


If you have took some time to read any of the init.d scripts on Debian / Fedora / RHEL / CentOS Linux etc. you will notice the logger logging facility is heavily used.

With logger you can print out message with different priorities (e.g. if you want to write an error message to mail.* logs), you can do so with:
 

 logger -i -p mail.err "Output of mail processing script"


To log a normal non-error (priority message) with logger to /var/log/mail.log system log.


 logger -i -p mail.notice "Output of mail processing script"


A whole list of supported facility named priority valid levels by logger (as taken of its current Linux manual) are as so:


FACILITIES AND LEVELS
       Valid facility names are:

              auth
              authpriv   for security information of a sensitive nature
              cron
              daemon
              ftp
              kern       cannot be generated from userspace process, automatically converted to user
              lpr
              mail
              news
              syslog
              user
              uucp
              local0
                to
              local7
              security   deprecated synonym for auth

       Valid level names are:

              emerg
              alert
              crit
              err
              warning
              notice
              info
              debug
              panic     deprecated synonym for emerg
              error     deprecated synonym for err
              warn      deprecated synonym for warning

       For the priority order and intended purposes of these facilities and levels, see syslog(3).


If you just want to log to Linux main log file (be it /var/log/syslog or /var/log/messages), depending on the Linux distribution, just type', even without any shell quoting:


logger 'The reason to reboot the server Currently was a System security Update


So what others is logger useful for?

 In addition to being a good diagnostic tool, you can use logger to test if all basic system logs with its respective priorities work as expected, this is especially
useful as I've seen on a Cloud Holsted OpenXEN based servers as a SAP consultant, that sometimes logging to basic log files stops to log for months or even years due to
syslog and syslog-ng problems hungs by other thirt party scripts and programs.
To test test all basic logging and priority on system logs as expected use the following logger-test-all-basic-log-logging-facilities.sh shell script.


#!/bin/bash
for i in {auth,auth-priv,cron,daemon,kern, \
lpr,mail,mark,news,syslog,user,uucp,local0 \
,local1,local2,local3,local4,local5,local6,local7}

do        
# (this is all one line!)


for k in {debug,info,notice,warning,err,crit,alert,emerg}
do

logger -p $i.$k "Test daemon message, facility $i priority $k"

done

done

Note that on different Linux distribution verions, the facility and priority names might differ so, if you get

logger: unknown facility name: {auth,auth-priv,cron,daemon,kern,lpr,mail,mark,news, \
syslog,user,uucp,local0,local1,local2,local3,local4, \
local5,local6,local7}

check and set the proper naming as described in logger man page.


4. Using a file descriptor that will output to a pre-set log file


Another way is to add the following code to the beginning of the script

#!/bin/bash
exec 3>&1 4>&2
trap 'exec 2>&4 1>&3' 0 1 2 3
exec 1>log.out 2>&1
# Everything below will go to the file 'log.out':

The code Explaned

  •     Saves file descriptors so they can be restored to whatever they were before redirection or used themselves to output to whatever they were before the following redirect.
    trap 'exec 2>&4 1>&3' 0 1 2 3
  •     Restore file descriptors for particular signals. Not generally necessary since they should be restored when the sub-shell exits.

          exec 1>log.out 2>&1

  •     Redirect stdout to file log.out then redirect stderr to stdout. Note that the order is important when you want them going to the same file. stdout must be redirected before stderr is redirected to stdout.

From then on, to see output on the console (maybe), you can simply redirect to &3. For example
,

echo "$(date) : Do print whatever you want logging to &3 file handler" >&3


I've initially found out about this very nice bash code from serverfault.com's post how can I fully log all bash script actions (but unfortunately on latest Debian 10 Buster Linux  that is prebundled with bash shell 5.0.3(1)-release the code doesn't behave exactly, well but still on older bash versions it works fine.

Sum it up


To shortlysummarize there is plenty of ways to do logging from a shell script logger command but using a function or a named pipe is the most classic. Sometimes if a script is supposed to write user or other script output to a a common file such as syslog, logger command can be used as it is present across most modern Linux distros.
If you have a better ways, please drop a common and I'll add it to this article.


How to stop REDSHIFT night light brightness and color saturation eye strain protection on GNU / Linux

Tuesday, August 7th, 2018

http://jonls.dk/assets/redshift-icon-256

You know on most operating systems such as Windows 8 / 10 ,  Mac OS X as well as  GNU / Linux / BSDs (FreeBSD) etc. with graphical environments such as  GNOME / KDE etc. , there is this default functionality nowadays that is helping to reduce eye strain and improve night sleep by modifying the light and brightness as well as coloring eminated by the monitor. 

On Windows this technology is called Night Light and is easily enabled by nagivating through menus:


Start  > Settings  > System > Display > Night light > Night light settings.


set-your-display-windows-night-time-windows-os-10

Windows 10 Night Time settings shot

On GNU / Linux and BSD-es the eye strain application that comes preinstalled by default on most distributions is redshift – for more what is redshift check out my previous article get more peaceful night sleep on Ubuntu, Mint and Xubuntu Linux.

There is also the alternative to use F.lux (which by the way is used to prevent eye strain on Mac OS X and was the program of choice to prevent eye strain in older Windows versions)

Even though Night Light / and redshift monitor color warmth change is often mostly useful and have a positive impact improving sleep as well removes eye strain on Linux my experience with it is not too positive as it changes the monitor color gamma and makes it often quite reddish and annoying even through a normal day and not only night time.
This makes the work experience on the computer not pleasurable thus just removing it for me and I guess for many would be a must.

Assuming that you have installed Free software OS such as Linux with redshift (note that on on older releases of Deb and RPM package based distributions: you will have to manually install it with something like:)

On Debian based distros with:
 

root@debian:~# apt-get install –yes redshift redshift-gtk


On RPM Fedora / Cent OS, Redhat Enterprise Linux etc. with a command like:


[root@fedora]# yum install –yes redshift redshift-gtk

redshift-on-KDE-settings-menu

Redshift settings on Linux with KDE GUI

So in order to remove redshift it completely from Linux which usually on most GNU / Linux distros is running as a default process

redshift-change-monitor-brightness-to-reduce-eye-strain-gnome


1. * Make sure you kill all processes called redshift and redshift-gtk


to do so check processes with same name and KILL 'EM ALL!:
 

root@linux:~# ps aux|grep -i redshift
hipo     44058  2.8  0.5 620980 42340 pts/2    Sl+  20:33   0:00 /usr/bin/python3 /usr/bin/redshift-gtk
hipo     44059  0.1  0.0 295712  6476 pts/2    Sl+  20:33   0:00 /usr/bin/redshift -v

root@linux:~# kill -9 44058 44059


2. * Set the color temperature of the Monitor / Screen back to 6500K (this can be done either by the button menu that most screens have)


or manually with redshift itself by executing command:


root@linux:~# redshift -O 6500


As the screen is back to normal color gamma, its now time to completely remove redshift in order to prevent it to mess up with your monitor colors, on next PC boot or on Gnome / Mate whatever UI used session logout.

To do so issue commands:


root@linux:~# dpkg –purge redshift redshift-gtk
(Reading database … 516053 files and directories currently installed.)
Removing redshift-gtk (1.11-1) …
Purging configuration files for redshift-gtk (1.11-1) …
Removing redshift (1.11-1) …
Processing triggers for man-db (2.8.3-2) …
Processing triggers for hicolor-icon-theme (0.17-2) …
Processing triggers for mime-support (3.61) …
Processing triggers for gnome-menus (3.13.3-11) …
Processing triggers for desktop-file-utils (0.23-3) …
Processing triggers for menu (2.1.47+b1) …

3. Enjoy normal colors on your monitor  Goodbye Forever REDSHIFT, goodbuy dark crappy Screen during the day. Hello normal Screen light !!! 🙂

Play Midis on Linux / Make Linux MIDI Ready for the Future – Enable embedded MIDI music to play in a Browser, Play MIDIs with VLC and howto enjoy Midis in Text Console

Wednesday, October 4th, 2017

how-to-play-midi-on-gnu-linux-in-graphic-environment-console-and-browser-midi-synthesizer-and-linux-tux-together


Play Midis on Linux or Make Linux MIDI Ready for the Future – Enable embedded MIDI music to play in a Browser, Play MIDIs with VLC and howto enjoy Midis in Text Console HOWTO


Playing MIDI has been quite a lot of fun historically,

if you grow up in the days when personal computers were still young and the Sound Blaster was a luxury, before the raise of Mp3 music format, you have certainly enjoyed the beeping of PC Speaker and later on during 386 and 486 / 586 computers the enjoyment of playing tracked music such as S3M and MOD,

in that good days playing MIDI music was the only alternative for PC maniacs who doesn't own a CD Drive (which itself) was another luxury and even thouse who had a CD ROM device, were mainly playing music in CD audio format (.CDA).
Anyhow MIDI was a cheap and a CPU unintensive way to listen to equivalent of favourite popular Audio Songs and for those who still remember many of the songs were recreated in MIDI format, just with a number of synthesized instruments without any voice (as MIDI is usually).

The same was true also for the good old days of raise of Mobile Phones, when polyphonic was a standard as CPU power was low MIDI was a perfect substitute for the CPU heavy Encoded MP3s / OGG and other formats that required a modern for that time Intel CPU running in 50+ Mhz usually 100 / 166Mhz was perfect for the days to play Mp3 but still even on that PCs we listened to Midi songs.

Therefore if you're one of those people like me who still enjoy to play some Midi Music in the year 2017 and feel a bit like Back into the Future movie and a Free Software fan and user, especially if you're a novice GNU  / Linux Free Software user, you will be unpleasently surprised that most today's default Linux distributions doesn't have an easy way to play Midi music format out of the box right after install.

Hence below article aims to give you an understanding on

How you can play Midi Music on GNU / Linux Operating System

First, lets Prepare to load necessery Linux kernel modules to make sure MIDI can be played by soundcard:

In /etc/modules make sure you have the following list of modules loaded:
 

linux-desktop:~# cat /etc/modules
3c59x
snd-emu10k1
snd-pcm-oss
snd-mixer-oss
snd-seq-oss

!Note the modules are working as of time of writting and in time can change to some other modules, depending on how the development of ALSA (Advanced Linux Sound Architecture) goes, and if the developers decide to rename the upmentioned modules

If you just have added the modules to /etc/modules with vim / nano to reload modules into the Linux kernel run:


linux-desktop:~# modprobe -a


Secondly, Installing a whole bunch of MIDI music related program tools can be achieved in Debian by installing the multimedia-midi package, e.g.:


linux-desktop:~# apt-get install –yes multimedia-midi


1. Playing Midi in Graphical environment with a double click using VLC


How to make MIDI easy listanable in Linux graphical environment like GNOME / KDE / XFCE desktop ?


If you want to make Midi music execution sa easy as  just clicking on the .MIDI file format on Linux you can do that with a midi extension available for VLC (Video Lan Client) Universal Multi Platform Media Player player

To install it on Debian Ubuntu GNU / Linux
 

# apt-get install –yes vlc-plugin-fluidsynth


Необходимо е да се изтеглят 6754 B архиви.
След тази операция ще бъде използвано 35,8 kB допълнително дисково пространство.
Изт:1 http://deb.debian.org/debian stretch/main amd64 vlc-plugin-fluidsynth amd64 2.2.6-1~deb9u1 [6754 B]
Изтеглени 6754 B за 0с (33,6 kB/сек)           
Selecting previously unselected package vlc-plugin-fluidsynth:amd64.
(Reading database … 382976 files and directories currently installed.)
Preparing to unpack …/vlc-plugin-fluidsynth_2.2.6-1~deb9u1_amd64.deb …
Unpacking vlc-plugin-fluidsynth:amd64 (2.2.6-1~deb9u1) …
Setting up vlc-plugin-fluidsynth:amd64 (2.2.6-1~deb9u1) …
Processing triggers for libvlc-bin:amd64 (2.2.6-1~deb9u1) …


Besides making your MIDI play on the GUI environment easy as a a point and click VLC will also be able to play MIDIs on GNU / Linux from your favourite browser (nomatter Firefox / Chrome or Opera), even though the player would play in a new PopUP Window it is easy to select once MIDI file from a random website for example – here is a directory listing of Webserver with Doom II Soundtrack in MIDI format , click over any file from list and Choose option for VLC to always remember that MIDI files has to be opened with VLC player.


2. Enable Firefox / IceWeasel browser to Support Website embedded MIDI files


So VLC could make you listen the downloadable MIDIs from Web pages but,
 

What if you have stumbled on an old website which was configured with very OLD HTML Code to play some nice music (or even different MIDI songs) for each part of the website (for each webpage) and you want to have the Websites created with embedded MIDIs to automatically play on Linux oncce you visit the site?


Sadly default support in Browser for MIDI across all GNU / Linux, I've used so far never worked out of the box, not that still anyone is developing modern websites with MIDIs, but still for the sake of backward compitability and for sake of interactivity it is worthy to enable embedded MIDI support in Linux

But with a couple of tunings as usual GNU / Linux can do almost everything, so here is how to enable embedded browser support for Midi on Linux (That should work with minor modifications not only on Debian / Ubuntu / ArchLinux but also on Fedoras, CentOS etc.
If you try it on any of this distributions, please drop a short comment and tell me in few lines how you made embedded midi worked on that distros.


apt-get install –yes timidity mozplugger

Next do restart firefox

Sometimes in order to work you might need to delete /home/[YOUR_USERNAME]/.mozilla/pluginreg.dat and restart firefox again, e.g. make a backup and give it a try:


cp -rpf /home/hipo/.mozilla/pluginreg.dat /home/hipo/.mozilla/pluginreg.dat.bak
rm -f /home/hipo/.mozilla/pluginreg.dat


Another good tip as talking for embedding MIDI support is to embed XPDF to render PDF pages inside the Browser, by default this is done by GNOME's Evince PDF reader but as it is sometimes buggy and might crash it is generally a good idea to switch to xpdf instead, if for some reason PDF is not directly displaying in browser or suddenly stopped working after some distro uipgrade, you might want to do below as well:
 

apt-get install xpdf

vim /etc/mozpluggerrc

Fin d and Comment out the line starting with:

It should look like this afterwards:

 Repeat Swallow ….
 

text/x-pdf: pdf: PDF file
#      repeat swallow(documentShell) fill: acroread -geometry +9000+9000 +useFrontEndProgram "$file"
        repeat noisy swallow(Xpdf) fill: xpdf -g +9000+9000 "$file"
        repeat noisy swallow(gv) fill: gv –safer –quiet –antialias -geometry +9000+9000 "$file"


3. Play Midi music in Linux text console / terminal


There is a console tool that historically has been like the Linux standard for playing midis over the years as I remember, its called timidity


To install timidity on .Deb based Linux:
 

linux-desktop:~$ su root
Password:
linux-desktop:~# apt-get install –yes timidity

Необходимо е да се изтеглят 0 B/580 kB архиви.
След тази операция ще бъде използвано 0 B допълнително дисково пространство.
(Reading database … 382981 files and directories currently installed.)
Preparing to unpack …/timidity_2.13.2-40.5_amd64.deb …
Unpacking timidity (2.13.2-40.5) over (2.13.2-40.5) …
Processing triggers for menu (2.1.47+b1) …
Processing triggers for man-db (2.7.6.1-2) …
Setting up timidity (2.13.2-40.5) …
Processing triggers for menu (2.1.47+b1) …


To test your new MIDI Synthesizer tool and make the enjoyment full you can download Doom 2 extracted MIDI Soundtrack from here
 

Once you have downloaded above Metal MIDI DOOM old school arcade soundtrack and untarred it into your home directory be it ~/doom-midis

A remark to make here is timidity is quite CPU intensive, but on modern Dual and Quad-Core PC Notebooks, the CPU load is not of a big concern.

To test and play with timidity:
 

linux-desktop~$ timidity ~/mp3/midis/*


timidity-playing-doom-midi-bunny-song-on-debian-stretch-gnome-terminal-screenshot
 

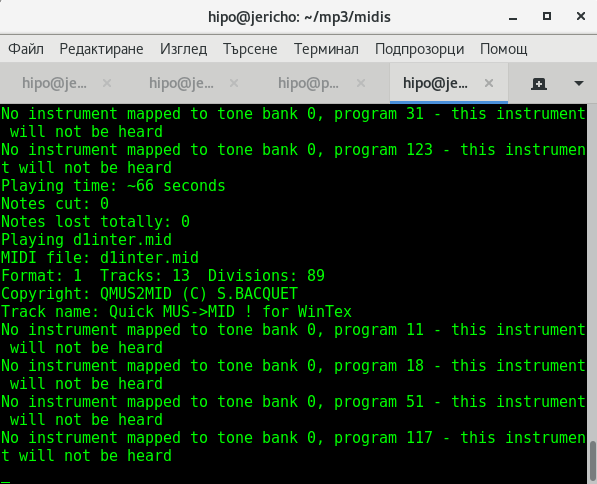
hipo@jericho:~/mp3/midis$ aplaymidi -l
 Port    Client name                      Port name
 14:0    Midi Through                     Midi Through Port-0
128:0    TiMidity                         TiMidity port 0
128:1    TiMidity                         TiMidity port 1
128:2    TiMidity                         TiMidity port 2
128:3    TiMidity                         TiMidity port 3


We have also the playmidi  (simple midi text console terminal player), which historically was working quite decent and I use it to in the past on my RedHat 6.0 and RedHat 7.0 to listen to my .MID format files but unfortunately as of time of writting something is wrong with it, so when I try to play MIDIs with it instead of timidity I get this erro:


$ playmidi *.mid
Playmidi 2.4 Copyright (C) 1994-1997 Nathan I. Laredo, AWE32 by Takashi Iwai
This is free software with ABSOLUTELY NO WARRANTY.
For details please see the file COPYING.
open /dev/sequencer: No such file or directory

Even though I tried hard to resolve that error by loading various midi related MIDI modules and following a lot of the suggestions online on how to  make /dev/sequencer work again it was all no luck.
 

Some people back in the distant year 2005, reported the problem was solved by simply loading snd-seq

But as of time of writting:


# modprobe snd-seq


Some people said in archlinux's Forum

/dev/sequencer sequencer: No such file or directory


is solved by loading snd-seq-oss kernel module, but on my Debian Linux 9.1 Stretch, this ain't work as well :


root@jericho:/home/hipo/mp3/midis# modprobe snd-seq-oss
modprobe: FATAL: Module snd-seq-oss not found in directory /lib/modules/4.9.0-3-amd64
root@jericho:/home/hipo/mp3/midis# uname -a;
Linux jericho 4.9.0-3-amd64 #1 SMP Debian 4.9.30-2+deb9u5 (2017-09-19) x86_64 GNU/Linux


Another invention of mine was to try to also link /dev/snd/seq to /dev/sequencer but this produced no positive result either:


# ln -sf /dev/snd/seq /dev/sequencer
# ls -al /dev/sequencer
lrwxrwxrwx 1 root root 12 окт  4 16:48 /dev/sequencer -> /dev/snd/seq


Note that after lining in that way I got following error with my attempt to play MIDIs with playmidi

# playmidi *.mid
Playmidi 2.4 Copyright (C) 1994-1997 Nathan I. Laredo, AWE32 by Takashi Iwai
This is free software with ABSOLUTELY NO WARRANTY.
For details please see the file COPYING.
there is no soundcard


Anyhow on some other Linux distributions (especially with Older Kernel versions), some of the above 3 suggested Fix might work perfectly fine so if you have some time give it a try please and drop me  a comment on how it went, you will help the GNU / Linux community out there that way.

Well never mind the bollocks, so

Now back to where I started timidity even though it will play fine it will not give any indication on the lenght of the midi song (precious information such as how much time is left until the end is over).

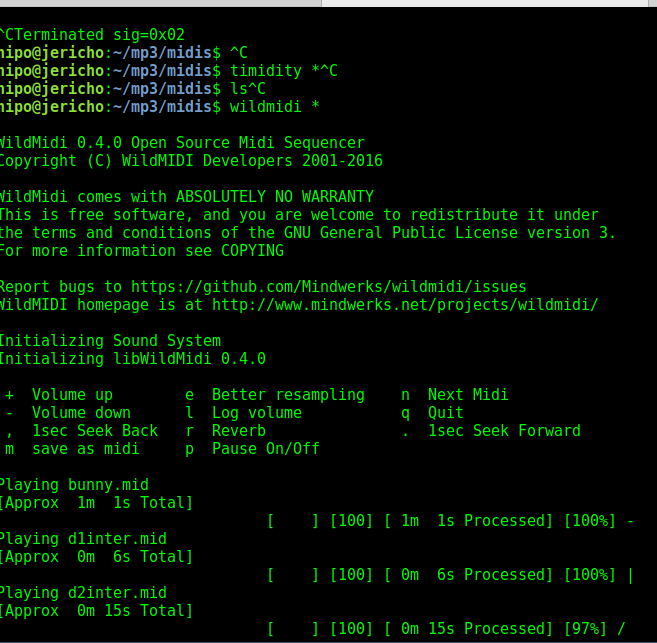
Hence if you prefer a player that gives you an indicator on how much is left towards the end length of each of the played MIDI file you can give a try to wildmidi:


linux-desktop:~$ apt-cache show wildmidi|grep -i description -A 2

Description-en: software MIDI player
 Minimal MIDI player implementation based on the wildmidi library that
 can either dump to WAV or playback over ALSA. It is intended to

Description-md5: b4b34070ae88e73e3289b751230cfc89
Homepage: http://www.mindwerks.net/projects/wildmidi/
Tag: implemented-in::c, role::program, sound::midi, sound::player,

Description: software MIDI player
Description-md5: 4673a7051f104675c73eb344bb045607
Homepage: http://wildmidi.sourceforge.net/
Bugs: https://bugs.launchpad.net/ubuntu/+filebug


If yet not installed install it after becoming admin user:


linux-desktop:~$ su root
Password:

linux-desktop:~# apt-get install –yes wildmidi


wildmidi is much less CPU intensive (it uses gstreamer to play (Gstreamer – open source multimedia framework)

And next give it a try by running:


linux-desktop:~$ wildmidi ~/mp3/midis/*


wildmidi-midi-lenght-status-text-console-player-for-linux-ubuntu-debian-fedora-suse


4. Editting MIDI files with Free Software and Proprietary MIDI Editor Programs


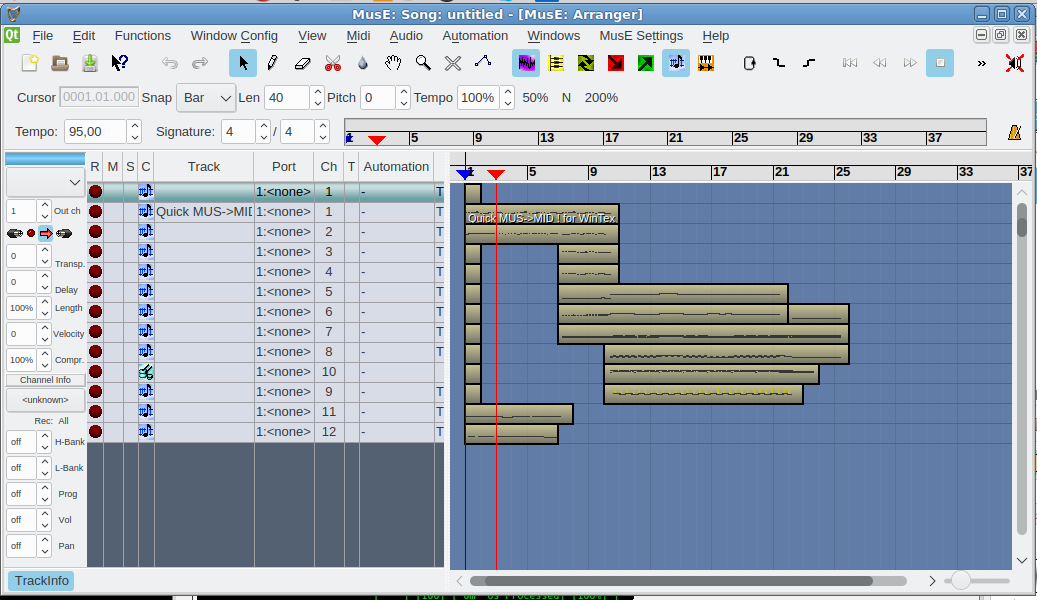
If you want a professional software that can play Midi in a fuzzy interactive GUI way and have some extra possibilities to edit MIDIs and other format give a try to Muse Sequencer:


linux-desktop:~$ sudo apt-get install –yes muse

The following NEW packages will be installed:
  muse
0 upgraded, 1 newly installed, 0 to remove and 38 not upgraded.
Need to get 5814 kB of archives.
After this operation, 21.0 MB of additional disk space will be used.
Get:1 http://deb.debian.org/debian stretch/main amd64 muse amd64 2.1.2-3+b1 [5814 kB]
Fetched 5814 kB in 2s (2205 kB/s)                             
    are supported and installed on your system.
Preconfiguring packages …
Selecting previously unselected package muse.
(Reading database … 382981 files and directories currently installed.)
Preparing to unpack …/muse_2.1.2-3+b1_amd64.deb …
Unpacking muse (2.1.2-3+b1) …
Processing triggers for mime-support (3.60) …
Processing triggers for desktop-file-utils (0.23-1) …
Processing triggers for doc-base (0.10.7) …
Processing 1 added doc-base file…
Registering documents with scrollkeeper…
Processing triggers for man-db (2.7.6.1-2) …
Processing triggers for shared-mime-info (1.8-1) …
Unknown media type in type 'all/all'
Unknown media type in type 'all/allfiles'
Processing triggers for gnome-menus (3.13.3-9) …
Setting up muse (2.1.2-3+b1) …
Processing triggers for hicolor-icon-theme (0.15-1) …


Below is short description what Muse can do for you:


MusE is a MIDI/audio sequencer with recording and editing capabilities.
 Some Highlights:
 

  * Standard midifile (smf) import-/export.
  * Organizes songs in tracks and parts which you can arrange with
    the part editor.
  * MIDI editors: pianoroll, drum, list, controller.
  * Score editor with high quality postscript printer output.
  * Realtime: editing while playing.
  * Unlimited number of open editors.
  * Unlimited undo/redo.
  * Realtime and step-recording.
  * Multiple MIDI devices.
  * Unlimited number of tracks.
  * Sync to external devices: MTC/MMC, Midi Clock, Master/Slave.
  * Audio tracks, LADSPA host for master effects.
  * Multithreaded.
  * Uses raw MIDI devices.
  * XML project file.
  * Project file contains complete app state (session data).
  * Application spanning Cut/Paste Drag/Drop.


linux-desktop~:$ muse

muse-advanced-midi-editor-free-software-for-linux


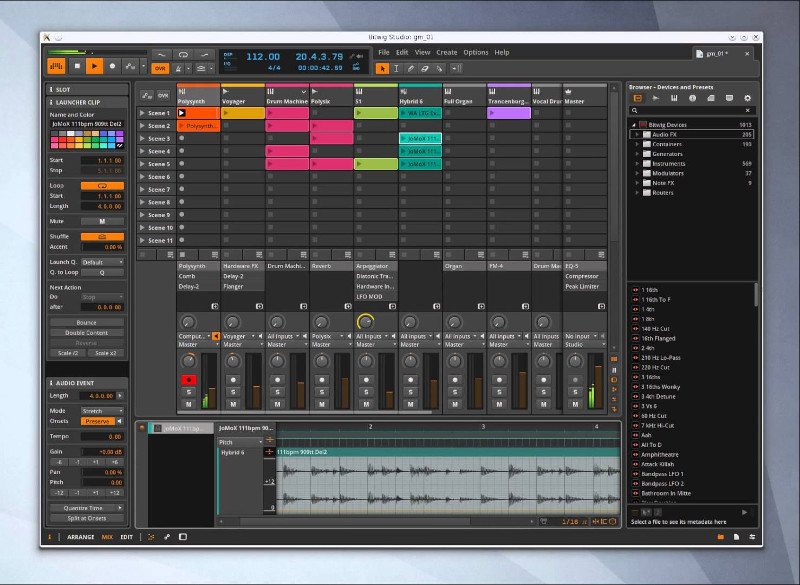
Below is another non-free program that you might, try if MusE doesn't fit your needs (is not rich enough for editting capabilities is bitwig (though I don't recommend since it is not free software)

bitwig – Bitwig Studio is a multi-platform music-creation system for production, performance and DJing, with a focus on flexible editing tools and a super-fast workflow.


bitwig-midi-and-audio-non-free-software-advanced-useful-sound-editor-for-linx


5. Some examples for Text editing and MIDI Conversion to CSV and ABC file formats There is pretty much more

For the MIDI Extremists who or people that create MIDIs and want to learn how a MIDI is made (the content of it etc.), I suggest you take a look at these 3 command line MIDI editing / conversion tools
 

  • midi2abc – A little tool to create MIDI formats to ABC format
  • midi2csv – Conver tour Favourite MIDI files to CSV for educational purposes so see what Channels, Tracks and Time Intervals is a MIDI song mad
  • midicopy – Copy selected, track, channel, time interval of MIDI file to another MIDI file3


Well, that's all folks now enjoy your MIDIs and don't forget to donate, as I'm jobless at the moment and the only profit I make is just a few bucks out of advertisement on this blog.
 

Fixing Qmail 451 qq temporary problem (#4.3.0) / @4000000050587780174c60dc status: qmail-todo stop processing asap / status: exiting

Wednesday, September 19th, 2012

I’m in process of installing plain new Qmail mail (SMTP) server following QmailRocks updated: Thibs QmailRocks install guide for Debian 6.0 Squeeze
The install went smoothly so far and I’m already doing this installation for about 5 hours or so. I’m done with the minor install and following Thibs instructions to Implement validrcptto feature to Qmail.

Anyone who works with Qmail, should already know the lack of validrcptto tons of SPAM problems and useless Qmail load, because of QMAIL attempts to delivery to the local mail server unexisting mail boxes ….


Fixing this whole mess is implemented with the validrcptto. I myself has installed numerous times validrcptto and almost ever I ended up in some kind of mess before fixing it once and for all, this time of course (quite traditionally) the “story” repeated to piss me off for a while 🙂

After following steps literally as described on Thibs great Qmail install tutorial!, I ended up with a Qmail mail server unable to deliver properly e-mails.

To debug why mails are not properly delivered by the mail server I used telnet:


root@qmail-host:/var/qmail/control# telnet localhost 25
Trying 127.0.0.1...
Connected to localhost.
Escape character is '^]'.
220 This is Mail Pc-Freak.NET ESMTP
HELO localhost
250 This is Mail Pc-Freak.NET
MAIL FROM:<hipo@www.pc-freak.net>
250 ok
RCPT TO:<hipo@www.pc-freak.net>
250 ok
DATA
354 go ahead
asdfdsfafsd
.
451 qq temporary problem (#4.3.0)

Some time, back while configuring another Qmail fresh install, I ended up with exactly same delivery error – I’ve take time to document how I fixed this weird qq temporary issue here

As I thought one error in “normal” Software can correspondent to one cause, I red my previous post and checked closely all that was in past wrong whether I encountered the err; guess what this time it wasn’t due to non-running (missing) clamav-daemon. Still though this was not the issue, it partially pointed me to the cause (problem with qmail-scanner.pl / spamd /pyzor / razor / dcc or whatever of this overall complexity ..).

First logical think was to check in logs. In /var/log/qmail/qmail-smtpd/current everything was looking good; my log looked like so:


root@qmail-host:/# tail -n 10 /var/log/qmail/qmail-smtpd/current
@40000000505877b91ab3aba4 tcpserver: end 23727 status 0
@40000000505877b91ab3af8c tcpserver: status: 0/30
@40000000505877f6273acefc tcpserver: status: 1/30
@40000000505877f6273ba9bc tcpserver: pid 23882 from 127.0.0.1
@40000000505877f6273f8dd4 tcpserver: ok 23882 mail.www.pc-freak.net:127.0.0.1:25 localhost:127.0.0.1::46769
@40000000505877fd1a3c647c qmail-smtpd[23882]: MFCHECK pass [127.0.0.1] www.pc-freak.net
@40000000505877fd1a3c935c qmail-smtpd[23882]: MAIL FROM:
@400000005058780123ba5eb4 qmail-smtpd[23882]: RCPT TO:

@4000000050587ccd179210b4 tcpserver: end 23882 status 256
@4000000050587ccd1792149c tcpserver: status: 0/30
root@qmail-host:/# tail -n 5 /var/log/qmail/qmail-smtpd/current
@40000000505877fd1a3c647c qmail-smtpd[23882]: MFCHECK pass [127.0.0.1] www.pc-freak.net

Second guess was to check in /var/log/qmail/qmail-send/current, there found errors like:


root@qmail-host:/# tail -n 10 /var/log/qmail/qmail-send/current
@4000000050584f8e0b799194 status: local 0/10 remote 0/120
@4000000050584f8e0b79957c end msg 9610091
@4000000050584fde2f5ebf44 status: qmail-todo stop processing asap
@4000000050584fde2f5ec32c status: exiting
@4000000050584fde32d2a884 status: local 0/10 remote 0/120
@4000000050584fe8136a44ac status: qmail-todo stop processing asap
@4000000050584fe8136a4894 status: exiting
@4000000050584fe8138b884c status: local 0/10 remote 0/120
@4000000050585014232903c4 status: qmail-todo stop processing asap
@4000000050585014232907ac status: exiting
@40000000505850142363e5fc status: local 0/10 remote 0/120
@40000000505851030773efa4 status: qmail-todo stop processing asap
@40000000505851030774320c status: exiting
@400000005058510307b5f214 status: local 0/10 remote 0/120

s you can see yourself, the errors are not giving any insight on what could be the reason, so I checked in /var/log/mail.log, just to find more errors there:


Sep 18 16:22:04 qmail-host qmail-scanner-queue.pl: X-Qmail-Scanner-2.10st:[pcfreak134797452279623171]

d_m: output spotted from /usr/bin/reformime -x/var/spool/qscan/tmp/qmail-host/I134797452279623171/ (sh: /usr/bin/reformime: not found#012) - that shouldn't happen!

As the error points out, the whole issues are caused by missing binary – /usr/bin/reformime. Logically I had to install reformime, so did a quick apt-cache search reformime and saw reformime is part of maildrop deb package. I thought it is installed but after checking with:


dpkg -a |grep -i maildrop

Realized it is missing and install it:


qmail-host:/# apt-get --yes install maildrop
....

That’s all after a qmail restart, i.e.:


qmail-host:/# qmailctl restart
* Stopping qmail-smtpdssl.
* Stopping qmail-smtpd.
* Sending qmail-send SIGTERM and restarting.
* Restarting qmail-smtpd.
* Restarting qmail-smtpdssl.
* Restarting qmail-pop3d.

qq temporary error got solved and from there on qmail received and sent mails normally with validrcptto enabled. Cheers 😉

Make picture transparent with the Gimp on Linux

Tuesday, November 16th, 2010

GIMP Logo make picture transparent with GIMP on GNU / Linux
I’m trying to learn some basic design this days as an attempt to fill my huge missing gap of knowledge in graphic processing.
I’ve always been not too good with visual stuff and always been focused on the command line and console, however since
some time design started being quite interesting thing to me and I found it quite handy and challenging to learn some basic designing.

I’m not really a Windows guy and thus my Photoshop skills are next to zero.
Since The Gimp is the substitute for Photoshopfor Linux users and I had a task for one of the websites I’m developing to make some pictures for the website transparent, therefore I had to learn how to make pictures transparent with The Gimp
After some reading online and some experimenting with GIMP it appeared to me it’s very easy to actually make pictures transparent with the GIMP.
So I’ve come with a small article here on how to make image or a picture transparent with Gimp in simple steps in order to help people who are trying to achieve the same easy task:

1. Open Gimp and place your mouse cursor on the picture

Here, Press the 2nd or 3rd mouse button to show menu.

2. Select Layer -> Transperancy -> Alpha to Selection

In that menu select Select Layer -> Transprerancy -> Alpha to Selection

Gimp Alpha to Selection Menu

3. Use Fuzzy Select Tool and select the picture background

Gimp fuzzy select background

4. From Gimp Window pane main menu choose the Clear option

Edit -> Clear (Delete)
gimp edit clear menu

That’s all now your picture background should be removed if some parts of the picture still needs to be purged just follow the above step and remove them.
I should say I thought making picture transparent with GIMP would be a more complex task than it really was, quite nice one more step in my development as a designer 🙂

What is Vertical scaling and Horizontal scaling – Vertical and Horizontal hardware / services scaling

Friday, June 13th, 2014

horizontal-vs-vertical-scaling-vertical-and-horizontal-scaling-explained-diagram

If you're coming from a small or middle-sized company to a corporations like HP or IBM probably you will not a clear defined idea on the 2 types (2 dimensions) of system Scaling (Horizontal and Vertical scaling). I know from my pesronal experience that in small companies – all needed is to guarantee a model for as less probels as possible without too much of defining things and with much less planning. Other thing is being a sysadmin in middle-sized companies, often doesn't give you opportunity to discuss issues to solve with other admins but you have to deal as "one man (machine) for all" and thus often to solve office server and services tasks you do some custom solution.
hence for novice system administrators probably it will be probably unclear what is the difference between Horizontal and Vertical Scaling?

horizontal-vertical-scaling-scale-up-and-scale-out-server-infrastructure-diagram


Vertical Scaling (scale vertically or scale up) :- adding more resources(CPU/RAM/DISK) to your server (database or application server is still remains one).
Vertical Scaling is much more used in small and middle-sized companies and in applications and products of middle-range. Very common example for Virtual Scaling nowdays is to buy an expensive hardware and use it as a Virtual Machine hypervisor (VMWare ESX). Where a database is involved using Vertical Scaling without use of multiple virtual machines might be not the best solution, as even though hardware might suffice (creation of database locks might impose problems). Reasons to scale vertically include increasing IOPS (Input / Ouput Operations), increasing CPU/RAM capacity, and increasing disk capacity.
Because Vertical Scaling usually means upgrade of server hardware – whenever an improved performance is targeted, even though if Virtualization is used, the risk for downtimes with it is much higher than whenever horizontal scaling.

Horizontal Scaling (scale horizontally or scale out):- adding more processing units (phyiscal machine) to your server (infrastructure be it application web/server or database).
Horizontal scaling, means increasing  the number of nodes in the cluster, reduces the responsibilities of each member node by spreading the keyspace wider and providing additional end-points for client connections. The capacity of each individual node does not change, but its load is decreased (because load is distributed between separate server nodes). Reasons to scale horizontally include increasing I/O concurrency, reducing the load on existing nodes, and increasing disk capacity.
Horizontal Scaling has been historically much more used for high level of computing and for application and services. The Internet and particular web services gave a boom of Horizontal Scaling use, most companies nowadays that provide well known web services like Google (Gmail, Youtube), Yahoo, Facebook, Ebay, Amazon etc. are using heavily horizontal scaling. Horizontal Scaling is a must use technology – whenever a high availability of (server) services are required.

How to debug mod_rewrite .htaccess problems with RewriteLog / Solve mod_rewrite broken redirects

Friday, September 30th, 2011

Its common thing that CMS systems and many developers custom .htaccess cause issues where websites depending on mod_rewrite fails to work properly. Most common issues are broken redirects or mod_rewrite rules, which behave differently among the different mod_rewrite versions which comes with different versions of Apache.

Everytime there are such problems its necessery that mod_rewrite’s RewriteLog functionality is used.
Even though the RewriteLog mod_rewrite config variable is well described on httpd.apache.org , I decided to drop a little post here as I’m pretty sure many novice admins might not know about RewriteLog config var and might benefit of this small article.
Enabling mod_rewrite requests logging of requests to the webserver and process via mod_rewrite rules is being done either via the specific website .htaccess (located in the site’s root directory) or via httpd.conf, apache2.conf etc. depending on the Linux / BSD linux distribution Apache config file naming is used.

To enable RewriteLog near the end of the Apache configuration file its necessery to place the variables in apache conf:

1. Edit RewriteLog and place following variables:

RewriteLogLevel 9
RewriteLog /var/log/rewrite.log

RewriteLogLevel does define the level of logging that should get logged in /var/log/rewrite.log
The higher the RewriteLogLevel number defined the more debugging related to mod_rewrite requests processing gets logged.
RewriteLogLevel 9 is actually the highest loglevel that can be. Setting the RewriteLogLevel to 0 will instruct mod_rewrite to stop logging. In many cases a RewriteLogLevel of 3 is also enough to debug most of the redirect issues, however I prefer to see more, so almost always I use RewriteLogLevel of 9.

2. Create /var/log/rewrite.log and set writtable permissions

a. Create /var/log/rewrite.log

freebsd# touch /var/log/rewrite.log

b. Set writtable permissons

Either chown the file to the user with which the Apache server is running, or chmod it to permissions of 777.

On FreeBSD, chown permissions to allow webserver to write in file, should be:

freebsd# chown www:www /var/log/rewrite.log

On Debian and alike distros:

debian:~# chown www-data:www-data /var/log/rewrite.log

On CentOS, Fedora etc.:

[root@centos ~]# chown httpd:httpd /var/log/rewrite.log

On any other distribution, you don’t want to bother to check the uid:gid, the permissions can be set with chmod 777, e.g.:

linux# chmod 777 /var/log/rewrite.log

Next after RewriteLog is in conf to make configs active the usual webserver restart is required.

To restart Apache On FreeBSD:

freebsd# /usr/local/etc/rc.d/apache2 restart
...

To restart Apache on Debian and derivatives:

debian:~# /etc/init.d/apache2 restart
...

On Fedora and derivive distros:

[root@fedora ~]# /etc/init.d/httpd restart
...

Its common error to forget to set proper permissions to /var/log/rewrite.log this has puzzled me many times, when enabling RewriteLog’s logging.

Another important note is when debugging for mod_rewrite is enabled, one forgets to disable logging and after a while if the /var/log partition is placed on a small partition or is on an old server with less space often the RewriteLog fills in the disk quickly and might create website downtimes. Hence always make sure RewriteLog is disabled after work rewrite debugging is no longer needed.

The way I use to disable it is by commenting it in conf like so:

#RewriteLogLevel 9
#RewriteLog /var/log/rewrite.log

Finally to check, what the mod_rewrite processor is doing on the fly its handy to use the well known tail -f

linux# tail -f /var/log/rewrite.log

A bunch of time in watching the requests, should be enough to point to the exact problem causing broken redirects or general website malfunction.
Cheers 😉

Cause and solution for Qmail sent error “Requested action aborted: error in processing Server replied: 451 qq temporary problem (#4.3.0)”

Friday, October 28th, 2011

One of the qmail servers I manage today has started returning strange errors in Squirrel webmail and via POP3/IMAP connections with Thunderbird.

What was rather strange is if the email doesn’t contain a link to a webpage or and attachment, e.g. mail consists of just plain text the mail was sent properly, if not however it failed to sent with an error message of:

Requested action aborted: error in processing Server replied: 451 qq temporary problem (#4.3.0)

After looking up in the logs and some quick search in Google, I come across some online threads reporting that the whole issues are caused by malfunction of the qmail-scanner.pl (script checking mail for viruses).

After a close examination on what is happening I found out /usr/sbin/clamd was not running at all?!
Then I remembered a bit earlier I applied some updates on the server with apt-get update && apt-get upgrade , some of the packages which were updated were exactly clamav-daemon and clamav-freshclam .
Hence, the reason for the error:

451 qq temporary problem (#4.3.0)

was pretty obvious qmail-scanner.pl which is using the clamd daemon to check incoming and outgoing mail for viruses failed to respond, so any mail which contained any content which needed to go through clamd for a check and returned back to qmail-scanner.pl did not make it and therefore qmail returned the weird error message.
Apparently for some reason apparently the earlier update of clamav-daemon failed to properly restart, the init script /etc/init.d/clamav-daemon .

Following fix was very simple all I had to do is launch clamav-daemon again:

linux:~# /etc/inid.d/clamav-daemon restart

Afterwards the error is gone and all mails worked just fine 😉

How to set up Qmail auto reply (Out of the Office), vacation message manually using .qmail message processing file

Tuesday, February 14th, 2012

Qmail Logo Auto reply message / how to setup qmail auto reply out of the office vacation message

I had to setup a QMAIL auto reply (Out of the Office) message on 5 email addresses and since I haven't done it for a long time it took me a couple 20 minutes to consult Qmail (Life With Qmail http://lifewithqmail.org (great website!) documentation and read a couple of online forum threads until I finally remembered, how I used to be setting up a vacation message manually via qmail's .qmail file.

Of course Setting qmail auto reply can always be done via QmailAdmin or VQadmin ..Qmail Vpopmail web frontends however on many Qmail mail servers Qmailadmin or/and VQadmin is absent due to some reason or even on a big mail servers the server doesn't run Apache at all. Hence it is good to know how to set qmail vacation message directly via plain SSH terminal connection and this is why how this article got born.

So here is how I enable qmail auto reply "manually", through .qmail for my email address info@my-email-domain.com:

1. Set a /var/vpopmail/domains/my-email-domain.com/info/.qmail file with the following content:

| /usr/bin/autorespond 86400 3 /home/vpopmail/domains/my-email-domain.com/info/vacation/message /home/vpopmail/domains/my-email-domain.com/info/vacation

2. Create /home/vpopmail/domains/my-email-domain.com/info/vacation directory

linux:~# mkdir -p /home/vpopmail/domains/my-email-domain.com/info/vacation/

3. Create /home/vpopmail/domains/my-email-domain.com/info/vacation/message file with auto reply message

First create the message file with touch command:

linux:~# touch /home/vpopmail/domains/my-email-domain.com/info/vacation/message

Then put with vim or mcedit etc. an auto-reply vacation message similar to the sample below:

From: info@cadiainsurance.com
Subject: We have received your message. Thank you!

Dear Customer, we thank you for the interest in our services.
A member of our team will reply promptly to your enquiry shortly.

4. Set proper permissions for vacation/message and .qmail files

/home/vpopmail/domains/my-email-domain.com/info/vacation/message and /home/vpopmail/domains/my-email-domain.com/info/.qmail files has to be owned by user/group vpopmail:vchkpw, e.g.:

linux:~# chown -R vpopmail:vchkpw /home/vpopmail/domains/my-email-domain.com/info/vacation
linux:~# chown vpopmail:vchkpw /home/vpopmail/domains/my-email-domain.com/info/.qmail

If you are a qmail administration with the requirement to create auto reply message for employees going on a holiday often (in a middle sized company office), setting up the out of the office auto reply manually one by one is a time consuming, annoying task and "crazy" task. Therefore some time ago while still I was employed in a Bulgarian mid-sized company called Design.BG, I've written a tiny shell script which creates qmail email users vacation messages by passing few arguments.

Here is my create_vpopmail_vacation.sh shell script
Note that this script might have a lot of bugs and is not much tested, so read it carefully and test it before you put it for daily use 😉
Happy Hacking! 😉