Posts Tagged ‘Pack’

Trip To Amsterdam (TTA)

Tuesday, March 3rd, 2009

Saint Nicolas Roman Catholic Church near Amsterdam trainstation pictureOn Tuesday Zlati (A friend of mine introduced to me by Father Veliko), came to Arnhem. The plan was that he came on Tuesday here and afterwards in Wednesday morning the Trip to Amsterdam was going to happen. First we had settled that he will be in Arnhem in 12:00 o’clock. So Around 10:50 I walked down the way to the trainstation. I was on my way when Zlati ringed and told that he still, haven’t catched the train and he is not going to make it for 12:00, though he will be on Arnhem Central Station in 04:35 in the afternoon. I came back to home and on my way bought some apples as well as a oily sweet thing from the Turkish shop “Sultan” 🙂

Around 3 I took my way to the city center again, on my way I had toleave Sali’s laptop in his home. I had taken his laptop to re-install Windows and setup his Windows in Bulgarian as well as configure it to be able to watch Bulgarian TV channels online.
In order to achieve that I used a proxy donated to me by Amridikon. Thanks Amri!

To make Windows Vista Home Premium to Bulgarian I had to use a small proggie “Vista Change Language 1.0”. I had to burn the program to a CD and boot into it and then use the downloaded language pack to change the vista text language to Bulgarian. I did so all went well, unfortunately after an upgrade the text in the menus did screw up. So I have to boot again in the Vista Change Language 1.0 boot CD and revert it back to Bulgarian.
Then I had to disable Windows Vista updates in order to prevent the same language mess up to occur again. This was a little out of the topic, but I decided it’s nice to have it on paper.

So back to where I was with my TTA .. I took Zlati from the train station,we went to Sali and he treated us with some kind of traditional turkish soup meal. The soup was quite nice btw. He was extremely happy that he could watch Bulgarian TV’s online through the bg.gledai.tv website. I was glad to that God helped me and blessed me in succeeding in all the things I mentioned above. Afterwards we went with Zlati and Koko to Albertheijn picked up a beer and a couple of other things. Then I and Zlati went to my place where we used my notebook to research about places of Interest, we would like to attend in Amsterdam. We went to bed around 2 o’clock at night.

At the morning we went to the train station. I suggested that we go a little earlier because I thought, well it might be better to be earlier in the city for to have more time to walk and take a look at its significant things in it. We were on the train station 8:10 and had the intention to take the first train at 8:29, however God had other plans for that.It seemed that we have to wait and buy a ticket for after 9:00, otherwise Zlati couldn’t use his train card for my discount.He was quite irritated by the fact that I suggested that we went to the train station so early since he was quite sleepy in the morning because we went to bed so late.

Anyways I got a coffee from the trainstation waiting-room coffee machine.And, eh the coffee there is expensive, be careful if you travel in the Netherlands by train.

The coffee costed 1.50 per cappuchino, huh … We catched a train in 9:29 and we were in the capital of Amsterdam in 10:40.
I was so excited! Yes the trip worthed the price of 16.30 EUR (with the 40% discount). Amsterdam is a really nice city, especially considering it’s architecture. And I saw such a big shops and so many things to choose from … The whole city is full of canals and boats are traveling through it.
We went to music store, wow there was so much music in it.
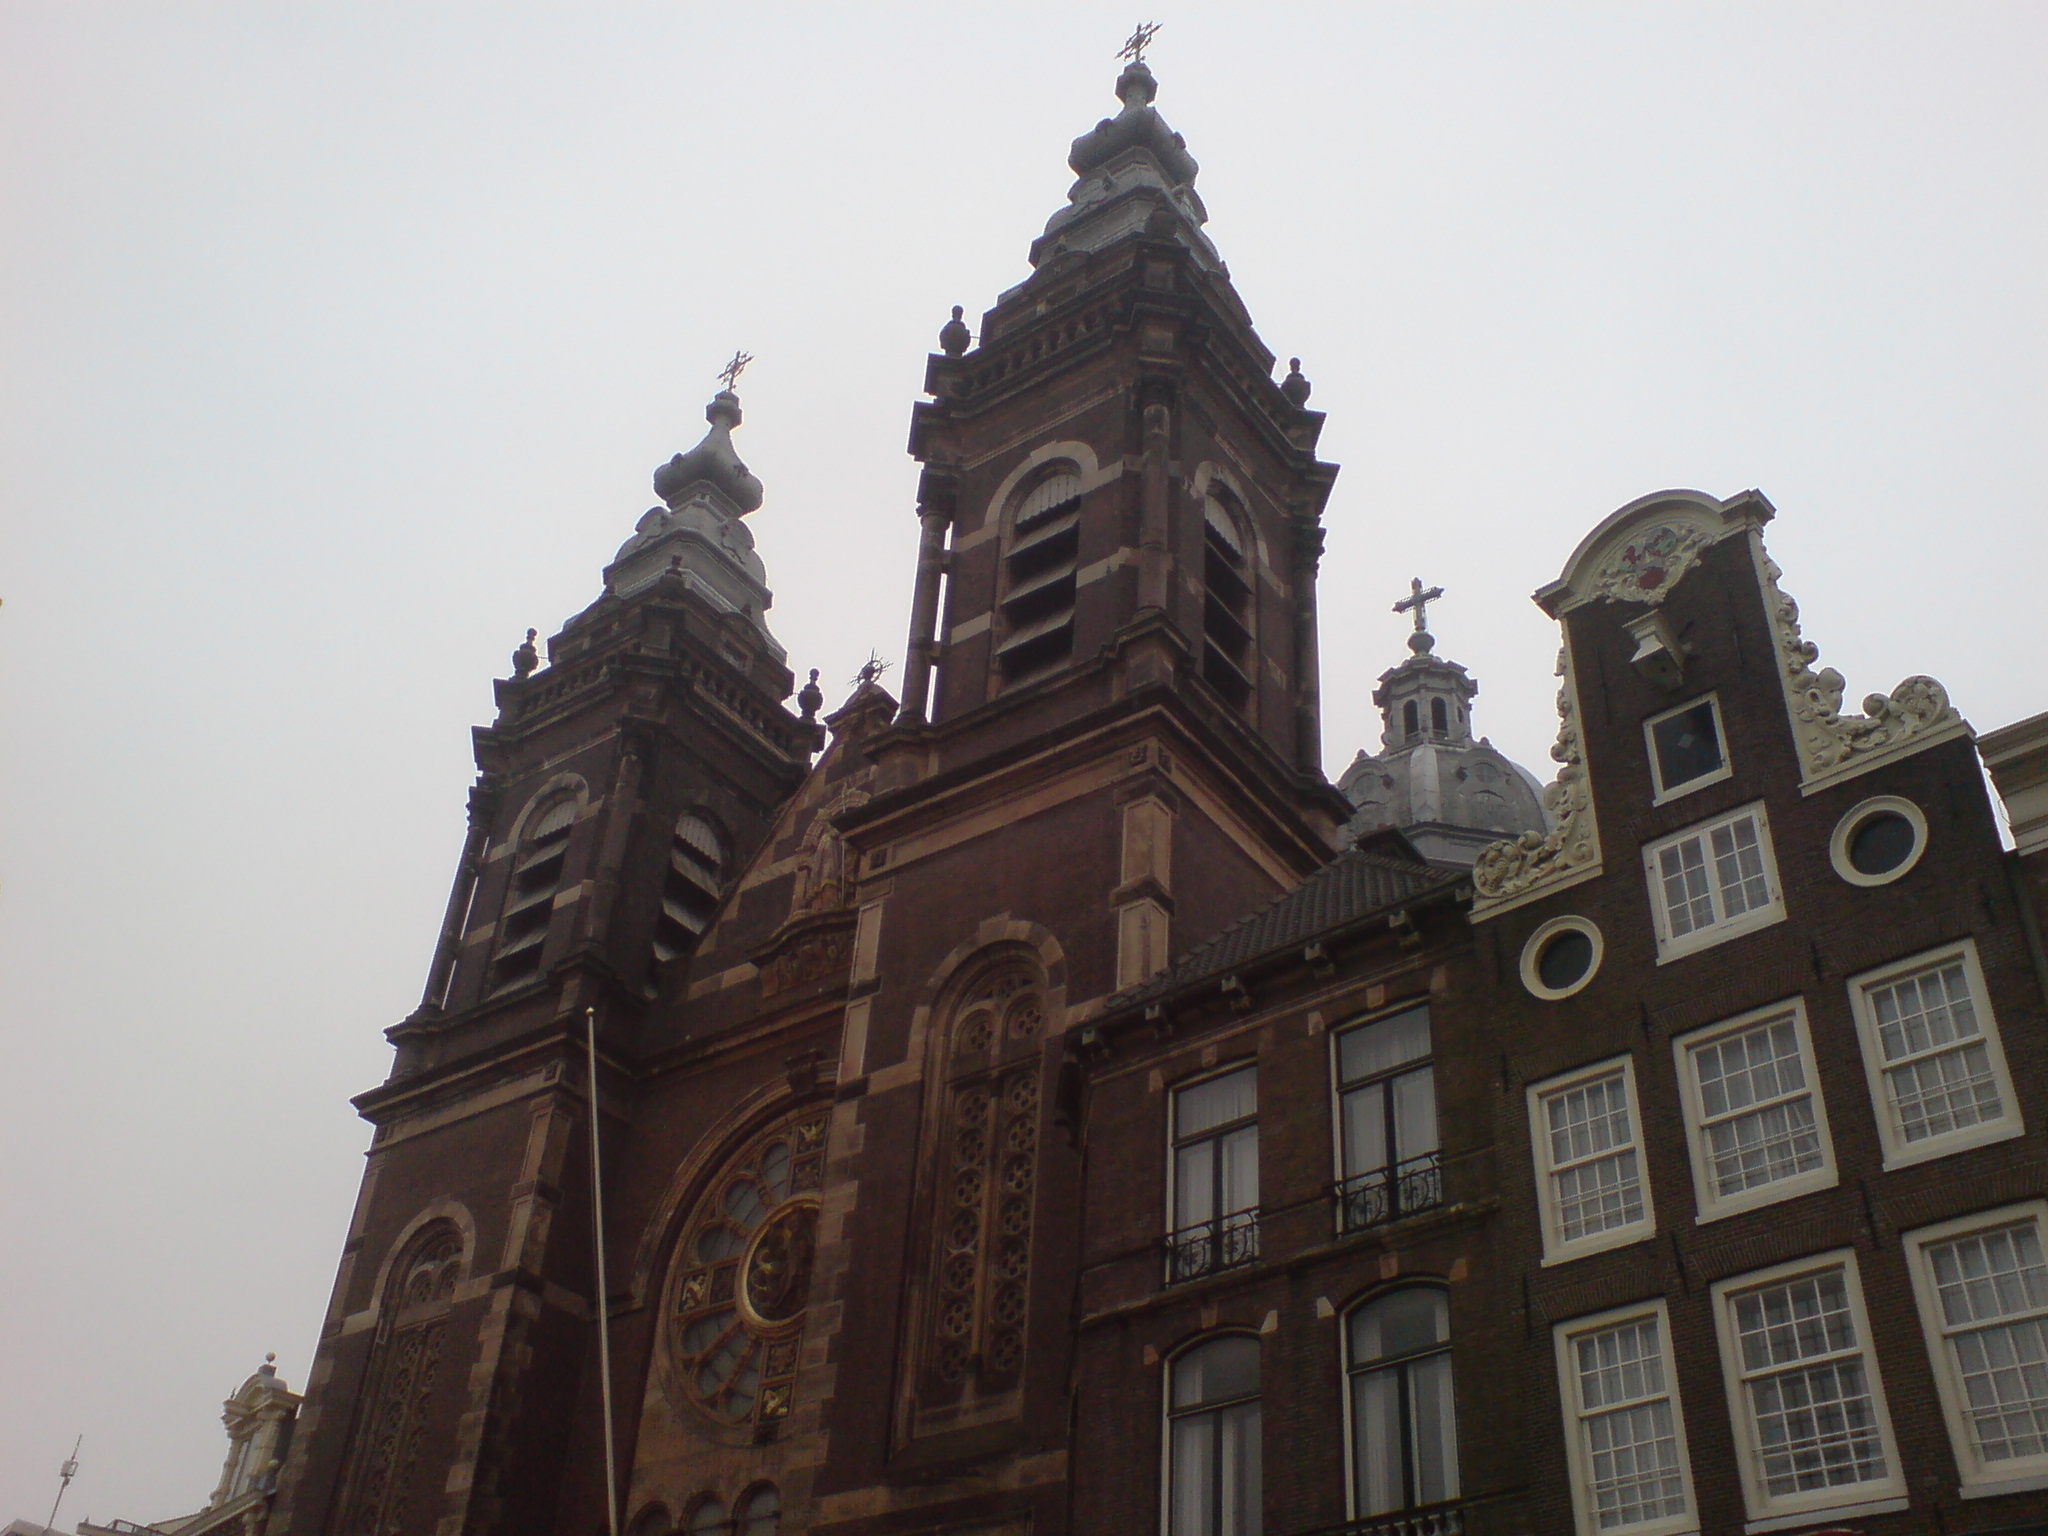
We entered a lot of Catholic Churches in one of the Catholic Churches there was an orthodox icon of St. Nickolas! So I made the sign of the cross and prayed the Saint to pray God for me the sinner.
With our arrival right after we went out of the central station I saw a bookstore,so I proposed Zlati to enter. It seemed that was a protestant Christian bookstore. Even though a protestant one the people there at least were believing in our Lord and Saviour Jesus Christ.

I had a small chat with one of the guys asking if they have Orthodox Bible, It seemed they haven’t so I started telling him about the advantages of being Orthodox Christian. I explained him how I became orthodox after God gave me the faith and transformed my life.
The bookstore had a free/coffee and tea.So each me and Zlati took a cappuchino. It was so nice God gave me a hot drink in the Early morning in Amsterdam.
A lot of people are insane in that place, I saw a lot of pod smokers on the street.

On a lot of places the air had that typical pod stell. We saw a lot of Museums, we tried to use a citymap although in a lot of cases  un-succesful. We saw so many Churches, Madam Tusad’s museum,as well as Anne Frank museum, the tulip museum.
There was also sex, museums we saw on our way and even this freaks had gay museum. We saw some road building in progress where a couple of people were building a road on top of pillars, right above the water! 🙂 The city is full of old buildings most of which originating from 16th century. The Architecture is really amazing. The parks and everything and the terraces had that typical European style which I’ve seen in movies showing people from the 18thor 19th century drinking coffees on the balconies. We took a lot of pictures. Unfortunately I still haven’t taken the pictures from Zlati. We entered into a shop which was selling buddhist, hindu and indian statues and souvenirs to warm a bit as the weather outside was coldy.
There we had a nice chat with the storekeeper, about religion and about my Orthodox faith in Our Lord Jesus! He mentioned that near around there is an Syrian Orthodox Church. So went to seek for it. After some rambling we found it but unfortunately it was already closed the time was quite late over 18:00, so it was quite normal to be closed.The style of the Church didn’t really much differentiated from the rest of the Catholic Churches.

Earlier we went into a Church, whether they had that modern exposition, again we went their to warm ourselves (it was such a cold day).

The Church inside was nice but the pictures,they was selling on the expo was really terrible, a lot of sado-mazo and perverted motives in the pictures …

I was saddened to see that they have de-sacrated a holy place like that. Well it’s true that the Roman catholics stepped aside from the orthodox faith some time ago but still they are believing Christians and therefore there temples are holy to some degree too … therefore such an abomination really shouldn’t happen.

The good thing was that in the Church they even had made toilets inside the church we could use 🙂
The Church wall paintings were displaying the way our Lord Jesus has walked on it’s way to final execution by the jews, carrying his cross on the way to Golgotha.

Around 18:30 we went to the street where the so famous prostites and drug addicts street was the “RED LIGHTS” – so famous all around the world ….

I couldn’t believed my eyes, prostites staying behind windows half naked waiting for a customer to hire them for sex …I have heard about that place but I really couldn’t imagine it could legally exist in the center of a metropolitan city like Amsterdam.

We walked in that “wicked” part of the city for around hour.
There were all kind of junkies people who looked really criminal, the prostitutes on the windows. Sex shops, sex video rooms, you name it .. all the disgusting stuff you could imagine. After this walk we went to the train station around 8:00 and took the train back to Arnhem. The whole day went quite flawless,God has heard our prayer to keep us from evil and give us safe journey.The whole trip was really relaxing for me! Praise the Lord for his great mercy towards me the sinner for giving my eyes to see all this things!

How to add repository manually from command line in Ubuntu Linux

Sunday, January 8th, 2012

I'm on a way trying to install Free Mega Games Pack and I'm facing troubles in following the instructions to add a the latest development wine version described on http://www.winehq.org/download/ubuntu
The guys from WineHQ has to update the wine install instructions, since the instructions are targetting older versions of Ubuntu which are not compatible with newer Ubuntus which comes natively with Unity
In order to complete the step in adding the WineHQ Ubuntu PPA development repository my only way was to add it using command line.
Here is how:

root@ubuntu:~# apt-add-repository ppa:ubuntu-wine/ppa
You are about to add the following PPA to your system:
Latest official WineHQ releases
Welcome to the Wine Team PPA. Here you can get the latest available Wine betas for every supported version of Ubuntu. This PPA is managed by Scott Ritchie, and is a replacement for the WineHQ budgetdedicated.com repository used for Jaunty and earlier.
More info: https://launchpad.net/~ubuntu-wine/+archive/ppa
Press [ENTER] to continue or ctrl-c to cancel adding it
Executing: gpg --ignore-time-conflict --no-options --no-default-keyring --secret-keyring /tmp/tmp.bvo21sFWKG --trustdb-name /etc/apt/trustdb.gpg --keyring /etc/apt/trusted.gpg --primary-keyring /etc/apt/trusted.gpg --keyserver hkp://keyserver.ubuntu.com:80/ --recv 883E8688397576B6C509DF495A9A06AEF9CB8DB0
gpg: requesting key F9CB8DB0 from hkp server keyserver.ubuntu.com
gpg: key F9CB8DB0: public key "Launchpad PPA for Ubuntu Wine Team" imported
gpg: no ultimately trusted keys found
gpg: Total number processed: 1
gpg: imported: 1 (RSA: 1)

Similarly adding a PPA repository on Debian is also possible by using a little shell script add-apt-repository.sh . add-apt-repository.sh simulates what ubuntu's apt-add-repositry python script does.

It is educative to mention PPA stands for (Personal package Archive) and the difference between normal repository and PPA is mainly in the fact that PPA repositories makes a package distributed by the repository like the native Ubuntu packages issued by Canonical.
Once for example a new version of a file is placed in PPA deb package repository, the newer package will be automatically installed to the system using it.

How to add extra plugins, effects, brushes and functionality to GIMP on GNU / Linux

Tuesday, February 28th, 2012

How to add extra plugins, effects brushes and functionality to GIMP on Debian and Ubuntu Linux / GIMP logo head pictureThese days, I'm playing with The GIMP. I've been a GNU / Linux, FreeBSD user for already 11 years now but as I'm doing mostly system administration and I don't have much expertise in Panting or Computer Graphical Design, I've never put much time to learn more in the interesting area of graphical design. Hence until just recently, Just until now, I've never spend time with the GIMP (GNU Image Manipulation Program) and never realized how powerful this great program is. The more I learn about GIMP functionalities and how it works the more it makes me determined to learn some basic web design 🙂

The functionality which The GIMP offers in a basic install is quite rich, however by default on most Debian and Ubuntu installations many of the great plugins which easifies the way to edit pictures is missing.

Example for a very valuable functionality which is not present with standard gimp package installed on Debian and Ubuntu are:
 

Here I will mention here few words on:

  • GIMP FX-Foundry Collection

GIMP FX-Foundry is a thoroughful collection of GIMP scripts (addon plugins), that automates many of the operations which requires a professional web design skills and gives an easy intuitive interface through which very robust "high level" graphic design can be accomplished. This additional GIMP extensions helps to create very unique design in just few simple steps, as well as gives multiple tools for the sake of easy pro design creation. For anyone looking for quick edit of images with GIMP FX-Foundry is a must have GIMP plugins extension. The script pack is located on http://gimpfx-foundry.sourceforge.net/

To install FX-Foundry scripts collection on Debian / Ubuntu / Linux Mint and other based Linux distributions:

debian:~# apt-get install --yes gimp-plugin-registry
...

gimp-plugin-registry package name is based on GIMP Plugin registry's website
. Gimp plugin registry contains many helpful design goodies 🙂

Once installed you will notice GIMP with a new menu on the main menus bar reading FX-Foundry :

GIMP Screenshot GNU Linux Debian additional FX Foundry menu

GIMP FX Foundry extensionos package contains 124 scripts for additional graphics manipulation. The collection contains less scripts than the ones provided by gimp-plugin-registry. package has 156 scripts inside.

One of the most helpful GIMP addition from the package is the inclusion of Save for Web button under:

File -> Save for Web

GIMP Save for Web menu suitable for reduced size images for HTML image producing on Debian GNU / Linux screenshot

Another very helpful .deb package which adds up to GIMP's design possibilities is gimp-data-extras .

gimp-data-extras adds 111 new GIMP Fill in Patterns , which can be used through the Blend Tool to Fill selected areas with color gradients.

To install gimp-data-extras on Debian:

debian:~# apt-get install --yes gimp-data-extras
...

Generally once installed this package will add to GIMP – an extra set of brushes, palettes, and gradients for The GIMP as you can read in the package description.

I was also quite stunned to find out the good old GIMP is capable of basic Video editting!!

On Debian and Ubuntu there is a package called gimp-gap which once installed adds an extra Video menu.

GIMP Screenshot GNU Debian linux adding GIMP extra Video editting capabilities

I've not tested the GIMP video editting capabilities yet, however I intend to learn something about it immediately when I have some free time left. You see the enormous list of Video editting possibilities GIMP obtaines with gimp-gap which btw stands for (The GIMP Animation Package).

To install gimp-gap:

debian:~# apt-get install --yes gimp-gap

I've noticed also the following list of others useful GIMP additions (mainly helpful in Web, Brochure and Logo Graphic Design) to install them:

debian:~# apt-get --yes install gimp-gmic gimp-ufraw gtkam-gimp gimp-gluas \gimp-dimage-color gimp-dds gimp-dcraw gimp-cbmplugs flegita-gimp gimp-texturize \gimp-resynthesizer gimp-lensfun gimp-gutenprint gtkam-gimp mrwtoppm-gimp

Here is the package description of the packages above command will install:

  • gimp-cbmplugs – plugins for The GIMP to import/export Commodore 64 files
  • gimp-data-extras – An extra set of brushes, palettes, and gradients for The GIMP
  • gimp-dcraw – GIMP plug-in for loading RAW digital photos
  • gimp-dds – DDS (DirectDraw Surface) plugin for the gimp
  • gimp-dimage-color – GIMP plugin to convert Minolta DiMAGE pictures to sRGB colour space
  • gimp-gap – The GIMP Animation Package
  • gimp-gluas – Lua environment plug-in for GIMP
  • gimp-gmic – GIMP plugin for GREYC's Magic Image Converter
  • gimp-gutenprint – print plugin for the GIMP
  • gimp-lensfun – Gimp plugin to correct lens distortion using the lensfun library
  • gimp-normalmap – Normal map plugin for GIMP
  • gimp-plugin-registry – repository of optional extensions for GIMP
  • gimp-resynthesizer – Gimp plugin for texture synthesis
  • gimp-texturize – generates large textures from a small sample
  • gimp-ufraw – gimp importer for raw camera images
  • flegita-gimp – Gnome Gimp scan plugin.
  • gtkam-gimp – gtkam gimp plugin to open digital camera pictures
  • mrwtoppm-gimp – GIMP-plugin to support Minolta DiMAGE 5/7/7i RAW images

Now after installing all this plugins and seeing all GIMP's power, I'm starting to wonder why are still people ranting Adobe PhotoShop is feature rich.
That's all, enjoy the great new GIMP features. Happy picture editting 😉

How to install Microsoft Windows XP SP3 on Debian GNU / Linux Squeeze

Thursday, December 1st, 2011

Windows XP Service Pack 3 QEMU Debian Squeeze

I have never did a proper install of Windows XP on Debian before hand. Even though I experimented once long time ago. I had zero success with installing Windows XP Service Pack 2 . The only Windows I can make correctly working before hand on these early days on my Debian powered notebook with qemu virtual machine emulator was Windows 2000 .

I decided to give it another go today as I hoped the qemu has advanced and I’ve seen many reports online of people who were able to correctly make Windows XP SP2 work out.

As I’ve seen many blog posts online of people who succesfully run with qemu Windows XP SP2, in order to escape from repeating the other guys experience and conduct a fresh experiment, I decided to give qemu a try with Microsoft.Windows.XP.Professional.SP3.Integrated.June.2011.Corporate

Before I proceed with using latest qemu I,

1. Installed qemu using the usual:

debian:~# apt-get install --yes qemu qemu-keymaps qemu-system qemu-user qemu-utils uml-utilities
...

Afterwards,

2. Created a new directory where the qemu Windows image will be stored:

debian:~# su hipo
hipo@noah:~$ mkdir windows
hipo@noah:~$ cd windows
hipo@noah:/home/hipo/windows$

As a following step I loaded the tun kernel module which is necessery for Qemu to properly handle the Windows LAN networking.

3. Load and set proper permissions for tun kernel module

In case if /dev/net is not existing first step is to create the proper device, however in most cases /dev/net should be there:

debian:~# mkdir -p /dev/net
debian:~# mknod /dev/net/tun c 10 200

As a next step its necessery to load tun kernel module and set the proper permissions:

debian:~# modprobe tun
debian:~# echo 'tun' >> /etc/modules
debian:~# chgrp users /dev/net/tun
debian:~# chmod g+w /dev/net/tun

Next step is to create an image file with dd or with qemu-img which will be holding the Virtual Machine Windows installation.

4. Create image file for Windows using dd

I decided to create a the image file to be with a size of 5 Gigabytes, this is of course custom so other people might prefer having it less or more the absolute minimum for a proper Windows XP SP3 install is 2000 Megabytes.

debian:~# su hipo -; cd windows;
debian:/home/hipo/windows$ dd of=hd.img bs=1024 seek=5000000 count=0
0+0 records in
0+0 records out
0 bytes (0 B) copied, 1.5505e-05 s, 0.0 kB/s

Notice here that the file dd will create will appear like 0 kb file until the Windows install from a BootCD is run with qemu.

5. Download an image of Microsoft.Windows.XP.Professional.SP3.Integrated.June.2011.Corporate from thepiratebay.org

Microsoft.Windows.XP.Professional.SP3.Integrated.June.2011.Corporate is currently available for download from the thepiratebay.org if in the times to come it is not available it will most likely be available from torrentz.net, isohunt.com etc. so I’ll skip more explanations with this step and let you use your favourite torrent program of choice to download the MS Windows iso. Just to make a note here I used transmission as this is my favourite torrent client. After downloading the iso I used K3B to burn the Image file as Bootable ISO. I’m naturally a GNOME user so to burn it as Image I just open it with K3B by using the GNOME menu and selecting Open with K3B

Next I instructed qemu to boot from the just burnt CD.

6. Boot windows Installation with Qemu from the Boot CD

debian:/home/hipo/windows$ qemu -boot d -cdrom /dev/cdrom -hda hd.img

Notice here that I’m running the qemu virtual machine emulator with a non-privileged reasons. This is important as qemu might have holes in the emulation of Windows Networking stack which if executed as root superuser. Can allow some malicious attacker to remotely compromise your GNU / Linux PC …

Qemu window will pop-up where one installs the Windows as it will install it using an ordinary PC. To switch qemu to fullscreen mode to have the complete feeling like installing Windows on an non-emulated PC ctrl + alt + f can be pressed.

The Windows installation took like 1 hour 20 minutes on my dual core 1.8 Ghz notebook with 2 GB of RAM. But I should say while installing I had multiple applications running; xmms, transmission, epiphany, icedove, evince etc. probably if I just run the Virtual Machine with no other applications to extra load my PC, probably the Windows install would have been done in max 50 minutes time.

After the installation is complete. To

7. Further run the installed Windows debian:/home/hipo/windows$ qemu -hda hd.img -boot c
...

As a next step its necessery to;

8. Bring up the tap0 interface and configure it for the user

I’m running my qemu emulator with my user hipo , so I run cmds:

debian:/home/hipo/windows$ su - root
debian:~# tunctl -u hipo
Set 'tap0' persistent and owned by uid 1000

9. Enable ip_forwarding and arp proxy and for wlan0 and tap0

debian:~# echo 1 > /proc/sys/net/ipv4/conf/wlan0/proxy_arp
debian:~# echo 1 > /proc/sys/net/ipv4/conf/tap0/proxy_arp

10. Install the proper Network Drivers inside Windows

That’s just in case, if they’re not supported by the Windows default existing drivers.
To do so, I downloaded my LAN drivers from the Vendor and put it on USB and sticked the USB drive to my laptop. In order to make the Kingston USB drive I used to transfer my LAN and Video drivers. I had to restart qemu with the parameter -usb -usbdevice host:0951:1625 , where I used lsusb to check and get the correct USB ID 0951:1625, like shown in the command below:

debian:~# lsusb |grep -i kingston
Bus 001 Device 006: ID 0951:1625 Kingston Technology DataTraveler 101 II

After on I booted again the Windows XP with the following command line in order to make qemu detect the USB Drive:

debian:/home/hipo/windows# sudo qemu -boot c -hda hd.img -usb -usbdevice host:0951:1625

One oddity here is that in order for qemu to detect the USB stick, I had to run it via sudo with super user privileges.Don’t ask me why this is the only way it worked …
Next on used the Windows device manager from Control Panel -> System -> Device Manager to point my undetected hardware to the correct Win drivers.

For the GUI preferring user qemu has a nice GNOME GUI interface called qemu-launcher, if you like to use qemu via it instead of scripting the qemu launcher commands, you can install and use via:

debian:~# apt-get install --yes qemu-launcher qemuctl
...
debian:/home/hipo/windows$ qemu-launcher

QEMU-Launcher Debian Squeeze Screenshot

Another GUI alternative to qemu-launcher, which easifys the work with qemu is qemulator; here is a screenshot:

Qemulator 0.5 - Qemu GUI Screenshot Debian Squeeze

Automatic blog posts tagging in wordpress blog 3.1 with (auto-tags) / wp plugin to increase Search Engine ranking

Monday, April 4th, 2011

There are plenty of articles, on how to increase search engine ranking in wordpress and I’m sure this article might be not that interesting but still I thought it might be nice to mention about this 3 wordpress plugins Auto-Tags, SEO Slugs and Platinium SEO Pack which will help you increase your traffic.

Let me say a few words for each of the 3 plugins:

1. Auto-tags
Below is the description of the plugin directly taken from the plugin website http://wordpress.org/extend/plugins/auto-tag/

This plugin uses the Yahoo.com and tagthe.net APIs to find the most relevant keywords
from the content of your post, and then adds them as tags.
New for version 0.2: an options page allows to choose how many tags are
retrieved from each service The tag adding is fully automatic,
so if you're using a plugin like feedwordpress to display RSS feeds
on your blog as posts, everything will get done as the feed
posts are published. No user intervention necessary!

Here are the installation instructions for auto-tags:

debian:~# cd /var/www/blog/wp-content/plugins
debian:/var/www/wp-content/plugins:# wget https://www.pc-freak.net/files/auto-tag.0.4.6.zip
100%[================================>] 14,325 45.3K/s in 0.3s

2011-04-04 12:30:17 (45.3 KB/s) – `auto-tag.0.4.6.zip’ saved [14325/14325]
debian:/var/www/wp-content/plugins:# unzip auto-tag.0.4.6.zip

In the above example my wordpress installation is in /var/www/blog/ , if your wordpress is installed in another directory location change to the respective directory.

To activate the Plugin go to:

Plugins -> Auto Tags
Press over Activate to activate the plugin.

To configure the Auto-tags plugin navigate to:

Settings -> Auto tags plugin

Auto tags Screen options

Therein you can configure the number of post tags to be retrieved from Yahoo, tagthe.net. The settings also allows you to disable certain tags you don’t want to appear in your post tags from the field, Remove those tags (comma separated)

The plugin also has an option called Append tags to the ones that already exist which on my wordpress 3.1 installation doesn’t work

After ending up your desired configuration simply press the Update Options button.

Now each time you type a new post in your wordpress blog, a tags related to the post will automatically be included.
Based on this tags Search engines will easily find content that relates to your blog tags and thus your page indexing will get better.