Posts Tagged ‘OpenBSD’

IPFilter firewall basics use for Adding / Removing and Cloning firewall rules

Thursday, June 1st, 2023

ipfilter-bsd-solaris-unix-firewall-short-review-ofLinux_firewalls-BSD_Firewall_logo

Linux users have most definitely used Netfilter (the older from us might remember and have used ipchains) and rest
should know well or at least partially tried iptables or if you have digged into Linux firewalls more professionally, might have tried nftables
and the newer firewalld (firewall-cmd) that is the standard nowadays in CentOS / Fedora and RHEL (again an abstraction over iptables.).
On Debian firewall is organized around custom shell scripts that deal with iptables chains, or if on Ubuntu perhaps you have tried UFW (The Uncomplicated Firewall)
frontend program for managing firewalls again with iptables. For the lazy ones UFW even has another GUI frontend called Gufw (intended to be easy, intuitive,
graphical user interface for managing Uncomlicated firewall.

Different Linux distributions do use a different set of firewall mechanisms preconfigure but there are other firewall solutions on other Unixes such as ipfilter.
That historically were heavily used that is worthy mentioning and if you happen to pop-up working as a network guy inside some large corporations you might face it.

IPFilter (commonly referred to as ipf) is an open-source software package that provides firewall services and network address translation (NAT) for many Unix-like operating systems.
The author and software maintainer is Darren Reed. IPFilter supports both IPv4 and IPv6 protocols, and is a stateful firewall.
IPFilter is delivered with FreeBSD, NetBSD, Solaris 10 & 11, illumos, OpenIndiana and HP-UX.
It used to be a part of OpenBSD, but it was removed by Theo de Raadt in May 2001 due to problems with its license.
It was subsequently replaced in OpenBSD by PF, which was developed by OpenBSD's own developers.
DragonFly BSD removed its support for IPFilter in May 2011.

IPFilter can be installed as a runtime-loadable kernel module or directly incorporated into the operating system kernel, depending on the specifics of each kernel and user preferences.
The software's documentation recommends the module approach, if possible.

Here are some commands for displaying, changing and distributing IP filters with ipfilter.
It will be mostly useful, if you happen to have some obsolete OS infrastructure or OpenBSD.

The commands given below are to add / remove and activate rules on machine with ipfilter:

# ipfilter –clone
# ipfilter –save
# ipfilter –activate
# ipfilter -addrule
# ipfilter -delrule
# help ipfilter

1. Check ipfilter current config

# ipfilter –show
Name: default_ipv4, Type: ipv4, State: active
Rule    Source IP                               Protocol   Dest Port   Action
1     any                                            tcp       22     permit
2     any                                            tcp       23     permit
3     any                                            tcp       80     permit
4     any                                            tcp      443     permit
5     any                                            udp      161     permit
6     any                                            udp      123     permit
7     any                                            tcp      600 – 1023     permit
8     any                                            udp      600 – 1023     permit
Name: default_ipv6, Type: ipv6, State: active
Rule    Source IP                               Protocol   Dest Port   Action
1     any                                            tcp       22     permit
2     any                                            tcp       23     permit
3     any                                            tcp       80     permit
4     any                                            tcp      443     permit
5     any                                            udp      161     permit
6     any                                            udp      123     permit
7     any                                            tcp      600 – 1023     permit
8     any                                            udp      600 – 1023     permit
Name: default_ipv4_new, Type: ipv4, State: defined
Rule    Source IP                               Protocol   Dest Port   Action
1     any                                            tcp       22     permit
2     any                                            tcp       23     permit
3     any                                            tcp       80     permit
4     any                                            tcp      443     permit
5     any                                            udp      161     permit
6     any                                            udp      123     permit
7     any                                            tcp      600 – 1023     permit
8     any                                            udp      600 – 1023     permit

2. Clone and activate ipfilter configuration

# ipfilter –clone default_ipv4_new -from default_ipv4
# ipfilter –activate default_ipv4_new
# ipfilter –show
Name: default_ipv4, Type: ipv4, State: defined
Rule    Source IP                               Protocol   Dest Port   Action
1     any                                            tcp       22     permit
2     any                                            tcp       23     permit
3     any                                            tcp       80     permit
4     any                                            tcp      443     permit
5     any                                            udp      161     permit
6     any                                            udp      123     permit
7     any                                            tcp      600 – 1023     permit
8     any                                            udp      600 – 1023     permit
Name: default_ipv6, Type: ipv6, State: active
Rule    Source IP                               Protocol   Dest Port   Action
1     any                                            tcp       22     permit
2     any                                            tcp       23     permit
3     any                                            tcp       80     permit
4     any                                            tcp      443     permit
5     any                                            udp      161     permit
6     any                                            udp      123     permit
7     any                                            tcp      600 – 1023     permit
8     any                                            udp      600 – 1023     permit
Name: default_ipv4_neu, Type: ipv4, State: active
Rule    Source IP                               Protocol   Dest Port   Action
1     any                                            tcp       22     permit
2     any                                            tcp       23     permit
3     any                                            tcp       80     permit
4     any                                            tcp      443     permit
5     any                                            udp      161     permit
6     any                                            udp      123     permit
7     any                                            tcp      600 – 1023     permit
8     any                                            udp      600 – 1023     permit

3. Modify cloned configuration

Lets say we would like to delete the telnet port accept traffic rule  (port 23)

# ipfilter –delrule default_ipv4_new -rule 2

To permit the rule agian

# ipfilter –addrule default_ipv4_new -rule 2 -sip any -dp 23 -proto tcp -act permit

To save the rule

# ipfilter –save default_ipv4_new                          

Getting Console and Graphical hardware system information on Linux with cpuinfo, neofetch, CPU-X (CPU-Z Unix alternative), I-nex and inxi

Tuesday, September 17th, 2019

getting-console-information-and-graphical-hardware-system-information-Linux-cpuinfo-neofetch-cpu-x-i-nex-1

Earlier I've wrote extensive article on how to get hardware information on Linux using tools such as dmidecode, hardinfo, lshw, hwinfo, x86info and biosdecode but there are few other hardware reporting tools for Linux worthy to mention that has been there for historical reasons such as cpuinfo as we as some new shiny ones such as neofetch (a terminal / console hardware report tool as well the CPU-X and I-Nex  which is Linux equivalent to the all known almost standard for Windows hardware detection CPU-Z worthy to say few words about.
 

1. cpuinfo


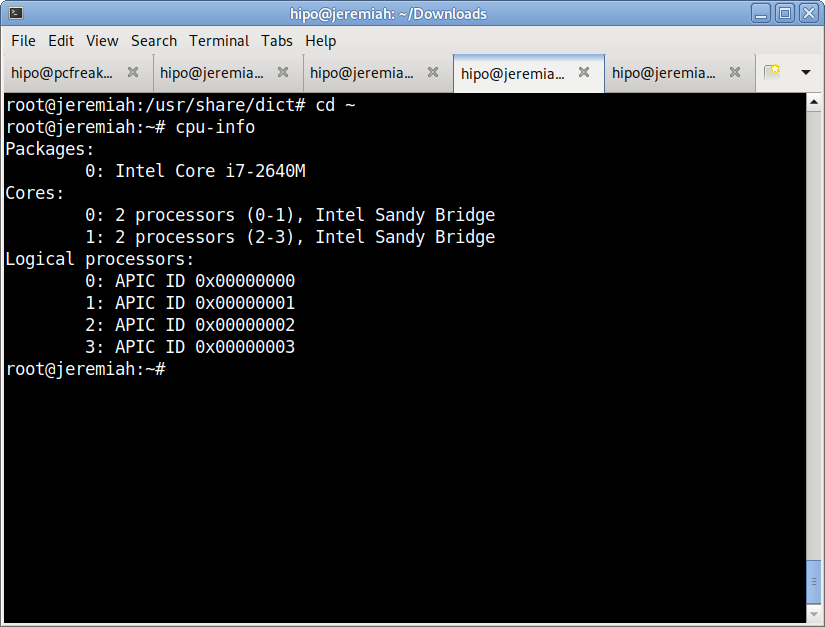
Perhaps the most basic tool to give you a brief information about your Processor type (model) number of Cores and Logical Processors is cpuinfo

I remember cpuinfo has been there since the very beginning on almost all Linux distributions's repository, nowadays its popularity of the days when the kings on the Linux OS server scenes were Slackware, Caldera OpenLinux and Redhat 6.0 Linux and Debian 3.0  declined but still for scripting purposes it is handy small proggie.

To install and run it in Debian  / Ubuntu / Mint Linux etc.:


aptitude install -y cpuinfo

/usr/bin/cpu-info


Linux-get-processor-system-info-in-console-cpu-info


2. neofetch


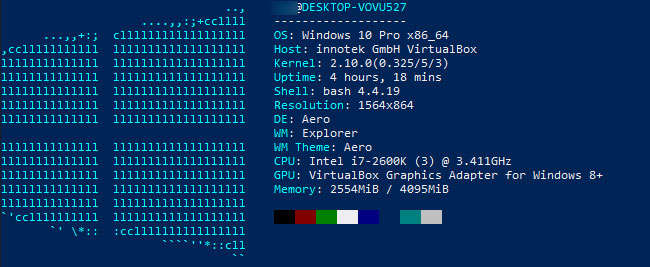
The next one worthy to install and check is neofetch (a cross-platform and easy-to-use system information
 command line script that collects your Linux system information and display it on the terminal next to an image, it could be your distributions logo or any ascii art of your choice.)

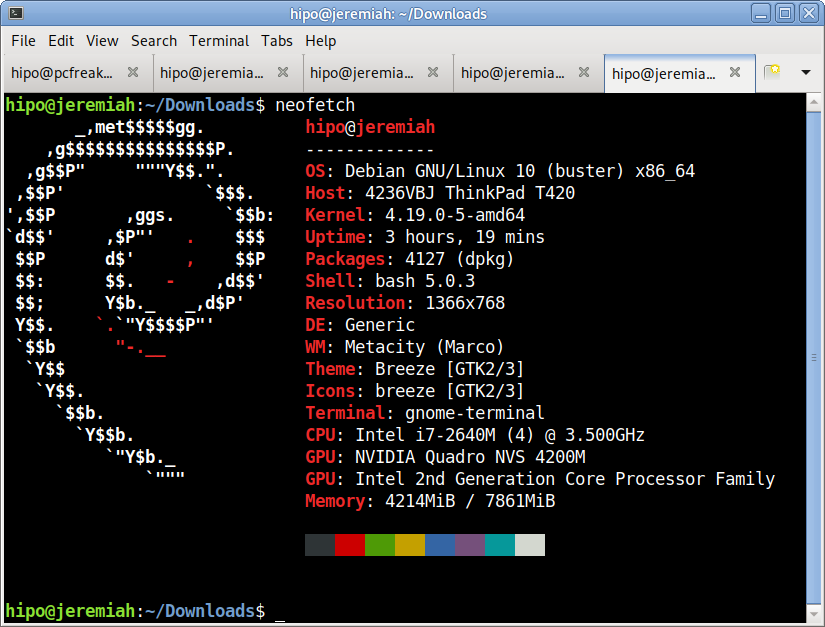
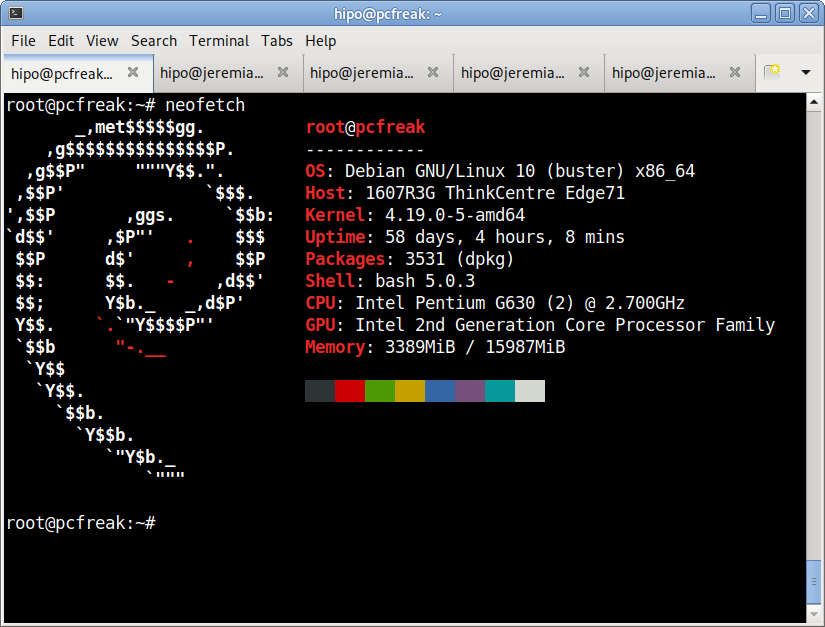
The cool thing about neofetch is besides being able to identify the System server / desktop hardware parameters, it gives some basic info about number of packages installed on the system, memory free and in use, used kernel and exact type of System (be it Dell PowerEdge Model XX, IBM eSeries Model / HP Proliant Model etc.

neofetch-OS-hardware-information-Linux-ascii-system-info-desktop-notebook

neofetch info generated on my home used Lenovo Thikpad T420

neofetch-OS-hardware-information-Linux-ascii-system-info-pcfreak-home-server
neofetch info from www.pc-freak.net running current machine

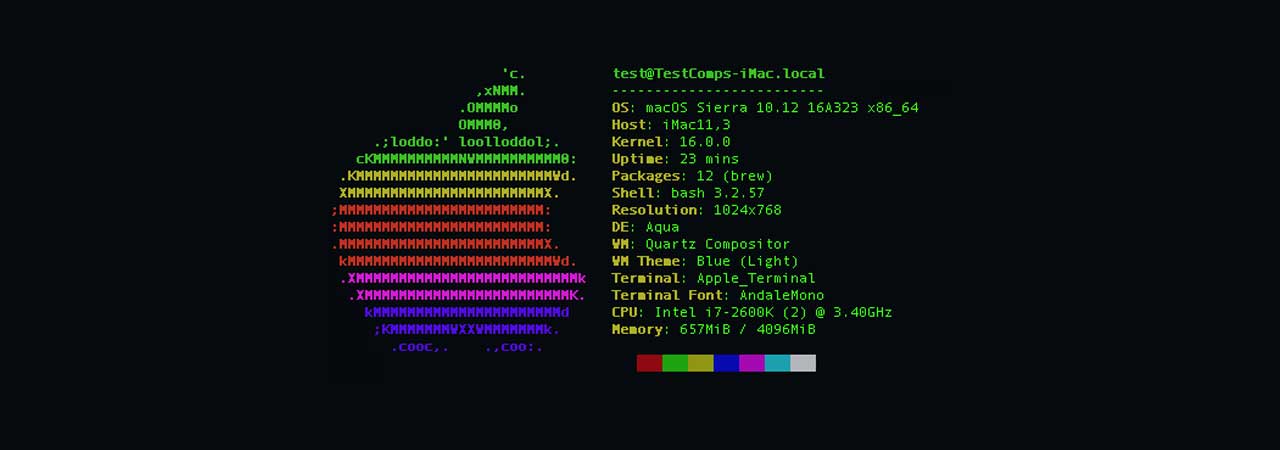
neofetch even supports Mac OS X and Windows OS ! 🙂

To install neofetch on Mac OS X:
 

/usr/bin/ruby -e "$(curl -fsSL https://raw.githubusercontent.com/Homebrew/install/master/install)"


or via Mac ported packages using brew

brew install neofetch


neofetch-screenshot-from-Mac-OS-X

neofetch is even installable on Windows OS that has the scoop command line installer tool installer manager with below PowerShell code in cmd.exe (Command line):

powershell Set-ExecutionPolicy RemoteSigned -scope CurrentUser
iex (new-object net.webclient).downloadstring('https://get.scoop.sh')
scoop install git
scoop install neofetch

neofetch-microsoft-windows-hardware-command-line-report-tool-screenshot


By the way Scoop was quite a finding for me and it is pretty handy to install plenty of useful command line Linux / UNIX tools, such as curl, wget, git etc. in the same easy straight forward way as a standard yum or apt-get on Windows (without explicitly installing things as GnuWin and CygWin).
 

3. CPU-X graphical user interface hardware report Linux GUI alternative to Windows CPU-Z


The packages for CPU-X are a bit outdated and even though there are rpm packages for Fedora, OpenSuSE and .deb package for Debian for Debian, Ubuntu and ArchLinux (pacman), there is no up to date version for Debian 10 and the package builds distributed for different Linux distros are a bit outdated.

Thus to install CPU-X on any Linux distribution it is perhaps best to use the portable version (static binary) of CPU-X.
It is currently available on https://github.com/X0rg/CPU-X/releases

To install latest portable version of CPU-X

wget https://github.com/X0rg/CPU-X/releases/download/v3.2.4/CPU-X_v3.2.4_portable.tar.gz

mkdir CPU-X
cd CPU-X

tar -zxvvf CPU-X_v3.2.4_portable.tar.gz
-rwxr-xr-x yohan/users 4563032 2019-01-13 22:15 CPU-X_v3.2.4_portable.bsd64
-rwxr-xr-x yohan/users 5484968 2019-01-13 22:15 CPU-X_v3.2.4_portable.linux64


cp -rpf CPU-X_v3.2.4_portable.linux64 /usr/local/bin/
ln -sf /usr/local/bin/CPU-X_v3.2.4_portable.linux64 /usr/local/bin/cpu-x


Next run as superuser (root)
 

hipo@jeremiah:~$ su -c 'cpu-x'


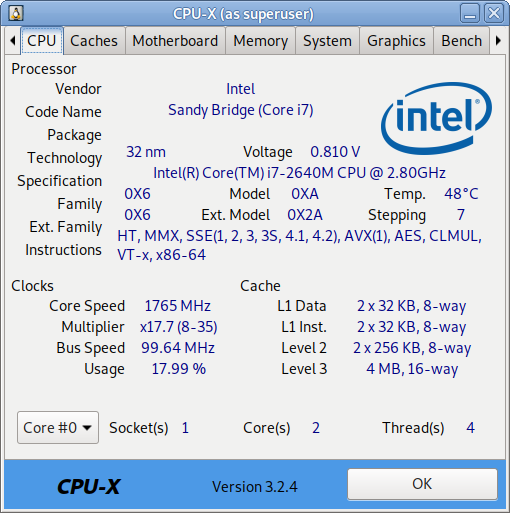
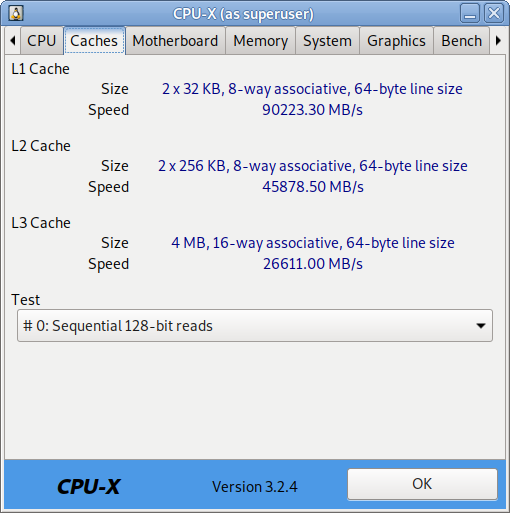
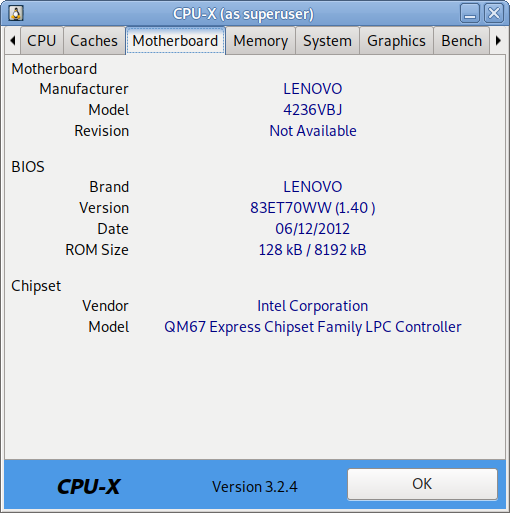
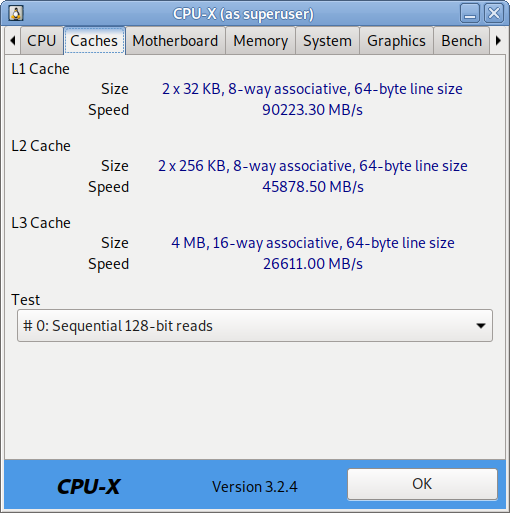
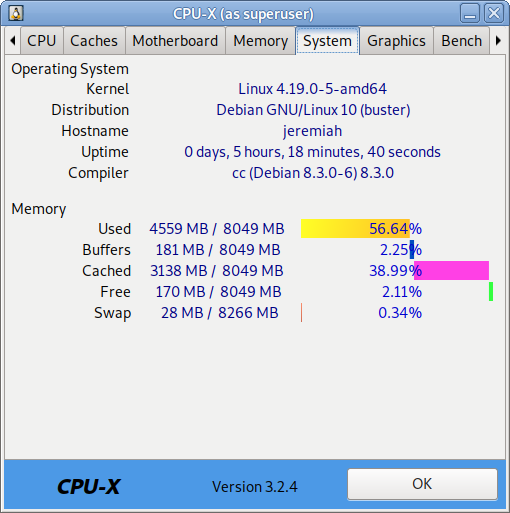
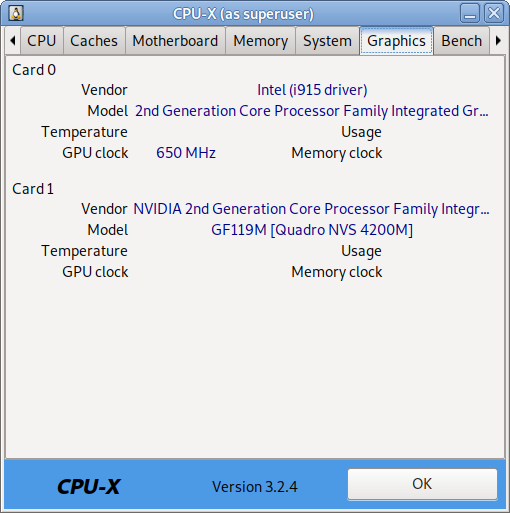
As seen from below screenshots cpu-x reports a lot of concrete specific hardware data on:

  • Processor
  • Motherboard
  • Memory
  • System
  • Graphic card
  • Performance

cpu-x-cpu-cpu-z-alternative-linux-screenshot-CPU-info

cpu-x-cpu-cpu-z-alternative-linux-screenshot-caches-info

cpu-x-cpu-cpu-z-alternative-linux-screenshot-Motherboard-info

cpu-x-cpu-cpu-z-alternative-linux-screenshot-memory-info

cpu-x-cpu-cpu-z-alternative-linux-screenshot-system-info

cpu-x-cpu-cpu-z-alternative-linux-screenshot-graphics-info

CPU-X can be installed also on FreeBSD very easily by just installing from BSD port tree sysutils/cpu-x/
It is also said to work on other *BSDs, NetBSD, OpenBSD Unixes but I guess this will require a manual compilation based on FreeBSD's port Makefile.

4. I-Nex another GUI alternative to CPU-Z for UNIX / Linux

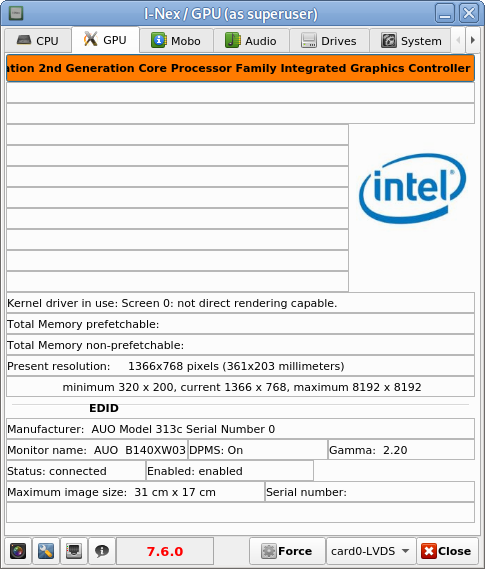
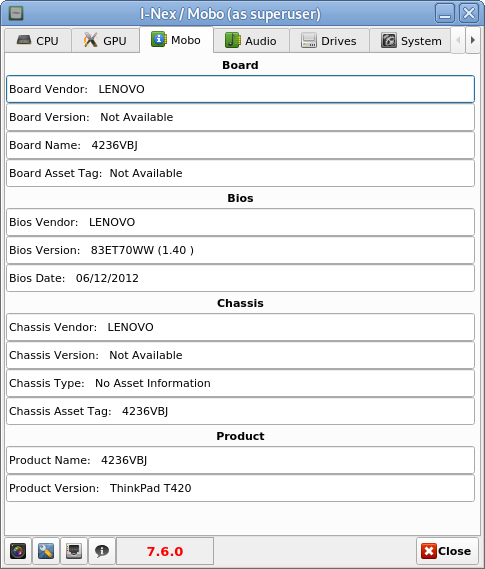
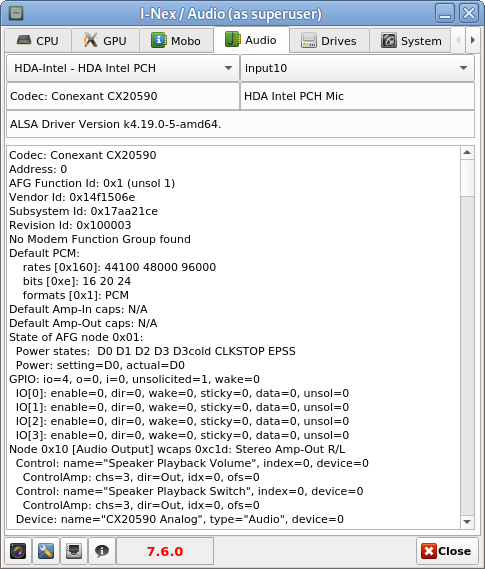
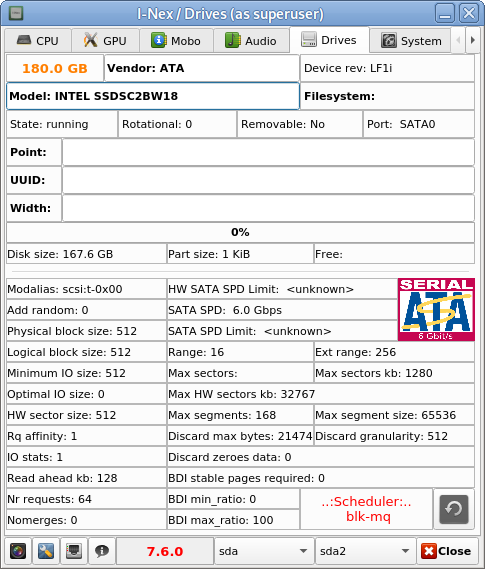
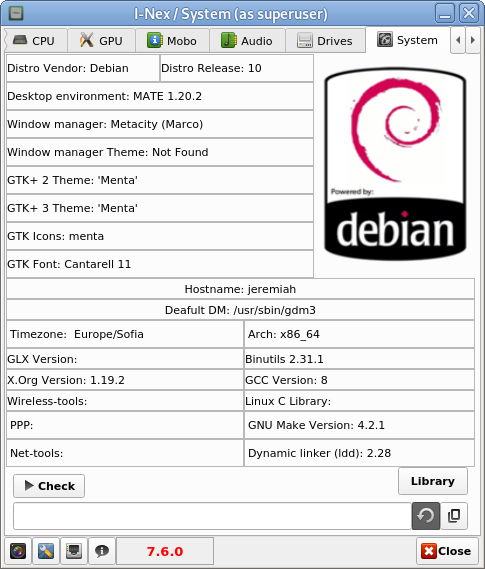
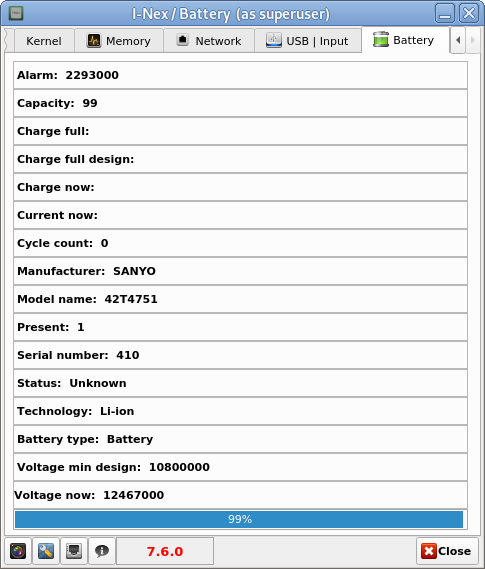
I-Nex is even more useful for general hardware reporting as it reports many hardware specifications not reported by CPU-X such as Battery type and Model Name  (if the hardware report is on a laptop), info on USB devices slots or plugged USB devices brand and specifications, the available Network devices on the system (MAC Addresses) of each of it, Installed and used drivers on Hard Disk (ATA / SATA / SCSI / SSD), HW Sector size, Logical Block size, HDD Sectors count and other specific Hard Drive data as well as information on available Audio (Sound Blaster) devices (HDA-Intel), used Codecs, loaded kernel ALSA driver, Video card used and most importantly indicators on Processor reported CPU (temperature).


To install I-nex

Go to https://launchpad.net/i-nex or any of the mirror links where it resides and install the respective package, in my case, I was doing the installation on Debian Linux, so fetched current latest amd64 package which as of moment of writting this article is i-nex_7.6.0-0-bzr977-20161012-ubuntu16.10.1_amd64.deb , next installed it with dpkg
 

dpkg -i i-nex_7.6.0-0-bzr977-20161012-ubuntu16.10.1_amd64.deb


As the package was depending on some other .deb packages, which failed to install to install the missing ones I had to further run
 

apt –fix-broken install

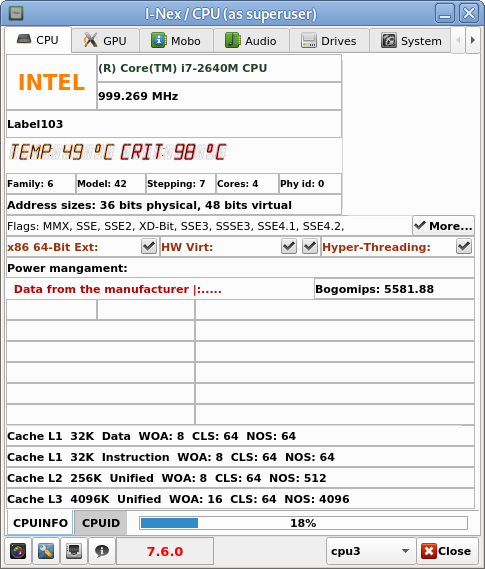
i-nex-cpu-info-linux-hardware-info-program


hre

I-Nex thermal indicators about CPU temperature on a Linux Desktop notebook

i-nex-gpu-info-linux-hardware-info-program

i-nex-mobo-info-linux-hardware-info-program

i-nex-audio-info-linux-hardware-info-program

i-nex-drivers-info-linux-hardware-info-program

i-nex-system-info-linux-hardware-info-program

i-nex-battery-info-linux-hardware-info-program


There are other Hardware identification report tools such as CUDA-Z that are useful to check if you have Nvidia Video Card hardware Installed on the PC to check the status of CUDA enabled GPUs, useful if working with nVidia Geforce, Quadro, Tesla cards and ION chipsets.

If you use it however be aware that CUDA-Z is not compatible with 3rd-party linux drivers for NVidia so make sure you have the current official Nvidia version.


5. Inxi full featured system information script


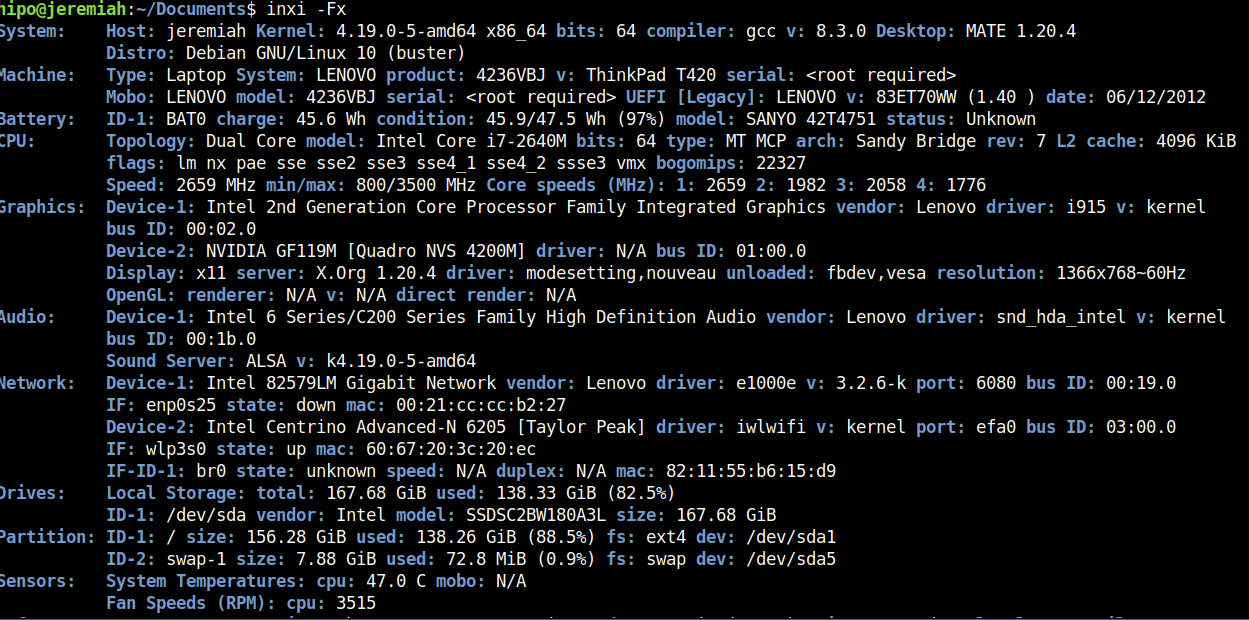
Inxi is a 10000 lines mega bash script that fetches hardware details from multiple different sources in /proc /sys and from commands on the system, and generates a beautiful looking console report that non technical users can read easily.

inxi-10-k-mega-bash-shell-script-reporting-on-installed-system-computer-hardware


inxi -Fx


inxi-report-on-installed-hardware-on-my-lenovo-thinkpad-home-laptop

Each of the pointed above tools has different method of collection of Hardware information from various resources e.g. – kernel loaded modules, dmesg, files like /proc/meminfo /proc/version /proc/scsi/scsi /proc/partitions.
Hence some of the tools are likely to report more info than otheres, so in case if some information you need regarding the system plugged in hardware is missing you can perhaps obtain it from another program. Most Linux distribution desktop provided GNOME package are including Hardinfo gui tool, but in many cases above mentioned tools are likely to add even more on info on what is inside your PC Box.
If you're aware of others tools that are useful not mentioned here please share it.

How to permanently enable Cookies in Lynx text browser – Disable accept cookies prompt in lynx console browser

Wednesday, April 18th, 2012

lynx-text-browser-logo
The default behaviour of lynx console text browser on Linuces, BSD and other free OSes is to always ask, for the accept cookies prompt once an internet web page is opened that requires browser cookies to be enabled.

I should admin, having this "secure by default" (always ask for new cookies) behaviour in lynx was a good practice from a security point of view.

Another reason, why this cookies prompt is enabled by default is back in the days, when lynx was actively developed by programmers the websites with cookies support was not that many and even cookies was mostly required for user/pass authentication (all those who still remember this days the websites that requires authentication was a way less than today) …
With this said the current continuing security cautious behaviour in the browser, left from its old days is understandable.

Screenshot Google Accept cookies Lynx dialog FreeBSD

However I personally sometimes, need to use lynx more frequently and this behaviour of always opening a new website in text mode in console to prompts me for a cookie suddenly becomes a big waste of time if you use lynx to browser more than few sites. Hence I decided to change the default way lynx handles cookies and make them enabled by default instead.
Actually even in the past, when I was mainly using internet in console on every new server or home Linux install, I was again making the cookies to be permanently accepted.
Everyone who used lynx a few times already knows its "annoying" to all time accept cookie prompts … This provoked me to write this short article to explain how enabling of constant cookie accepting in lynx is done

To enable the persistent cookies in lynx, one needs to edit lynx.cfg on different GNU / Linux and BSD* distributions lynx.cfg is located in different directory.

Most of the lynx.cfg usual locations are /etc/lynx/lynx.cfg or /etc/lynx.cfg as of time of writting this post in Debian Squeeze GNU / Linux the lynx.cfg is located in /etc/lynx-cur/lynx.cfg, whether for FreeBSD / NetBSD / OpenBSD users the file is located in /usr/local/etc/lynx.cfg

What I did to allow all cookies is open lynx.cfg in vim edit and change the following lines:

a)

#FORCE_SSL_COOKIES_SECURE:FALSE

with

FORCE_SSL_COOKIES_SECURE:TRUE

b)

#SET_COOKIES:TRUE

uncomment it to:

SET_COOKIES:TRUE

c) next, change

ACCEPT_ALL_COOKIES:FALSE

ACCEPT_ALL_COOKIES:TRUE

Onwards opening any website with lynx auto-accepts the cookies.

lynx Always allowing from domain cookies Linux screenshot

Google in Bulgarian Lynx browser screenshot

For people who care about there security (who still browse in console (surely not many anymore)), permanently allowing the cookies is not a good idea. But for those who are ready to drop off little security for convenience its ok.
 

How to mount NTFS Windows XP filesystem on FreeBSD, NetBSD, OpenBSD

Friday, May 11th, 2012

Mounting NTFS hdd partitions on FreeBSD logo picture

A friend of mine bring home a Seagate External Hard Disk Drive using USB 3 as a communication media. I needed to attach the hard disk to my FreeBSD router to transfer him some data, the External HDD is formatted to use NTFS as a main file partition and hence to make the file transfers I had to somehow mount the NTFS partition on the HDD.

FreeBSD and other BSDs, just like Linux does not have embedded NTFS file system mount support.
In order to add an external write support for the plugged hdd NTFS I looked in the ports tree:

freebsd# cd /usr/ports
freebsd# make search name='ntfs'
Port: fusefs-ntfs-2010.10.2
Path: /usr/ports/sysutils/fusefs-ntfs
Info: Mount NTFS partitions (read/write) and disk images
Maint: ports@FreeBSD.org
B-deps: fusefs-libs-2.7.4 libiconv-1.13.1_1 libtool-2.4 libublio-20070103 pkg-config-0.25_1
R-deps: fusefs-kmod-0.3.9.p1.20080208_7 fusefs-libs-2.7.4 libiconv-1.13.1_1 libublio-20070103 pkg-config-0.25_1
WWW: http://www.tuxera.com/community/

Port: ntfsprogs-2.0.0_1
Path: /usr/ports/sysutils/ntfsprogs
Info: Utilities and library to manipulate NTFS partitions
Maint: ports@FreeBSD.org
B-deps: fusefs-libs-2.7.4 libiconv-1.13.1_1 libublio-20070103 pkg-config-0.25_1
R-deps: libublio-20070103 pkg-config-0.25_1
WWW: http://www.linux-ntfs.org/
freebs# cd sysutils/fusefs-ntfs/
freebsd# ls
Makefile distinfo files/ pkg-descr pkg-plist
freebsd# cat pkg-descr
The ntfs-3g driver is an open source, freely available read/write NTFS
driver, which provides safe and fast handling of the Windows XP, Windows
Server 2003 and Windows 2000 filesystems. Almost the full POSIX filesystem
functionality is supported, the major exceptions are changing the file
ownerships and the access rights.
WWW: http://www.tuxera.com/community/

Using ntfs-3g I managed to succeed mounting the NTFS on my old PC running FreeBSD ver. 7_2

1. Installing fuserfs-ntfs support on BSD

Before I can use ntfs-3g, to mount the paritition, I had to install fuserfs-ntfs bsd port, with:

freebsd# cd /usr/ports/sysutils/fusefs-ntfs
freebsd# make install clean
.....

I was curious if ntfsprogs provides other utilities to do the ntfs mount but whilst trying to install it I realized it is already installed as a dependency package to fusefs-ntfs.

fusefs-ntfs package provides a number of utilities for creating, mounting, fixing and doing various manipulations with Microsoft NTFS filesystems.

Here is a list of all the executable utilities helpful in NTFS fs management:

freebsd# pkg_info -L fusefs-ntfs\* | grep -E "/bin/|/sbin|README"
/usr/local/bin/lowntfs-3g
/usr/local/bin/ntfs-3g
/usr/local/bin/ntfs-3g.probe
/usr/local/bin/ntfs-3g.secaudit
/usr/local/bin/ntfs-3g.usermap
/usr/local/bin/ntfscat
/usr/local/bin/ntfscluster
/usr/local/bin/ntfscmp
/usr/local/bin/ntfsfix
/usr/local/bin/ntfsinfo
/usr/local/bin/ntfsls
/usr/local/sbin/mkntfs
/usr/local/sbin/ntfsclone
/usr/local/sbin/ntfscp
/usr/local/sbin/ntfslabel
/usr/local/sbin/ntfsresize
/usr/local/sbin/ntfsundelete
/usr/local/share/doc/ntfs-3g/README
/usr/local/share/doc/ntfs-3g/README.FreeBSD

The README and README.FreeBSD are wonderful, reading for those who want to get more in depth knowledge on using the up-listed utilities.

One utility, worthy to mention, I have used in the past is ntfsfix. ntfsfix resolve issues with NTFS partitions which were not unmounted on system shutdown (electricity outage), system hang up etc.

2. Start fusefs (ntfs) and configure it to auto load on system boot

Once fuserfs-ntfs is installed, if its necessery ntfs fs mounts to be permanently supported on the BSD system add fusefs_enable="YES" to /etc/rc.conf(the FreeBSD services auto load conf).

freebsd# echo 'fusefs_enable="YES"' >> /etc/rc.conf

One note to make here is that you need to have also dbus_enable="YES" and hald_enable="YES" in /etc/rc.conf, not having this two in rc.conf will prevent fusefs to start properly. Do a quick grep to make sure this two variables are enabled:

Afterwards fsusefs load up script should be run:

freebsd# /usr/local/etc/rc.d/fusefs start
Starting fusefs.

Another alternative way to load ntfs support on the BSD host is to directly load fuse.ko kernel module:

freebsd# /sbin/kldload fuse.ko

3. Mounting the NTFS partition

In my case, the Seagate hard drive was detected as da0, where the NTFS partition was detected as s1 (da0s1):

freebsd# dmesg|grep -i da0
da0 at umass-sim0 bus 0 target 0 lun 0
da0: Fixed Direct Access SCSI-4 device
da0: 40.000MB/s transfers
da0: 953869MB (1953525164 512 byte sectors: 255H 63S/T 121601C)br />GEOM_LABEL: Label for provider da0s1 is ntfs/Expansion Drive.
GEOM_LABEL: Label for provider da0s1 is ntfs/Expansion Drive.

Therefore further to mount it one can use mount_ntfs (to quickly mount in read only mode) or ntfs-3g for (read / write mode):

If you need to just quickly mount a disk drive to copy some data and umount it with no need for writting to the NTFS partition do;

freebsd# /sbin/mount_ntfs /dev/ad0s1 /mnt/disk

Note that mount_ntfs command is a native BSD command and have nothing to do with ntfs-3g. Therefore using it to mount NTFS is not the same as mounting it via ntfs-3g cmd

freebsd# /usr/local/bin/ntfs-3g -o rw /dev/da0s1 /mnt/disk/

Something, I've noticed while using ntfs-3g is, it fails to properly exit even when the ntfs-3g shell execution is over:

freebsd# ps ax |grep -i ntfs|grep -v grep
18892 ?? Is 0:00.00 /usr/local/bin/ntfs-3g -o rw /dev/da0s1 /mnt/disk/

I dunno if this is some kind of ntfs-3g bug or feature specific to all versions of FreeBSD or it is something local to FBSD 7.2

Thought ntfs-3g, keeps appearing in process list, praise God as of time of writting NTFS support on FreeBSD prooved to be stable.
Read / Write disk operations to the NTFS I tested it with works great. Just about 5 years ago I still remember write mode was still experimental. Now it seems NTFS mounts can be used with no hassle even on production machines.

4. Auto mounting NTFS partition on FreeBSD system boot

There are two approaches towards 'the problem' I can think of.
The better way to auto mount on boot (in my view) is through /etc/fstab use

If /etc/fstab + ntfs-3g is to be used, you will however change the default /sbin/mount_ntfs command to point to /usr/local/bin/ntfs-3g, i.e.:

freebsd# mv /sbin/mount_ntfs /sbin/mount_ntfs.orig
freebsd# ln -s /usr/local/bin/ntfs-3g /sbin/mount_ntfs

Then to mount /dev/da0s1 via /etc/fstab add line:

/dev/ad0s1 /mnt/disk ntfs rw,late 0 0

To not bother with text editor run:

freebsd# echo '/dev/ad0s1 /mnt/disk ntfs rw,late 0 0' >> /etc/fstab

I've red in posts in freebsd forums, there is also a way to use ntfs-3g for mounting partitions, without substituting the original bsd /sbin/mount_ntfs, the exact commands suggested to be used with no need to prior mv /sbin/mount_ntfs to /sbin/mount_ntfs.orig and link it to ntfs is:

/dev/ad0s1 /disk ntfs rw,mountprog=/usr/local/bin/ntfs-3g,late 0 0

For any other NTFS partitions, for instance /dev/ad0s2, /dev/ad2s1 etc. simply change the parititon name and mount points.

The second alternative to adding the NTFS to auto mount is through /etc/rc.local. /etc/rc.local content will be executed very late in system boot. :

echo '/usr/local/bin/ntfs-3g -o rw /dev/da0s1' >> /etc/rc.local

One disadvanage of using /etc/rc.local for mounting the partition is the hanging ntfs-3g in proc list:

freebsd# ps ax |grep -i ntfs|grep -v grep
18892 ?? Is 0:00.00 /usr/local/bin/ntfs-3g -o rw /dev/da0s1 /mnt/disk/

Though, I haven't tested it yet. Using the same methodology should be perfectly working on PC-BSD, DragonFlyBSD, NetBSD and OpenBSD.
I will be glad if someone who runs any of the other BSDs can confirm, following this instructions works fine on these BSDs too.

diskinfo Linux hdparm FreeBSD equivalent command for disk info and benchmarking

Thursday, March 8th, 2012

FreeBSD Linux hdparm equivalent is diskinfo artistic logo

On Linux there is the hdparm tool for various hard disk benchmarking and extraction of hard disk operations info.
As the Linux manual states hdparmget/set SATA/IDE device parameters

Most Linux users should already know it and might wonder if there is hdparm port or equivalent for FreeBSD, the aim of this short post is to shed some light on that.

The typical use of hdparm is like this:

linux:~# hdparm -t /dev/sda8

/dev/sda8:
Timing buffered disk reads: 76 MB in 3.03 seconds = 25.12 MB/sec
linux:~# hdparm -T /dev/sda8
/dev/sda8:
Timing cached reads: 1618 MB in 2.00 seconds = 809.49 MB/sec

The above output here is from my notebook Lenovo R61i.
If you're looking for alternative command to hdparm you should know in FreeBSD / OpenBSD / NetBSD, there is no exact hdparm equivalent command.
The somehow similar hdparm equivallent command for BSDs (FreeBSD etc.) is:
diskinfo

diskinfo is not so feature rich as linux's hdparm. It is just a simple command to show basic information for hard disk operations without no possibility to tune any hdd I/O and seek operations.
All diskinfo does is to show statistics for a hard drive seek times I/O overheads. The command takes only 3 arguments.

The most basic and classical use of the command is:

freebsd# diskinfo -t /dev/ad0s1a
/dev/ad0s1a
512 # sectorsize
20971520000 # mediasize in bytes (20G)
40960000 # mediasize in sectors
40634 # Cylinders according to firmware.
16 # Heads according to firmware.
63 # Sectors according to firmware.
ad:4JV48BXJs0s0 # Disk ident.

Seek times:
Full stroke: 250 iter in 3.272735 sec = 13.091 msec
Half stroke: 250 iter in 3.507849 sec = 14.031 msec
Quarter stroke: 500 iter in 9.705555 sec = 19.411 msec
Short forward: 400 iter in 2.605652 sec = 6.514 msec
Short backward: 400 iter in 4.333490 sec = 10.834 msec
Seq outer: 2048 iter in 1.150611 sec = 0.562 msec
Seq inner: 2048 iter in 0.215104 sec = 0.105 msec

Transfer rates:
outside: 102400 kbytes in 3.056943 sec = 33498 kbytes/sec
middle: 102400 kbytes in 2.696326 sec = 37978 kbytes/sec
inside: 102400 kbytes in 3.178711 sec = 32214 kbytes/sec

Another common use of diskinfo is to measure hdd I/O command overheads with -c argument:

freebsd# diskinfo -c /dev/ad0s1e
/dev/ad0s1e
512 # sectorsize
39112312320 # mediasize in bytes (36G)
76391235 # mediasize in sectors
75784 # Cylinders according to firmware.
16 # Heads according to firmware.
63 # Sectors according to firmware.
ad:4JV48BXJs0s4 # Disk ident.

I/O command overhead:
time to read 10MB block 1.828021 sec = 0.089 msec/sector
time to read 20480 sectors 4.435214 sec = 0.217 msec/sector
calculated command overhead = 0.127 msec/sector

Above diskinfo output is from my FreeBSD home router.

As you can see, the time to read 10MB block on my hard drive is 1.828021 (which is very high number),
this is a sign the hard disk experience too many read/writes and therefore needs to be shortly replaced with newer faster one.
diskinfo is part of the basis bsd install (bsd world). So it can be used without installing any bsd ports or binary packages.

For the purpose of stress testing hdd, or just some more detailed benchmarking on FreeBSD there are plenty of other tools as well.
Just to name a few:
 

  • rawio – obsolete in FreeBSD 7.x version branch (not available in BSD 7.2 and higher)
  • iozone, iozone21 – Tools to test the speed of sequential I/O to files
  • bonnie++ – benchmark tool capable of performing number of simple fs tests
  • bonnie – predecessor filesystem benchmark tool to bonnie++
  • raidtest – test performance of storage devices
  • mdtest – Software to test metadata performance on filsystems
  • filebench – tool for micro-benchmarking storage subsystems

Linux hdparm allows also changing / setting various hdd ATA and SATA settings. Similarly, to set and change ATA / SATA settings on FreeBSD there is the:

  • ataidle

tool.

As of time of writting ataidle is in port path /usr/ports/sysutils/ataidle/

To check it out install it as usual from the port location:

FreeBSD also has also the spindown port – a small program for handling automated spinning down ofSCSI harddrive
spindown is useful in setting values to SATA drives which has problems with properly controlling HDD power management.

To keep constant track on hard disk operations and preliminary warning in case of failing hard disks on FreeBSD there is also smartd service, just like in Linux.
smartd enables you to to control and monitor storage systems using the Self-Monitoring, Analysisand Reporting Technology System (S.M.A.R.T.) built into most modern ATA and SCSI hard disks.
smartd and smartctl are installable via the port /usr/ports/sysutils/smartmontools.

To install and use smartd, ataidle and spindown run:

freebsd# cd /usr/ports/sysutils/smartmontools
freebsd# make && make install clean
freebsd# cd /usr/ports/sysutils/ataidle/
freebsd# make && make install clean
freebsd# cd /usr/ports/sysutils/spindown/
freebsd# make && make install clean

Check each one's manual for more info.

BSD (Berkley Software Distribituion) use by distribution type (FreeBSD, NetBSD, OpenBSD, DrangflyBSD) use percantage charts

Saturday, February 18th, 2012

I've hit an interesting article in Wikipedia called Comparison of BSD operating systems
The article explains basic difference between different BSD (Berkley Software Distributions) and what is the primary accent of each of the BSD (free software OS) distributions. It also reveals basic details about the history and how each of the BSD's came to existence. I recommend to anyone interested in free software as it is just a great reading for everybody interested in FOSS.

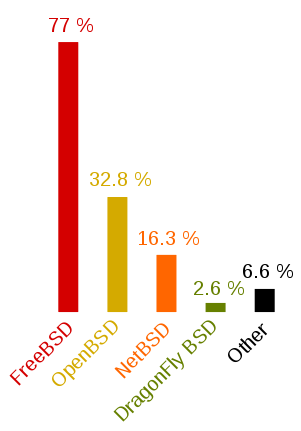
The most interesting part of the wiki thread is a bar chart, provided by BSD Certification Group research conducted in September 2005.

FreeBSD, OpenBSD, NetBSD, Dragonflybsd usage statistics

The above diagram is showing the proportion of users of each BSD variant from the BSD usage survey prior conducted

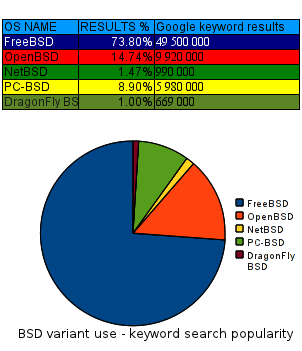
The research is already 6 years old, and unfortunately as of time of writting seems to be the only publicly available. Though being outdated, I believe generally the bar charts distributions along different BSD variants would be mostly true. The only big difference will be probably in PC-BSD which is not even on the diagram should have outbeaten DragonflyBSD's use. Since there is no public data available for 2012 and the years 2005 – 2012 for the use percantage of each of the BSD distributions, I've thought about a pseudo way to get some general statistics on each of the BSD distributions popularity. The methodology to gather the required statistics comes to simply, type in Google each of the BSD variant "code names" (e.g. freebsd, netbsd, openbsd etc.) and look at the number of results returned. It seems logical the more results distribution keyword searched returns, the bigger the probability of more users to be involved in developing or using the respective BSD variant.

Below you see the results, I've gathered in my quick "google research":

FreeBSD NetBSD OpenBSD BSD variant (users) use diagram based on Google searches of keywords 2012

As you can see in the above data FreeBSD is still probably leading the BSD use, the public interest to OpenBSD – BSD focused on security has significantly grow since the last 6 years. Next it is seen the PC-BSD users base has probably tremendously increased and according to the Google results returned it is probably on a 3rd place by users interest (use?) followed by NetBSD with only 1.47% of all the BSD users. Lastly with only 0.99%, orders Dragonfly BSD which no longer is so popular as a Desktop BSD based OS as it used to be back in 2005.
Again the presented diagram results are based on only on the factor of Google BSD variant popularity and hence shouldn't be consired too trustworthy, still I'm sure it gives a general idea on how used is each of the BSD variants as of Jan 2012.

How to mount ISO image files in Graphical Environment (GUI) on Ubuntu and Debian GNU/Linux

Saturday, January 14th, 2012

Mounting ISO files in Linux is easy with mount cmd, however remembering the exact command one has to issue is a hard task because mounting ISO files is not a common task.

Mounting ISO files directly by clicking on the ISO file is very nice, especially for lazy people uninitiated with the command line 😉

Besides that I'm sure many Windows users are curious if there is an equivallent program to DaemonTools for Linux / BSD*?

The answer to this question is YES!
There are two major programs which can be used as a DaemonTools substitute on Linux:

These are FuriousISOMount and AcetoneISO
AcetoneISO is more known and I've used it some long time ago and if I'm correct it used to be one of the first ISO Mount GUI programs for Linux. There is a project called GMount-ISO / (GMountISO) which of the time of writting this article seems to be dead (at least I couldn't find the source code).

Luckily FuriousISOMount and AcetoneISO are pretty easy to install and either one of the two is nowdays existing in most Linux distributions.
Probably the programs can also be easily run on BSD platform also quite easily using bsd linux emulation.
If someone has tried something to mount GUIs in Free/Net/OpenBSD, I'll be interesting to hear how?

1. Mount ISO files GUI in GNOME with Furius ISO Mount

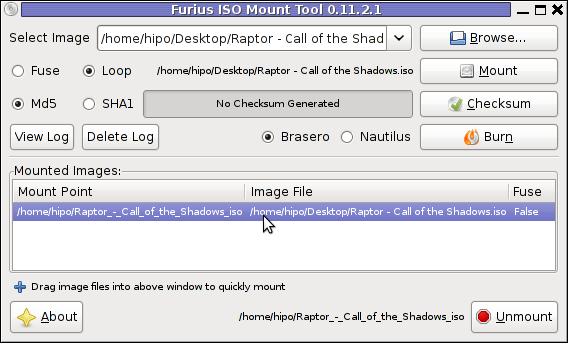
FuriousISOMount is a simple Gtk+ interface to mount -t iso9660 -o loop command.

To start using the program on Debian / Ubuntu install with apt;

debian:~# apt-get install furiusisomount
The following extra packages will be installed:
fuseiso fuseiso9660 libumlib0
The following NEW packages will be installed:
furiusisomount fuseiso fuseiso9660 libumlib0

To access the program in GNOME after install use;

Applications -> Accessories -> Furious ISO Mount

Screenshot ISO Mount Tool Debian GNU/Linux Screenshot
 

When mounting it is important to choose Loop option to mount the iso instead of Fuse

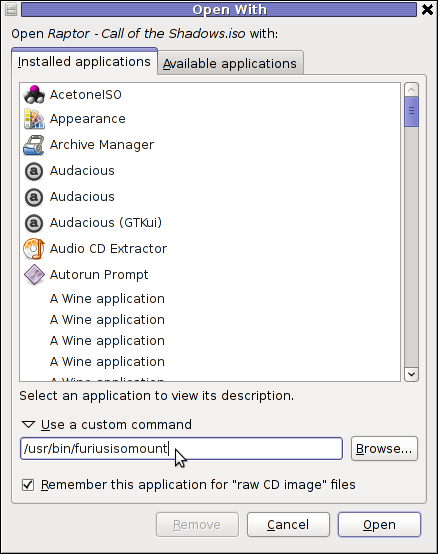
After the program is installed to associate the (.iso) ISO files, to permanently be opened with furiusisomount roll over the .iso file and choose Open With -> Other Application -> (Use a custom command) -> furiusisomount

GNOME Open with menu Debian GNU / Linux

2. Mount ISO Files in KDE Graphical Environment with AcetoneISO

AcetoneISO is build on top of KDE's QT library and isway more feature rich than furiousisomount.
Installing AcetoneISO Ubuntu and Debian is done with:

debian:~# apt-get install acetoneiso
The following NEW packages will be installed:
acetoneiso gnupg-agent gnupg2 libksba8 pinentry-gtk2 pinentry-qt4
0 upgraded, 6 newly installed, 0 to remove and 35 not upgraded.
Need to get 3,963 kB of archives.
After this operation, 8,974 kB of additional disk space will be used.
...

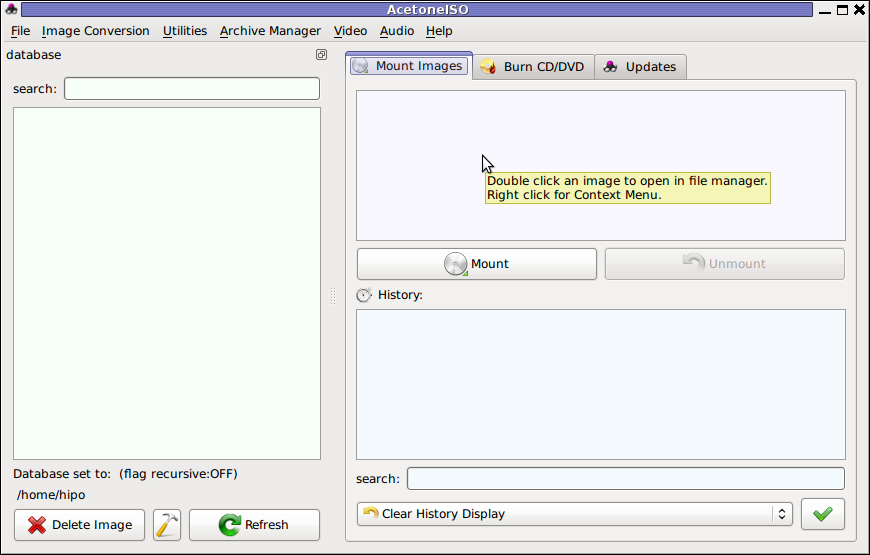
Screenshot Furius ISO Mount Tool Debian GNU/Linux ScreenShot

AcetoneISO supports:
 

  • conversion between different ISO formats
  • burn images to disc
  • split ISO image volumes
  • encrypt images
  • extract password protected files

Complete list of the rich functionality AcetoneISO offers is to be found on http://www.acetoneteam.org/viewpage.php?page_id=6
To start the program via the GNOME menus use;

Applications -> Accessories -> Sound & Video -> AcetoneISO

I personally don't like AcetoneISO as I'm not a KDE user and I see the functionality this program offers as to rich and mostly unnecessery for the simple purpose of mounting an ISO.

3. Mount ISO image files using the mount command

If you're a console guy and still prefer mounting ISO with the mount command instead of using fancy gui stuff use:

# mount -t iso9660 -o loop /home/binary/someiso.iso /home/username/Iso_Directory_Name


How to install OpenNTPD NTP server to synchronize system clock on FreeBSD for better security

Sunday, February 12th, 2012

FreeBSD, OpenBSD, NetBSD and Linux ntpd alternative server to synchronize server system time

Lately I've been researching on ntpd and wrote a two articles on how to install ntpd on CentOS, Fedora and how to install ntpd on FreeBSD and during my research on ntpd, I've come across OpenNTPD and decided to give it a go on my FreeBSD home router.
OpenBSD project is well known for it is high security standards and historically has passed the test of time for being a extraordinary secure UNIX like free operating system.
OpenBSD is developed in parallel with FreeBSD, however the development model of the two free operating systems are way different.

As a part of the OpenBSD to be independant in its basis of software from other free operating systems like GNU / Linux and FreeBSD. They develop the all around free software realm known OpenSSH. Along with OpenSSH, one interesting project developed for the main purpose of OpenBSD is OpenNTPD.

Here is how openntpd.org describes OpenNTPD:

"a FREE, easy to use implementation of the Network Time Protocol. It provides the ability to sync the local clock to remote NTP servers and can act as NTP server itself, redistributing the local clock."

OpenNTPD's accent just like OpenBSD's accent is security and hence for FreeBSD installs which targets security openntpd might be a good choice. Besides that the so popular classical ntpd has been well known for being historically "insecure", remote exploits for it has been released already at numerous times.

Another reason for someone to choose run openntpd instead of ntpd is its great simplicity. openntpd configuration is super simple.

Here are the steps I followed to have openntpd time server synchronize clock on my system using other public accessible openntpd servers on the internet.

1. Install openntpd through pkg_add -vr openntpd or via ports tree

a) For binar install with pkg_add issue:

freebsd# pkg_add -vr openntpd
...

b) if you prefer to compile it from source

freebsd# cd /usr/ports/net/openntpd
freebsd# make install clean
...

2. Enable OpenNTPD to start on system boot:

freebsd# echo 'openntpd_enable="YES"' >> /etc/rc.conf

3. Create openntpd ntpd.conf configuration file

There is a default sample ntpd.conf configuration which can be straight use as a conf basis:

freebsd# cp -rpf /usr/local/share/examples/openntpd/ntpd.conf /usr/local/etc/ntpd.conf

Default ntpd.conf works just fine without any modifications, if however there is a requirement the openntpd server to listen and accept time synchronization requests from only certain hosts add to conf something like:

listen on 192.168.1.2
listen on 192.168.1.3
listen on 2607:f0d0:3001:0009:0000:0000:0000:0001
listen on 127.0.0.1

This configuration will enable only 192.168.1.2 and 192.168.1.3 IPv4 addresses as well as the IPv6 2607:f0d0:3001:0009:0000:0000:0000:0001 IP to communicate with openntpd.

4. Start OpenNTPD service

freebsd# /usr/local/etc/rc.d/openntpd

5. Verify if openntpd is up and running

freebsd# ps axuww|grep -i ntp
root 31695 0.0 0.1 3188 1060 ?? Ss 11:26PM 0:00.00 ntpd: [priv] (ntpd)
_ntp 31696 0.0 0.1 3188 1140 ?? S 11:26PM 0:00.00 ntpd: ntp engine (ntpd)
_ntp 31697 0.0 0.1 3188 1088 ?? S 11:26PM 0:00.00 ntpd: dns engine (ntpd)
root 31700 0.0 0.1 3336 1192 p2 S+ 11:26PM 0:00.00 grep -i ntp

Its also good idea to check if openntpd has succesfully established connection with its peer remote openntpd time servers. This is necessery to make sure pf / ipfw firewall rules are not preventing connection to remote 123 UDP port:

freebsd# sockstat -4 -p 123
USER COMMAND PID FD PROTO LOCAL ADDRESS FOREIGN ADDRESS
_ntp ntpd 31696 4 udp4 83.228.93.76:54555 212.70.148.15:123
_ntp ntpd 31696 6 udp4 83.228.93.76:56666 195.69.120.36:123
_ntp ntpd 31696 8 udp4 83.228.93.76:49976 217.75.140.188:123

By default openntpd is also listening to IPv6 if IPv6 support is enabled in freebsd kernel.

6. Resolve openntpd firewall filtering issues

If there is a pf firewall blocking UDP requests to in/out port 123 within /etc/pf.conf rule like:

block in log on $EXT_NIC proto udp all

Before the blocking rule you will have to add pf rules:

# Ipv4 Open outgoing port TCP 123 (NTP)
pass out on $EXT_NIC proto tcp to any port ntp
# Ipv6 Open outgoing port TCP 123 (NTP)
pass out on $EXT_NIC inet6 proto tcp to any port ntp
# Ipv4 Open outgoing port UDP 123 (NTP)
pass out on $EXT_NIC proto udp to any port ntp
# Ipv6 Open outgoing port UDP 123 (NTP)
pass out on $EXT_NIC inet6 proto udp to any port ntp

where $EXT_NIC is defined to be equal to the external lan NIC interface, for example:
EXT_NIC="ml0"

Afterwards to load the new pf.conf rules firewall has to be flushed and reloaded:

freebsd# /sbin/pfctl -f /etc/pf.conf -d
...
freebsd# /sbin/pfctl -f /etc/pf.conf -e
...

In conclusion openntpd should be more secure than regular ntpd and in many cases is probably a better choice.
Anyhow bear in mind on FreeBSD openntpd is not part of the freebsd world and therefore security updates will not be issued directly by the freebsd dev team, but you will have to regularly update with the latest version provided from the bsd ports to make sure openntpd is 100% secure.

For anyone looking for more precise system clock synchronization and not so focused on security ntpd might be still a better choice. The OpenNTPD's official page states it is designed to reach reasonable time accuracy, but is not after the last microseconds.
 

How to Split files on Linux FreeBSD, NetBSD and OpenBSD

Sunday, July 31st, 2011

Split large files in pieces Scissors

Did you have the need to sometimes split an SQL extra large files to few pieces in order to be able to later upload it via phpmyadmin?
Did you needed an extra large video or data file to be cut in few pieces in order to transfer it in few pieces over an USB stick?
Or just to give you an another scenario where I sometimes need to have an enormous file let’s say 3G split in few pieces, in order to later read it in vim or mcedit .
I sometimes need to achieve this on FreeBSD and Linux hosts thus I thought it will be helpful to somebody to give a very quick tutorial on the way large files can be cut in pieces on Linux and BSD hosts.

GNU/Linux and FreeBSD are equipped with the split command. The purpose of this command is exactly the cutting of a file to a number of pieces.

On Linux the split command comes by default install to the system with the coreutils package on most Debian (deb) based and Redhat based (rpm) distributions, theerefore Linux’s version of split is GNU/split since it’s part of the GNU Coreutils package. An interesting fact about Linux split is that one of the two programmers who has coded it is Richard Stallman 😉

On BSD Unix split is the AT&T UNIX (BSD) split

In the past splitting files in pieces was much more needed than today, as people used floppy drives to transfer data, though today with the bloom of Internet and the improve of the data carriers transferring even an extra large files from one place to another is a way more trivial task still at many occasions splitting it in pieces is needed.

Even though today splitting file is very rarely required, still there are times when being able to split a file in X number of parts is very much needed.
Maybe the most common use of splitting a file today is necessery when a large SQL file dumps, like let’s say 200 MBytes of info database needs to be moved from ane hosting provider to another one.
Many hosting providers does disallow direct access with standard mySQL client programs to the database directly and only allow a user to connect only via phpMyAdmin or some other web interface like Cpanel to improve data into the SQL or PostgreSQL server.

In such times, having knowledge on the Unix split command is a priceless asset.

Even though on Linux and BSD the code for the split command is not identical and GNU/split and BSD/split has some basic differences, the use of split on both of these Unices is identical.
The way to split a file in few pieces using on both Linux and BSD OSes is being done with one and the same command, here is how:

1. Splitting file in size of 40 mb On Linux

linux:~# split -b 40m SQL-Backup-Data.sql SQL-Backup-Data_split

2. Splitting file in size of 40mb on BSD (FreeBSD, OpenBSD, NetBSD)

freebsd# split -b 40m SQL-Backup-Data.sql SQL-Backup-Data_split

The Second argument the split command takes is actually called a prefix, the prefix is used as a basis name for the creation of the newly generated files cut in pieces file based on SQL-Backup-Data.sql.

As I said identical command will split the SQL-Backup-Data.sql files in a couple of parts which of it will be sized 40 megas.

These command will generate few files output like:

freebsd# ls -1 SQL-Backup-Dat*SQL-Backup-Data.sql
SQL-Backup-Dataa
SQL-Backup-Dataab
SQL-Backup-Dataac
SQL-Backup-Dataad
SQL-Backup-Dataae

As you see the SQL-Backup-Data.sql with size 200MB is being split in four files each of which is sized 40mbytes.

After the files are transfered to another Linux or BSD host, they can easily be again united in the original file with the command:

linux:~# for i in $(ls -1 SQL-Backup-Data_split*); echo $i >> SQL-Backup-Data.sql

Alternatively in most Unices also using cat should be enough to collect back the pieces into the original file, like so:

freebsd# cat SQL-Backup-Data_split* >> SQL-Backup-Data.sql

Enjoy splitting

How to block IP address with pf on FreeBSD, NetBSD and OpenBSD

Wednesday, July 27th, 2011

Pf Firewall BSD logo

I’ve noticed some IPs which had a kind of too agressive behaviour towards my Apache webserver and thus decided to filter them out with the Firewall.
As the server is running FreeBSD and my firewall choise is bsd’s pf I added the following lines to my /etc/pf.conf to filter up the abiser IP:

table persist file "/etc/pf.blocked.ip.conf"
EXT_NIC="ml0" # interface connected to internet
block drop in log (all) quick on $EXT_NIC from to any
echo '123.123.123.123' >> /etc/pf.blocked.ip.conf

As you see I’m adding the malicious IP to /etc/pf.blocked.ip.conf, if I later decide to filter some other IPs I can add them up there and they will be loaded and filtered by pf on next pf restart.

Next I restarted my pf firewall definitions to make the newly added rules in pf.conf to load up.

freebsd# pfctl -d
freebsd# pfctl -e -f /etc/pf.conf

To show all IPs which will be inside the blockips filtering tables, later on I used:

pfctl -t blockips -T show

I can also later use pf to add later on new IPs to be blocked without bothering to restart the firewall with cmd:

freebsd# pfctl -t blockedips -T add 111.222.333.444

Deleting an IP is analogous and can be achieved with:

freebsd# pfctl -t blockedips -T delete 111.222.333.444

There are also logs stored about pf IP blocking as well as the other configured firewall rules in /var/log/pflog file.
Hope this is helpful to somebody.