Posts Tagged ‘Installing’

How to make 27 inch monitor to work on 2560×1440 with Virtualbox Linux

Wednesday, October 4th, 2023

make-virtualbox-with-linux-work-on-2k-2560x1440-howto

I've bought a new "second hand" refurbished EIZO Flexscan Monitor EV2760 S1 K1 awesome monitor re from Kvant Serviz a company reseller of Second Hand electronics that is located on the territy of Bulgarian Academy of Sciences (BAN / BAS) and was created by BAS people originally for the BAS people and am pretty happy with it for doing my daily job as system administrator, especially as the monitor has been used on very short screen time for only 256 use hours (which is less than a year of full-use time), whether EIZO does guarantee their monitors to be able to serve up to 5 Full years monitor use time.

For those who deals with Graphics such as Designers and people into art working with Computers knows EIZO brand Monitors for quite some time now and it seems as much of those people are using Windows or Macintoshes, these monitors have been mainly created to work optimally with Windows / Mac computers on a higher resolution.
My work PC that is Dell Latitude 5510 with its HDMI cable has been running perfect with The EIZO with Windows 10, however as I'm using a Virtualbox virutal machines with CentOS Linux, the VM does not automatically detected the highest resolution 2K that this monitors supports 2560×1440 at 60 Hz is the best one can use to get more things fit into the screen and hopefully also good for the Eyes, the Ecoview shoulk also be a good idea for the eyes, as the Ecoview by EIZO tries to adjust the monitor brightness to lower levels according to the light in the room to try to minimize the eye strain on the eyes. The Ecoview mode is a little bit I guess like the famous BENQ's monitors Eye care. 
I'm talking about all this Displays specifics as I spend quite a lot of time to learn the very basics about monitors as my old old 24 Inch EIZO Monitor Flexscan model 2436W started to wear off with time and doesn't support HDMI cable input, so I had to use a special. cable connector that modifies the signal from HDMI to DVI (and I'm not sure how this really effects the eyes), plus the DVI quality is said to be a little bit worse than HDMI as far as I read a bit on the topic online.

Well anyways currently I'm a happy owner of the EIZO EV2760 Monitor which has a full set of inputs of:

  • 27" In-Plane Switching (IPS) Panel
  • DisplayPort | HDMI | DVI-D | 3.5mm Audio
  • 2560 x 1440 Native Resolution
  • 1000:1 Typical Contrast Ratio
     

I've tried to make the monitor work with Linux and my first assumption from what I've read was that I have to reinstall the Guess Addition Tools on the Virtualbox with additing the Guest Addition Tools via the Vbox GUI interface:

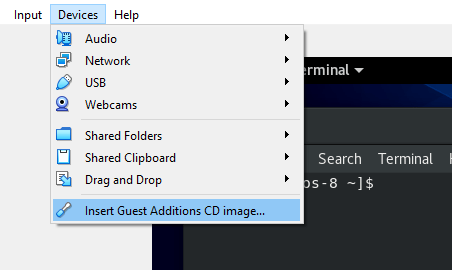
Devices -> Insert Guest Additions CD Image
virtualbox-resolutions-screenshot

But got an error that the Guest additions tools iso is missing
So eventually resolved it by remounting and reinstalling the guest addition tools with the following set of commands:

[root@localhost test]# yum install perl gcc dkms kernel-devel kernel-headers make bzip2
[root@localhost test]# cd /mnt/cdrom/
[root@localhost cdrom]# ls
AUTORUN.INF  runasroot.sh                       VBoxSolarisAdditions.pkg
autorun.sh   TRANS.TBL                          VBoxWindowsAdditions-amd64.exe
cert         VBoxDarwinAdditions.pkg            VBoxWindowsAdditions.exe
NT3x         VBoxDarwinAdditionsUninstall.tool  VBoxWindowsAdditions-x86.exe
OS2          VBoxLinuxAdditions.run


[root@localhost cdrom]# ./VBoxLinuxAdditions.run 

Verifying archive integrity… All good.
Uncompressing VirtualBox 6.1.34 Guest Additions for Linux……..
VirtualBox Guest Additions installer
Removing installed version 6.1.34 of VirtualBox Guest Additions…
Copying additional installer modules …
Installing additional modules …
VirtualBox Guest Additions: Starting.
VirtualBox Guest Additions: Building the VirtualBox Guest Additions kernel
modules.  This may take a while.
VirtualBox Guest Additions: To build modules for other installed kernels, run
VirtualBox Guest Additions:   /sbin/rcvboxadd quicksetup <version>
VirtualBox Guest Additions: or
VirtualBox Guest Additions:   /sbin/rcvboxadd quicksetup all
VirtualBox Guest Additions: Building the modules for kernel
3.10.0-1160.80.1.el7.x86_64.
ERROR: Can't map '//etc/selinux/targeted/policy/policy.31':  Invalid argument

ERROR: Unable to open policy //etc/selinux/targeted/policy/policy.31.
libsemanage.semanage_read_policydb: Error while reading kernel policy from /etc/selinux/targeted/active/policy.kern. (No such file or directory).
OSError: No such file or directory
VirtualBox Guest Additions: Running kernel modules will not be replaced until
the system is restarted


The solution to that was to reinstal the security policy-target was necessery

[root@localhost test]# yum install selinux-policy-targeted –reinstall


And of course rerun the reinstall of Guest addition tools up to the latest

[root@localhost cdrom]# ./VBoxLinuxAdditions.run 

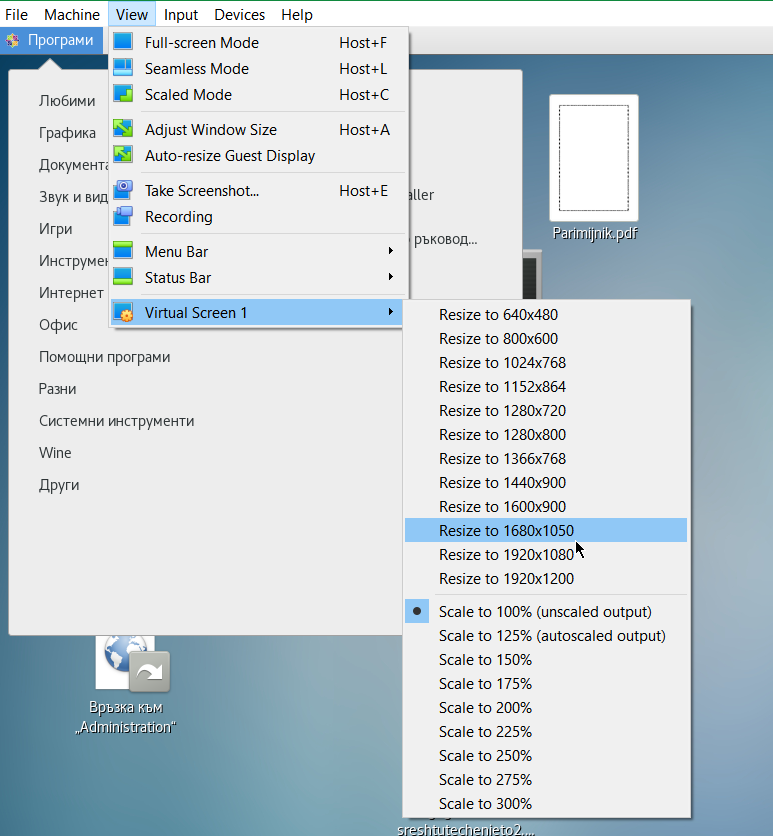
Unfortunately that doesn't make it resolve it and even shutting down the VM machine and reloading it again with Raised Video Memory for the simulated hardware from settings from 16 MB to 128MB for the VM does not give the option from the Virtualbox interface to set the resolution from
 

View -> Virtual Screen 1 (Resize to 1920×1200)

to any higher than that.

After a bit of googling I found some newer monitors doesn't seem to be seen by xrandr command and few extra commands with xrandr need to be run to make the 2K resolution 2560×1440@60 Herzes work under the Linux virtual machine.

These are the extra xranrd command that make it happen

# xrandr –newmode "2560x1440_60.00" 311.83  2560 2744 3024 3488  1440 1441 1444 1490  -HSync +Vsync
# xrandr –addmode Virtual1 2560x1440_60.00
# xrandr –output Virtual1 –mode "2560x1440_60.00"

As this kind of settings needs to be rerun on next time the Virtual Machine runs it is a good idea to place the commands in a tiny shell script:

[test@localhost ~]$ cat xrandr-set-resolution-to-2560×1440.sh 
#!/bin/bash
xrandr –newmode "2560x1440_60.00" 311.83  2560 2744 3024 3488  1440 1441 1444 1490  -HSync +Vsync
xrandr –addmode Virtual1 2560x1440_60.00
xrandr –output Virtual1 –mode "2560x1440_60.00"


You can Download  the xrandr-set-resolution-to-2560×1440.sh script from here

Once the commands are run, to make it affect the Virtualbox, you can simply put it in FullScreen mode via


View -> Full-Screen Mode (can be teriggered from keyboard by pressing Right CTRL + F) together

[test@localhost ~]$ xrandr –addmode Virtual1 2560x1440_60.00
[test@localhost ~]$ xrandr –output Virtual1 –mode "2560x1440_60.00"
[test@localhost ~]$ xrandr 
Screen 0: minimum 1 x 1, current 2560 x 1440, maximum 8192 x 8192
Virtual1 connected primary 2560×1440+0+0 (normal left inverted right x axis y axis) 0mm x 0mm
   1920×1200     60.00 +  59.88  
   2560×1600     59.99  
   1920×1440     60.00  
   1856×1392     60.00  
   1792×1344     60.00  
   1600×1200     60.00  
   1680×1050     59.95  
   1400×1050     59.98  
   1280×1024     60.02  
   1440×900      59.89  
   1280×960      60.00  
   1360×768      60.02  
   1280×800      59.81  
   1152×864      75.00  
   1280×768      59.87  
   1024×768      60.00  
   800×600       60.32  
   640×480       59.94  
   2560x1440_60.00  60.00* 
Virtual2 disconnected (normal left inverted right x axis y axis)
Virtual3 disconnected (normal left inverted right x axis y axis)
Virtual4 disconnected (normal left inverted right x axis y axis)
Virtual5 disconnected (normal left inverted right x axis y axis)
Virtual6 disconnected (normal left inverted right x axis y axis)
Virtual7 disconnected (normal left inverted right x axis y axis)
Virtual8 disconnected (normal left inverted right x axis y axis)

Tadadadam ! That's all folks, enjoy having your 27 Inch monitor running at 2560×1440 @ 60 Hz 🙂


Improve MobaXterm Best Windows terminal client with some additional settings tune ups / Install extra Linux Cygwin tools on MobaXterm and various post install configuration goodies

Friday, January 20th, 2023

mobaxterm-logo_400x400-terminal-client-tune-up-howto-for-a-new-install

Earlier I've written a an article MobaXTerm: A good gnome-terminal like tabbed SSH client for Windows / Windows Putty Tabs Alternative in which I've introduced the best in my opinion SSH / Telnet / VNC / RDP / Xserver in one Terminal client emulator for Windows operating systems.

The client has been around for quite some time and it has been improving rapidly over the last 10 years, where it now more looks like a separate Operating System than a single terminal client. It's size is quite compact as well and my opinion and every self respectiving developer, system administrator, IT geek or a hacker would definitely
use the mobaxterm at home or at work place on a daily. I guess some of my readers, who have already migrated SuperPutty / SecureCRT or Putty / XMing or whatever kind of exotic Remote SSH Console terminal is used could validate this 🙂
Therefore as I've set up Mobaxterm on a multiple computers all around, I've found it useful to write a small article with some post-install hints (tune ups) one can do immediately once he has installed the Desktop or Portable Apps version of mobaxterm on desktop PC / notebook.
 

1. Set up your bashrc server / command aliases

Lets say you need to setup some rules for connectivity via a socks proxy to dig holes over a harsh company firewalls or add
custom options to every ssh client attempt to remote server, or simply alias some of your servers with custom connectivity options
and so on simply open vi / vim text editor from mobaxterm local terminal and place inside your rules, for example that could be anything like:


alias ssh='ssh -o stricthostkeychecking=no -o passwordauthentication=yes -o PreferredAuthentications=password  -v'
alias sftp='sftp -o stricthostkeychecking=no -o passwordauthentication=yes -o PreferredAuthentications=password'

alias work-server='ssh UserName@work-server -v -o passwordauthentication=yes -o PreferredAuthentications=password'

alias proxy='ssh -D 3128 UserName@proxyIP-host1 -o ConnectTimeout=80'
alias proxy1='ssh -D 3128 UserName@proxy-host2 -p 443 -o ConnectTimeout=60'
alias proxy3='ssh -D 3128 Username@proxy-host3 -p 443 -o ConnectTimeout=60'

Simply open the terminal and setup whatever you require
export ftp_proxy="http://proxy-host:8080"
export https_proxy="https://proxy-host:8080"
export http_proxy="http://proxy-host:8080"
export HTTP_PROXY="http://proxy-host:8080"
export HTTPS_PROXY="http://proxy-host:8080"


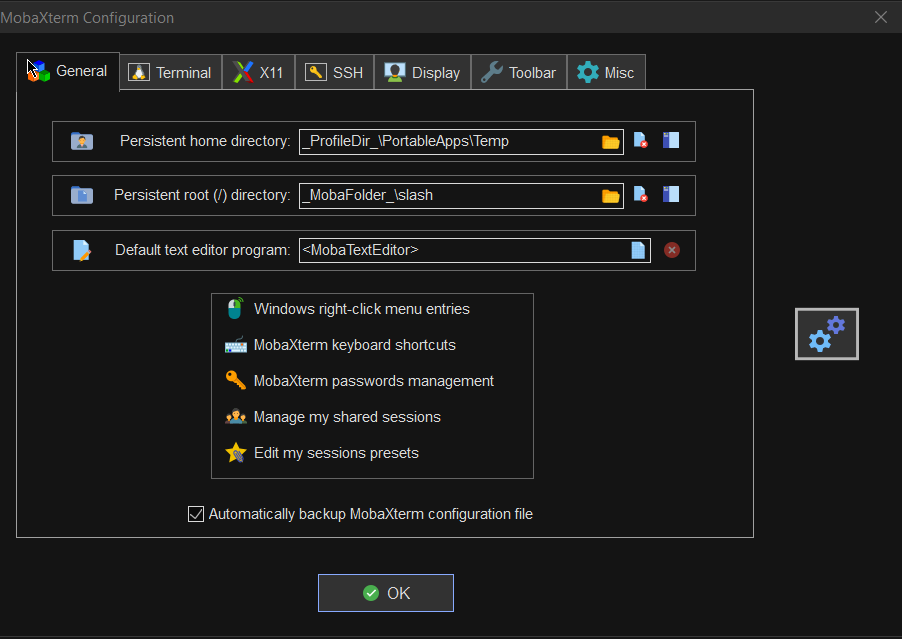
2. Set mobaxterm presistent directory / persistent root directory and default text editor

Make sure you have properly defined at least Persistent directory / Persistent directory if you want to keep the files under your /home/mobaxterm and root directory be able to save your data from local mobaxterm terminal work you have done.

To do so o to Configuration -> General

MobaXterm-persistent-home-directory
 

3. Change default settings for Opening / Closing Terminal tabs just like in gnome-terminal

MobaXterm is really awesome as the developer, followed pretty much the logic of some common GNU / Linux Terminal clients like Gnome-Terminal and KDE's default Konsole terminal.

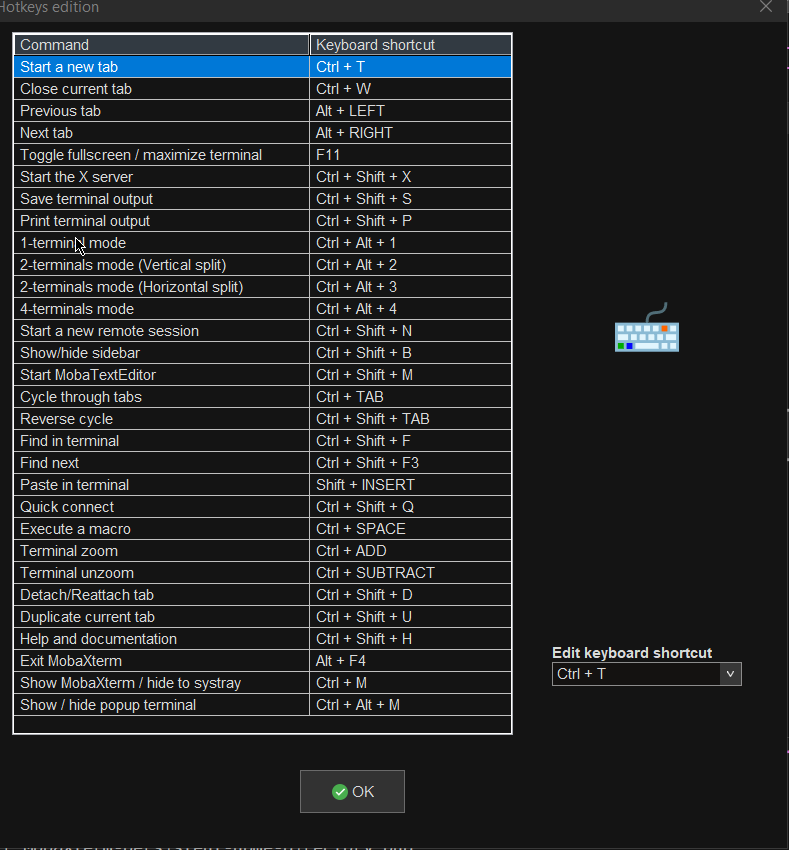
One of the first things to do once Mobaxterm is installed on the PC is to set up nice key binds as default onces might be heard to learn at the beginning or you might have already the habit to use the certain set of key combinations on your Linux desktop:

Common once are:

1. Open tab / Close tab common once I bind to are (CTRL + T / CTRL + W)
2. Previous tab move / Next tab move keys common one I use are (ALT + LEFT / ALT + RIGHT)
3. Find in terminal (CTRL + F)

rebind-mobaxterm-standard-keys
 

4. Make MobaXterm to automatically open a terminal to not Start local terminal every time

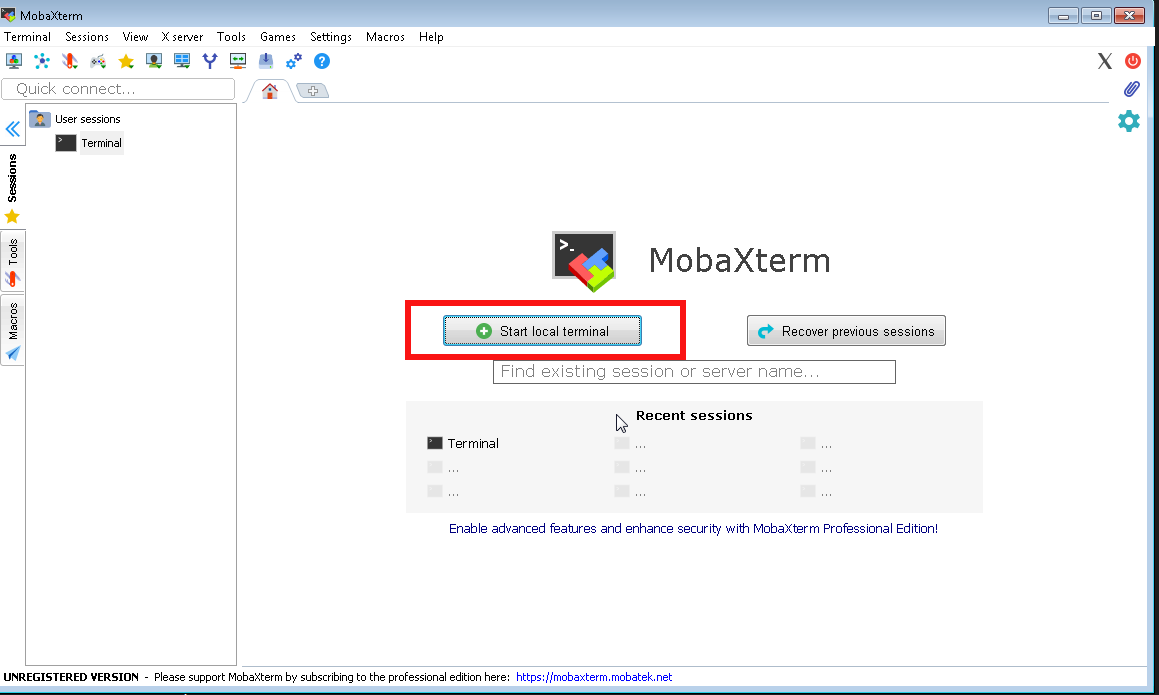
By default mobaxterm it is really annoying cause every time you run it after system reboot you have to select
Start local terminal
Once you run the terminal you get this prompt and you have to press on Start local terminal

mobaxterm-start-local-terminal


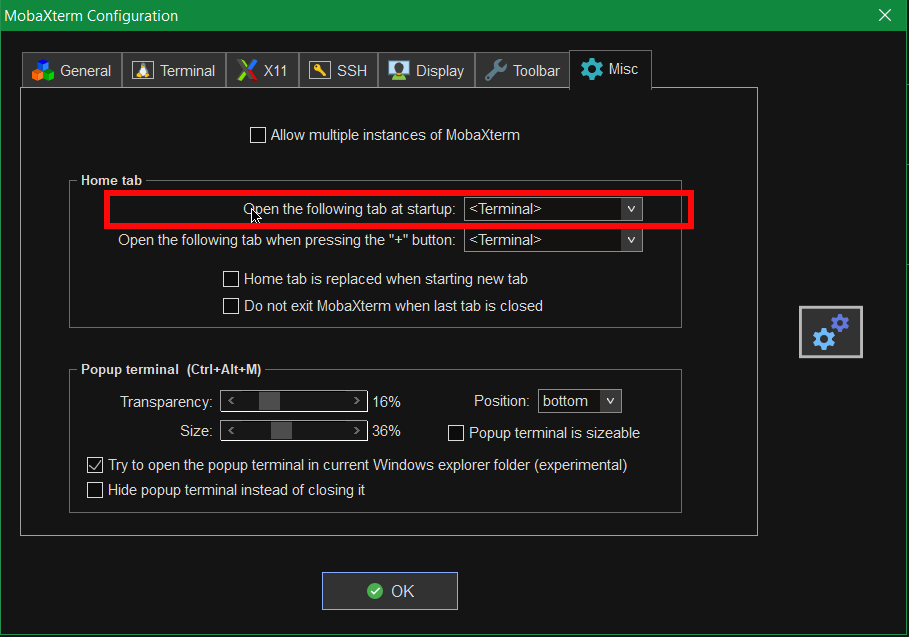
How to make Mobaxterm automatically open local Terminal Tab on every boot?
 

To fix this so every time a local terminal is spawn on MobaXterm you have get to:
 

Settings -> Configuration -> Misc


Open the Following tab at startup by default it will be

<Home (Pinned)>

Change it to:

<Terminal>

mobaxterm-open-the-followintab-tab-in-startup

That's it on next login your Local Terminal with /bin/bash.exe will auto load !
 

[hipo.WINDOWS-PC] ➤ env|grep -i SHELL
SHELL=/bin/bash.exe
PATH=/bin:/drives/c/Users/hipo/DOCUME~1
/MobaXterm/slash/bin:/drives/c/Windows:/drives/c/Windows/system32:/drives/c/Windows/system32:/drives/c/Windows:/drives/c/Windows/System32/Wbem:
/drives/c/Windows/System32/WindowsPowerShell/v1.0:/drives/c/Windows/sysnative
PSModulePath=C:\Windows\system32\WindowsPowerShell\v1.0\Modules\
CMDPATH=C:\Windows\system32;C:\Windows;C:\Windows\System32\Wbem;
C:\Windows\System32\WindowsPowerShell\v1.0\;C:\Windows\sysnative\;
C:\Users\hipo\DOCUME~1\MobaXterm\slash\bin
WINPATH=C:\Windows\system32;C:\Windows;C:\Windows\System32\Wbem;C:\Windows\System32\WindowsPowerShell\v1.0\;C:\Windows\sysnative\


5. Make menu buttons to appear smaller


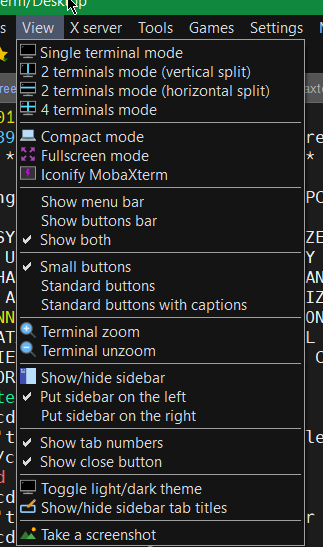
Go to menu and select
View -> (Small Buttons)

mobaxterm-select-small-buttons-screenshot

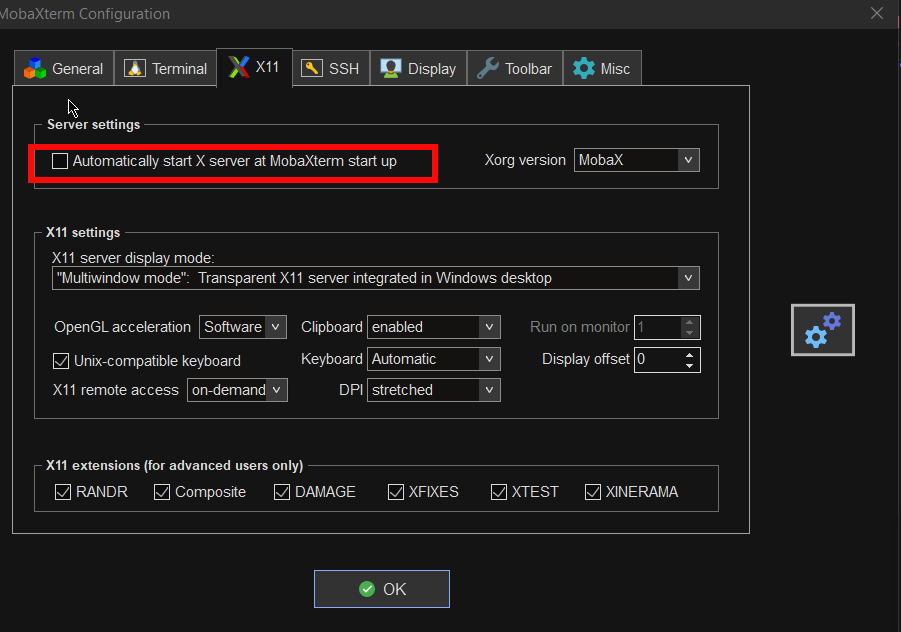
6. Disable auto start of XServer to prevent a port listener on the machine on TCP port

By default mobaxterm opens XServer listener, so you can immediately connect from a remote SSH servers missing Xserver and install software requiring an XServer, for example software such as Oracle Database or some MiddleWare WebLogig or IBM's Web Sphere. This is useful but if you want to have a good security only allow this server on a purpose. Otherwise the XServer will run in parallel with rest of your Moba and just load up your PC and eat up some RAM memory. To disable it go to:

mobaxterm-x11-automatically-start-X-server-disable-stop-at-startup

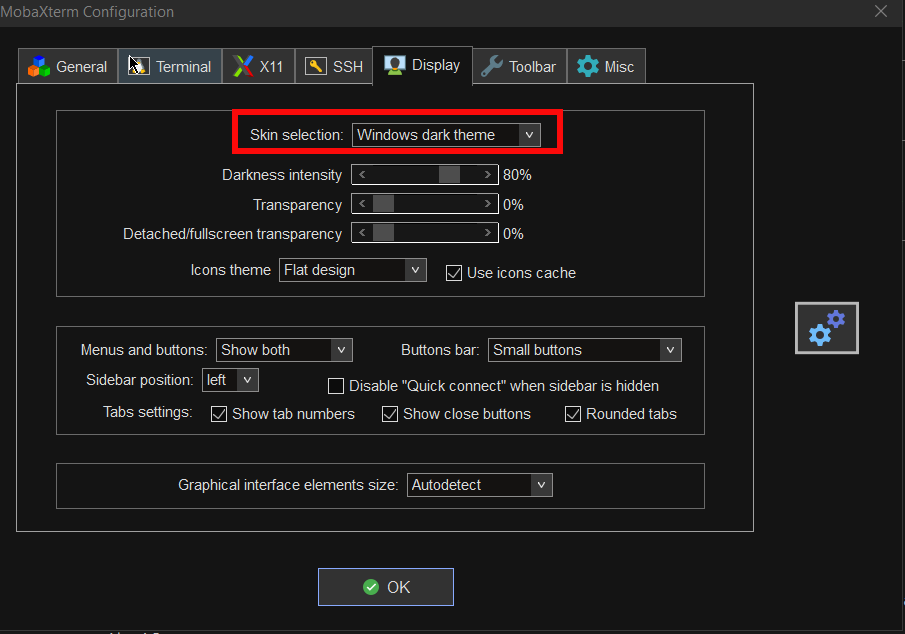
7. Change the mobaxterm Default theme to Dark

This is optional I like to set the Theme to Dark, also as a Theme for Windows as well as for MobaxTerm, the aim of that is simply to not put extra stress on my eye sight. Being on the PC around 8 to 10 hours and spending some 6 to 8 hours on console work is enough. If you want to do as well.

mobaxterm-change-default-theme-to-dark-theme

8. Install additional set of common Linux tools to mobaxterm to use on Windows
 

Tools such as:

1. Midnight Commander (mc)
2. Wget
3. Curl
4. Vim
5. Screen
6. Rsync
7. Perl
8. W3m
9. dosunix
10. unix2dos
11. gnupg
12. diffutils
13. mysql
14. mpg123
15. whois


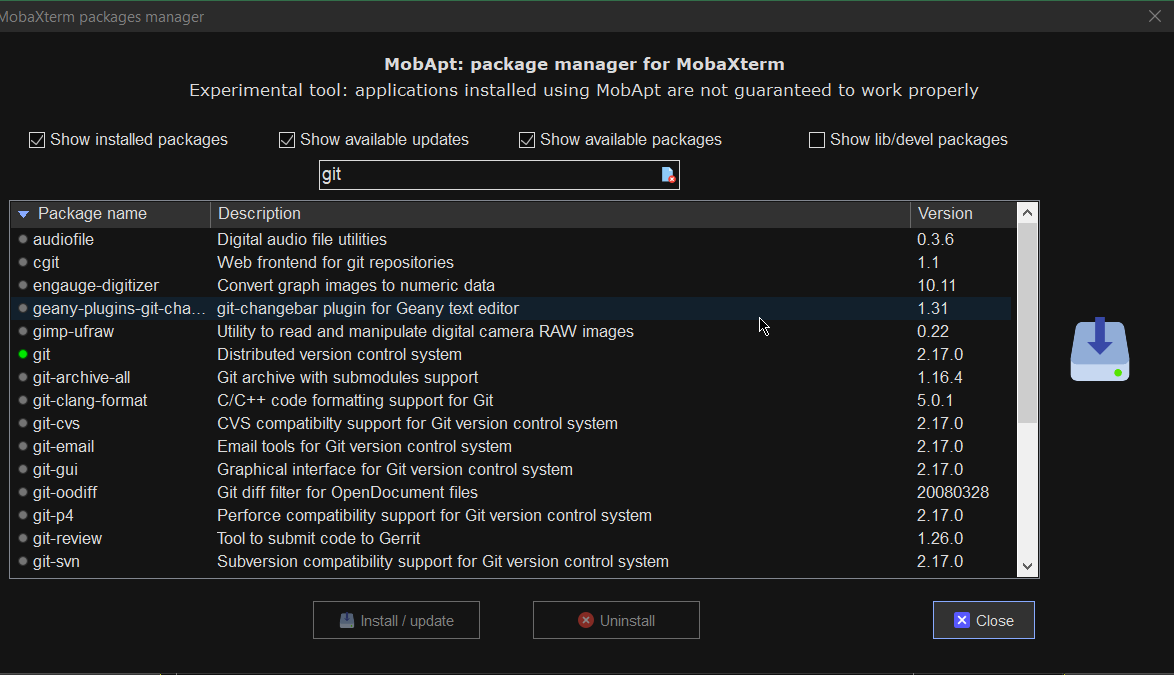
If you want to have a set of packages pre-installed that are including above as well as the rest of mine, here is a dump of my installed mobapt manager packages:

For more simply use the experimental Mobaxterm  Graphical Package installer
 

[hipo.WINDOWS-PC] ➤  for i in $(cat Downloads/installed-packages-mobaxterm.txt ); do apt-cyg install $i; done
 

Found package GeoIP-database

Installing GeoIP-database
Downloading GeoIP-database-20180505-1.tar.xz…
Unpacking GeoIP-database-20180505-1.tar.xz…


Running postinstall scripts
Package GeoIP-database installed.

Rebasing new libraries

Found package adwaita-icon-theme

Installing adwaita-icon-theme
Downloading adwaita-icon-theme-3.26.1-1.tar.xz…


You will be prompted for a single Yes for the respository

MobApt Packages Manager

mobapt-pkg-manager-install-git-from-gui-mobaxterm-package-installer

Though it is said it is experimental, I have to say the MobApt Apt Manager works quite good, I never had any issues with it so far.

9. Mobaxterm.ini the settings storage file that can help you move your configurations

If you have to prepeare new MobaXterm on multiple PCs frequently perhaps it is best to just copy the Mobaxterm.ini file. 
Here is an example of my mobaxterm.ini for download.
 

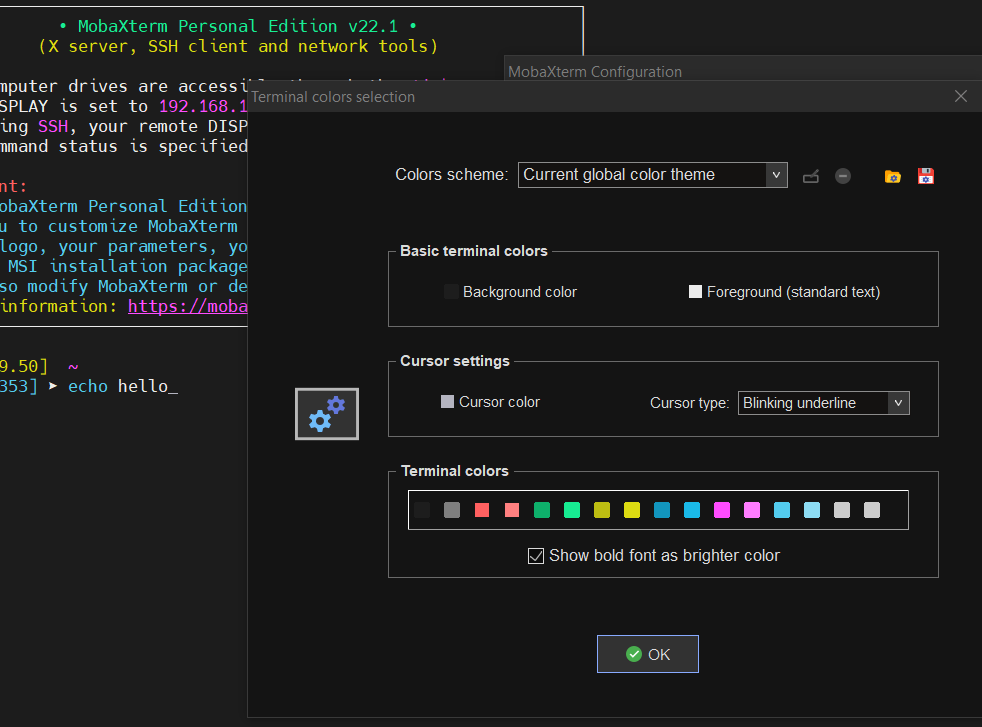
10. Change terminal colors and curor type and enable blinking (customizations)


Settings -> Configuration -> Terminal -> (Default Terminal Color Settings)


mobaxterm-change-terminal-colors-and-blinking-cursor-setting-screenshot

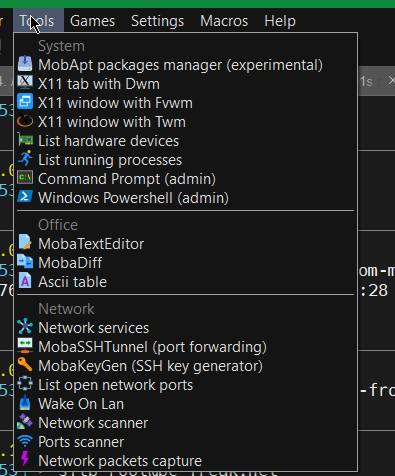
11. Use very useful moba Tools
 

mobaxterm-terminal-great-useful-tools-screenshot
For sysadmins Moba has plenty of other jems such as:

  • Network Port scanner such as Nmap with GUI

  • list open network ports (GUI interface to netmap)

  • SSH tunnel tool

  • Moba Diff

  • Wake on Lan

  • Network Packet capturer (such as tcpdump)

  • List running processes (such as taskmgr in simple form)

  • List machine hardware devices (such as Windows Device manager)

 
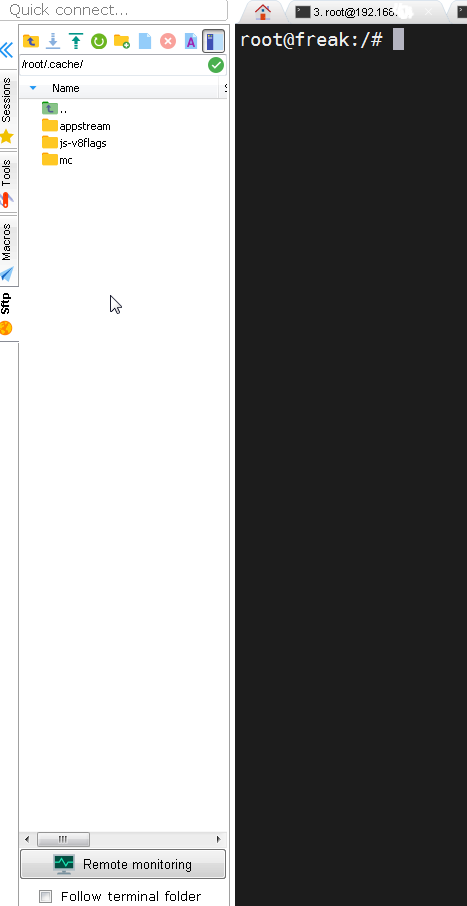
12. Remote monitoring of opened ssh session


To enable remote monitoring for a Saved session simply use the "Remote monitoring" button on the down left corner of the terminal.

mobaxterm-remote-monitoring-of-remote-ssh-server-screenshot-button

Or to enable it for a new host, open:

1. "Saved sessions"
2. Click over "User sessions"
3. New Session -> (SSH)
4. Basic SSH Settings (Remote host) -> OK
5. Click over the new created session
6. Click on Remote monitoring for the opened session

remote-monitoring-from-mobaxterm-screenshot

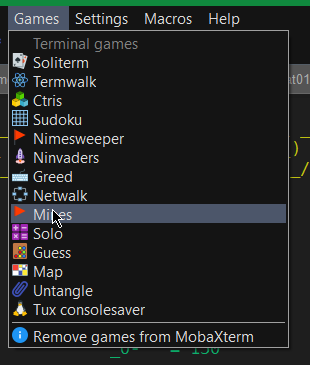
13. Play some mobaxterm console games

As you might have pissed off of configuring go on and enjoy some of the great console games, some of which are also present on a normal Linux new distribution installation. 🙂

mobaxterm-list-of-games-screenshot

List of Moba Games

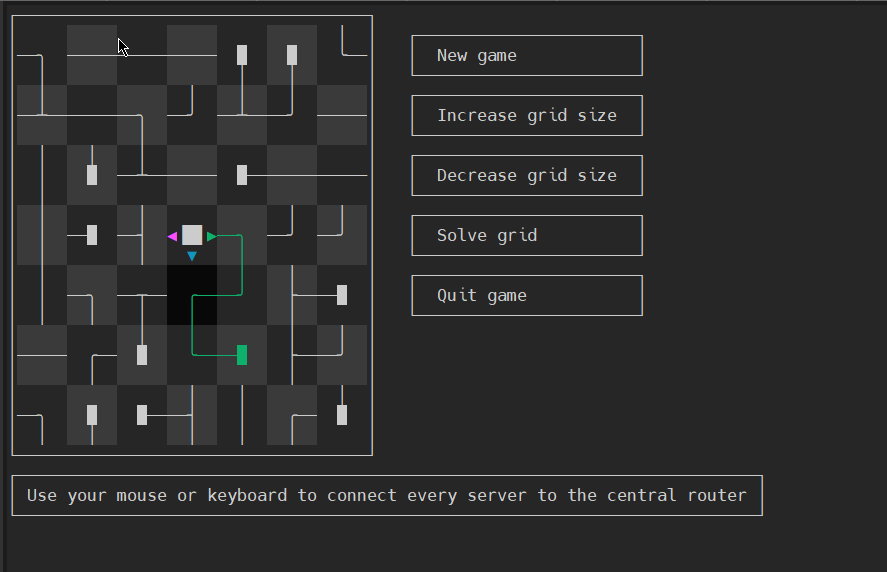
teamwalk-mobaxterm-console-connect-network-routers-game
TeamWalk (Use your mouse or keyboard to connect every server to the central router)

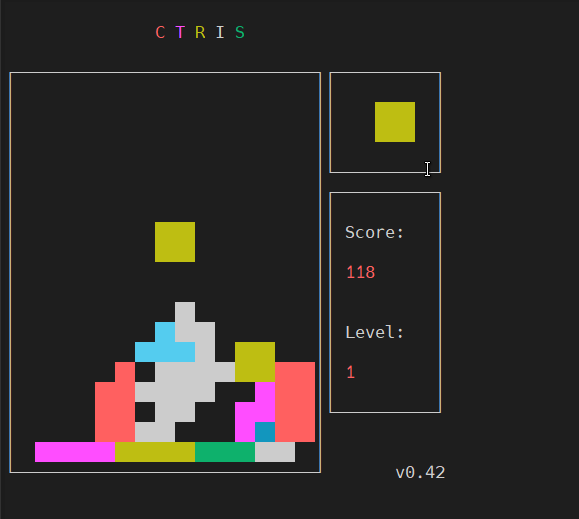
ctris-console-text-game-mobaxterm

Ctris Console tetris from Mobaxterm

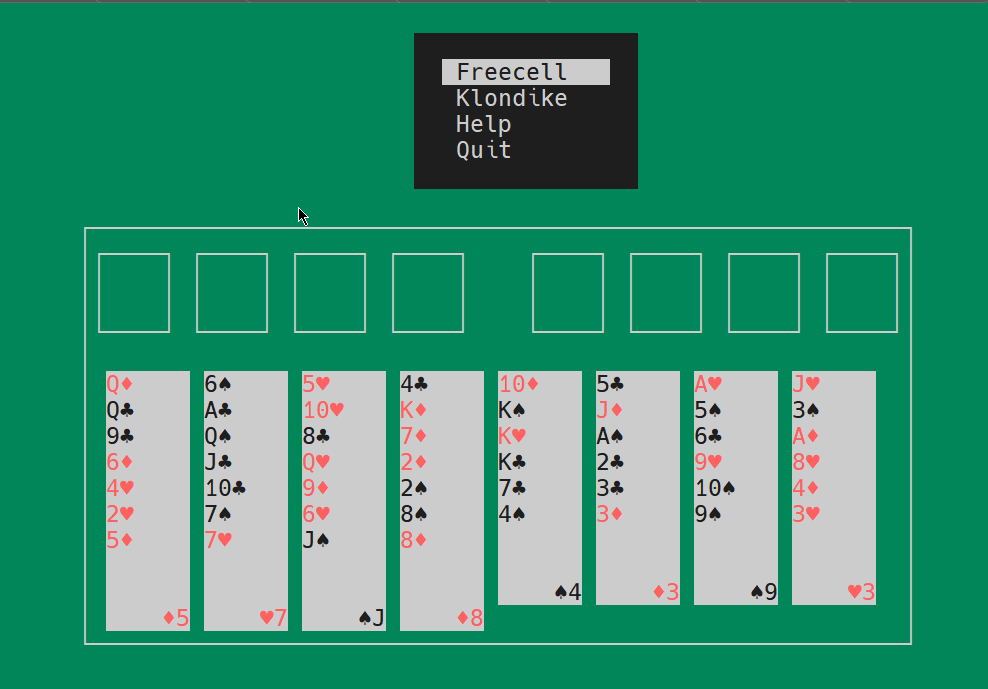
solitaire-text-console-game-played-on-mobaxterm-screenshot

Text console Solitaire from Moba
 

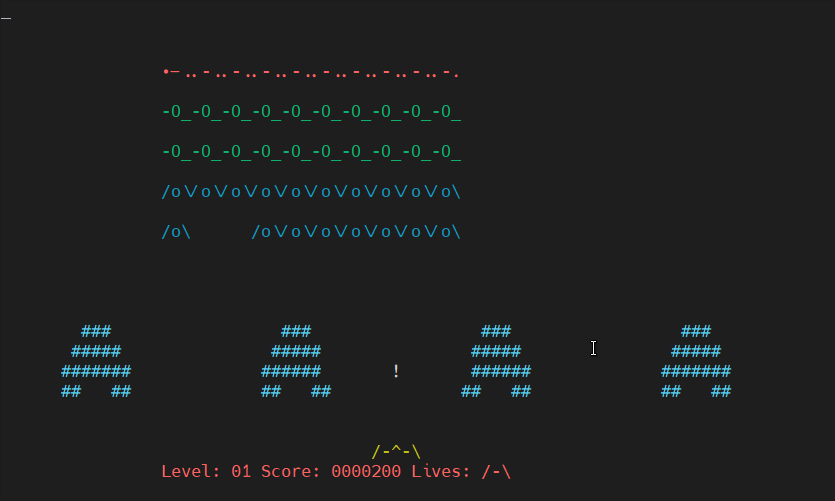
Ninvaders-console-game-mobaxterm

Here is NinVaders (Text Version of Space Invaders Arcade Classic)
 

Enjoy ! 🙂

CentOS 8 / Redhat 8 insert additional guests additions to VM to enable Fullscreen, Copy / Paste and Shared Folder from host OS

Monday, January 10th, 2022

virtualbox-guest-additions-install-on-centos-8.3-linux-oracle-logo

My experience with enabling virtualbox additions guest tools on many of the separate Linux distributions throughout time is pretty bad as it always is a pain in the ass to enable fully functional full screen and copy paste for Virtualbox…
 
For those who installed it for a first time vbox guest addition tools for Virtualbox are additional software components added so the Emulated Operating system
could allow better screen resolution and better mouse integration support.

So far I've installed virtualbox additions tools to CentOS 7 and Debian Linux various releases and faced complications there as well.
Few days ago my colleague Georgi Stoyanov have installed CentOS 8.3 with current version of VirtualBox 6.1 (vesrsion from beginning of 2022) and he has also shared had issues with enabling the CentOS 8.3 Linux to work with guestadditions but eventually found a resolution.

Thus he has shared with me the solution and I share it with you, so hopefully someone else could enable Guesttools on his CentOS 8.3 with less digging online.
The error received is:

# ./VBoxLinuxAdditions.run

Trying to install Guest Additions in RHEL 8.3.

VirtualBox Guest Additions: Starting.
VirtualBox Guest Additions: Building the VirtualBox Guest Additions kernel
modules. This may take a while.
VirtualBox Guest Additions: To build modules for other installed kernels, run
VirtualBox Guest Additions: /sbin/rcvboxadd quicksetup
VirtualBox Guest Additions: or
VirtualBox Guest Additions: /sbin/rcvboxadd quicksetup all
VirtualBox Guest Additions: Building the modules for kernel
4.18.0-193.el8.x86_64.

VirtualBox Guest Additions: Look at /var/log/vboxadd-setup.log to find out what
went wrong
ValueError: File context for /opt/VBoxGuestAdditions-6.0.20/other/mount.vboxsf already defined
VirtualBox Guest Additions: Running kernel modules will not be replaced until
the system is restarted
Press Return to close this window…

No idea what to do next. Been trying for sometime.


To enable guestaddtions in CentOS 8.3, e.g. get arount the error you have to:


1. Install all necessery dependncies RPMs required by GuestAddition tools


# dnf install tar bzip2 kernel-devel-$(uname -r) kernel-headers perl gcc make elfutils-libelf-devel

# dnf -y install gcc automake make kernel-headers dkms bzip2 libxcrypt-compat kernel-devel perl

2.  Run below semanage and restorecon commands


# semanage fcontext -d /opt/VBoxGuestAdditions-/other/mount.vboxsf
# restorecon /opt/VBoxGuestAdditions-/other/mount.vboxsf


3.  Insert Virtualbox guest additions ISO and Run it


centos-insert-guest-additions-linux-virtualbox-screenshot
 

Devices -> Insert Guest Additions CD Image


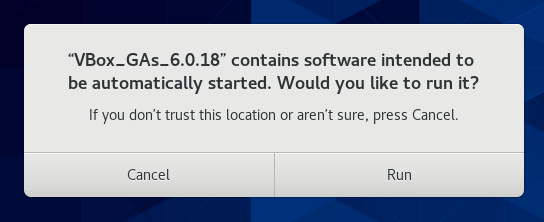
Click Run button to exec Vbox_GAs_6.0.18 script or run it manually

Run-Guest-Additions-screenshot-virtualbox-centos-8

or mount it manually with mount command and execute the VBoxLinuxAdditions.run to do so:


$ cd /run/media/`whoami`/VB*
$ su
# ./VBoxLinuxAdditions.run
Installing additional modules …
VirtualBox Guest Additions: Building the VirtualBox Guest Additions kernel modules.  This may take a while.
VirtualBox Guest Additions: Running kernel modules will not be replaced until the system is restarted
VirtualBox Guest Additions: Starting.


4. Reboot the VM
 

# reboot

5. Check and Confirm Virtualbox guest additions are properly installed and running
 

# lsmod | grep vbox


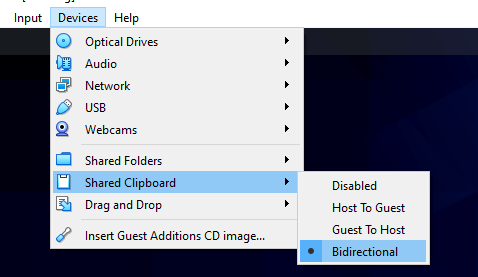
6. Enable Copy / Paste from to Virttual Machine e.g. Shared Clipboard / Shared Folder etc.


Share-Clipboard-in-Virtualbox-screenshot-centos-8


The three options most useful besides the support for FullScreen OS emulation by Virtualbox to enable right after
guesttools is on are:


1. Devices -> Shared Clipboard -> Bidirectional
2. Devices -> Drag and Drop -> Bidirectional
3. Devices -> Shared Folders -> Shared Folder Settings


Howto install Google Chrome web browser on CentOS Linux 7

Friday, December 11th, 2020

After installing CentOS 7 Linux testing Virtual Machine in Oracle Virtualbox 6.1 to conduct some testing with php / html / javascript web script pages and use the VM for other work stuff that I later plan to deploy on production CentOS systems, I came to requirement of having a working Google Chrome browser.

In that regards, next to Firefox, I needed to test the web applications in commercial Google Chrome to see what its usercan expect. For those who don't know it Google Chrome is based on Chromium Open source browser (https://chromium.org) which is available by default via default CentOS EPEL repositories.

One remark to make here is before installing Google Chrome, I've also test my web scripts first with chromium, to install Chromium free browser on CentOS:

[root@localhost mozilla_test0]# yum install chromium
Loaded plugins: fastestmirror, langpacks
Loading mirror speeds from cached hostfile
 * base: mirror.wwfx.net
 * epel: mirror.t-home.mk
 * extras: mirror.wwfx.net
 * updates: mirror.wwfx.net
Resolving Dependencies
–> Running transaction check
—> Package chromium.x86_64 0:85.0.4183.121-1.el7 will be installed
–> Processing Dependency: chromium-common(x86-64) = 85.0.4183.121-1.el7 for package: chromium-85.0.4183.121-1.el7.x86_64
–> Processing Dependency: nss-mdns(x86-64) for package: chromium-85.0.4183.121-1.el7.x86_64
–> Processing Dependency: libminizip.so.1()(64bit) for package: chromium-85.0.4183.121-1.el7.x86_64
–> Running transaction check
—> Package chromium-common.x86_64 0:85.0.4183.121-1.el7 will be installed
—> Package minizip.x86_64 0:1.2.7-18.el7 will be installed
—> Package nss-mdns.x86_64 0:0.14.1-9.el7 will be installed
–> Finished Dependency Resolution


Dependencies Resolved

============================================================================================================================================
 Package                              Arch                        Version                                   Repository                 Size
============================================================================================================================================
Installing:
 chromium                             x86_64                      85.0.4183.121-1.el7                       epel                       97 M
Installing for dependencies:
 chromium-common                      x86_64                      85.0.4183.121-1.el7                       epel                       16 M
 minizip                              x86_64                      1.2.7-18.el7                              base                       34 k
 nss-mdns                             x86_64                      0.14.1-9.el7                              epel                       43 k

Transaction Summary
============================================================================================================================================
Install  1 Package (+3 Dependent packages)

Total download size: 113 M
Installed size: 400 M
Is this ok [y/d/N]: y
Downloading packages:
(1/4): minizip-1.2.7-18.el7.x86_64.rpm                                                                               |  34 kB  00:00:00     
(2/4): chromium-common-85.0.4183.121-1.el7.x86_64.rpm                                                                |  16 MB  00:00:08     
(3/4): chromium-85.0.4183.121-1.el7.x86_64.rpm                                                                       |  97 MB  00:00:11     
(4/4): nss-mdns-0.14.1-9.el7.x86_64.rpm                                                                              |  43 kB  00:00:00     
——————————————————————————————————————————————–
Total                                                                                                       9.4 MB/s | 113 MB  00:00:12     
Running transaction check
Running transaction test
Transaction test succeeded
Running transaction
  Installing : minizip-1.2.7-18.el7.x86_64                                                                                              1/4
  Installing : chromium-common-85.0.4183.121-1.el7.x86_64                                                                               2/4
  Installing : nss-mdns-0.14.1-9.el7.x86_64                                                                                             3/4
  Installing : chromium-85.0.4183.121-1.el7.x86_64                                                                                      4/4
  Verifying  : chromium-common-85.0.4183.121-1.el7.x86_64                                                                               1/4
  Verifying  : minizip-1.2.7-18.el7.x86_64                                                                                              2/4
  Verifying  : chromium-85.0.4183.121-1.el7.x86_64                                                                                      3/4
  Verifying  : nss-mdns-0.14.1-9.el7.x86_64                                                                                             4/4

Installed:
  chromium.x86_64 0:85.0.4183.121-1.el7                                                                                                     

Dependency Installed:
  chromium-common.x86_64 0:85.0.4183.121-1.el7            minizip.x86_64 0:1.2.7-18.el7            nss-mdns.x86_64 0:0.14.1-9.el7           

Complete!

Chromium browser worked however it is much more buggy than Google Chrome and the load it puts on the machine as well as resources it consumes is terrible if compared to Proprietary G. Chrome.

Usually I don't like google chrome as it is a proprietary product and I don't even install it on my Linux Desktops, neither use as using is against any secure wise practice and but I needed this time ..

Thus to save myself some pains therefore proceeded and installed Google Chromium.
Installion  of Google Chrome is a straight forward process you download the latest rpm run below command to resolve all library dependencies and you're in:

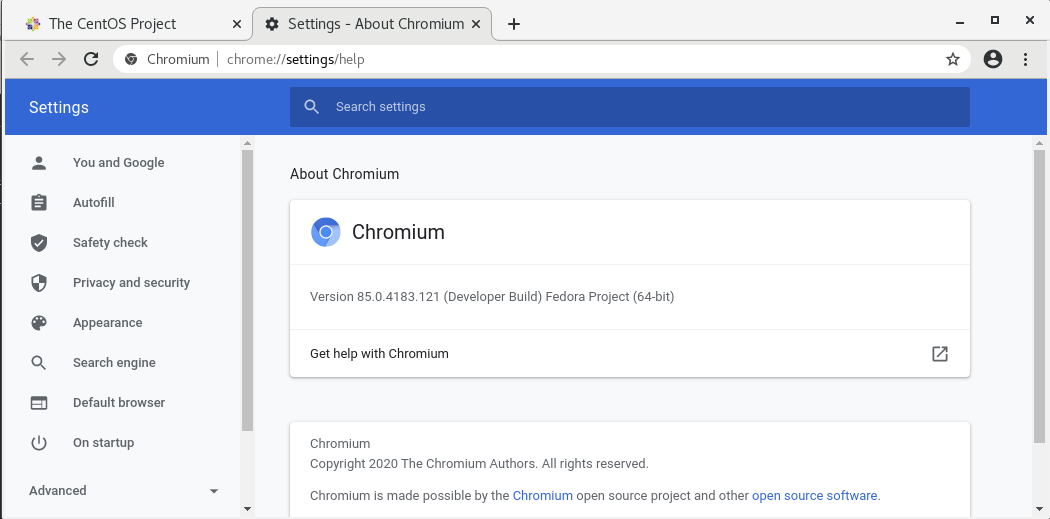
chromium-open-source-browser-on-centos-7-screenshot


[root@localhost mozilla_test0]# rpm -ivh google-chrome-stable_current_x86_64.rpm
warning: google-chrome-stable_current_x86_64.rpm: Header V4 DSA/SHA1 Signature, key ID 7fac5991: NOKEY
error: Failed dependencies:
    liberation-fonts is needed by google-chrome-stable-87.0.4280.88-1.x86_64
    libvulkan.so.1()(64bit) is needed by google-chrome-stable-87.0.4280.88-1.x86_64
[root@localhost mozilla_test0]# wget https://dl.google.com/linux/direct/google-chrome-stable_current_x86_64.rpm
–2020-12-11 07:03:02–  https://dl.google.com/linux/direct/google-chrome-stable_current_x86_64.rpm
Resolving dl.google.com (dl.google.com)… 172.217.17.238, 2a00:1450:4017:802::200e
Connecting to dl.google.com (dl.google.com)|172.217.17.238|:443… connected.
HTTP request sent, awaiting response… 200 OK
Length: 72280700 (69M) [application/x-rpm]
Saving to: ‘google-chrome-stable_current_x86_64.rpm


100%[==================================================================================================>] 72,280,700  11.0MB/s   in 6.6s   

2020-12-11 07:03:09 (10.4 MB/s) – ‘google-chrome-stable_current_x86_64.rpm’ saved [72280700/72280700]

[root@localhost mozilla_test0]# yum localinstall google-chrome-stable_current_x86_64.rpm
Loaded plugins: fastestmirror, langpacks
Examining google-chrome-stable_current_x86_64.rpm: google-chrome-stable-87.0.4280.88-1.x86_64
Marking google-chrome-stable_current_x86_64.rpm to be installed
Resolving Dependencies
–> Running transaction check
—> Package google-chrome-stable.x86_64 0:87.0.4280.88-1 will be installed
–> Processing Dependency: liberation-fonts for package: google-chrome-stable-87.0.4280.88-1.x86_64
Loading mirror speeds from cached hostfile
 * base: mirror.wwfx.net
 * epel: mirrors.uni-ruse.bg
 * extras: mirror.wwfx.net
 * updates: mirror.wwfx.net
–> Processing Dependency: libvulkan.so.1()(64bit) for package: google-chrome-stable-87.0.4280.88-1.x86_64
–> Running transaction check
—> Package liberation-fonts.noarch 1:1.07.2-16.el7 will be installed
–> Processing Dependency: liberation-narrow-fonts = 1:1.07.2-16.el7 for package: 1:liberation-fonts-1.07.2-16.el7.noarch
—> Package vulkan.x86_64 0:1.1.97.0-1.el7 will be installed
–> Processing Dependency: vulkan-filesystem = 1.1.97.0-1.el7 for package: vulkan-1.1.97.0-1.el7.x86_64
–> Running transaction check
—> Package liberation-narrow-fonts.noarch 1:1.07.2-16.el7 will be installed
—> Package vulkan-filesystem.noarch 0:1.1.97.0-1.el7 will be installed
–> Finished Dependency Resolution

Dependencies Resolved

============================================================================================================================================
 Package                             Arch               Version                      Repository                                        Size
============================================================================================================================================
Installing:
 google-chrome-stable                x86_64             87.0.4280.88-1               /google-chrome-stable_current_x86_64             227 M
Installing for dependencies:
 liberation-fonts                    noarch             1:1.07.2-16.el7              base                                              13 k
 liberation-narrow-fonts             noarch             1:1.07.2-16.el7              base                                             202 k
 vulkan                              x86_64             1.1.97.0-1.el7               base                                             3.6 M
 vulkan-filesystem                   noarch             1.1.97.0-1.el7               base                                             6.3 k

Transaction Summary
============================================================================================================================================
Install  1 Package (+4 Dependent packages)

Total size: 231 M
Total download size: 3.8 M
Installed size: 249 M
Is this ok [y/d/N]: y
Downloading packages:
(1/4): liberation-fonts-1.07.2-16.el7.noarch.rpm                                                                     |  13 kB  00:00:00     
(2/4): liberation-narrow-fonts-1.07.2-16.el7.noarch.rpm                                                              | 202 kB  00:00:00     
(3/4): vulkan-filesystem-1.1.97.0-1.el7.noarch.rpm                                                                   | 6.3 kB  00:00:00     
(4/4): vulkan-1.1.97.0-1.el7.x86_64.rpm                                                                              | 3.6 MB  00:00:01     
——————————————————————————————————————————————–
Total                                                                                                       1.9 MB/s | 3.8 MB  00:00:02     
Running transaction check
Running transaction test
Transaction test succeeded
Running transaction
Warning: RPMDB altered outside of yum.
  Installing : vulkan-filesystem-1.1.97.0-1.el7.noarch                                                                                  1/5
  Installing : vulkan-1.1.97.0-1.el7.x86_64                                                                                             2/5
  Installing : 1:liberation-narrow-fonts-1.07.2-16.el7.noarch                                                                           3/5
  Installing : 1:liberation-fonts-1.07.2-16.el7.noarch                                                                                  4/5
  Installing : google-chrome-stable-87.0.4280.88-1.x86_64                                                                               5/5
Redirecting to /bin/systemctl start atd.service
  Verifying  : vulkan-1.1.97.0-1.el7.x86_64                                                                                             1/5
  Verifying  : 1:liberation-narrow-fonts-1.07.2-16.el7.noarch                                                                           2/5
  Verifying  : 1:liberation-fonts-1.07.2-16.el7.noarch                                                                                  3/5
  Verifying  : google-chrome-stable-87.0.4280.88-1.x86_64                                                                               4/5
  Verifying  : vulkan-filesystem-1.1.97.0-1.el7.noarch                                                                                  5/5

Installed:
  google-chrome-stable.x86_64 0:87.0.4280.88-1                                                                                              

Dependency Installed:
  liberation-fonts.noarch 1:1.07.2-16.el7         liberation-narrow-fonts.noarch 1:1.07.2-16.el7       vulkan.x86_64 0:1.1.97.0-1.el7      
  vulkan-filesystem.noarch 0:1.1.97.0-1.el7      

Complete!
 

Once Chrome is installed you can either run it from gnome-terminal
 

[test@localhost ~]$ gnome-terminal &


Google-chrome-screenshot-on-centos-linux

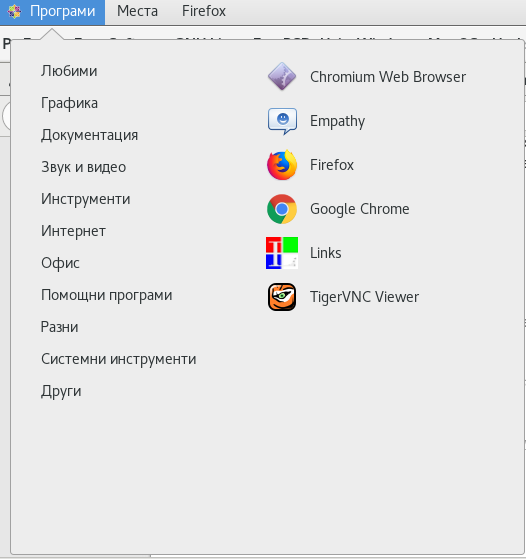
Or find it in the list of CentOS programs:

Applications → Internet → Google Chrome

google-chrome-programs-list-internet-cetnos

Last step to do is to make Google Chrome easily updatable to keep up VM level on high security and let it get updated every time when apply security updates with yum check-update && yum upgrade
for that its necessery to create new custom repo file
/etc/yum.repos.d/google-chrome.repo

[root@localhost mozilla_test0]# vim /etc/yum.repos.d/google-chrome.repo
[google-chrome]
name=google-chrome
baseurl=http://dl.google.com/linux/chrome/rpm/stable/x86_64
enabled=1
gpgcheck=1
gpgkey=https://dl.google.com/linux/linux_signing_key.pub

Now letes import the gpg checksum key

[root@localhost mozilla_test0]# rpmkeys –import https://dl.google.com/linux/linux_signing_key.pub

That's all folks google-chrome is at your disposal.

Fix FTP active connection issues “Cannot create a data connection: No route to host” on ProFTPD Linux dedicated server

Tuesday, October 1st, 2019

proftpd-linux-logo

Earlier I've blogged about an encounter problem that prevented Active mode FTP connections on CentOS
As I'm working for a client building a brand new dedicated server purchased from Contabo Dedi Host provider on a freshly installed Debian 10 GNU / Linux, I've had to configure a new FTP server, since some time I prefer to use Proftpd instead of VSFTPD because in my opinion it is more lightweight and hence better choice for a small UNIX server setups. During this once again I've encounted the same ACTIVE FTP not working from FTP server to FTP client host machine. But before shortly explaining, the fix I find worthy to explain briefly what is ACTIVE / PASSIVE FTP connection.


1. What is ACTIVE / PASSIVE FTP connection?
 

Whether in active mode, the client specifies which client-side port the data channel has been opened and the server starts the connection. Or in other words the default FTP client communication for historical reasons is in ACTIVE MODE. E.g.
Client once connected to Server tells the server to open extra port or ports locally via which the overall FTP data transfer will be occuring. In the early days of networking when FTP protocol was developed security was not of such a big concern and usually Networks did not have firewalls at all and the FTP DATA transfer host machine was running just a single FTP-server and nothing more in this, early days when FTP was not even used over the Internet and FTP DATA transfers happened on local networks, this was not a problem at all.

In passive mode, the server decides which server-side port the client should connect to. Then the client starts the connection to the specified port.

But with the ever increasing complexity of Internet / Networks and the ever tightening firewalls due to viruses and worms that are trying to own and exploit networks creating unnecessery bulk loads this has changed …

active-passive-ftp-explained-diagram
 

2. Installing and configure ProFTPD server Public ServerName

I've installed the server with the common cmd:


apt –yes install proftpd


And the only configuration changed in default configuration file /etc/proftpd/proftpd.conf  was
ServerName          "Debian"

I do this in new FTP setups for the logical reason to prevent the multiple FTP Vulnerability Scan script kiddie Crawlers to know the exact OS version of the server, so this was changed to:


ServerName "MyServerHostname"


Though this is the bad security through obscurity practice doing so is a good practice.
 

3. Create iptable firewall rules to allow ACTIVE FTP mode


But anyways, next step was to configure the firewall to be allowed to communicate on TCP PORT 21 and 20 to incoming source ports range 1024:65535 (to enable ACTIVE FTP) on firewal level with iptables on INPUT and OUTPUT chain rules, like this:


iptables -A INPUT -p tcp –sport 1024:65535 -d 0/0 –dport 21 -m state –state NEW,ESTABLISHED -j ACCEPT
iptables -A INPUT -p tcp -s 0/0 –sport 1024:65535 -d 0/0 –dport 20 -m state –state NEW,ESTABLISHED -j ACCEPT
iptables -A OUTPUT -p tcp -s 0/0 –sport 21 -d 0/0 –dport 1024:65535 -m state –state ESTABLISHED -j ACCEPT
iptables -A OUTPUT -p tcp -s 0/0 –sport 20 -d 0/0 –dport 1024:65535 -m state –state ESTABLISHED,RELATED -j ACCEPT


Talking about Active and Passive FTP connections perhaps for novice Linux users it might be worthy to say few words on Active and Passive FTP connections

Once firewall has enabled FTP Active / Passive connections is on and FTP server is listening, to test all is properly configured check iptable rules and FTP listener:
 

/sbin/iptables -L INPUT |grep ftp
ACCEPT     tcp  —  anywhere             anywhere             tcp spts:1024:65535 dpt:ftp state NEW,ESTABLISHED
ACCEPT     tcp  —  anywhere             anywhere             tcp spts:1024:65535 dpt:ftp-data state NEW,ESTABLISHED
ACCEPT     tcp  —  anywhere             anywhere             tcp dpt:ftp
ACCEPT     tcp  —  anywhere             anywhere             tcp dpt:ftp-data

netstat -l | grep "ftp"
tcp6       0      0 [::]:ftp                [::]:*                  LISTEN    


4. Loading nf_nat_ftp module and net.netfilter.nf_conntrack_helper (for backward compitability)


Next step of course was to add the necessery modules nf_nat_ftp nf_conntrack_sane that makes FTP to properly forward ports with respective Firewall states on any of above source ports which are usually allowed by firewalls, note that the range of ports given 1024:65535 might be too much liberal for paranoid sysadmins and in many cases if ports are not filtered, if you are a security freak you can use some smaller range such as 60000-65535.


Here is time to say for sysadmins who haven't recently had a task to configure a new (unecrypted) File Transfer Server as today Secure FTP is almost alltime used for file transfers for the sake of security might be puzzled to find out the old Linux kernel ip_conntrack_ftp which was the standard module used to make FTP Active connections work is substituted nowadays with  nf_nat_ftp and nf_conntrack_sane.

To make the 2 modules permanently loaded on next boot on Debian Linux they have to be added to /etc/modules

Here is how sample /etc/modules that loads the modules on next system boot looks like

cat /etc/modules
# /etc/modules: kernel modules to load at boot time.
#
# This file contains the names of kernel modules that should be loaded
# at boot time, one per line. Lines beginning with "#" are ignored.
softdog
nf_nat_ftp
nf_conntrack_sane


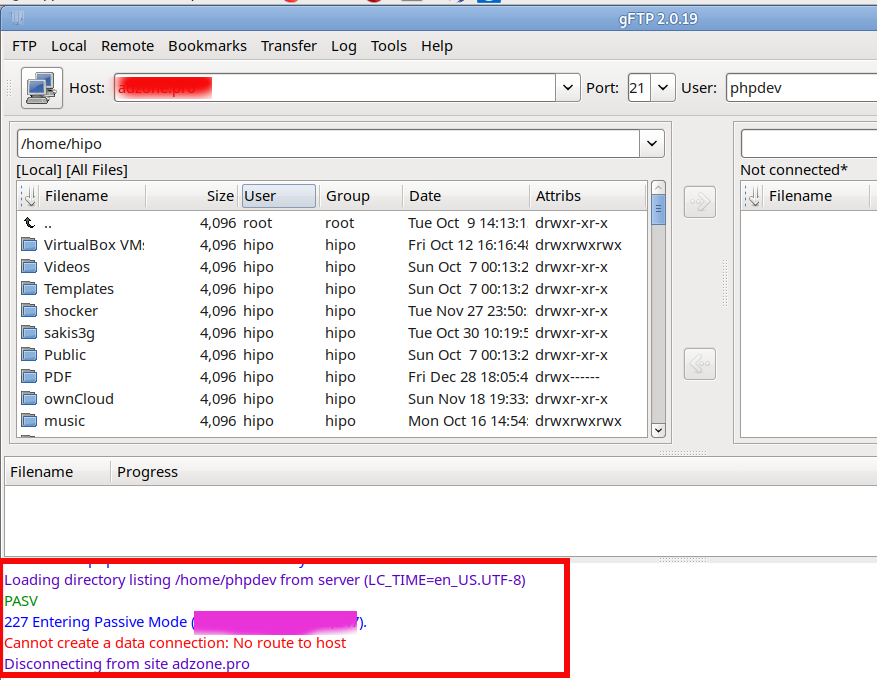
Next to say is that in newer Linux kernels 3.x / 4.x / 5.x the nf_nat_ftp and nf_conntrack-sane behaviour changed so  simply loading the modules would not work and if you do the stupidity to test it with some FTP client (I used gFTP / ncftp from my Linux desktop ) you are about to get FTP No route to host errors like:


Cannot create a data connection: No route to host


cannot-create-a-data-connection-no-route-to-host-linux-error-howto-fix


Sometimes, instead of No route to host error the error FTP client might return is:


227 entering passive mode FTP connect connection timed out error


To make the nf_nat_ftp module on newer Linux kernels hence you have to enable backwards compatibility Kernel variable


/proc/sys/net/netfilter/nf_conntrack_helper


echo 1 > /proc/sys/net/netfilter/nf_conntrack_helper


To make it permanent if you have enabled /etc/rc.local legacy one single file boot place as I do on servers – for how to enable rc.local on newer Linuxes check here

or alternatively add it to load via sysctl

sysctl -w net.netfilter.nf_conntrack_helper=1

And to make change permanent (e.g. be loaded on next boot)

echo 'net.netfilter.nf_conntrack_helper=1' >> /etc/sysctl.conf


5. Enable PassivePorts in ProFTPD or PassivePortRange in PureFTPD


Last but not least open /etc/proftpd/proftpd.conf find PassivePorts config value (commented by default) and besides it add the following line:


PassivePorts 60000 65534


Just for information if instead of ProFTPd you experience the error on PureFTPD the configuration value to set in /etc/pure-ftpd.conf is:
 

PassivePortRange 30000 35000


That's all folks, give the ncftp / lftp / filezilla or whatever FTP client you prefer and test it the FTP client should be able to talk as expected to remote server in ACTIVE FTP mode (and the auto passive mode) will be not triggered anymore, nor you will get a strange errors and failure to connect in FTP clients as gftp.

Cheers 🙂

Installing usual Software Tools and Development header files and libraries on a newly installed Debian Server

Thursday, February 11th, 2010

installing-usual-software-tools-and-development-header-files-and-libraries-on-newly-installed-Debian-Ubuntu-server
Today I start my work as a system administrator for a new IT company.
My first duties include configuration and installation of some usual programs
used in everyday's sys admin job.
In that manner of thoughts I have long ago realized there is a common group of
tools and software I had to install on almost each and every new configured
Debian GNU / Linux running Server.
Here is a list of packages I usually install on new Debian systems,
even though this exact commands are expected to be executed on Debian (5.0) Lenny
I believe they are quite accurate for Debian Testing and Debian Testing/Unstable,
bleeding edge distributions.
Before I show you the apt-get lines with all the packages, I would advice you to install
and use netselect-apt to select the fastest Debian package mirror near you
So to install and use run the following commands;

aptitude install netselect-apt
netselect-apt -n lenny

Now as netselect-apt would have tested for the fastest mirror and created sources.list
file in your current directory, open the sources.list file and decide what should enter your
official /etc/apt/sources.list file or in other words merge the two files as you like.
Good, now as we have a fast mirror to download our packages let's continue further with the
packages to install.
Excecute the following command to install some of the basic tools and packages:

# install some basic required tools, software and header files
debian-server:~# apt-get install tcpdump mc ncurses-dev htop iftop iptraf nmap tcpdump apache2 apachetop
mysql-server-5.0 phpmyadmin vnstat rsync traceroute tcptrace e2fsprogs hddtemp finger mtr-tiny
netcat screen imagemagick flex snort mysql-server-5.0 sysstat lm-sensors alien rar unrar util-linux curl
vim lynx links elinks sudo autoconf gcc build-essential dpkg-dev webalizer awstats

Herein I'll explain just a few of the installed package and their install
purpose,as they could be unknown to some of the people out there.

apachetop - monitors apache log file in real time similar to gnu top
iftop - display bandwidth usage on selected interface interactively
vnstat - show inbound & outbound traffic usage on selected network interfaces
e2fsprogs - some general tools for creation of ext2 file systems etc.
hddtemp - Utility to monitor hard drive temperature
mtr-tiny - matt's traceroute great traceroute proggie
netcat - TCP/IP swiss army knife, quite helpful for network maintance tasks
snort - an Intrusion Detecting System
build-essential - installs basic stuff required for most applications compiled from source code
sysstat - generates statistics about server load each and every ten minutes, check man for more
lm-sensors - enables you to track your system hardware sensors information and warn in CPU heatups etc.

I believe the rest of them are no need to be explained, if you're not familiar with them check the manuals.
So far so good but this is not all I had to install, as you probably know most Apache webservers nowadays
are running PHP and are using a dozen of PHP libraries / extensions not originally bundled with PHP install
Therefore here are some more packages related to php to install that would install some more php goodies.

# install some packages required for many php enabled applications
debian-esrver:~# apt-get install php-http php-db php-mail php-net-smtp php-net-socket php-pear php-xml-parser
php5-curl php5-gd php5-imagick php5-mysql php5-odbc php5-recode php5-sybase php5-xmlrpc php5-dev

As I said that is mostly the basic stuff that is a must have on most of the Debian servers I have
configured this days, of course this is not applicable to all situations, however I hope
this would be of use to somebody out there.

How to install KVM Kernel-based Virtual Machine Virtualization on Linux

Sunday, October 14th, 2018

install-KVM-Kernel-based-Virtual-Machine-virtualization-on-Linux

If you want to run multiple virtual machines on GNU / Linux server or your Linux powered Desktop you have the possibility to use a couple of Virtual Machines just to name a few VirtualBox and VMWare are the option the native way to do it is using the Linux kernel via a loadable kernel module called KVM (Kernel-based Virtual Machine).
Though Oracle's Virtualbox generally works and you could add new test beds virtual machines (install multiple Linux / *BSD OS) it is not fully Free Software and not even fully open source licensed, VMWare even though superior as a Virtualization product is proprietary and its application costs a lot of money which not each develpoper or small / mid-sized company could afford.

Once the kvm.ko module is loaded your Linux kernel turns into a full-featured Virtual Machine Hypervisor.
Starting with Linux kernel 2.6.X the KVM Hypervisor is available and easy to install virtually all modern Linux distributions Redhat / CentOS Debian / Ubuntu etc. support it and its up to running few commands to install and start using the Power of Kernel embedded Virtualization.

KVM could be used to run in parallel multiple Operating Systems such as Windows / Linux / FreeBSD and others of BSDs family,  each running under a separate virtual machine with its private dedicated (isolated), disc, graphic card, network card etc.

To start up I assume you have already installed some kind of Linux distribution either locally or on a remote dedicated server.
 

1. Installing KVM on Debian GNU / Linux / Ubuntu / Mint and other deb based distros


Using APT tool install below packages:


root@jeremiah:~# apt install –yes qemu-kvm libvirt-clients libvirt-daemon-system bridge-utils libguestfs-tools genisoimage virtinst libosinfo-bin


2. Installing virt-manager GUI to manage Virtual servers


root@jeremiah:~# apt-cache show virt-manager|grep -i desc -A 1
Description-en: desktop application for managing virtual machines
 It presents a summary view of running domains and their live performance &

Description-md5: 9f7f584744b77cdacc2291f2a8ac220e
Homepage: http://virt-manager.et.redhat.com/


root@jeremiah:~# apt install –yes virt-manager


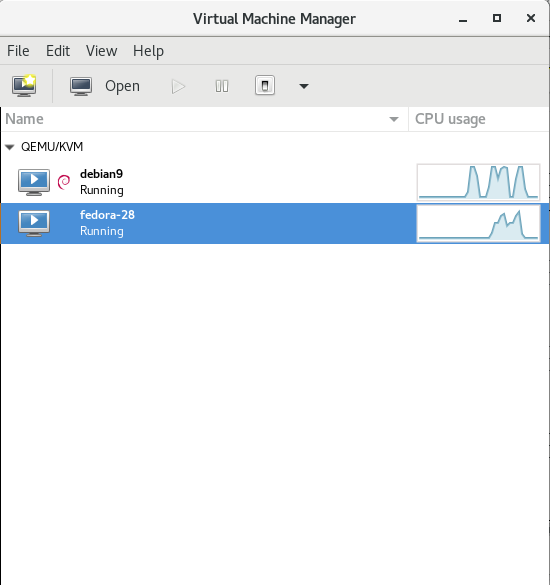
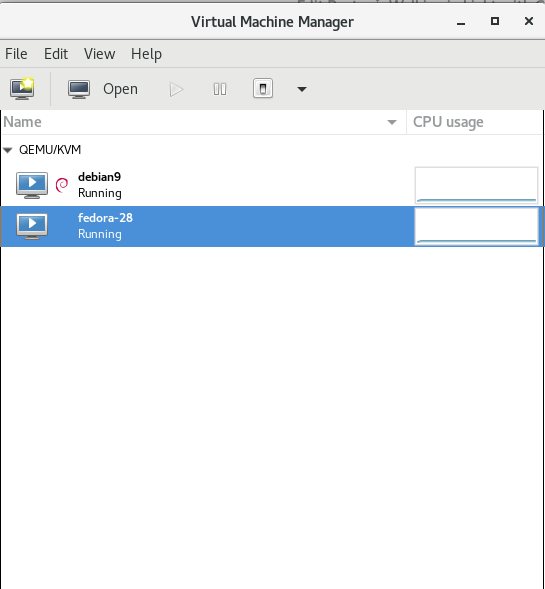
virtual-manager-kvm-gnu-linux-virtual-machines-cpu-hdd-load-statistics-screenshot


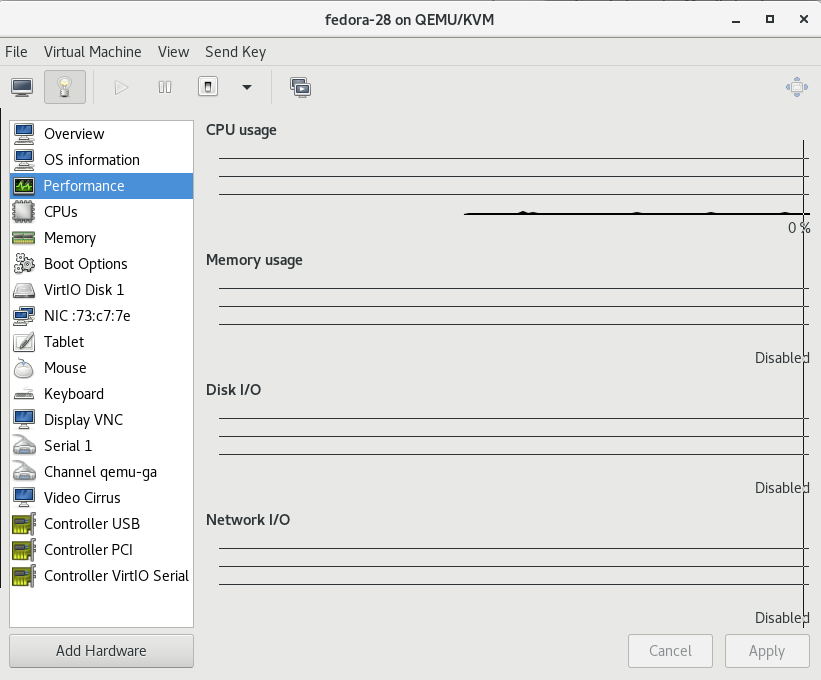
virtual-manager-fedora-28-linux-virtual-machine-settings-screenshot


3. Configure bridged networking to allow access to newly configured VMs

Bridging has to be added via /etc/network/interfaces therefore it is a good idea to create a backup of it before modifying:


# cp -rpf /etc/network/interfaces /etc/network/interfaces.bakup-$(echo $(date '+%Y-%m-%d-%H'))


# vim /etc/network/interfaces

auto br0
 iface br0 inet static
         address 10.15.44.26
         netmask 255.255.255.192
         broadcast 10.15.44.63
         dns-nameservers 10.0.80.11 10.0.80.12
         # set static route for LAN
      post-up route add -net 10.0.0.0 netmask 255.0.0.0 gw 10.18.44.1
      post-up route add -net 161.26.0.0 netmask 255.255.0.0 gw 10.18.44.1
         bridge_ports eth0
         bridge_stp off
         bridge_fd 0
         bridge_maxwait 0
 
 # br1 setup with static wan IPv4 with ISP router as a default gateway
 auto br1
 iface br1 inet static
         address 192.168.222.51
         netmask 255.255.255.248
         broadcast 192.168.222.55
         gateway 192.168.222.49
         bridge_ports eth1
         bridge_stp off
         bridge_fd 0
         bridge_maxwait 0


Once file is saved in vim editor restart the networking.


# systemctl restart network.manager


To verify whether the bridge has been succesfully upped.


root@jeremiah:/home/hipo/kvm# brctl show
bridge name    bridge id        STP enabled    interfaces
virbr0        8000.525400cb1cd1    yes        virbr0-nic


4. List all installable Virtual OS images
 

root@jeremiah:/home/hipo/kvm# virt-builder -list
centos-6                 x86_64     CentOS 6.6
centos-7.0               x86_64     CentOS 7.0
centos-7.1               x86_64     CentOS 7.1
centos-7.2               aarch64    CentOS 7.2 (aarch64)
centos-7.2               x86_64     CentOS 7.2
centos-7.3               x86_64     CentOS 7.3
centos-7.4               x86_64     CentOS 7.4
centos-7.5               x86_64     CentOS 7.5
cirros-0.3.1             x86_64     CirrOS 0.3.1
cirros-0.3.5             x86_64     CirrOS 0.3.5
debian-6                 x86_64     Debian 6 (Squeeze)
debian-7                 sparc64    Debian 7 (Wheezy) (sparc64)
debian-7                 x86_64     Debian 7 (wheezy)
debian-8                 x86_64     Debian 8 (jessie)
debian-9                 x86_64     Debian 9 (stretch)
fedora-18                x86_64     Fedora® 18
fedora-19                x86_64     Fedora® 19
fedora-20                x86_64     Fedora® 20
fedora-21                aarch64    Fedora® 21 Server (aarch64)
fedora-21                armv7l     Fedora® 21 Server (armv7l)
fedora-21                ppc64      Fedora® 21 Server (ppc64)
fedora-21                ppc64le    Fedora® 21 Server (ppc64le)
fedora-21                x86_64     Fedora® 21 Server
fedora-22                aarch64    Fedora® 22 Server (aarch64)
fedora-22                armv7l     Fedora® 22 Server (armv7l)
fedora-22                i686       Fedora® 22 Server (i686)
fedora-22                x86_64     Fedora® 22 Server
fedora-23                aarch64    Fedora® 23 Server (aarch64)
fedora-23                armv7l     Fedora® 23 Server (armv7l)
fedora-23                i686       Fedora® 23 Server (i686)
fedora-23                ppc64      Fedora® 23 Server (ppc64)
fedora-23                ppc64le    Fedora® 23 Server (ppc64le)
fedora-23                x86_64     Fedora® 23 Server
fedora-24                aarch64    Fedora® 24 Server (aarch64)
fedora-24                armv7l     Fedora® 24 Server (armv7l)
fedora-24                i686       Fedora® 24 Server (i686)
fedora-24                x86_64     Fedora® 24 Server
fedora-25                aarch64    Fedora® 25 Server (aarch64)
fedora-25                armv7l     Fedora® 25 Server (armv7l)
fedora-25                i686       Fedora® 25 Server (i686)
fedora-25                ppc64      Fedora® 25 Server (ppc64)
fedora-25                ppc64le    Fedora® 25 Server (ppc64le)
fedora-25                x86_64     Fedora® 25 Server
fedora-26                aarch64    Fedora® 26 Server (aarch64)
fedora-26                armv7l     Fedora® 26 Server (armv7l)
fedora-26                i686       Fedora® 26 Server (i686)
fedora-26                ppc64      Fedora® 26 Server (ppc64)
fedora-26                ppc64le    Fedora® 26 Server (ppc64le)
fedora-26                x86_64     Fedora® 26 Server
fedora-27                aarch64    Fedora® 27 Server (aarch64)
fedora-27                armv7l     Fedora® 27 Server (armv7l)
fedora-27                i686       Fedora® 27 Server (i686)
fedora-27                ppc64      Fedora® 27 Server (ppc64)
fedora-27                ppc64le    Fedora® 27 Server (ppc64le)
fedora-27                x86_64     Fedora® 27 Server
fedora-28                i686       Fedora® 28 Server (i686)
fedora-28                x86_64     Fedora® 28 Server
freebsd-11.1             x86_64     FreeBSD 11.1
scientificlinux-6        x86_64     Scientific Linux 6.5
ubuntu-10.04             x86_64     Ubuntu 10.04 (Lucid)
ubuntu-12.04             x86_64     Ubuntu 12.04 (Precise)
ubuntu-14.04             x86_64     Ubuntu 14.04 (Trusty)
ubuntu-16.04             x86_64     Ubuntu 16.04 (Xenial)
ubuntu-18.04             x86_64     Ubuntu 18.04 (bionic)
opensuse-13.1            x86_64     openSUSE 13.1
opensuse-13.2            x86_64     openSUSE 13.2
opensuse-42.1            x86_64     openSUSE Leap 42.1
opensuse-tumbleweed      x86_64     openSUSE Tumbleweed


5. Create Virtual Machine OS-es from scratch with virt-builder

Below we'll create two images one for Fedora 28 and 1 for Debian 9 using the virt-builder (a tool to build virtual images quickly), the images that could be used are shown through below virt-builder –list command.
 

# iso='fedora-28';
# iso1='debian-9';


# sudo virt-builder $iso \
     –size=10G \
     –format qcow2 -o /var/lib/libvirt/images/$iso-vm1.qcow2 \
     –hostname $iso-vm1 \
     –network \
     –timezone Europe/Sofia


[   3.3] Downloading: http://libguestfs.org/download/builder/fedora-28.xz
[   5.2] Planning how to build this image
[   5.2] Uncompressing
[  20.8] Resizing (using virt-resize) to expand the disk to 10.0G
[  50.8] Opening the new disk
[  53.7] Setting a random seed
[  53.7] Setting the hostname: fedora-28-vm1
[  53.7] Setting the timezone: Europe/Sofia
[  53.7] Setting passwords
virt-builder: Setting random password of root to YMTkxaJIkEU24Ytf

[  54.7] Finishing off
                   Output file: /var/lib/libvirt/images/fedora-28-vm1.qcow2
                   Output size: 10.0G
                 Output format: qcow2
            Total usable space: 9.3G
                    Free space: 8.2G (87%)


# sudo virt-builder $iso1 \
     –size=10G \
     –format qcow2 -o /var/lib/libvirt/images/$iso-vm1.qcow2 \
     –hostname $iso1-vm1 \
     –network \
     –timezone Europe/Sofia


[   3.2] Downloading: http://libguestfs.org/download/builder/debian-9.xz
[   4.1] Planning how to build this image
[   4.1] Uncompressing
[  16.9] Resizing (using virt-resize) to expand the disk to 10.0G
[  40.1] Opening the new disk
[  42.9] Setting a random seed
virt-builder: warning: random seed could not be set for this type of guest
[  42.9] Setting the hostname: debian-9-vm1
[  43.6] Setting the timezone: Europe/Sofia
[  43.6] Setting passwords
virt-builder: Setting random password of root to JtzEYGff9KxL5jCR
[  44.3] Finishing off
                   Output file: /var/lib/libvirt/images/debian-9-vm1.qcow2
                   Output size: 10.0G
                 Output format: qcow2
            Total usable space: 9.8G
                    Free space: 9.0G (91%)


vim bridged.xml

<network>
  <name>br0</name>
  <forward mode="bridge"/>
  <bridge name="br0"/>
</network>


# sudo virsh net-define –file bridged.xml
# sudo virsh net-autostart br0
# sudo virsh net-start br0


Above two commands will download pre-packaged KVM isos and store them inside /var/lib/libvirt/images/ you see also the root (administrator) password for both ISOs printed out.


root@jeremiah:/home/hipo/kvm# ls -ld /var/lib/libvirt/images/*
-rw-r–r– 1 root         root         10739318784 Oct 12 23:45 /var/lib/libvirt/images/debian-9-vm1.qcow2
-rw-r–r– 1 root         root         10739318784 Oct 12 23:46 /var/lib/libvirt/images/fedora-28-vm1.qcow2


To access directly the new created VMs as we have specified the –vnc option it is possible to directly vnc to the new host with VNC client (in linux I use vncviewer), on Windows you can use something like TightVNC.
 

6. Use official Linux distributions ISO boot files to install into KVM VM


Those who would like to run inside KVM VM Linux could do it directly using installable ISO files and install the set of Linux with the required packages, just like installing a fresh new Linux on a bare-metal machine.
To do so download your ISO image from the net (either from official distro website or a mirror website, in case if you need to spin an older version) and use virt-install to run the installer inside KVM.


root@jeremiah:~# cd /var/lib/libvirt/boot/;
root@jeremiah:~# wget http://mirrors.netix.net/centos/7.5.1804/isos/x86_64/CentOS-7-x86_64-DVD-1804.iso


# sudo virt-install \
–virt-type=kvm \
–name centos7 \
–ram 2048 \
–vcpus=2 \
–os-variant=centos7.0 \
–virt-type=kvm \
–hvm \
–cdrom=/var/lib/libvirt/boot/CentOS-7-x86_64-DVD-1804.iso \
–network=bridge=br0,model=virtio \
–network=bridge=br1,model=virtio \
–graphics vnc \
–disk path=/var/lib/libvirt/images/centos7.qcow2,size=40,bus=virtio,format=qcow2


7. List newly created VMs with Virsh command


root@jeremiah:/home/hipo/kvm# virsh list –all
 Id    Name                           State
—————————————————-
 3     fedora-28                      running
 –     debian9                        shut off


The –all parameter lists all available VMs ready to spin, if you want to check what are the VMs that are only running use instead:


root@jeremiah:/home/hipo/kvm# virsh list
 Id    Name                           State
—————————————————-
 3     fedora-28                      running


8. Install Virtual Machine OS-es

Below lines will install 2 Virtual machines one Fedora 28 and Debian 9


 os='fedora-28';
virt-install –import –name $os \
    –ram 2048 \
    –vcpu 2 \
    –disk path=/var/lib/libvirt/images/$os-vm1.qcow2,format=qcow2 \
    –os-variant fedora-unknown \
    –network=bridge=br0,model=virtio \
    –noautoconsole \
  –hvm \
  –graphics vnc

os='debian9';
virt-install –import –name $os     \
–ram 2048     \
–vcpu 2     \
–disk path=/var/lib/libvirt/images/$os-vm1.qcow2,format=qcow2     \
–os-variant debian9     –network=bridge=br0,model=virtio     \
–noautoconsole \
–hvm \
–graphics vnc


To deploy more just change the virtual machine type in os variable and modify the –os-variant variable to match the distribution name, to get the correct –os-variant variables that can be passed use osinfo-query below is output of the cmd:


root@jeremiah:/home/hipo/kvm# osinfo-query os
 Short ID             | Name                                               | Version  | ID                                      
———————-+—————————————————-+———-+—————————————–
 altlinux1.0          | Mandrake RE Spring 2001                            | 1.0      | http://altlinux.org/altlinux/1.0        
 altlinux2.0          | ALT Linux 2.0                                      | 2.0      | http://altlinux.org/altlinux/2.0        
 altlinux2.2          | ALT Linux 2.2                                      | 2.2      | http://altlinux.org/altlinux/2.2        
 altlinux2.4          | ALT Linux 2.4                                      | 2.4      | http://altlinux.org/altlinux/2.4        
 altlinux3.0          | ALT Linux 3.0                                      | 3.0      | http://altlinux.org/altlinux/3.0        
 altlinux4.0          | ALT Linux 4.0                                      | 4.0      | http://altlinux.org/altlinux/4.0        
 altlinux4.1          | ALT Linux 4.1                                      | 4.1      | http://altlinux.org/altlinux/4.1        
 altlinux5.0          | ALT Linux 5.0                                      | 5.0      | http://altlinux.org/altlinux/5.0        
 altlinux6.0          | ALT Linux 6.0                                      | 6.0      | http://altlinux.org/altlinux/6.0        
 altlinux7.0          | ALT Linux 7.0                                      | 7.0      | http://altlinux.org/altlinux/7.0        
 centos6.0            | CentOS 6.0                                         | 6.0      | http://centos.org/centos/6.0            
 centos6.1            | CentOS 6.1                                         | 6.1      | http://centos.org/centos/6.1            
 centos6.2            | CentOS 6.2                                         | 6.2      | http://centos.org/centos/6.2            
 centos6.3            | CentOS 6.3                                         | 6.3      | http://centos.org/centos/6.3            
 centos6.4            | CentOS 6.4                                         | 6.4      | http://centos.org/centos/6.4            
 centos6.5            | CentOS 6.5                                         | 6.5      | http://centos.org/centos/6.5            
 centos6.6            | CentOS 6.6                                         | 6.6      | http://centos.org/centos/6.6            
 centos6.7            | CentOS 6.7                                         | 6.7      | http://centos.org/centos/6.7            
 centos6.8            | CentOS 6.8                                         | 6.8      | http://centos.org/centos/6.8            
 centos6.9            | CentOS 6.9                                         | 6.9      | http://centos.org/centos/6.9            
 centos7.0            | CentOS 7.0                                         | 7.0      | http://centos.org/centos/7.0            
 debian1.1            | Debian Buzz                                        | 1.1      | http://debian.org/debian/1.1            
 debian1.2            | Debian Rex                                         | 1.2      | http://debian.org/debian/1.2            
 debian1.3            | Debian Bo                                          | 1.3      | http://debian.org/debian/1.3            
 debian2.0            | Debian Hamm                                        | 2.0      | http://debian.org/debian/2.0            
 debian2.1            | Debian Slink                                       | 2.1      | http://debian.org/debian/2.1            
 debian2.2            | Debian Potato                                      | 2.2      | http://debian.org/debian/2.2            
 debian3              | Debian Woody                                       | 3        | http://debian.org/debian/3              
 debian3.1            | Debian Sarge                                       | 3.1      | http://debian.org/debian/3.1            
 debian4              | Debian Etch                                        | 4        | http://debian.org/debian/4              
 debian5              | Debian Lenny                                       | 5        | http://debian.org/debian/5              
 debian6              | Debian Squeeze                                     | 6        | http://debian.org/debian/6              
 debian7              | Debian Wheezy                                      | 7        | http://debian.org/debian/7              
 debian8              | Debian Jessie                                      | 8        | http://debian.org/debian/8              
 debian9              | Debian Stretch                                     | 9        | http://debian.org/debian/9              
 debiantesting        | Debian Testing                                     | testing  | http://debian.org/debian/testing        
 fedora-unknown       | Fedora                                             | unknown  | http://fedoraproject.org/fedora/unknown
 fedora1              | Fedora Core 1                                      | 1        | http://fedoraproject.org/fedora/1       
 fedora10             | Fedora 10                                          | 10       | http://fedoraproject.org/fedora/10      
 fedora11             | Fedora 11                                          | 11       | http://fedoraproject.org/fedora/11      
 fedora12             | Fedora 12                                          | 12       | http://fedoraproject.org/fedora/12      
 fedora13             | Fedora 13                                          | 13       | http://fedoraproject.org/fedora/13      
 fedora14             | Fedora 14                                          | 14       | http://fedoraproject.org/fedora/14      
 fedora15             | Fedora 15                                          | 15       | http://fedoraproject.org/fedora/15      
 fedora16             | Fedora 16                                          | 16       | http://fedoraproject.org/fedora/16      
 fedora17             | Fedora 17                                          | 17       | http://fedoraproject.org/fedora/17      
 fedora18             | Fedora 18                                          | 18       | http://fedoraproject.org/fedora/18      
 fedora19             | Fedora 19                                          | 19       | http://fedoraproject.org/fedora/19      
 fedora2              | Fedora Core 2                                      | 2        | http://fedoraproject.org/fedora/2       
 fedora20             | Fedora 20                                          | 20       | http://fedoraproject.org/fedora/20      
 fedora21             | Fedora 21                                          | 21       | http://fedoraproject.org/fedora/21      
 fedora22             | Fedora 22                                          | 22       | http://fedoraproject.org/fedora/22      
 fedora23             | Fedora 23                                          | 23       | http://fedoraproject.org/fedora/23      
 fedora24             | Fedora 24                                          | 24       | http://fedoraproject.org/fedora/24      
 fedora25             | Fedora 25                                          | 25       | http://fedoraproject.org/fedora/25      
 fedora26             | Fedora 26                                          | 26       | http://fedoraproject.org/fedora/26      
 fedora3              | Fedora Core 3                                      | 3        | http://fedoraproject.org/fedora/3       
 fedora4              | Fedora Core 4                                      | 4        | http://fedoraproject.org/fedora/4       
 fedora5              | Fedora Core 5                                      | 5        | http://fedoraproject.org/fedora/5       
 fedora6              | Fedora Core 6                                      | 6        | http://fedoraproject.org/fedora/6       
 fedora7              | Fedora 7                                           | 7        | http://fedoraproject.org/fedora/7       
 fedora8              | Fedora 8                                           | 8        | http://fedoraproject.org/fedora/8       
 fedora9              | Fedora 9                                           | 9        | http://fedoraproject.org/fedora/9       
 freebsd1.0           | FreeBSD 1.0                                        | 1.0      | http://freebsd.org/freebsd/1.0          
 freebsd10.0          | FreeBSD 10.0                                       | 10.0     | http://freebsd.org/freebsd/10.0         
 freebsd10.1          | FreeBSD 10.1                                       | 10.1     | http://freebsd.org/freebsd/10.1         
 freebsd10.2          | FreeBSD 10.2                                       | 10.2     | http://freebsd.org/freebsd/10.2         
 freebsd10.3          | FreeBSD 10.3                                       | 10.3     | http://freebsd.org/freebsd/10.3         
 freebsd10.4          | FreeBSD 10.4                                       | 10.4     | http://freebsd.org/freebsd/10.4         
 freebsd11.0          | FreeBSD 11.0                                       | 11.0     | http://freebsd.org/freebsd/11.0         
 freebsd11.1          | FreeBSD 11.1                                       | 11.1     | http://freebsd.org/freebsd/11.1         
 freebsd2.0           | FreeBSD 2.0                                        | 2.0      | http://freebsd.org/freebsd/2.0          
 freebsd2.0.5         | FreeBSD 2.0.5                                      | 2.0.5    | http://freebsd.org/freebsd/2.0.5        
 freebsd2.2.8         | FreeBSD 2.2.8                                      | 2.2.8    | http://freebsd.org/freebsd/2.2.8        
 freebsd2.2.9         | FreeBSD 2.2.9                                      | 2.2.9    | http://freebsd.org/freebsd/2.2.9        
 freebsd3.0           | FreeBSD 3.0                                        | 3.0      | http://freebsd.org/freebsd/3.0          
 freebsd3.2           | FreeBSD 3.2                                        | 3.2      | http://freebsd.org/freebsd/3.2          
 freebsd4.0           | FreeBSD 4.0                                        | 4.0      | http://freebsd.org/freebsd/4.0          
 freebsd4.1           | FreeBSD 4.1                                        | 4.1      | http://freebsd.org/freebsd/4.1          
 freebsd4.10          | FreeBSD 4.10                                       | 4.10     | http://freebsd.org/freebsd/4.10         
 freebsd4.11          | FreeBSD 4.11                                       | 4.11     | http://freebsd.org/freebsd/4.11         
 freebsd4.2           | FreeBSD 4.2                                        | 4.2      | http://freebsd.org/freebsd/4.2          
 freebsd4.3           | FreeBSD 4.3                                        | 4.3      | http://freebsd.org/freebsd/4.3          
 freebsd4.4           | FreeBSD 4.4                                        | 4.4      | http://freebsd.org/freebsd/4.4          
 freebsd4.5           | FreeBSD 4.5                                        | 4.5      | http://freebsd.org/freebsd/4.5          
 freebsd4.6           | FreeBSD 4.6                                        | 4.6      | http://freebsd.org/freebsd/4.6          
 freebsd4.7           | FreeBSD 4.7                                        | 4.7      | http://freebsd.org/freebsd/4.7          
 freebsd4.8           | FreeBSD 4.8                                        | 4.8      | http://freebsd.org/freebsd/4.8          
 freebsd4.9           | FreeBSD 4.9                                        | 4.9      | http://freebsd.org/freebsd/4.9          
 freebsd5.0           | FreeBSD 5.0                                        | 5.0      | http://freebsd.org/freebsd/5.0          
 freebsd5.1           | FreeBSD 5.1                                        | 5.1      | http://freebsd.org/freebsd/5.1          
 freebsd5.2           | FreeBSD 5.2                                        | 5.2      | http://freebsd.org/freebsd/5.2          
 freebsd5.2.1         | FreeBSD 5.2.1                                      | 5.2.1    | http://freebsd.org/freebsd/5.2.1        
 freebsd5.3           | FreeBSD 5.3                                        | 5.3      | http://freebsd.org/freebsd/5.3          
 freebsd5.4           | FreeBSD 5.4                                        | 5.4      | http://freebsd.org/freebsd/5.4          
 freebsd5.5           | FreeBSD 5.5                                        | 5.5      | http://freebsd.org/freebsd/5.5          
 freebsd6.0           | FreeBSD 6.0                                        | 6.0      | http://freebsd.org/freebsd/6.0          
 freebsd6.1           | FreeBSD 6.1                                        | 6.1      | http://freebsd.org/freebsd/6.1          
 freebsd6.2           | FreeBSD 6.2                                        | 6.2      | http://freebsd.org/freebsd/6.2          
 freebsd6.3           | FreeBSD 6.3                                        | 6.3      | http://freebsd.org/freebsd/6.3          
 freebsd6.4           | FreeBSD 6.4                                        | 6.4      | http://freebsd.org/freebsd/6.4          
 freebsd7.0           | FreeBSD 7.0                                        | 7.0      | http://freebsd.org/freebsd/7.0          
 freebsd7.1           | FreeBSD 7.1                                        | 7.1      | http://freebsd.org/freebsd/7.1          
 freebsd7.2           | FreeBSD 7.2                                        | 7.2      | http://freebsd.org/freebsd/7.2          
 freebsd7.3           | FreeBSD 7.3                                        | 7.3      | http://freebsd.org/freebsd/7.3          
 freebsd7.4           | FreeBSD 7.4                                        | 7.4      | http://freebsd.org/freebsd/7.4          
 freebsd8.0           | FreeBSD 8.0                                        | 8.0      | http://freebsd.org/freebsd/8.0          
 freebsd8.1           | FreeBSD 8.1                                        | 8.1      | http://freebsd.org/freebsd/8.1          
 freebsd8.2           | FreeBSD 8.2                                        | 8.2      | http://freebsd.org/freebsd/8.2          
 freebsd8.3           | FreeBSD 8.3                                        | 8.3      | http://freebsd.org/freebsd/8.3          
 freebsd8.4           | FreeBSD 8.4                                        | 8.4      | http://freebsd.org/freebsd/8.4          
 freebsd9.0           | FreeBSD 9.0                                        | 9.0      | http://freebsd.org/freebsd/9.0          
 freebsd9.1           | FreeBSD 9.1                                        | 9.1      | http://freebsd.org/freebsd/9.1          
 freebsd9.2           | FreeBSD 9.2                                        | 9.2      | http://freebsd.org/freebsd/9.2          
 freebsd9.3           | FreeBSD 9.3                                        | 9.3      | http://freebsd.org/freebsd/9.3          
 freedos1.2           | FreeDOS 1.2                                        | 1.2      | http://freedos.org/freedos/1.2          
 gnome-continuous-3.10 | GNOME 3.10                                         | 3.10     | http://gnome.org/gnome-continuous/3.10  
 gnome-continuous-3.12 | GNOME 3.12                                         | 3.12     | http://gnome.org/gnome-continuous/3.12  
 gnome-continuous-3.14 | GNOME 3.14                                         | 3.14     | http://gnome.org/gnome-continuous/3.14  
 gnome3.6             | GNOME 3.6                                          | 3.6      | http://gnome.org/gnome/3.6              
 gnome3.8             | GNOME 3.8                                          | 3.8      | http://gnome.org/gnome/3.8              
 macosx10.0           | MacOS X Cheetah                                    | 10.0     | http://apple.com/macosx/10.0            
 macosx10.1           | MacOS X Puma                                       | 10.1     | http://apple.com/macosx/10.1            
 macosx10.2           | MacOS X Jaguar                                     | 10.2     | http://apple.com/macosx/10.2            
 macosx10.3           | MacOS X Panther                                    | 10.3     | http://apple.com/macosx/10.3            
 macosx10.4           | MacOS X Tiger                                      | 10.4     | http://apple.com/macosx/10.4            
 macosx10.5           | MacOS X Leopard                                    | 10.5     | http://apple.com/macosx/10.5            
 macosx10.6           | MacOS X Snow Leopard                               | 10.6     | http://apple.com/macosx/10.6            
 macosx10.7           | MacOS X Lion                                       | 10.7     | http://apple.com/macosx/10.7            
 mageia1              | Mageia 1                                           | 1        | http://mageia.org/mageia/1              
 mageia2              | Mageia 2                                           | 2        | http://mageia.org/mageia/2              
 mageia3              | Mageia 3                                           | 3        | http://mageia.org/mageia/3              
 mageia4              | Mageia 4                                           | 4        | http://mageia.org/mageia/4              
 mageia5              | Mageia 5                                           | 5        | http://mageia.org/mageia/5              
 mageia6              | Mageia 6                                           | 6        | http://mageia.org/mageia/6              
 mandrake10.0         | Mandrake Linux 10.0                                | 10.0     | http://mandriva.com/mandrake/10.0       
 mandrake10.1         | Mandrake Linux 10.1                                | 10.1     | http://mandriva.com/mandrake/10.1       
 mandrake10.2         | Mandrake Linux 10.2                                | 10.2     | http://mandriva.com/mandrake/10.2       
 mandrake5.1          | Mandrake Linux 5.1                                 | 5.1      | http://mandriva.com/mandrake/5.1        
 mandrake5.2          | Mandrake Linux 5.2                                 | 5.2      | http://mandriva.com/mandrake/5.2        
 mandrake5.3          | Mandrake Linux 5.3                                 | 5.3      | http://mandriva.com/mandrake/5.3        
 mandrake6.0          | Mandrake Linux 6.0                                 | 6.0      | http://mandriva.com/mandrake/6.0        
 mandrake6.1          | Mandrake Linux 6.1                                 | 6.1      | http://mandriva.com/mandrake/6.1        
 mandrake7.0          | Mandrake Linux 7.0                                 | 7.0      | http://mandriva.com/mandrake/7.0        
 mandrake7.1          | Mandrake Linux 7.1                                 | 7.1      | http://mandriva.com/mandrake/7.1        
 mandrake7.2          | Mandrake Linux 7.2                                 | 7.2      | http://mandriva.com/mandrake/7.2        
 mandrake8.0          | Mandrake Linux 8.0                                 | 8.0      | http://mandriva.com/mandrake/8.0        
 mandrake8.1          | Mandrake Linux 8.1                                 | 8.1      | http://mandriva.com/mandrake/8.1        
 mandrake8.2          | Mandrake Linux 8.2                                 | 8.2      | http://mandriva.com/mandrake/8.2        
 mandrake9.0          | Mandrake Linux 9.0                                 | 9.0      | http://mandriva.com/mandrake/9.0        
 mandrake9.1          | Mandrake Linux 9.1                                 | 9.1      | http://mandriva.com/mandrake/9.1        
 mandrake9.2          | Mandrake Linux 9.2                                 | 9.2      | http://mandriva.com/mandrake/9.2        
 mandriva2006.0       | Mandriva Linux 2006.0                              | 2006.0   | http://mandriva.com/mandriva/2006.0     
 mandriva2007         | Mandriva Linux 2007                                | 2007     | http://mandriva.com/mandriva/2007       
 mandriva2007.1       | Mandriva Linux 2007 Spring                         | 2007.1   | http://mandriva.com/mandriva/2007.1     
 mandriva2008.0       | Mandriva Linux 2008                                | 2008.0   | http://mandriva.com/mandriva/2008.0     
 mandriva2008.1       | Mandriva Linux 2008 Spring                         | 2008.1   | http://mandriva.com/mandriva/2008.1     
 mandriva2009.0       | Mandriva Linux 2009                                | 2009.0   | http://mandriva.com/mandriva/2009.0     
 mandriva2009.1       | Mandriva Linux 2009 Spring                         | 2009.1   | http://mandriva.com/mandriva/2009.1     
 mandriva2010.0       | Mandriva Linux 2010                                | 2010.0   | http://mandriva.com/mandriva/2010.0     
 mandriva2010.1       | Mandriva Linux 2010 Spring                         | 2010.1   | http://mandriva.com/mandriva/2010.1     
 mandriva2010.2       | Mandriva Linux 2010.2                              | 2010.2   | http://mandriva.com/mandriva/2010.2     
 mandriva2011         | Mandriva Linux 2011                                | 2011     | http://mandriva.com/mandriva/2011       
 mbs1.0               | Mandriva Business Server 1.0                       | 1.0      | http://mandriva.com/mbs/1.0             
 mes5                 | Mandriva Enterprise Server 5.0                     | 5.0      | http://mandriva.com/mes/5.0             
 mes5.1               | Mandriva Enterprise Server 5.1                     | 5.1      | http://mandriva.com/mes/5.1             
 msdos6.22            | Microsoft MS-DOS 6.22                              | 6.22     | http://microsoft.com/msdos/6.22         
 netbsd0.8            | NetBSD 0.8                                         | 0.8      | http://netbsd.org/netbsd/0.8            
 netbsd0.9            | NetBSD 0.9                                         | 0.9      | http://netbsd.org/netbsd/0.9            
 netbsd1.0            | NetBSD 1.0                                         | 1.0      | http://netbsd.org/netbsd/1.0            
 netbsd1.1            | NetBSD 1.1                                         | 1.1      | http://netbsd.org/netbsd/1.1            
 netbsd1.2            | NetBSD 1.2                                         | 1.2      | http://netbsd.org/netbsd/1.2            
 netbsd1.3            | NetBSD 1.3                                         | 1.3      | http://netbsd.org/netbsd/1.3            
 netbsd1.4            | NetBSD 1.4                                         | 1.4      | http://netbsd.org/netbsd/1.4            
 netbsd1.5            | NetBSD 1.5                                         | 1.5      | http://netbsd.org/netbsd/1.5            
 netbsd1.6            | NetBSD 1.6                                         | 1.6      | http://netbsd.org/netbsd/1.6            
 netbsd2.0            | NetBSD 2.0                                         | 2.0      | http://netbsd.org/netbsd/2.0            
 netbsd3.0            | NetBSD 3.0                                         | 3.0      | http://netbsd.org/netbsd/3.0            
 netbsd4.0            | NetBSD 4.0                                         | 4.0      | http://netbsd.org/netbsd/4.0            
 netbsd5.0            | NetBSD 5.0                                         | 5.0      | http://netbsd.org/netbsd/5.0            
 netbsd5.1            | NetBSD 5.1                                         | 5.1      | http://netbsd.org/netbsd/5.1            
 netbsd6.0            | NetBSD 6.0                                         | 6.0      | http://netbsd.org/netbsd/6.0            
 netbsd6.1            | NetBSD 6.1                                         | 6.1      | http://netbsd.org/netbsd/6.1            
 netbsd7.0            | NetBSD 7.0                                         | 7.0      | http://netbsd.org/netbsd/7.0            
 netbsd7.1            | NetBSD 7.1                                         | 7.1      | http://netbsd.org/netbsd/7.1            
 netbsd7.1.1          | NetBSD 7.1.1                                       | 7.1.1    | http://netbsd.org/netbsd/7.1.1          
 netware4             | Novell Netware 4                                   | 4        | http://novell.com/netware/4             
 netware5             | Novell Netware 5                                   | 5        | http://novell.com/netware/5             
 netware6             | Novell Netware 6                                   | 6        | http://novell.com/netware/6             
 openbsd4.2           | OpenBSD 4.2                                        | 4.2      | http://openbsd.org/openbsd/4.2          
 openbsd4.3           | OpenBSD 4.3                                        | 4.3      | http://openbsd.org/openbsd/4.3          
 openbsd4.4           | OpenBSD 4.4                                        | 4.4      | http://openbsd.org/openbsd/4.4          
 openbsd4.5           | OpenBSD 4.5                                        | 4.5      | http://openbsd.org/openbsd/4.5          
 openbsd4.8           | OpenBSD 4.8                                        | 4.8      | http://openbsd.org/openbsd/4.8          
 openbsd4.9           | OpenBSD 4.9                                        | 4.9      | http://openbsd.org/openbsd/4.9          
 openbsd5.0           | OpenBSD 5.0                                        | 5.0      | http://openbsd.org/openbsd/5.0          
 openbsd5.1           | OpenBSD 5.1                                        | 5.1      | http://openbsd.org/openbsd/5.1          
 openbsd5.2           | OpenBSD 5.2                                        | 5.2      | http://openbsd.org/openbsd/5.2          
 openbsd5.3           | OpenBSD 5.3                                        | 5.3      | http://openbsd.org/openbsd/5.3          
 openbsd5.4           | OpenBSD 5.4                                        | 5.4      | http://openbsd.org/openbsd/5.4          
 openbsd5.5           | OpenBSD 5.5                                        | 5.5      | http://openbsd.org/openbsd/5.5          
 openbsd5.6           | OpenBSD 5.6                                        | 5.6      | http://openbsd.org/openbsd/5.6          
 openbsd5.7           | OpenBSD 5.7                                        | 5.7      | http://openbsd.org/openbsd/5.7          
 openbsd5.8           | OpenBSD 5.8                                        | 5.8      | http://openbsd.org/openbsd/5.8          
 openbsd5.9           | OpenBSD 5.9                                        | 5.9      | http://openbsd.org/openbsd/5.9          
 openbsd6.0           | OpenBSD 6.0                                        | 6.0      | http://openbsd.org/openbsd/6.0          
 openbsd6.1           | OpenBSD 6.1                                        | 6.1      | http://openbsd.org/openbsd/6.1          
 openbsd6.2           | OpenBSD 6.2                                        | 6.2      | http://openbsd.org/openbsd/6.2          
 opensolaris2009.06   | OpenSolaris 2009.06                                | 2009.06  | http://sun.com/opensolaris/2009.06      
 opensuse-factory     | openSUSE                                           | factory  | http://opensuse.org/opensuse/factory    
 opensuse-unknown     | openSUSE                                           | unknown  | http://opensuse.org/opensuse/unknown    
 opensuse10.2         | openSUSE 10.2                                      | 10.2     | http://opensuse.org/opensuse/10.2       
 opensuse10.3         | openSUSE 10.3                                      | 10.3     | http://opensuse.org/opensuse/10.3       
 opensuse11.0         | openSUSE 11.0                                      | 11.0     | http://opensuse.org/opensuse/11.0       
 opensuse11.1         | openSUSE 11.1                                      | 11.1     | http://opensuse.org/opensuse/11.1       
 opensuse11.2         | openSUSE 11.2                                      | 11.2     | http://opensuse.org/opensuse/11.2       
 opensuse11.3         | openSUSE 11.3                                      | 11.3     | http://opensuse.org/opensuse/11.3       
 opensuse11.4         | openSUSE 11.4                                      | 11.4     | http://opensuse.org/opensuse/11.4       
 opensuse12.1         | openSUSE 12.1                                      | 12.1     | http://opensuse.org/opensuse/12.1       
 opensuse12.2         | openSUSE 12.2                                      | 12.2     | http://opensuse.org/opensuse/12.2       
 opensuse12.3         | openSUSE 12.3                                      | 12.3     | http://opensuse.org/opensuse/12.3       
 opensuse13.1         | openSUSE 13.1                                      | 13.1     | http://opensuse.org/opensuse/13.1       
 opensuse13.2         | openSUSE 13.2                                      | 13.2     | http://opensuse.org/opensuse/13.2       
 opensuse42.1         | openSUSE Leap 42.1                                 | 42.1     | http://opensuse.org/opensuse/42.1       
 opensuse42.2         | openSUSE Leap 42.2                                 | 42.2     | http://opensuse.org/opensuse/42.2       
 opensuse42.3         | openSUSE Leap 42.3                                 | 42.3     | http://opensuse.org/opensuse/42.3       
 opensusetumbleweed   | openSUSE Tumbleweed                                | tumbleweed | http://opensuse.org/opensuse/tumbleweed
 rhel-atomic-7.0      | Red Hat Enterprise Linux Atomic Host 7.0           | 7.0      | http://redhat.com/rhel-atomic/7.0       
 rhel-atomic-7.1      | Red Hat Enterprise Linux Atomic Host 7.1           | 7.1      | http://redhat.com/rhel-atomic/7.1       
 rhel-atomic-7.2      | Red Hat Enterprise Linux Atomic Host 7.2           | 7.2      | http://redhat.com/rhel-atomic/7.2       
 rhel2.1              | Red Hat Enterprise Linux 2.1                       | 2.1      | http://redhat.com/rhel/2.1              
 rhel2.1.1            | Red Hat Enterprise Linux 2.1 Update 1  
/etc/bind/masters/elinvent.com            | 2.1.1    | http://redhat.com/rhel/2.1.1            
 rhel2.1.2            | Red Hat Enterprise Linux 2.1 Update 2              | 2.1.2    | http://redhat.com/rhel/2.1.2            
 rhel2.1.3            | Red Hat Enterprise Linux 2.1 Update 3              | 2.1.3    | http://redhat.com/rhel/2.1.3            
 rhel2.1.4            | Red Hat Enterprise Linux 2.1 Update 4              | 2.1.4    | http://redhat.com/rhel/2.1.4            
 rhel2.1.5            | Red Hat Enterprise Linux 2.1 Update 5              | 2.1.5    | http://redhat.com/rhel/2.1.5            
 rhel2.1.6            | Red Hat Enterprise Linux 2.1 Update 6              | 2.1.6    | http://redhat.com/rhel/2.1.6            
 rhel2.1.7            | Red Hat Enterprise Linux 2.1 Update 7              | 2.1.7    | http://redhat.com/rhel/2.1.7            
 rhel3                | Red Hat Enterprise Linux 3                         | 3        | http://redhat.com/rhel/3                
 rhel3.1              | Red Hat Enterprise Linux 3 Update 1                | 3.1      | http://redhat.com/rhel/3.1              
 rhel3.2              | Red Hat Enterprise Linux 3 Update 2                | 3.2      | http://redhat.com/rhel/3.2              
 rhel3.3              | Red Hat Enterprise Linux 3 Update 3                | 3.3      | http://redhat.com/rhel/3.3              
 rhel3.4              | Red Hat Enterprise Linux 3 Update 4                | 3.4      | http://redhat.com/rhel/3.4              
 rhel3.5              | Red Hat Enterprise Linux 3 Update 5                | 3.5      | http://redhat.com/rhel/3.5              
 rhel3.6              | Red Hat Enterprise Linux 3 Update 6                | 3.6      | http://redhat.com/rhel/3.6              
 rhel3.7              | Red Hat Enterprise Linux 3 Update 7                | 3.7      | http://redhat.com/rhel/3.7              
 rhel3.8              | Red Hat Enterprise Linux 3 Update 8                | 3.8      | http://redhat.com/rhel/3.8              
 rhel3.9              | Red Hat Enterprise Linux 3 Update 9                | 3.9      | http://redhat.com/rhel/3.9              
 rhel4.0              | Red Hat Enterprise Linux 4.0                       | 4.0      | http://redhat.com/rhel/4.0              
 rhel4.1              | Red Hat Enterprise Linux 4.1                       | 4.1      | http://redhat.com/rhel/4.1              
 rhel4.2              | Red Hat Enterprise Linux 4.2                       | 4.2      | http://redhat.com/rhel/4.2              
 rhel4.3              | Red Hat Enterprise Linux 4.3                       | 4.3      | http://redhat.com/rhel/4.3              
 rhel4.4              | Red Hat Enterprise Linux 4.4                       | 4.4      | http://redhat.com/rhel/4.4              
 rhel4.5              | Red Hat Enterprise Linux 4.5                       | 4.5      | http://redhat.com/rhel/4.5              
 rhel4.6              | Red Hat Enterprise Linux 4.6                       | 4.6      | http://redhat.com/rhel/4.6              
 rhel4.7              | Red Hat Enterprise Linux 4.7                       | 4.7      | http://redhat.com/rhel/4.7              
 rhel4.8              | Red Hat Enterprise Linux 4.8                       | 4.8      | http://redhat.com/rhel/4.8              
 rhel4.9              | Red Hat Enterprise Linux 4.9                       | 4.9      | http://redhat.com/rhel/4.9              
 rhel5.0              | Red Hat Enterprise Linux 5.0                       | 5.0      | http://redhat.com/rhel/5.0              
 rhel5.1              | Red Hat Enterprise Linux 5.1                       | 5.1      | http://redhat.com/rhel/5.1              
 rhel5.10             | Red Hat Enterprise Linux 5.10                      | 5.10     | http://redhat.com/rhel/5.10             
 rhel5.11             | Red Hat Enterprise Linux 5.11                      | 5.11     | http://redhat.com/rhel/5.11             
 rhel5.2              | Red Hat Enterprise Linux 5.2                       | 5.2      | http://redhat.com/rhel/5.2              
 rhel5.3              | Red Hat Enterprise Linux 5.3                       | 5.3      | http://redhat.com/rhel/5.3              
 rhel5.4              | Red Hat Enterprise Linux 5.4                       | 5.4      | http://redhat.com/rhel/5.4              
 rhel5.5              | Red Hat Enterprise Linux 5.5                       | 5.5      | http://redhat.com/rhel/5.5              
 rhel5.6              | Red Hat Enterprise Linux 5.6                       | 5.6      | http://redhat.com/rhel/5.6              
 rhel5.7              | Red Hat Enterprise Linux 5.7                       | 5.7      | http://redhat.com/rhel/5.7              
 rhel5.8              | Red Hat Enterprise Linux 5.8                       | 5.8      | http://redhat.com/rhel/5.8              
 rhel5.9              | Red Hat Enterprise Linux 5.9                       | 5.9      | http://redhat.com/rhel/5.9              
 rhel6.0              | Red Hat Enterprise Linux 6.0                       | 6.0      | http://redhat.com/rhel/6.0              
 rhel6.1              | Red Hat Enterprise Linux 6.1                       | 6.1      | http://redhat.com/rhel/6.1              
 rhel6.2              | Red Hat Enterprise Linux 6.2                       | 6.2      | http://redhat.com/rhel/6.2              
 rhel6.3              | Red Hat Enterprise Linux 6.3                       | 6.3      | http://redhat.com/rhel/6.3              
 rhel6.4              | Red Hat Enterprise Linux 6.4                       | 6.4      | http://redhat.com/rhel/6.4              
 rhel6.5              | Red Hat Enterprise Linux 6.5                       | 6.5      | http://redhat.com/rhel/6.5              
 rhel6.6              | Red Hat Enterprise Linux 6.6                       | 6.6      | http://redhat.com/rhel/6.6              
 rhel6.7              | Red Hat Enterprise Linux 6.7                       | 6.7      | http://redhat.com/rhel/6.7              
 rhel6.8              | Red Hat Enterprise Linux 6.8                       | 6.8      | http://redhat.com/rhel/6.8              
 rhel6.9              | Red Hat Enterprise Linux 6.9                       | 6.9      | http://redhat.com/rhel/6.9              
 rhel7.0              | Red Hat Enterprise Linux 7.0                       | 7.0      | http://redhat.com/rhel/7.0              
 rhel7.1              | Red Hat Enterprise Linux 7.1                       | 7.1      | http://redhat.com/rhel/7.1              
 rhel7.2              | Red Hat Enterprise Linux 7.2                       | 7.2      | http://redhat.com/rhel/7.2              
 rhel7.3              | Red Hat Enterprise Linux 7.3                       | 7.3      | http://redhat.com/rhel/7.3              
 rhel7.4              | Red Hat Enterprise Linux 7.4                       | 7.4      | http://redhat.com/rhel/7.4              
 rhl1.0               | Red Hat Linux 1.0                                  | 1.0      | http://redhat.com/rhl/1.0               
 rhl1.1               | Red Hat Linux 1.1                                  | 1.1      | http://redhat.com/rhl/1.1               
 rhl2.0               | Red Hat Linux 2.0                                  | 2.0      | http://redhat.com/rhl/2.0               
 rhl2.1               | Red Hat Linux 2.1                                  | 2.1      | http://redhat.com/rhl/2.1               
 rhl3.0.3             | Red Hat Linux 3.0.3                                | 3.0.3    | http://redhat.com/rhl/3.0.3             
 rhl4.0               | Red Hat Linux 4.0                                  | 4.0      | http://redhat.com/rhl/4.0               
 rhl4.1               | Red Hat Linux 4.1                                  | 4.1      | http://redhat.com/rhl/4.1               
 rhl4.2               | Red Hat Linux 4.2                                  | 4.2      | http://redhat.com/rhl/4.2               
 rhl5.0               | Red Hat Linux 5.0                                  | 5.0      | http://redhat.com/rhl/5.0               
 rhl5.1               | Red Hat Linux 5.1                                  | 5.1      | http://redhat.com/rhl/5.1               
 rhl5.2               | Red Hat Linux 5.2                                  | 5.2      | http://redhat.com/rhl/5.2               
 rhl6.0               | Red Hat Linux 6.0                                  | 6.0      | http://redhat.com/rhl/6.0               
 rhl6.1               | Red Hat Linux 6.1                                  | 6.1      | http://redhat.com/rhl/6.1               
 rhl6.2               | Red Hat Linux 6.2                                  | 6.2      | http://redhat.com/rhl/6.2               
 rhl7                 | Red Hat Linux 7                                    | 7        | http://redhat.com/rhl/7                 
 rhl7.1               | Red Hat Linux 7.1                                  | 7.1      | http://redhat.com/rhl/7.1               
 rhl7.2               | Red Hat Linux 7.2                                  | 7.2      | http://redhat.com/rhl/7.2               
 rhl7.3               | Red Hat Linux 7.3                                  | 7.3      | http://redhat.com/rhl/7.3               
 rhl8.0               | Red Hat Linux 8.0                                  | 8.0      | http://redhat.com/rhl/8.0               
 rhl9                 | Red Hat Linux 9                                    | 9        | http://redhat.com/rhl/9                 
 sled10               | SUSE Linux Enterprise Desktop 10                   | 10       | http://suse.com/sled/10                 
 sled10sp1            | SUSE Linux Enterprise Desktop 10 SP1               | 10.1     | http://suse.com/sled/10.1               
 sled10sp2            | SUSE Linux Enterprise Desktop 10 SP2               | 10.2     | http://suse.com/sled/10.2               
 sled10sp3            | SUSE Linux Enterprise Desktop 10 SP3               | 10.3     | http://suse.com/sled/10.3               
 sled10sp4            | SUSE Linux Enterprise Desktop 10 SP4               | 10.4     | http://suse.com/sled/10.4               
 sled11               | SUSE Linux Enterprise Desktop 11                   | 11       | http://suse.com/sled/11                 
 sled11sp1            | SUSE Linux Enterprise Desktop 11 SP1               | 11.1     | http://suse.com/sled/11.1               
 sled11sp2            | SUSE Linux Enterprise Desktop 11 SP2               | 11.2     | http://suse.com/sled/11.2               
 sled11sp3            | SUSE Linux Enterprise Desktop 11 SP3               | 11.3     | http://suse.com/sled/11.3               
 sled11sp4            | SUSE Linux Enterprise Desktop 11 SP4               | 11.4     | http://suse.com/sled/11.4               
 sled12               | SUSE Linux Enterprise Desktop 12                   | 12       | http://suse.com/sled/12                 
 sled12sp1            | SUSE Linux Enterprise Desktop 12 SP1               | 12.1     | http://suse.com/sled/12.1               
 sled12sp2            | SUSE Linux Enterprise Desktop 12 SP2               | 12.2     | http://suse.com/sled/12.2               
 sled9                | SUSE Linux Enterprise Desktop 9                    | 9        | http://suse.com/sled/9                  
 sles10               | SUSE Linux Enterprise Server 10            
/etc/bind/masters/elinvent.com        | 10       | http://suse.com/sles/10                 
 sles10sp1            | SUSE Linux Enterprise Server 10 SP1                | 10.1     | http://suse.com/sles/10.1               
 sles10sp2            | SUSE Linux Enterprise Server 10 SP2                | 10.2     | http://suse.com/sles/10.2               
 sles10sp3            | SUSE Linux Enterprise Server 10 SP3                | 10.3     | http://suse.com/sles/10.3               
 sles10sp4            | SUSE Linux Enterprise Server 10 SP4                | 10.4     | http://suse.com/sles/10.4               
 sles11               | SUSE Linux Enterprise Server 11                    | 11       | http://suse.com/sles/11                 
 sles11sp1            | SUSE Linux Enterprise Server 11 SP1                | 11.1     | http://suse.com/sles/11.1               
 sles11sp2            | SUSE Linux Enterprise Server 11 SP2                | 11.2     | http://suse.com/sles/11.2               
 sles11sp3            | SUSE Linux Enterprise Server 11 SP3                | 11.3     | http://suse.com/sles/11.3               
 sles11sp4            | SUSE Linux Enterprise Server 11 SP4                | 11.4     | http://suse.com/sles/11.4               
 sles12               | SUSE Linux Enterprise Server 12                    | 12       | http://suse.com/sles/12                 
 sles12sp1            | SUSE Linux Enterprise Server 12 SP1                | 12.1     | http://suse.com/sles/12.1               
 sles12sp2            | SUSE Linux Enterprise Server 12 SP2                | 12.2     | http://suse.com/sles/12.2               
 sles9                | SUSE Linux Enterprise Server 9                     | 9        | http://suse.com/sles/9                  
 solaris10            | Solaris 10                                         | 10       | http://sun.com/solaris/10               
 solaris11            | Oracle Solaris 11                                  | 11       | http://oracle.com/solaris/11            
 solaris9             | Solaris 9                                          | 9        | http://sun.com/solaris/9                
 ubuntu10.04          | Ubuntu 10.04 LTS                                   | 10.04    | http://ubuntu.com/ubuntu/10.04          
 ubuntu10.10          | Ubuntu 10.10                                       | 10.10    | http://ubuntu.com/ubuntu/10.10          
 ubuntu11.04          | Ubuntu 11.04                                       | 11.04    | http://ubuntu.com/ubuntu/11.04          
 ubuntu11.10          | Ubuntu 11.10                                       | 11.10    | http://ubuntu.com/ubuntu/11.10          
 ubuntu12.04          | Ubuntu 12.04 LTS                                   | 12.04    | http://ubuntu.com/ubuntu/12.04          
 ubuntu12.10          | Ubuntu 12.10                                       | 12.10    | http://ubuntu.com/ubuntu/12.10          
 ubuntu13.04          | Ubuntu 13.04                                       | 13.04    | http://ubuntu.com/ubuntu/13.04          
 ubuntu13.10          | Ubuntu 13.10                                       | 13.10    | http://ubuntu.com/ubuntu/13.10          
 ubuntu14.04          | Ubuntu 14.04 LTS                                   | 14.04    | http://ubuntu.com/ubuntu/14.04          
 ubuntu14.10          | Ubuntu 14.10                                       | 14.10    | http://ubuntu.com/ubuntu/14.10          
 ubuntu15.04          | Ubuntu 15.04                                       | 15.04    | http://ubuntu.com/ubuntu/15.04          
 ubuntu15.10          | Ubuntu 15.10                                       | 15.10    | http://ubuntu.com/ubuntu/15.10          
 ubuntu16.04          | Ubuntu 16.04                                       | 16.04    | http://ubuntu.com/ubuntu/16.04          
 ubuntu16.10          | Ubuntu 16.10                                       | 16.10    | http://ubuntu.com/ubuntu/16.10          
 ubuntu17.04          | Ubuntu 17.04                                       | 17.04    | http://ubuntu.com/ubuntu/17.04          
 ubuntu17.10          | Ubuntu 17.10                                       | 17.10    | http://ubuntu.com/ubuntu/17.10          
 ubuntu4.10           | Ubuntu 4.10                                        | 4.10     | http://ubuntu.com/ubuntu/4.10           
 ubuntu5.04           | Ubuntu 5.04                                        | 5.04     | http://ubuntu.com/ubuntu/5.04           
 ubuntu5.10           | Ubuntu 5.10                                        | 5.10     | http://ubuntu.com/ubuntu/5.10           
 ubuntu6.06           | Ubuntu 6.06 LTS                                    | 6.06     | http://ubuntu.com/ubuntu/6.06           
 ubuntu6.10           | Ubuntu 6.10                                        | 6.10     | http://ubuntu.com/ubuntu/6.10           
 ubuntu7.04           | Ubuntu 7.04                                        | 7.04     | http://ubuntu.com/ubuntu/7.04           
 ubuntu7.10           | Ubuntu 7.10                                        | 7.10     | http://ubuntu.com/ubuntu/7.10           
 ubuntu8.04           | Ubuntu 8.04 LTS                                    | 8.04     | http://ubuntu.com/ubuntu/8.04           
 ubuntu8.10           | Ubuntu 8.10                                        | 8.10     | http://ubuntu.com/ubuntu/8.10           
 ubuntu9.04           | Ubuntu 9.04                                        | 9.04     | http://ubuntu.com/ubuntu/9.04           
 ubuntu9.10           | Ubuntu 9.10                                        | 9.10     | http://ubuntu.com/ubuntu/9.10           
 win1.0               | Microsoft Windows 1.0                              | 1.0      | http://microsoft.com/win/1.0            
 win10                | Microsoft Windows 10                               | 10.0     | http://microsoft.com/win/10             
 win2.0               | Microsoft Windows 2.0                              | 2.0      | http://microsoft.com/win/2.0            
 win2.1               | Microsoft Windows 2.1                              | 2.1      | http://microsoft.com/win/2.1            
 win2k                | Microsoft Windows 2000                             | 5.0      | http://microsoft.com/win/2k             
 win2k12              | Microsoft Windows Server 2012                      | 6.3      | http://microsoft.com/win/2k12           
 win2k12r2            | Microsoft Windows Server 2012 R2                   | 6.3      | http://microsoft.com/win/2k12r2         
 win2k3               | Microsoft Windows Server 2003                      | 5.2      | http://microsoft.com/win/2k3            
 win2k3r2             | Microsoft Windows Server 2003 R2                   | 5.2      | http://microsoft.com/win/2k3r2          
 win2k8               | Microsoft Windows Server 2008                      | 6.0      | http://microsoft.com/win/2k8            
 win2k8r2             | Microsoft Windows Server 2008 R2                   | 6.1      | http://microsoft.com/win/2k8r2          
 win3.1               | Microsoft Windows 3.1                              | 3.1      | http://microsoft.com/win/3.1            
 win7                 | Microsoft Windows 7                                | 6.1      | http://microsoft.com/win/7              
 win8                 | Microsoft Windows 8                                | 6.2      | http://microsoft.com/win/8              
 win8.1               | Microsoft Windows 8.1                              | 6.3      | http://microsoft.com/win/8.1            
 win95                | Microsoft Windows 95                               | 4.0      | http://microsoft.com/win/95             
 win98                | Microsoft Windows 98                               | 4.1      | http://microsoft.com/win/98             
 winme                | Microsoft Windows Millennium Edition               | 4.9      | http://microsoft.com/win/me             
 winnt3.1             | Microsoft Windows NT Server 3.1                    | 3.1      | http://microsoft.com/winnt/3.1          
 winnt3.5             | Microsoft Windows NT Server 3.5                    | 3.5      | http://microsoft.com/winnt/3.5          
 winnt3.51            | Microsoft Windows NT Server 3.51                   | 3.51     | http://microsoft.com/winnt/3.51         
 winnt4.0             | Microsoft Windows NT Server 4.0                    | 4.0      | http://microsoft.com/winnt/4.0          
 winvista             | Microsoft Windows Vista                            | 6.0      | http://microsoft.com/win/vista          
 winxp                | Microsoft Windows XP                               | 5.1      | http://microsoft.com/win/xp  


9. Start / Stop listed KVM Virtual Machine


root@jeremiah:~# virsh list –all
 Id    Name                           State
—————————————————-
 3     fedora-28                      running
 –     debian9                        shut off


To start debian9 linux virtual machine that is currently off


root@jeremiah:~# virsh start fedora-28
Domain fedora-28 started


root@jeremiah:/home/hipo# virsh start debian9
error: Failed to start domain debian9
error: Requested operation is not valid: network 'default' is not active

root@jeremiah:/home/hipo# virsh net-list –all
Name                 State      Autostart     Persistent
———————————————————-
br0                  active     yes           yes
default              inactive   no            yes


root@jeremiah:/home/hipo# virsh net-start default
Network default started

root@jeremiah:/home/hipo# virsh start debian9
Domain debian9 started


10. Attach to running VM with virsh or virt-manager


root@jeremiah:~# virsh list
 Id    Name                           State
—————————————————-
 1     fedora-28                      running
 3     debian9                        running

root@jeremiah:~# virsh connect debian9


Note that to make the login prompt appear you have to press enter once after the ^] connection string appears


kvm-connect-to-virtual-machine-with-virsh-command-screenshot-howto

An alternative way is to use virt-manager GUI KVM desktop management interface and click over the Virtual Machine Guest name, in same fashion like in VirtualBox.

virtual-manager-virt-manager-screenshot-with-Virtual-Machines-inside-on-Debian-Linux

virt-manager-gui-interface-connect-to-fedora-28-virtual-machine

If you have KVM running on your Linux desktop PC / notebook you can also connect via VNC with virsh command.


root@jericho:~# virsh vncdisplay centos7


Another handy thing is to expose the Virtualized Guest OS with VNC in order to be able to connect and manage installation or further Linux configuration via VNC using an SSH Tunnel with port forwarding:


$ ssh hipo@www.pc-freak.net -L 5901:127.0.0.1:5901


11.  Start / Shutdown / Suspend / Reboot (safe reboot) a VM guest machine domain


root@jericho:~# virsh shutdown debian9
root@jericho:~# virsh start fedora-28
root@jericho:~# virsh suspend debian9
root@jericho:~# virsh reboot fedora-28


12. Remove / Delete KVM Virtual Machines domain


root@jeremiah:~# virsh undefine fedora-28
root@jeremiah:~# virsh destroy fedora-28


Closing words


Using KVM to experiment with different OS distributions is really fun just like you can easily run a number of the major most popular Linux Distributions and a set of different versions. It takes few minutes to have a fully functional Linux to play with and it saves a lot of hassles when dealing with GNU / Linux and FreeBSD, doing so in Virtualbox for me prooved to be much more complicated (not to mention that often Virtualbox had an ugly bugs so even Importing an Appliance as a Guest VM with an official distro OS-es failed with weird errors.
One other very practical use of Kerkel-based Virtualization is if you want to run your servers using own Micro-Services architecture (e.g. run multiple Linux OS-es each running a separate Apache / Nginx / MySQL / PostGreSQL / Backup / Storage) etc. all of it running on a single dedicated server or a self-hosted bare-metal
There are plenty of Web Interfaces for Management KVM (proprietary and free software) that could even futher simplify the use and deploy / destory of KVM VMs.
All that makes possible running your own Linux or Web hosting provider a relatively easy task and seriously could cut business expenses and operational (maintenance) costs.

If you plan to run youw own hosting company, I can help you establish your infrastructure and advise you on the right technologies to use.


Linux “bash: mail: command not found” error fix – Installing mail cli on Fedora, Debian, CentOS, Ubuntu

Friday, September 7th, 2018

bash-mail-command-not-found-error-fix-linux-installing-bsd-mailx-linux-fedora-debian-centos

If you just hired a cheap VPS with some kind of Linux OS installed or just installed a home Linux test system environment inside a Virtual Machine (such as VirtualBox) on your notebook and you want to read system email reports delivered by services (e.g. track possible errors with the OS) or simply test whether Email relaying is configured properly

and you end up with shell error:

bash: mail: command not found

because mail command is missing and you wonder what Linux package you have to install in order to have the lovely mail / mailx command back on the OS … this article will help you how you can easily solve it by installing the mailx binary file (e.g. install the package providing it depending on the Linux Distribution Operating System you face the problem on.

1.  Install mailx command on Debian / Ubuntu / Mint and other .deb based Linux
 

root@linux:~# apt-get install –yes bsd-mailx


An alternative way to install the mailx system binary is to install  mailutils package

which will set up the system with essential mail related programs and set up a light Exim MTA and common server Email surrounding  so you can easily configure default installed Exim Mail Server to serve as an SMTP relay (through dpkg-reconfigure exim4-config) command


root@linux~:# apt-get install mailutils
Reading package lists… Done
Building dependency tree       
Reading state information… Done
The following additional packages will be installed:
  exim4-base exim4-config exim4-daemon-light guile-2.0-libs libgsasl7
  libkyotocabinet16v5 libmailutils5 libmariadbclient18 libntlm0
  mailutils-common mysql-common
Suggested packages:
  eximon4 exim4-doc-html | exim4-doc-info spf-tools-perl swaks mailutils-mh
  mailutils-doc
The following NEW packages will be installed:
  exim4-base exim4-config exim4-daemon-light guile-2.0-libs libgsasl7
  libkyotocabinet16v5 libmailutils5 libmariadbclient18 libntlm0 mailutils


root@linux:~# dpkg-reconfigure exim4-config


dpkg-reconfigure-exim4-config-debian-linux-exim4-email-server-screenshot

2. Install mailx Linux command on Fedora / CentOS / RHEL e.g. Redhat based distros


On RPM based distrubutions the package name is different from debians to install it there you have to fetch and install current distro mailx .rpm

To install mail command on older CentOS / Redhat 7/6/5 distributions


[root@centos:~]# yum install -y mailx


On Fedora 22+ version yum auto-dependency tool was substituted with dnf:


[root@fedora:~]# dnf install -y mailx


3. Send Test Email with mail command


root@linux:~# echo "Sample Message Body" | mail -s "Whatever … Message Subject" remote_receiver@remote-server-email-address.com


Check the mailbox, you just sent the sample email, hopefully if MTA is relaying correctly and the SMTP relay is properly delivering the email should be at the recipient address.

Installing the phpbb forum on Debian (Squeeze/Sid) Linux

Saturday, September 11th, 2010

howto-easily-install-phpbb-on-debian-gnu-linux

I've just installed the phpbb forum on a Debian Linux because we needed a goodquick to install communication media in order to improve our internal communication in a student project in Strategic HR we're developing right now in Arnhem Business School.

Here are the exact steps I followed to have a properly it properly instlled:

1. Install the phpbb3 debian package
This was pretty straight forward:

debian:~# apt-get install phpbb3

At this point of installation I've faced a dpkg-reconfigure phpbb deb package configuration issue:
I was prompted to pass in the credentials for my MySQL password right after I've selected the MySQL as my preferred database back engine.
I've feeded my MySQL root password as well as my preferred forum database name, however the database installation failed because, somehow the configuration procedure tried to connect to my MySQL database with the htcheck user.
I guess this has to be a bug in the package itself or something from my previous installation misconfigured the way the debian database backend configuration was operating.
My assumption is that my previously installed htcheck package or something beforehand I've done right after the htcheck and htcheck-php packages installation.

after the package configuration failed still the package had a status of properly installed when I reviewed it with dpkg
I've thought about trying to manually reconfigure it using the dpkg-reconfigure debian command and I gave it a try like that:

debian:~# dpkg-reconfigure phpbb3

This time along with the other fields I've to fill in the ncurses interface I was prompted for a username before the password prompted appeared.
Logically I tried to fill in the root as it's my global privileges MySQL allowed user.
However that didn't helped at all and again the configuration tried to send the credentials with user htcheck to my MySQL database server.
To deal with the situation I had to approach it in the good old manual way.

2. Manually prepare / create the required phpbb forum database

To completet that connected to the MySQL server with the mysql client and created the proper database like so:

debian:~# mysql -u root -p
mysql>
CREATE database phpbb3forum;

3. Use phpmyadmin or the mysql client command line to create a new user for the phpbb forum

Here since adding up the user using the phpmyadmin was a way easier to do I decided to go that route, anyways using the mysql cli is also an option.

From phpmyadmin It's pretty easy to add a new user and grant privileges to a certain database, to do so navigate to the following database:

Privileges -> -> Add a new user ->

Now type your User name: , Host , Password , Re-type password , also for a Host: you have to choose Local from the drop down menu.

Leave the Database for user field empty as we have already previously created our desired database in step 2 of this article

Now press the "Go" button and the user will get created.

Further after choose the Privileges menu right on the bottom of the page once again, select through the checkbox the username you have just created let's say the previously created user is phpbb3

Go to Action (There is a picture with a man and a pencil on the right side of this button

Scroll down to the page part saying Database-specific privileges and in the field Add privileges on the following database: fill in your previosly created database name in our case it's phpbb3forum

and then press the "Go" button once again.
A page will appear where you will have to select the exact privileges you would like to grant on the specific selected database.
For some simplicity just check all the checkbox to grant as many privilegs to your database as you could.
Then again you will have to press the "Go" button and there you go you should have already configured an username and database ready to go with your new phpbb forum.

4. Create a virtualhost if you would like to have the forum as a subdomain or into a separate domain

If you decide to have the forum on a separate sub-domain or domain as I did you will have to add some kind of Virtualhost into either your Apache configuration /etc/apache2/apache2.conf or into where officially the virutualhosts are laid in Debian Linux in /etc/apache2/sites-available
I've personally created a new file like for instance /etc/apache2/sites-available/mysubdomain.mydomain.com

Here is an example content of the new Virtualhost:

<VirtualHost *>
ServerAdmin admin-email@domain.com
ServerName mysubdomain.domain.com

# Indexes + Directory Root.
DirectoryIndex index.php index.php5 index.htm index.html index.pl index.cgi index.phtml index.jsp index.py index.asp

DocumentRoot /usr/share/phpbb3/www/

# Logfiles
ErrorLog /var/log/apache2/yourdomain/error.log
CustomLog /var/log/apache2/yourdomain/access.log combined
# CustomLog /dev/null combined
<Directory /usr/share/phpbb3/www/>
Options FollowSymLinks MultiViews -Includes ExecCGI
AllowOverride All
Order allow,deny
allow from all </Directory>
</VirtualHost>

In above Virtualhost just change the values for ServerAdmin , ServerName , DocumentRoot , ErrorLog , CustomLog and Directory declaration to adjust it to your situation.

5. Restart the Apache webserver for the new Virtualhost to take affect

debian:~# /etc/init.d/apache2 restart

Now accessing your http://mysubdomain.domain.com should display the installed phpbb3 forum
The default username and password for your forum you can use straight are:

username: admin
password: admin

So far so good you by now have the PHPBB3 forum properly installed and running, however if you try to Register a new user in the forum you will notice that it's impossible because of a terrible ugly message reading:

Sorry but this board is currently unavailable.

I've spend few minutes online to scrape through the forums before I can understand what I have to stop that annoying message from appearing and allow new users to register in the phpbb forum

The solution came natural and was a setting that had to be changed with the forum admin account, thus login as admin and look at the bottom of the page, below the text reading Powered by phpBB © 2000, 2002, 2005, 2007 phpBB Group you will notice a link with Administration Control Panel
just press there a whole bunch of menus will appear on the screen allowing you to do numerous things, however what you will have to do is go to
Board Settings -> Disable Board

and change the radio button there to say No

That's all now your forum will be ready to go and your users can freely register and if the server where the forum is installed has an already running mail server, they will receive an emails with a registration data concerning their new registrations in your new phpbb forum.
Cheers and Enjoy your new shiny phpbb Forum 🙂

Migrate Webserver and SQL data from old SATA Hard drive to SSD to boost websites performance / Installing new SSD KINGSTON 120GB hard disk on Linux

Monday, March 28th, 2016

ssd-linux-migrate-webserver-and-mysql-from-old-SATA-to-SSD-Kingston-Hard-drive-to-boost-performance-installing-new-SSD-on-Debian-linux
Blog and websites hosted on a server were giving bad performance lately and the old SATA Hard Disk on the Lenovo Edge server seemed to be overloaded from In/Out operations and thus slowing down the websites opeining time as well as SQL queries (especially the ones from Related Posts WordPress plugin was quite slow. Sometimes my blog site opening times were up to 8-10 seconds.

To deal with the issue I obviously needed a better speed of I/O of hard drive thus as I've never used SSD hard drives so far,  I decided to buy a new SSD (Solid State Drive) KINGSTON SV300S37A120G, 605ABBF2, max UDMA/133  hard disk.
Mounting the hard disk physically on the computer tower case wasn't a big deal as there are no rotating elements of the SSD it doesn't really matter how it is mounted main thing is that it is being hooked up somewhere to the case.

I was not sure whether the SSD HDD is supported by my Debian GNU / Linux so I had see whether Linux Operating System has properly detected your hard disk use dmesg

1. Check if SSD Hard drive is supported in Linux


linux:~# dmesg|grep -i kingston
[    1.182734] ata5.00: ATA-8: KINGSTON SV300S37A120G, 605ABBF2, max UDMA/133
[    1.203825] scsi 4:0:0:0: Direct-Access     ATA      KINGSTON SV300S3 605A PQ: 0 ANSI: 5


linux:~# dmesg|grep -i sdb
[    1.207819] sd 4:0:0:0: [sdb] 234441648 512-byte logical blocks: (120 GB/111 GiB)
[    1.207847] sd 4:0:0:0: [sdb] Write Protect is off
[    1.207848] sd 4:0:0:0: [sdb] Mode Sense: 00 3a 00 00
[    1.207860] sd 4:0:0:0: [sdb] Write cache: enabled, read cache: enabled, doesn't support DPO or FUA
[    1.207928]  sdb: unknown partition table
[    1.208319] sd 4:0:0:0: [sdb] Attached SCSI disk


Well great news as you see from above output obviously the Kingston SSD HDD was detected by the kernel.
I've also inspected whether the proper dimensions of hard drive (all 120 Gigabytes are being detected by the OS):


linux:~# fdisk -l /dev/sdb
Disk /dev/sdb: 120.0 GB, 120034123776 bytes
255 heads, 63 sectors/track, 14593 cylinders, total 234441648 sectors
Units = sectors of 1 * 512 = 512 bytes
Sector size (logical/physical): 512 bytes / 512 bytes
I/O size (minimum/optimal): 512 bytes / 512 bytes
Disk identifier: 0x00000000

Even better as the proper HDD sizing was detected by Linux kernel.
Next thing to do was of course to create ext4 filesystem on the SSD HDD.
I wanted to give 2 separate partitions for my Webserver Websites DocumentRoot directories which all lay under the standard Apache location inside /var/www as well as MySQL data folder which is also under the standard Debian based Linuces – /var/lib/mysql as the SQL data directory was just 3.3 GB size, I've decided to reserve 20GB gigabytes for the MySQL and another 100 GB for my PHP / CSS / JS / HTML and other data files /var/www.
 

2. Create SSD partitions with cfdisk

Hence I needed to create:

1. SSD partition of 100GB
2. SSD partition of 20GB

I have cfdisk installed and I believe, the easiest way to create the partitions is using interactive partitioner as CFDISK instead of fdisk: so in order to make the proper partitions I've ran


linux:~# cfdisk /dev/sdb


I' will skip explainig details on how to use CFDISK as it is pretty standard – display or manipulate disk partition table tool.
Just press on NEW button (moving with arrow keys buttons) and choose the 2 partitions size 100000 and 20000 MB (one thing to note here is that you have to choose between Primary and  Logical creation of partitions, as my SSD is a secondary drive and I already have a ) and then press the
WRITE button to save all the partition changes.

!!! Be very careful here as you might break up your other disks data make sure you're really modifying the SSD Hard Drive and not your other /dev/sda or other attached external Hard drive or ATA / SATA disk.
Press the WRITE button only once you're absolutely sure, you do it at your own (always create backup of your other data and don't blame me if something goes wrong) …

Once created the two partitions will look like in the screenshot below:
creating-linux-partitions-with-cfdisk-linux-partitioning-tool.png


3. Create ext4 filesystem 100 and 20 GB partitions

Next thing to do before the two partitions are ready to mount under Webserver's files documentroot /var/www and /var/lib/mysql is to create ext4 filesystem, though some might prefer to stick to ext3 or reiserfs partition, I would recommend you use ext4 for the reason ext4 according to my quick research is said to perform much better with SSD Hard Drives.

The tool to create the ext4 filesystems is mkfs4.ext4 it is provided by debian package e2fsprogs I have it already installed on my server, if you don't have it just go on and install it with:
 

linux:~# apt-get install –yes e2fsprogs


To create the two ext4 partitions run:
 

linux:~# mkfs4.ext4 /dev/sdb5


linux:~# mfs4.ext4 /dev/sdb6


Here the EXT4 filesystem on partition that is supposed to be 100 Gigabytes will take 2, 3 minutes as the dimensions of partition are a bit bigger, so if you don't want to get boring go grab a coffee, once the partitions are ready you can evaluate whether everyhing is properly created with fdisk you should get output like the one below


linux:~# fdisk -l /dev/sdb
Disk /dev/sdb: 120.0 GB, 120034123776 bytes
255 heads, 63 sectors/track, 14593 cylinders, total 234441648 sectors
Units = sectors of 1 * 512 = 512 bytes
Sector size (logical/physical): 512 bytes / 512 bytes
I/O size (minimum/optimal): 512 bytes / 512 bytes
Disk identifier: 0x00000000

   Device Boot      Start         End      Blocks   Id  System
/dev/sdb1              63   234441647   117220792+   5  Extended
/dev/sdb5             126    39070079    19534977   83  Linux
/dev/sdb6        39070143   234441647    97685752+  83  Linux


4. Mount newly created SSD partitions under /var/www and /var/lib/mysql

Before I mounted /var/www and /var/lib/mysql in order to be able to mount under the already existing directories I had to:

1. Stop Apache and MySQL server
2. Move Mysql and Apache Documentroot and Data directories to -bak
3. Create new empty /var/www and /var/lib/mysql direcotries
4. Copy backpups ( /var/www-bak and /var/lib/mysql-bak ) to the newly mounted ext4 SSD partitions

To achieve that I had to issue following commands:
 

linux:~# /etc/init.d/apache2 stop
linux:~# /etc/init.d/mysql stop

linux:~# mv /var/www /var/www-bak
linux:~# mv /var/lib/mysql /var/lib/mysql-bak

linux:~# mkdir /var/www
linux:~# mkdir /var/lib/mysql
linux:~# chown -R mysql:mysql /var/lib/mysql


Then to manually mount the SSD partitions:
 

linux:~# mount  /dev/sdb5 /var/lib/mysql
linux:~# mount /dev/sdb6 /var/www


To check that the folders are mount into the SSD drive, ran mount cmd:


linux:~# mount
/dev/sda1 on / type ext3 (rw,errors=remount-ro)
tmpfs on /lib/init/rw type tmpfs (rw,nosuid,mode=0755)
proc on /proc type proc (rw,noexec,nosuid,nodev)
sysfs on /sys type sysfs (rw,noexec,nosuid,nodev)
udev on /dev type tmpfs (rw,mode=0755)
tmpfs on /dev/shm type tmpfs (rw,nosuid,nodev)
devpts on /dev/pts type devpts (rw,noexec,nosuid,gid=5,mode=620)
fusectl on /sys/fs/fuse/connections type fusectl (rw)
/dev/sdc1 on /backups type ext4 (rw)
/dev/sdb5 on /var/lib/mysql type ext4 (rw,relatime,discard,data=ordered))
/dev/sdb6 on /var/www type ext4 (rw,relatime,discard,data=ordered))


That's great now the filesystem mounts fine, however as it an SSD drive and SSD drives are being famous for having a number of limited writes on disk before the drive lifetime is over it is a good idea to increase a bit the lifetime of the SSD by mounting the SSD partitions with noatime and errors=remount-ro (in order to not log file access times to filesystem table and to remount the FS read only in case of some physical errors of the drive).

5. Configure SSD partitions to boot every time Linux reboots

Now great, the filesystems gets mounted fine so next thing to do is to make it automatically mount every time the Linux OS boots up, this on GNU / Linux is done through /etc/fstab, for my 2 ext4 partitions this is the content to add at the end of /etc/fstab:


/dev/sdb5               /var/lib/mysql      ext4        noatime,errors=remount-ro       0       1
/dev/sdb6               /var/www        ext4    noatime,errors=remount-ro       0       1


quickest way to add it without a text editor is to echo to the end of file:
 

linux:~# cp -rpf /etc/fstab /etc/fstab.bak_25_03_2016
linux:~# echo ' /dev/sdb5               /var/lib/mysql      ext4        noatime,errors=remount-ro,discard       0       1' >> /etc/fstab
linux:~# echo ' /dev/sdb6               /var/www        ext4    noatime,errors=remount-ro,discard       0       1 ' >> /etc/fstab


Then mount again all the filesystems including the 2 new created SSD (100 and 20 GB) partitions:
 

linux:~# umount /var/www
linux:~# umount /var/lib/mysql
linux:~# mount -a


To assure properly mounted with noatime and remount-ro on errors options:


linux:~# mount | grep -i sdb
/dev/sdb5 on /var/lib/mysql type ext4 (rw,noatime,errors=remount-ro)
/dev/sdb6 on /var/www type ext4 (rw,noatime,errors=remount-ro)


It is also a good idea to check a statistics of disk free command:
 

linux:~# df -h|grep -i sdb
/dev/sdb5         19G  0G    19G  0% /var/lib/mysql
/dev/sdb6         92G   0G    92G  0% /var/www


6. Copy all Webserver and SQL data from backupped directories to new SSD mounted

Last but not least is to copy all original content files from /var/www-bak and /var/lib/mysql-bak to the new freshly  created SSD partitions, though copying the files can be made with normal linux copy command (cp),
I personally prefer rsync because rsync is much quicker and more efficient in copying large amount of files in my case this were 48 Gigabytes.

To copy files from with rsync:


linux:~# rsync -av –log-file /var/log/backup.log  /var/www-bak /var/www
linux:~# rsync -av –log-file /var/log/backup.log  /var/lib/mysql-bak /var/lib/mysql


Then ofcourse, finally to restore my websites normal operation I had to bring up the Apache Webservers and MySQL service


linux:~# /etc/init.d/apache2 start
linux:~# /etc/init.d/mysql start


7. Optimizing SSD performance with periodic trim (discard of unused blocks on a mounted filesystem)

As I digged deeper into how to even further optimize SSD drive performance I learned about the cleaning action TRIM of the partitions for a long term performance proper operation, to understand it better think about trimming like Windows degrament operatin.
 

NAME
fstrim – discard unused blocks on a mounted filesystem

SYNOPSIS
fstrim [-o offset] [-l length] [-m minimum-free-extent] [-v] mountpoint

DESCRIPTION
fstrim is used on a mounted filesystem to discard (or "trim") blocks which are not in use by the filesystem. This is useful for
solid-state drives (SSDs) and thinly-provisioned storage.

By default, fstrim will discard all unused blocks in the filesystem. Options may be used to modify this behavior based on range or
size, as explained below.


Trimming is really necessery, otherwise SSD become very slow after some time. All modern SSD's support TRIM, but older SSD's from before 2010 usually don't.
Thus for an older SSD you'll want to check this on the website of the manufacturer.

As I mentioned earlier TRIM is not supported by all SSD drives, to check whether TRIM is supported by SSD:

linux:~# hdparm -I /dev/sdb|grep -i -E 'trim|discard'
                  *          Data set Management TRIM supported (limit 1 block)

It's easiest to let the system perform an automatic TRIM. That can be done in several ways.

The quickest way for trimming is to place into /etc/rc.local trim  commands, in my case it was the following commands:


fstrim -v /var/lib/mysql
fstrim -v /var/www

To add it I've used my favourite vim text editor.
Adding commands to rc.local will make SSD trimming be executed at boot time so this will reduce a bit the downtime during the trim with some time so perhaps for those like me which are running a crually important websites a better

An alternative way is to schedule a daily cron job to do just place a new job in /etc/cron.daily/trim e.g.:
 

linux:~# vim /etc/cron.daily/trim


#!/bin/sh
fstrim -v /var/lib/mysql
fstrim -v /var/www

linux:~# chmod +x /etc/cron.daily/trim

However the best way to enable automatic trimming to SSD  is to just add the discard parameter to /etc/fstab I've already done that earlier in this article.

Not really surprising the increase of websites opening (page load times) were decreased dramatically web page loading waiting time fall down 2 to 2.5 times, so the moral of story for me is always when possible from now on to use SSD in order to have superb websites opening times.

To sum it up what was achieved with moving my data into SSD Drive, before moving websites and SQL data to SSD drive the websites were opening for 6 to 10 seconds now sites open in 2 to 4.5 seconds which is below 5 seconds (the normal waiting time for a user to see your website).
By the way it should be not a news forfor people that are into Search Engine Optimization but might be for some of unexperienced new Admins and Webmasters that, all that all page opening times that  exceeds 5 secs is considered to be a slow website (and therefore perhaps not worthy to read).
The high load page times >5 secs makes the website also less interesting not only for end users but also for search engines (Google / Yahoo / Bing / Baidoo etc.) will is said to crawl it less if website is slow.
Search Engines are said to Index much better and crawl more frequently into more responsive websites.
Hence implementing SSD to a server and decreasing the page load time should bring up my visitors stats a bit too.

Well that's all for today, hope you enjoyed 🙂