Posts Tagged ‘Frequency’

Monitoring chronyd time service is synchronized, get additional time server values with Zabbix userparameter script

Monday, March 21st, 2022

monitoring-chronyc-time-server-synchronization-zabbix-logo

If you''re running a server infrastructure and your main monitoring system is Zabbix. Then a vital check you might want to setup is to monitor the server time synchronization to a central server. In newer Linux OS-es ntpd time server is started to be used lesser and many modern Linux distributions used in the corporate realm are starting to recommend using chrony as a time synchronization client / server.

In this article, I'll show you how you can quickly setup monitoring of chronyd process and monitoring whether the time is successfully synchronizing with remote Chronyd time server. This will be done with a tiny one liner shell script setup as userparameter It is relatively easy then to setup an Action Alert


1. Create userparameter script to send parsed chronyd time synchronization to Zabbix Server

chronyc tracking provides plenty of useful data which can give many details about info such as offset, skew, root delay, stratum, update interval.

[root@server: ~]# chronyc tracking
Reference ID    : 0A32EF0B (fkf-intp01.intcs.meshcore.net)
Stratum         : 3
Ref time (UTC)  : Fri Mar 18 12:42:31 2022
System time     : 0.000032544 seconds fast of NTP time
Last offset     : +0.000031102 seconds
RMS offset      : 0.000039914 seconds
Frequency       : 3.037 ppm slow
Residual freq   : +0.000 ppm
Skew            : 0.023 ppm
Root delay      : 0.017352410 seconds
Root dispersion : 0.004285847 seconds
Update interval : 1041.6 seconds
Leap status     : Normal

[root@server zabbix_agentd.d]# cat userparameter_chrony.conf 
UserParameter=chrony.json,chronyc -c tracking | sed -e s/'^'/'{"chrony":[“‘/g -e s/’$’/'”]}'/g -e s/','/'","'/g
[root@server zabbix_agentd.d]#

The -c option passed to chronyc is printing the chronyc tracking command ouput data in comma-separated values ( CSV ) format.

2. Create Necessery Item key to get chronyd processes and catch the userparameter data


  • First lets create a an Item key to calculate the chronyd daemon proc.num
    proc.num – simply returns the number of processes in the process list just like a simple
    pgrep servicename command does.
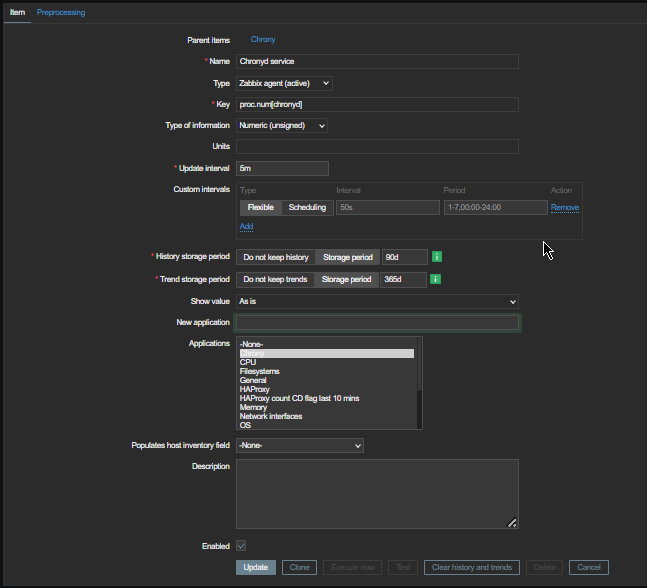

monitroing-chronyc_zabbix_item_report_to-zabbix

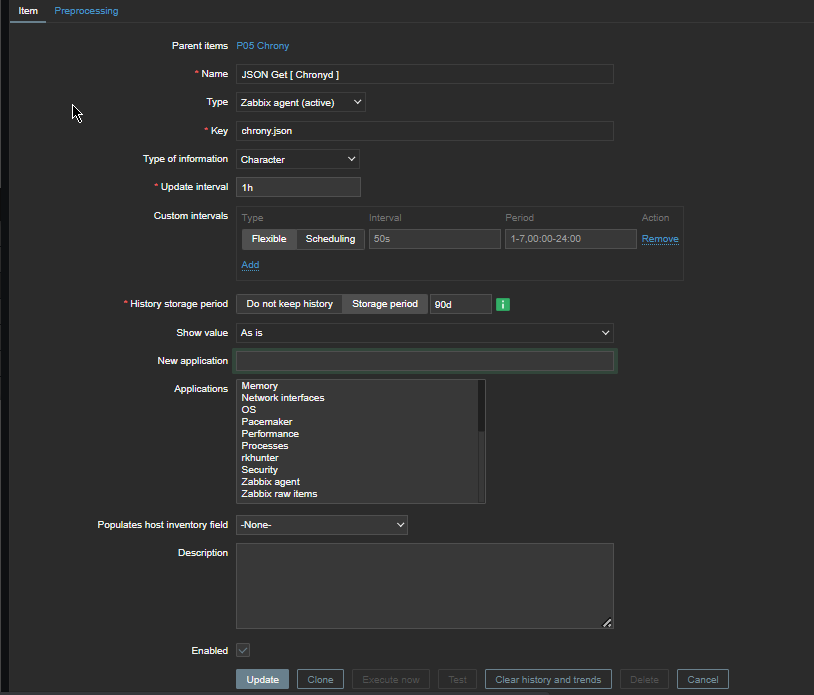
Second lets create the Item for the userparameter script, the chrony.json key should be the same as the key given in the userparameter script.
obtain-chronyc-statistic-variables-from-remote-chronyd-to-zabbix-windows

Create Chrony Zabbix Triggers 
 

Expression 

{server-host:proc.num[chronyd].last()}<1


will be triggered if the process of chronyd on the server is less than 1


chronyc_monitoring_process-is-not-running-screenshot

Next configure

{server-host:chrony[Leap status].iregexp[Not synchronised) ]=1


to trigger Alert Chronyd is Not synchronized if the Expression check occurs.
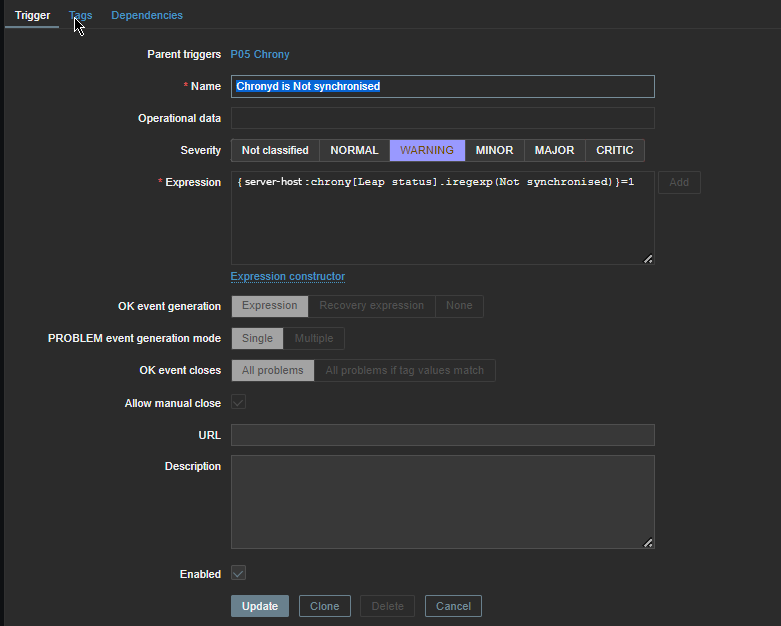
chronyd-is-not-synchronized-trigger-iregexp

Reload the zabbix-agent on the server
 

To make zabbix-agent locally installed on the machine read the userparameter into memory  (in my case this is zabbix-agent-4.0.28-1.el8.x86_64) installed on Redhat 8.3 (Ootpa), you have to restart it.

[root@server: ~]# systemctl restart zabbix-agent
[root@server: ~]# systemctl status zabbix-agent

● zabbix-agent.service – Zabbix Agent
   Loaded: loaded (/usr/lib/systemd/system/zabbix-agent.service; enabled; vendor preset: disabled)
   Active: active (running) since Thu 2021-12-16 16:41:02 CET; 3 months 0 days ago
 Main PID: 862165 (zabbix_agentd)
    Tasks: 6 (limit: 23662)
   Memory: 20.6M
   CGroup: /system.slice/zabbix-agent.service
           ├─862165 /usr/sbin/zabbix_agentd -c /etc/zabbix/zabbix_agentd.conf
           ├─862166 /usr/sbin/zabbix_agentd: collector [idle 1 sec]
           ├─862167 /usr/sbin/zabbix_agentd: listener #1 [waiting for connection]
           ├─862168 /usr/sbin/zabbix_agentd: listener #2 [waiting for connection]
           ├─862169 /usr/sbin/zabbix_agentd: listener #3 [waiting for connection]
           └─862170 /usr/sbin/zabbix_agentd: active checks #1 [idle 1 sec]

Warning: Journal has been rotated since unit was started. Log output is incomplete or unavailable.


In a short while you should be seeing in the chrony.json key History data fed by the userparameter Script.

In Zabbix Latest data, you will see plenty of interesting time synchronization data get reported such as Skew, Stratum, Root Delay, Update Interval, Frequency etc.

chronyd-zabbix-reported-time-synchronization-offset-leap-residual-freq-root-delay-screenshot

To have an email Alerting further, go and setup a new Zabbix Action based on the Trigger with your likings and you're done. 
The tracked machine will be in zabbix to make sure your OS clock is not afar from the time server. Repeat the same steps if you need to track chronyd is up running and synchronized on few machines, or if you have to make it for dozens setup a Zabbix template.
How to connect to WiFi network using console or terminal on GNU / Linux

Wednesday, November 2nd, 2011

iwlist-screenshot-howto-connect-to-wifi-in-text-console-linux-wpasupplicant

Sometimes its useful to connect to Wireless Networks using console . The reasons for that might be many, one possible reason is to be able to debug, Wireless connection failures or simply omit the use of the many available GUI wifi connection programs.

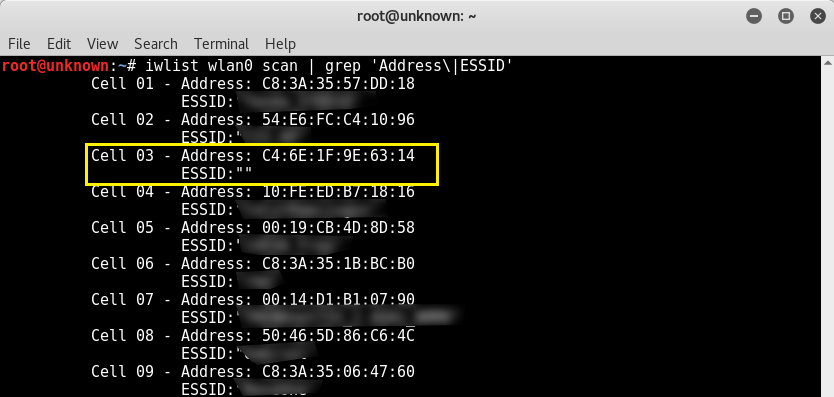
As a first step before connecting in terminal is to look up for the wifi networks available for connection, this is done with cmd:

linux:~# iwlist wlan0 scanning
wlan0 Scan completed :
Cell 01 - Address: 00:24:01:90:8F:38
Channel:7
Frequency:2.442 GHz (Channel 7)
Quality=70/70 Signal level=-39 dBm
Encryption key:on
ESSID:"magdanoz"
Bit Rates:1 Mb/s; 2 Mb/s; 5.5 Mb/s; 11 Mb/s
Bit Rates:6 Mb/s; 9 Mb/s; 12 Mb/s; 48 Mb/s; 18 Mb/s
24 Mb/s; 36 Mb/s; 54 Mb/s
Mode:Master
Extra:tsf=000000034f5c786b
Extra: Last beacon: 68ms ago
IE: Unknown: 00086D616764616E6F7A
IE: Unknown: 010482848B96
IE: Unknown: 030107
IE: Unknown: 32080C1218602430486C
IE: Unknown: CC0700CC020000018A
IE: Unknown: CC0700CC0300000100
IE: WPA Version 1
Group Cipher : TKIP
Pairwise Ciphers (2) : TKIP CCMP
Authentication Suites (1) : PSK
IE: IEEE 802.11i/WPA2 Version 1
Group Cipher : TKIP
Pairwise Ciphers (2) : TKIP CCMP
Authentication Suites (1) : PSK
Cell 02 - Address: 00:1E:2A:60:5E:DC
Channel:1
...

To just list the ESSID s of the wifi networks:

linux:~# iwlist wlan0 scanning|grep -i 'essid'
ESSID:"magdanoz"
ESSID:"default"
ESSID:"todorov"
ESSID:"BTC-ADSL"
ESSID:"Zahari"
ESSID:"Drago"

1. Connecting to Open Wireless Network

Now from the above output it is clear 6 wifi networks are available for connection. The default wifi network from the list is an Open network (e.g. without pass). To connect to it I use cmd:

linux:~# /sbin/iwconfig wlan0 essid 'default'
linux:~# /sbin/iwconfig wlan0 key open

After connected to configure IP, Gateway and DNS from a DHCP server running on the WIFI router, dhclient cmd is used:

linux:~# /sbin/dhclient wlan0

2. Connecting to WEP 64bit / 128bit encrypted network

linux:~# /sbin/iwconfig wlan0 key 1234-5678-9101-1213

3. Connecting to WPA / WPA2 encrypted wifi network

To connect to WPA or WPA2 encrypted network its necessery to have installed wpasupplicant package. The name of the package might vary in different distributions on Debian and Ubuntu, the name of the package is wpasupplicant, on Fedora, CentOS and RHEL the package that has to be in is wpa_supplicant :
After having installed the wpa_supplicant to connect to the network with ESSID name magdanoz , wpa_passphrase is used first:

linux:~# /usr/bin/wpa_passphrase magdanoz Secret_Wifi_Password | tee -a /etc/wpa_supplicant.conf
network={
ssid="magdanoz"
#psk="Secret_Wifi_Password"
psk=6f7590250c4496ff7bf8dd25199ac3bb5a614d4bc069975aa884bcf084da73bc
}

As you see in above command the secret password key is generated printed on the screen and then added to /etc/wpa_supplicant.conf , necessery to establish the wireless connection with wpa_supplicant with cmd:

linux:~# /sbin/wpa_supplicant wpa_supplicant -d wext -i wlan0 -c /etc/wpa_supplicant.conf -B

-d wext instructs wpa_supplicant to use (Linux wireless extension driver).
-B tells wpa_supplicant to background the connection to prevent the wireless connection to drop off, if the console / terminal from which it is launched gets closed.

In case of succesful connection with wpa_supplicant , once again IP, Gateway and DNS is configured fetching the settings from the wifi hotspot dhcp server:

linux:~# /sbin/dhclient wlan0

General information about the wireless network and info related to the established connection can be obtained with /usr/bin/iwconfig :

linux:~# /sbin/iwconfig
lo no wireless extensions.
eth0 no wireless extensions.
wlan0 IEEE 802.11abg ESSID:"magdanoz"
Mode:Managed Frequency:2.442 GHz Access Point: 00:24:00:90:8F:38
Bit Rate=54 Mb/s Tx-Power=15 dBm
Retry long limit:7 RTS thr:off Fragment thr:off
Encryption key:off
Power Management:off
Link Quality=70/70 Signal level=-39 dBm
Rx invalid nwid:0 Rx invalid crypt:0 Rx invalid frag:0
Tx excessive retries:0 Invalid misc:0 Missed beacon:0

To configure the exact channel over which the wireless connection will be established again is done with iwconfig, for instance to configure wlan0 wifi connection established to be on wifi channel 7:

linux:~# /sbin/iwconfig wlan0 channel 11

By default iwconfig is set to automatically set the channel based on connected network ESSID , if the channel is modified to some specific number to revert it back use:

linux:~# /sbin/iwconfig wlan0 channel auto