Posts Tagged ‘Flash’

How to configure VIVACOM 3g USB ( internet ) modem HUAWEI Mobile broadband E173 on Debian and Ubuntu GNU / Linux

Wednesday, July 4th, 2012

sakis3g-configure-usb-modem-kdialog-shot

I've been given a HUAWEI Mobile Broadband E173 USB 3g model. The USB modem contains a flash USB Storage segment storing a little install program dedicated to make the modem work fine on Microsoft Windows XP / Vista / 7 and probably other M$ OSes. I'm a long time DebianGNU / Linux user and as a free software enthusiast I ofcourse wanted to be able to use Vivacom's 3G USB Modem on my Linux powered notebook.

Thanksfully as I've red on Vivacom's website the modem supports Linux OS 🙂

For those unaware in Bulgaria there are currently 3 major GSM network providers providing 3G internet this are;;;
 

  • VIVACOM – The ex Government ran national company BTC (Bulgarian Telecommunication Company)
  • M-Tel – The first GSM network provider that entered Bulgaria around year 1995
  • GLOBUL – The 3rd and last GSM mobile and net provider entered last and not so much used by Bulgarians today

Until today I had no experience in running any 3G modems on Linux, neither I had used the 3 networks 3G internet to determine which one is best, however I've been given for temporal use a VIVACOM 3G internet modem today so I proceeded to try installing it on my Debian host.

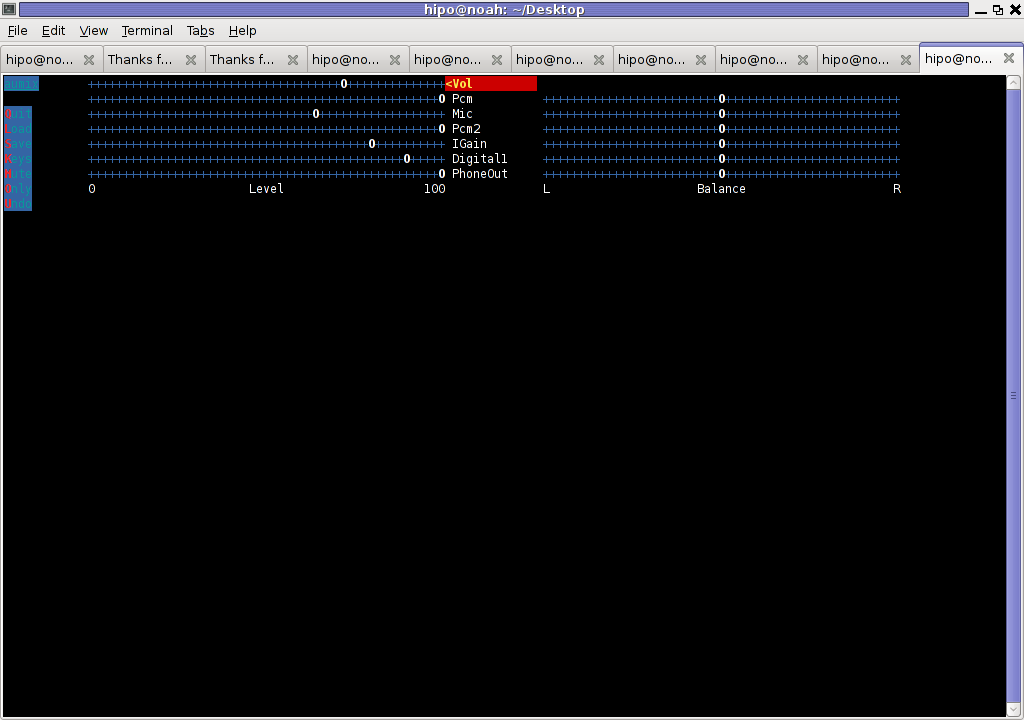
My Linux system is a bit strangely configured as I use wicd network connection manager -( wicd-gtk ) to manage wireless and LAN connections instead of the standard installed GNOME network manager – available through package ( network-manager-gnome ).

The reason I use wicd is not that it is so much better than GNOME network manger but rather for historical reasons because few years past I had impression it works better in connecting me to wireless networks. Another reason why I choosed wicd back then was the nice looking stats …

I tried plugging in the Vivacom USB 3G modem stick and checked in wicd to see if I can see a possibility to connect to the mobile opeartor 3G network but unfortunately nothing appeared.

Though the 3G adsl modem was unavailable straing in wicd, checking about it in the list of attached USB devices I could see it detected, e.g.:

noah:~# lsusb |grep -i huawei
Bus 001 Device 007: ID 12d1:1c05 Huawei Technologies Co., Ltd.

This was at least a good sign pointing me to the thoughts that the modem is probably gonna work.

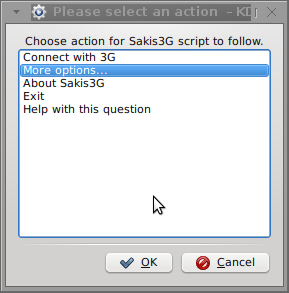
I did a quick Google search to see if other people succeded running the device on a Linux host and came across a few blog posts in Bulgarian explaining a "success story" on Ubuntu Linux through using a tweakened shell script – sakis3g. For more on how the script works and script download check out Sakis3g

Here is a quote from sakis3g's website describing the script:
 

It automagically setups your USB or Bluetooth™ modem, and may even detect operator settings.
You should try it when anything else fails!

Sakis3g has different versions designed for for plenty of spacific hware architectures i.e. for (i386, amd64, armv4t, armv5t).
There is also a version of the script which by the way contains a combination of bash shell scripting instruction and some binary exec data.

To run sakis3g on my laptop I did:

1. Download sakis3g

My notebook architecture is 64 bit so I download and used the amd64 version of the script;;;

hipo@noah:~$ mkdir sakis3g
hipo@noah:~$ cd sakis3g
hipo@noah:~/sakis3g$ wget http://www.sakis3g.org/versions/latest/amd64/sakis3g.gz

I've made also a mirror of sakis3g i386, 64 bit and all architecture the mirrors just in case it disappears in future. The mirror versions of sakis3g are here:

a. sakis3g i386 b. sakis3g amd64 c. sakis3g all architectures source

2. Unarchive and make it executable

After downloading it as it is in gzip I had to do the usual de-gzipping and making the file executable;;;

hipo@noah:~/sakis3g$ /bin/gzip -d sakis3g.gz
hipo@noah:~/sakis3g$ chmod +x sakis3g

The script is then ready to run by either clicking twice on it or (as I prefer for debugging reasons to run it in terminal):

hipo@noah:~$ ./sakis3g

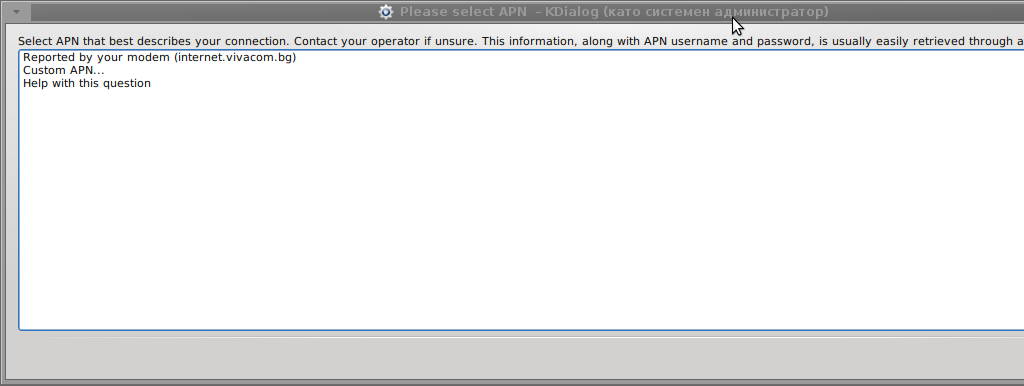
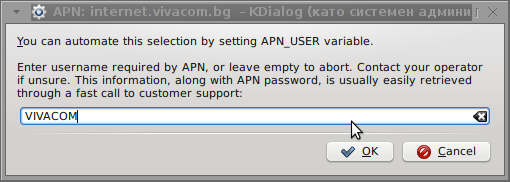
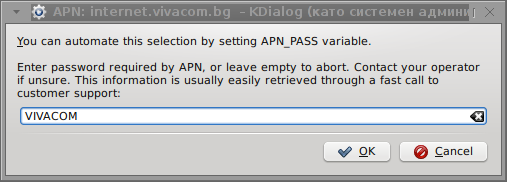
Something that I have wondered a bit was the dialog where I had to fill in some data of some variable APN abbreviation for – (Access Point Name)

The APN host for VIVACOM mobile internet is;;;
APN: internet.vivacom.bg

I've used the Windows configuration progrma to gather also the following data that I thought might be important for configuring the 3G adsl modem on the Linux host;;;

Auth: *99#
User: VIVACOM
pass: VIVACOM

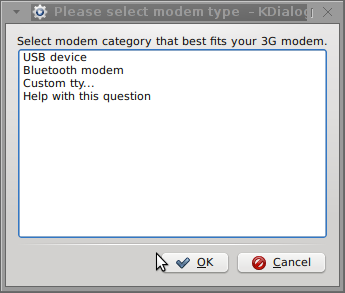
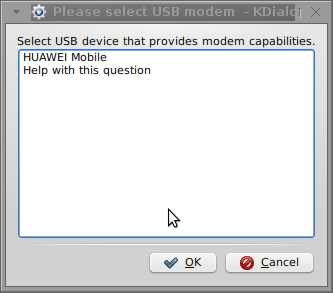
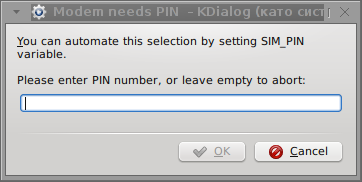
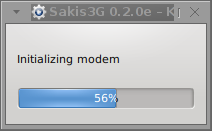
Here are all the configuration screenshots I've taken from sakis3g and all the data that I filled in.
Next the following tiny window appeared on screen:

Sakis3g configure usb modem kdialog shot 1 VIVACOM USB Modem Sakis 3g Shot 2 sakis 3g usb modem vivacom connect screenshot 2 vivacom 3g modem linux sakis3g enter pin dialog shot 4 Sending pin screenshot 5 sakis3g APN Dialog sakis3g screenshot 6sakis3g Internet Linux VIVACOM screenshot 7sakis3g Debian GNU Linux VIVACOM 3g Internet screenshot 8sakis3g initializing modem screenshot 9sakis3g successful connect to VIVACOM mobile 3g usb adls modem shot 10

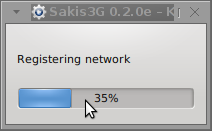
Well that's all folks, now sakis3g succesfully connected to the I_net via an (PPP) VPN connection tunnel here is data from ifconfig command showing the succesful 3G connection to VIVACOM;;;

noah:~# /sbin/ifconfig ppp0
ppp0 Link encap:Point-to-Point Protocol
inet addr:10.58.146.232 P-t-P:10.64.64.64 Mask:255.255.255.255
UP POINTOPOINT RUNNING NOARP MULTICAST MTU:1500 Metric:1
RX packets:2066 errors:1 dropped:0 overruns:0 frame:0
TX packets:1609 errors:0 dropped:0 overruns:0 carrier:0
collisions:0 txqueuelen:3
RX bytes:2232058 (2.1 MiB) TX bytes:341693 (333.6 KiB)

The internet via the 3G connection is not blazing fast but good enough to check your mail or read some webpages. VIVACOM currently has different (traffic limited packages) for their 3G internet, I'm not sure which package exactly is the 3G USB stick modem but probably the "quick" internet connection that is now would slow down once the traffic limit is reached …
Hope this post helps someone to configure 3G internet on VIVACOM in Debian and Ubuntu Linux. Though I've tested sakis3g on Debian it should work with no hassles on any other GNU Linux distribution that has bash installed.

How to add (.srt , .sub) subtitles to .flv flash movie video on Linux

Friday, April 15th, 2011

how-to-add-srt-subtitles-to-flv-flash-movie-video-on-linux
If you're on Linux the questions like, how can I convert between video and audio formats, how to do photo editing etc. etc. have always been a taugh question as with it's diversity Linux often allows too many ways to do the same things.

In the spirit of questioning I have been recently curious, how can a subtitles be added to a flash video (.flv) video?

After some research online I've come up with the below suggested solution which uses mplayer to do the flash inclusion of the subtitles file.

mplayer your_flash_movie.flv -fs -subfont-text-scale 3

While including the subtitles to the .flv file, it's best to close up all the active browsers and if running something else on the desktop close it up.
Note that above's mplayer example for (.srt and .sub) subtitle files example is only appropriate for a .flv movie files which already has a third party published subtitle files.

What is interesting is that often if you want to make custom subtitles to let's say a video downloaded from Youtube on Linux the mplayer way pointed above will be useless. Why?

Well the Linux programs that allows a user to add custom subtitles to a movie does not support the flv (flash video) file format.

My idea on how to create custom subtitles and embed them into a flv movie file is very simple and it goes like this:

1. Convert the .flv file format to let's say .avi or .mpeg
2. Use gnome-subitles or subtitleeditor to create the subtitles for the .avi or .mpeg file
3. Convert back the .avi/.mpeg file with included subtitles to .flv (flash video format)

This methodology is really long and time consuming, but pitily as far as my understanding goes it's the only way to do that on your Linux until now.

To make the conversations between .flv and .avi format you will need to use the ffmpeg – (FFMpeg command line tool video converter), here is how:

– Convert .flv to .avi

debian:~# /usr/bin/ffmpeg -i input_flvfilename.flv output_avifilename.avi

– Convert .avi file to .flv

debian:~# /usr/bin/ffmpeg -y -i /path/to/your/avi/input_avifilename.avi -acodec mp3 -ar 22050 -f flv
/path/to/your/flv/output_flvfilename.flv

The required overall tools which you will have to have installed on your Debian or Ubuntu Linux are:

1. ffmpeg
2. gnome-subtitles
3. subtitleeditor
4. mplayer

You will also have to spend some time to get to know gnome-subtitles or subtitleeditor, but it won't be that long until you get the idea on how to use them.

Best Windows tools to Test (Benchmark) Hard Drives, SSD Drives and RAID Storage Controllers

Wednesday, April 23rd, 2014

atto-windows-hard-disk-benchmark-freeware-tool-screenshot-check-hard-disk-speed-windows
Disk Benchmarking is very useful for people involved in Graphic Design, 3D modelling, system admins  and anyone willing to squeeze maximum of his PC hardware.

If you want to do some benchmarking on newly built Windows server targetting Hard Disk performance, just bought a new hard SSD (Solid State Drives) and you want to test how well Hard Drive I/O operations behave or you want to see a regular HDD benchmarking of group of MS Windows PCs and plan hardware optiomization, check out ATTO Disk Benchmark.

So why exactly ATTO Benchmark? – Cause it is one of the best Windows Free Benchmark tools on the internet.

ATTO is a widely-accepted Disk Benchmark freeware utility to help measure storage system performance. ATTO though being freeware is among top tools utilized in industry. It is very useful in comparing different Hard Disk vendors speed, measure Windows storage systems performance with various transfer sizes and test lengths for reads and writes.

ATTO Disk Benchmark is used by manufacturers of Hardware RAID controllers, its precious tool to test Windows storage controllers, host bus adapters (HBAs).

Here is ATTO Benchmark tool specifications (quote from their webstie):
 

  • Transfer sizes from 512KB to 8MB
  • Transfer lengths from 64KB to 2GB
  • Support for overlapped I/O
  • Supports a variety of queue depths
  • I/O comparisons with various test patterns
  • Timed mode allows continuous testing
  • Non-destructive performance measurement on formatted drives
  • Transfer sizes from 512KB to 8MB
  • Transfer lengths from 64KB to 2GB
  • Support for overlapped I/O
  • Supports a variety of queue depths
  • I/O comparisons with various test patterns
  • Timed mode allows continuous testing
  • Non-destructive performance measurement on formatted drives
  • – See more at: http://www.attotech.com/disk-benchmark/#sthash.rRlgSTOE.dpuf

Here is mirrored latest version of ATTO Disk for Download. Once you get your HDD statistics you will probably want to compare to other people results. On  TomsHardware's world famous Hardware geek site there are plenty of Hard Drives performance Charts

Of course there are other GUI alternatives to ATTO Benchmark one historically famous is NBench

NBench

nbench_benchmark_windows_hard-drive-cpu-and-memory

Nbench is nice little benchmarking program for Windows NT. Nbench reports the following components of performance:

CPU speed: integer and floating operations/sec
L1 and L2 cache speeds: MB/sec
main memory speed: MB/sec
disk read and write speeds: MB/sec

SMP systems and multi-tasking OS efficiency can be tested using up to 20 separate threads of execution.

For Console Geeks or Windows server admins there are also some ports of famous *NIX Hard Disk Benchmarking tools:

NTiogen

NTiogen benchmark was written by Symbios Logic, It's Windows NT port of their popular UNIX benchmark IOGEN. NTIOGEN is the parent processes that spawns the specified number of IOGEN processes that actually do the I/O.
The program will display as output the number of processes, the average response time, the number of I/O operations per second, and the number of KBytes per second. You can download mirror copy of Ntiogen here


There are plenty of other GUI and Console HDD Benchmarking Win Tools, i.e.:

IOMeter (ex-developed by Intel and now abandoned available as open source available on SourceForge)

iometer-benchmark-disk-storage-speed-windows
 

Bench32 – Comprehensive benchmark that measures overall system performance under Windows NT or Windows 95, now obsolete not developed anymore abandoned by producer company.

ThreadMark32 – capable of bench (ex developed and supported by ADAPTEC) but also already unsupported

IOZone – filesystem benchmark tool. The benchmark generates and measures a variety of file operations. Iozone has been ported to many machines and runs under many operating systems.
 

N! B! Important note to make here is above suggested tools will provide you more realistic results than the proprietary vendor tools shipped by your hardware vendor. Using proprietary software produced by a single vendor makes it impossible to analyze and compare different hardwares, above HDD benchmarking tools are for "open systems", e.g. nomatter what the hardware producer is produced results can be checked against each other.
Another thing to consider is even though if you use any of above tools to test and compare two storage devices still results will be partially imaginary, its always best to conduct tests in Real Working Application Environments. If you're planning to launch a new services structure always test it first and don't rely on preliminary returned soft benchmarks.

if you know some other useful benchmarking software i'm missing please share.

The Tuesday in Holland and a Sunday shock in Protestatant Church

Wednesday, October 29th, 2008

Well I haven’t blog for a while so I decided to give a shot. And Glorify God! Again!At Monday I had my defense of the the Change Management project we handed in inMr. Vinke’s pigeon box. I trusted to God and prayed fervently. The Monday wentjust flawless Glory be to the Holy Trinity (The Father, The Son and the Holy Spirit)! Amen!Everything went quite well during the Management Meeting. Each 3 who constructed my groupwere able to partake at the right moment. I was really calm and peaceful during the whole meeting!Cause of God’s mercy and power who was helping me and helping us. Our teachers who pretended to bea Managers in a company gave their point on our Change Management Plan. They tried to squeezeus with unfortable questions. Happily we had a reasonable answers on most of them. What’s left now is to fix few minor things about the plan and then hand it in to the teachers.Afterwards I hope if everything is ok, each one of 3 of us will receive an individual task andwill start working on it. Am let me recall some memories from the day before. Max (a black guy),who happens to be my neighbor and a Christian also invited me to join his protestant presbetyrianChuch he attend. I accepted since I feel a need to be in the Church and the Orthodox Church missesme so much.. Well we went to a building with a hall in which the protestant Church gathered together.The reason I accepted to join that Church was that they preach in English there.I was quite stunned when I found out that the pastor is actually a female (a black one).They started with a sort of entry speech or at least it looked like this to me.The service continued as the pastor went out preaching. Oh boy, Oh boy what a preach it was,I couldn’t believe on my eyes. The pastor acted completely like a general she was screamingpassages of the Holy Bible, stressing out on some of the things. Blaming the pplthat they fail to understand the Bible she asked them that the ppl ask God for enligthmenton what this passages red. Then the service moved by as a few individuals were invitedto share testimonies of what God has done for them during the week.. A little laterthere was a sort of prayer session where everybody was praying with different prayer,it was like an uncontrolled crowd in which each one of them acted completely different.Some of them were screaming hysterically at moments I was scared to be honest.Then the pastor took the bottle of oil and started laying hands upon some of the pplof the Church, Oh God they were shaking falling down on the ground, screaming makinggrimaces, it was an awful things to see .. I was not aware if the people were pretendingor this is real. The pastor was Chasing away demons out of the ppl, or at leastshe told me later that this is what she does. It was such bad place to be I was eageringto be out of this place as fast as possible as the ppl (Church) acted like a sect.The Pastor wanted to lay hands on me either but I rejected the proposition with the words,”No, No, I’m Orthodox”. Later I tried to explain to some of the ppl my concernsabout what is wrong in this church according to me. And a woman (a real piggy one),started arguing with me with the arguments that I quote her here “i’m God”, was likeshit this guys are even blasphemous. Luckily some of the other members of the Churchcorrected the questionable lady that she is wrong although she was unwilling to acceptthe fact. Later I had a little chat with the pastor and her husband plus onemore lady. Let’s say that their belief was closer to the Faith reality than the rest.But still I was really shocked from the experience … I don’t know if they’re wrong or rightall I know and want is that God have mercy over them and me and guide us to know his truth completely.About today: Well let’s say a peaceful they it was, except the fact that one of the webservershad died. And was not acceptable for around an hour and a half. As soon as a colleagueinformed me I restarted the failed apache. I could say I haven’t done much from middaytill the early afternoon I spend in the University accompanied by Ina. We had fewtalks about stuff and so on and so on. When I came back “home” to the dorm.I worked a bit. I spend some time learning some english words in an effort to enrich my vocabulary.Since there is a Adobe Flash Player 10 for Linux for already a few weeks. I decided to installit on my laptop. Well it took me some time until I installed it correctly. Now I haveAdobe Flash 10 on my Debian machine! It seems this version of Flash includes a possibilityto use cameras with flash. I was curious about how does this new release of flash performscomparing to the old Adobe Flash 9. According to a Benchmarking made on Linux and Macit is said that Flash 10 tend to be less CPU hungry and in general peforms better than it’spredecessor. The whole article could be red on the here . Let me conclude that post with a cool thing. A friend of mine has referred me to the following “Virtual Barbershop” check it out here link . Be sure that you listen it on headphones otherwise you won’t be able to fully enjoy it! :)END—–

How to: Improve Adobe Flash Player Video speed on Debian / Ubuntu Linux

Friday, October 12th, 2012

How to improve Adobe Flash Player Video, accelerate Flash video speed on Ubuntu, Xubuntu, Debian, Fedora - ArchLinux

I have recently installed Xubuntu to a friend with an old computer hardware. The computer is used just for basic access to the Internet web browsing – (Firefox, Opera) and Skype. All runs smoothly but sometimes the Videos in Youtube are lagging. Hence I looked for a way to make the Adobe Flash Player run smoother on this (Ubuntu 12.04) based Linux.

After a bit of searching if there is something written on the topic of Optimizing Flash Player / Flash Videos speed on Linux, I’ve stumbled acrossed one flash variable, which if used could improve Video Speed; The variable is OverrideGPUValidation and should be turned on in Flash Player with:


OverrideGPUValidation=true

The Flash Player configuration, settings on Linux could be set either globally by using:

  • /etc/adobe/mms.cfg – (system-wide configuration file, set Flash player policy for all existing users)

or locally for individual users through:

  • ~/.adobe/mms.cfg – (user-local configuration file affecting only /home/sampleuser/ flash player settings)

For Desktop Linux purposes which are used as a home desk station it is quite rarely the host to be used than more than one single user, so if that’s the case with you there is no worth to set OverrideGPUValidation=true via /etc/adobe/mms.cfg

Well anyways if need to set Flash player setting globally you will have to create /etc/adobe (which is created on deb flash player package install):


root@xubuntu:~# mkdir /etc/adobe
root@xubuntu:~# echo 'OverrideGPUValidation=true' >> /etc/adobe/mms.cfg

The local user (hidden) directory ~/.adobe is created automatically on first time the Flash Player is used in browser, just like usual with rest of Linux programs. Inside are a few directories created used by flash player but mss.cfg is not created.
For local users hence to enable OverrideGPUValidation=true type in terminal:

Enabling

user@xubuntu:~$ echo "OverrideGPUValidation=true" >> ~/.adobe/mms.cfg

The option does accelerate a bit the Flash Videos, but don’t expect huge speed ups. Normally using this option on some hosts up to 10 to 20/ 30% in Video playing (overall) speed, could be improved. On some hosts it is possible using the variable does not have a significant impact at all.

The options should work equal on Linux hosts and only Debian based ones as it is a Flash Player it is however tested with latest Flash Player Linux version which of time of writing this post is v. (11.2.202.243)
Don’t know if the same option will work on earlier Flash Player versions, so it is up to testing it. I will be glad to hear from people who tested the value and can report a speed improvement. I will be glad to hear the Video Adapter and general hardware configuration on whom OverrideGPUValidation=true speed up Flash Player.
Hope this tip helps someone.

Upgrading Skype 2.0 to Skype 2.2 beta on Debian GNU / Linux – Skype Mic hell

Saturday, December 31st, 2011

Making Skype work with Alsa on Debian GNU / Linux

Though, I'm GNU / Linux user for many years now. I have to say, everything is not so perfect as many people present it.
Configuring even simple things related to multimedia on Linux is often a complete nightmare.
An example, today I've decided to upgrade my 32 bit Skype version 2.0 beta for Linux to 64 bit Skype 2.2 beta .
The reason I was motivated to upgrade skype was basicly 2.

a) My Skype run through 32 bit binary emulation with /usr/bin/linux32

b) I had issues with my skype if someone give me a Skype Call, while I have a flash video or some other stream in Browser (let's say Youtube).
Actually being unable to receive a skype call or initiate one while I have some kind of music running in the background or just some kind of Youtube video paused was really annoying. Hence until now, everytime I wanted to speak over skype I had to close all Browser windows or tabs that are using my sound card and then restart my Skype program ….

Just imagine how ridiculous is that especially for a modern Multimedia supporting OS as Linux is. Of course the problems, I've experienced wasn't directly a problem of Linux. The problems are caused by the fact I have to use the not well working proprietary software version of Skype on my Debian GNU / Linux.
I would love to actually boycott Skype as RMS recommends, but unfortunately until now I can't, since many of my friends as well as employers use Skype to connect with me on daily basis.
So in a way I had to migrate to newer version of skype in order to make my Linux experience a bit more desktop like …

Back to the my skype 2.0 to 2.2. beta upgrade story, the overall Skype upgrade procedure was easy and went smootlhy, setting correct capturing later on however was a crazy task ….
Here is the step by step to follow to make my upgraded skype and internal notebook mic play nice together:

1. Download 64 bit Skype for Debian from skype.com

For the sake of preservation in case it disappears in future, I've made a mirror of skype for debian you can download here
My upgrade example below uses directly the 64 bit Skype 2.2beta binary mirror:

Here are the cmds once can issue if he has to upgrade to 2.2beta straight using my mirrored skype:

debian:~# wget https://www.pc-freak.net/files/skype-debian_2.2.0.35-1_amd64.deb
...

2. Remove the old version of skype

In my case I have made my previous skype installation using .tar.bz2 archive and not a debian package, however for some testing I also had a version of skype 2.0beta installed as a deb so for the sake of clarity I removed the existing skype deb install:

debian:~# dpkg -r skype
...

3. Install skype-debian_2.2.0.35-1_amd64.deb downloaded deb

debian:~# dpkg -i skype-debian_2.2.0.35-1_amd64.deb
...

After installing skype, I installed pavucontrol A volume control for the PulseAudio sound server

4. Install pavucontrol

debian:~# apt-get install pavucontrol

PavUcontrol PulseAudio mixer screenshot

Pavucontrol has plenty of sound configurations and enables the user to change many additional settings which cannot be tuned in alsamixer

pavucontrol was necessery to play with until I managed to make my microphone able to record.

5. Build and install latest Debian (Testing) distribution alsa driver

debian:~# aptitude install module-assistant
debian:~# m-a prepare
debian:~# aptitude -t testing install alsa-source
debian:~# m-a build alsa
debian:~# m-a install alsa
debian:~# rmmod snd_hda_intel snd_pcm snd_timer snd soundcore snd_page_alloc
debian:~# modprobe snd_hda_intel
debian:~# echo 'options snd-hda-intel model=auto' >> /etc/modprobe.d/alsa-base.conf

In my case removing the sound drivers and loading them once again did not worked, so I had to reboot my system before the new compiled alsa sound modules gets loaded …
The last line echo 'options snd-hda-intel model=auto' … was necessery for my Thinkpard r61 Intel audio to work out. For some clarity my exact sb model is:

debian:~$ lspci |grep -i audio
00:1b.0 Audio device: Intel Corporation 82801H (ICH8 Family) HD Audio Controller (rev 03)

For other notebooks with different sound drivers echo 'options snd-hda-intel model=auto' … should be omitted.

6. Tune microphone and sound settings in alsamixer

debian:~$ alsamixer

Alsamixer Select Soundcard Debian Linux Screenshot
Right after launching alsamixer I had to press F6: Select Sound Card and choose my sound card (0 HDA Intel).

Following my choice I unmuted all the microphones and enabled Microphone Boost as well as did some adjustments to the MIC volume level.

Alsamixer My Intel SoundCard Debian Linux

Setting proper MIC Volume levels is absolutely necessery, otherwise there is a constant noise getting out of the speakers …

7. Use aumix to set some other sound settings

For some unclear reasons, besides alsamixer , I often had to fix stuff in aumix . Honestly I don't understand where exactly aumix fits in the picture with Alsa and my loaded alsa sound blaster module?? If someone can explain I'll be thankful.

Launch aumix to further adjust some sound settings …

debian:~$ aumix

Aumix Debian GNU Linux Squeeze Screenshot

In above screenshot you see, my current aumix settings which works okay with mic and audio output.

9. Test Microphone the mic is capturing sounds correctly

Set ~/.asoundrc configuration for Skype

Edit ~/.asoundrc and put in:

pcm.pulse {
type pulse
}
ctl.pulse {
type pulse
}
pcm.!default {
type pulse
}
ctl.!default {
type pulse
}
pcm.card0 {
type hw
card 0
}
ctl.card0 {
type hw
card 0
}
pcm.dsp0 { type plug slave.pcm "hw:0,0" }
pcm.dmixout {
# Just pass this on to the system dmix
type plug
slave {
pcm "dmix"
}
}
pcm.skype {
type asym
playback.pcm "skypeout"
capture.pcm "skypein"
}
pcm.skypein {
# Convert from 8-bit unsigned mono (default format set by aoss when
# /dev/dsp is opened) to 16-bit signed stereo (expected by dsnoop)
#
# We cannot just use a "plug" plugin because although the open will
# succeed, the buffer sizes will be wrong and we will hear no sound at
# all.
type route
slave {
pcm "skypedsnoop"
format S16_LE
}
ttable {
0 {0 0.5}
1 {0 0.5}
}
}
pcm.skypeout {
# Just pass this on to the system dmix
type plug
slave {
pcm "dmix"
}
}
pcm.skypedsnoop {
type dsnoop
ipc_key 1133
slave {
# "Magic" buffer values to get skype audio to work
# If these are not set, opening /dev/dsp succeeds but no sound
# will be heard. According to the ALSA developers this is due
# to skype abusing the OSS API.
pcm "hw:0,0"
period_size 256
periods 16
buffer_size 16384
}
bindings {
0 0
}
}
I'm not 100% percent if putting those .asoundrc configurations are necessery. I've seen them on archlinux's wiki as a perscribed fix to multiple issues with Skype sound in / out.

Onwardds, for the sake of test if my sound settings set in pavucontrol enables the internal mic to capture sound I used two programs:

1. gnome-sound-recorder
2. arecord

gnome-sound-recorder GNU / Linux Screenshot
gnome-sound-recorder

gnome-sound-recorder is probably used by most GNOME users, though I'm sure Linux noviced did not play with it yet.

arecord is just a simple console based app to capture sound from the microphone. To test if the microphone works I captured a chunk of sounds with cmd:

debian:~$ arecord cow.wav
Recording WAVE 'cow.wav' : Unsigned 8 bit, Rate 8000 Hz, Mono

Later on I played the file with aplay (part of alsa-utils package in Debian), to check if I'll hear if mic succesfully captured my voice, e.g.:

debian:~$ play cow.wav
cow.wav:
File Size: 22.0k Bit Rate: 64.1k
Encoding: Unsigned PCM
Channels: 1 @ 8-bit
Samplerate: 8000Hz
Replaygain: off
Duration: 00:00:02.75
In:100% 00:00:02.75 [00:00:00.00] Out:22.0k [-=====|=====-] Clip:0
Done.

By the way, the aplay ASCII text equailizer is really awesome 😉 aplay is also capable of playing (Ogg Vorbis .ogg) free sound format.

Further on, I launched the new installed version of skype and tested Skype Calls (Mic capturing), with Skype Echo / Sound Test Service
I'll be glad to hear if this small article, helped anybody to fix any skype Linux related issues ?. I would be happy to hear also from people who had similar issues with a different fixes for skype on Linux.
Its also interesting to hear from Ubuntu and other distributions users if following this tutorial had somehow helped in resolving issues with Skype mic.

How to convert Ogg Video (.ogv) to Flash video (.flv) on Linux and FreeBSD

Thursday, September 29th, 2011

ffmpeg is the de-facto standard for Video conversion on Linux and BSD platforms. I was more than happy to find out that ffmpeg is capable of converting an .ogv file format to .flv (Flash compressed Video).
Ogg Vorbis Video to Flash’s conversion on Linux is a real piece of cake with ffmpeg .
Here is how to convert .ogv to .flv:

debian:~# ffmpeg -i ogg_vorbis_video_to_convert_.ogv converted_ogg_vorbis_video_to_flash_video.flv
...

Conversion of a 14MB ogg vorbis video to flv took 28 seconds, the newly produced converted_ogg_vorbis_video_to_flash_video.flv has been reduced to a size of 9MB. This is on a system with 2 GB of memory and dual core 1.8 Ghz intel CPU.

Fixing / Resolving Fullscreen Adobe Flash issues in Debian Linux

Monday, April 11th, 2011

Adobe Flash Player ugly Logo!

If you’re experiencing problems with maximising flash (let’s say youtube) videos on your Debian or Ubuntu or any other debian derivative.
You’re not the only one! I myself has often experienced the same annoying issue.

The flash fullscreen failures or slownesses are caused by flash player’s attempts to use directly your machine hardware, as Linux kernel is rather different than Windows and the guys from Macromedia are creating always a way more buggy port of flash for unix than it’s windows versions, it’s quite normal that the flash player is unable to properly address the computer hardware on Linux.

As i’m not programmer and I couldn’t exactly explain the cause for the fullscreen flash player mishaps, I’ll skip this and right give you the two command lines solution:

debian:~# mkdir /etc/adobe
debian:~# echo "OverrideGPUValidation = 1" >> /etc/adobe/mms.cfg

This should fix it for, you now just restart your Icedove (Firefox), Epiphany Opera or whatever browser you’re used to and launch some random video in youtube to test the solution, hopefully it should be okay 😉 But you never know with flash let’s just hope that very soon the open flash alternative gnash will be production ready and at last we the free software users will be freed from the evil “slavery” of adobe’s non-free flash player!
Though this tip is tested on Debian based Linux distributions it should most likely work same in all kind of other Linuxes.

The tip should also probably have effect in FreeBSD, though the location of the adobe directory and mms.cfg should probably be /usr/local/etc/adobe, I’ll be glad to hear from some FreeBSD user if including the OverrideGPUValidation = 1 flash option to mms.cfg like below:

# mkdir /usr/local/etc/adobe
# echo "OverrideGPUValidation = 1" >> /usr/local/etc/adobe/mms.cfg

would have an impact on any flash player fullscreen issues on FreeBSD and other BSD direvative OSes that run the linux-flash port.

How to install Adobe Flash Player on Ubuntu Jaunty

Saturday, September 19th, 2009

It’s incredibly simple and comes to the command:
$ sudo apt-get install flashplugin-nonfreeEnjoy your brand new working Adobe Flash player.END—–