Posts Tagged ‘Draft’
Wednesday, July 4th, 2012 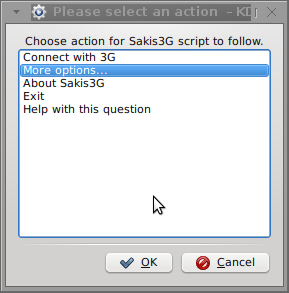
I've been given a HUAWEI Mobile Broadband E173 USB 3g model. The USB modem contains a flash USB Storage segment storing a little install program dedicated to make the modem work fine on Microsoft Windows XP / Vista / 7 and probably other M$ OSes. I'm a long time DebianGNU / Linux user and as a free software enthusiast I ofcourse wanted to be able to use Vivacom's 3G USB Modem on my Linux powered notebook.
Thanksfully as I've red on Vivacom's website the modem supports Linux OS 🙂
For those unaware in Bulgaria there are currently 3 major GSM network providers providing 3G internet this are;;;
- VIVACOM – The ex Government ran national company BTC (Bulgarian Telecommunication Company)
- M-Tel – The first GSM network provider that entered Bulgaria around year 1995
- GLOBUL – The 3rd and last GSM mobile and net provider entered last and not so much used by Bulgarians today
Until today I had no experience in running any 3G modems on Linux, neither I had used the 3 networks 3G internet to determine which one is best, however I've been given for temporal use a VIVACOM 3G internet modem today so I proceeded to try installing it on my Debian host.
My Linux system is a bit strangely configured as I use wicd network connection manager -( wicd-gtk ) to manage wireless and LAN connections instead of the standard installed GNOME network manager – available through package ( network-manager-gnome ).
The reason I use wicd is not that it is so much better than GNOME network manger but rather for historical reasons because few years past I had impression it works better in connecting me to wireless networks. Another reason why I choosed wicd back then was the nice looking stats …
I tried plugging in the Vivacom USB 3G modem stick and checked in wicd to see if I can see a possibility to connect to the mobile opeartor 3G network but unfortunately nothing appeared.
Though the 3G adsl modem was unavailable straing in wicd, checking about it in the list of attached USB devices I could see it detected, e.g.:
noah:~# lsusb |grep -i huawei

Bus 001 Device 007: ID 12d1:1c05 Huawei Technologies Co., Ltd.
This was at least a good sign pointing me to the thoughts that the modem is probably gonna work.
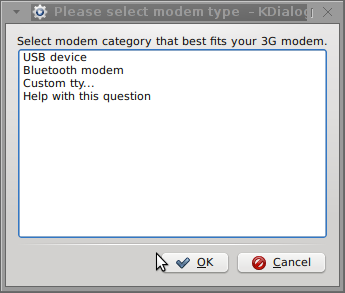
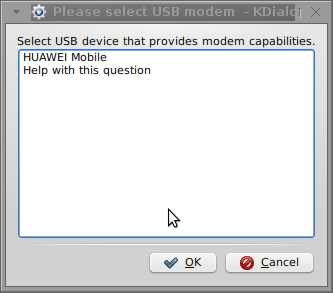
I did a quick Google search to see if other people succeded running the device on a Linux host and came across a few blog posts in Bulgarian explaining a "success story" on Ubuntu Linux through using a tweakened shell script – sakis3g. For more on how the script works and script download check out Sakis3g
Here is a quote from sakis3g's website describing the script:
It automagically setups your USB or Bluetooth™ modem, and may even detect operator settings.
You should try it when anything else fails!
Sakis3g has different versions designed for for plenty of spacific hware architectures i.e. for (i386, amd64, armv4t, armv5t).
There is also a version of the script which by the way contains a combination of bash shell scripting instruction and some binary exec data.
To run sakis3g on my laptop I did:
1. Download sakis3g
My notebook architecture is 64 bit so I download and used the amd64 version of the script;;;
hipo@noah:~$ mkdir sakis3g

hipo@noah:~$ cd sakis3g

hipo@noah:~/sakis3g$ wget http://www.sakis3g.org/versions/latest/amd64/sakis3g.gz
I've made also a mirror of sakis3g i386, 64 bit and all architecture the mirrors just in case it disappears in future. The mirror versions of sakis3g are here:
a. sakis3g i386 b. sakis3g amd64 c. sakis3g all architectures source
2. Unarchive and make it executable
After downloading it as it is in gzip I had to do the usual de-gzipping and making the file executable;;;
hipo@noah:~/sakis3g$ /bin/gzip -d sakis3g.gz

hipo@noah:~/sakis3g$ chmod +x sakis3g
The script is then ready to run by either clicking twice on it or (as I prefer for debugging reasons to run it in terminal):
hipo@noah:~$ ./sakis3g
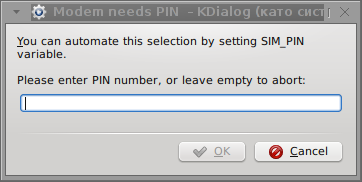
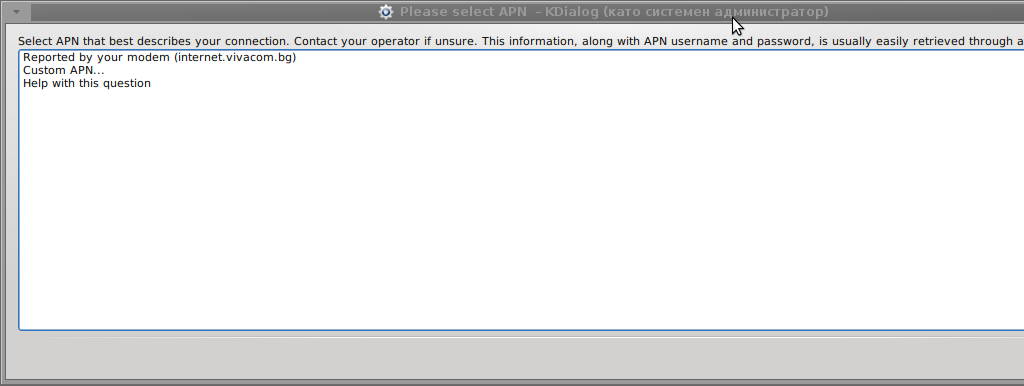
Something that I have wondered a bit was the dialog where I had to fill in some data of some variable APN abbreviation for – (Access Point Name)
The APN host for VIVACOM mobile internet is;;;
APN: internet.vivacom.bg
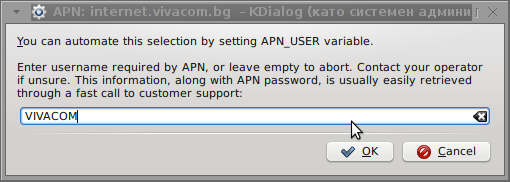
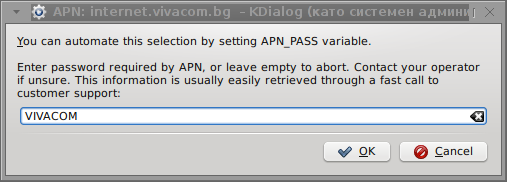
I've used the Windows configuration progrma to gather also the following data that I thought might be important for configuring the 3G adsl modem on the Linux host;;;
Auth: *99#

User: VIVACOM

pass: VIVACOM
Here are all the configuration screenshots I've taken from sakis3g and all the data that I filled in.
Next the following tiny window appeared on screen:
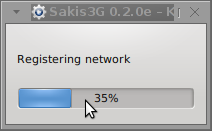
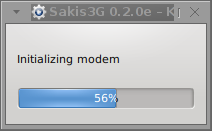

Well that's all folks, now sakis3g succesfully connected to the I_net via an (PPP) VPN connection tunnel here is data from ifconfig command showing the succesful 3G connection to VIVACOM;;;
noah:~# /sbin/ifconfig ppp0

ppp0 Link encap:Point-to-Point Protocol

inet addr:10.58.146.232 P-t-P:10.64.64.64 Mask:255.255.255.255

UP POINTOPOINT RUNNING NOARP MULTICAST MTU:1500 Metric:1

RX packets:2066 errors:1 dropped:0 overruns:0 frame:0

TX packets:1609 errors:0 dropped:0 overruns:0 carrier:0

collisions:0 txqueuelen:3

RX bytes:2232058 (2.1 MiB) TX bytes:341693 (333.6 KiB)
The internet via the 3G connection is not blazing fast but good enough to check your mail or read some webpages. VIVACOM currently has different (traffic limited packages) for their 3G internet, I'm not sure which package exactly is the 3G USB stick modem but probably the "quick" internet connection that is now would slow down once the traffic limit is reached …
Hope this post helps someone to configure 3G internet on VIVACOM in Debian and Ubuntu Linux. Though I've tested sakis3g on Debian it should work with no hassles on any other GNU Linux distribution that has bash installed.
Tags: adsl modem, architecture, Auto, bulgarians, configure, connection, DebianGNU, download, Draft, Flash, flash usb, free software enthusiast, Gnome, GSM, gsm network, gzip, host, internet modem, lan connections, linux system, m tel, manager, microsoft windows, Mobile, modem work, modems, nbsp, network provider, network providers, Point, quot, reason, segment, Shell, software, telecommunication company, time, Ubuntu, usb internet, usb modem, wicd, wireless networks, work
Posted in Linux, Linux and FreeBSD Desktop, Various | 3 Comments »
Thursday, April 19th, 2012 
It is the first week after Orthodox Christian Easter. This year 2012, the Orthodox Christians Easter date was on fifteen of April.
We've not just had a feast of an Eastern, but we actually celebrated the greatest day in all human history that happened 2012 years ago – The Glories Resurrection of our Lord Jesus Christ from the Death in the Third day!
Some Roman Catholic Christians, might be wondering, why the Orthodox Church is celebrating one week after Jewish Pascha, so in short I will explain in the reason.We orthodox christians do not celebrate with Roman Catholics Easter because Roman Catholics use the gregorian calendar to calculate and decided the day in which the Eastern celebrations should occur, where we the Orthodox Christians use still the old moon calendar (which the jews used too), when Jesus was crucified.
The gregorian calendar is very precise from a scientific point of view, however from a Church stand point it is completely wrong because, plainly taking the gregorian calendar math model doesn't take in consideration, that the jews are still celebrating their pascha following the old moon calendar.
The consequence is this year Roman Catholics, celebrated with Jewish. This from our Orthodox Christian point of view is incorrect, because Christ's Cross suffering is the pascha for us christians.
We Christians consider that the old God ordained jewish pascha was a prophecy feast, simply to remind jewish people before Christ's coming that Messiah (Christ) will come to say his people.
As Jewish rejected their true Messiah and Crucified him on the Cross, they have rejected to accept Christ as being the true pascha lamb slained for our sins.
Hence the Orthodox Christian Church teaches even to this day, that it is not righteous to celebrate Christ's Glorious Resurrection with Jewish Pascha.
Prohibition to celebrate Easter and Jewish Pascha on the same day is an Orthodox Church rule, since the early church days.
The Holy Fathers in their Church councils Council of Nicaea etc. has established as unchangable Church rule that, Jesus's Resurrection day feath, should never-ever coincide with the Jewish Pascha Celebrations.
The reasons the Church fathers ordered the Church Easter day to be always 1 week after Jewish Pascha is our saviour Jesus Christ ate pascha with his desciples as we can read in the 4 gospels in Holy Bible. After Jesus ate pascha, he was caught mocked, tortured and crucified (killed on a cross shaped trees).
Jesus is Risen! Truly He is Risen!
The Slavonic Paschal Greeting, translated words, we use across the Slavonic dome: ( Bulgaria / Russia / Ukraine, Serbia) is:
Христос Воскресе ! Воистину Воскресе!
According to our Church Tradition, Christians should great each other with the Paschal greeting Hristos Voskrese during the whole "bright week" instead of the usual Hi / Hello phrase.
The current Bulgarian version of Христос Възкресе ! Воистину Воскресе! is
Христос Възкръсна! Наистина Възкръсна!
One great miracle that testifies about the Christ's resurrection each and every year happens on each Orthodox Christian Eastern in Jerusalem in the Temple of Holy Sepulchre (where the saviour's grave cave, before the resurrection used to be). Last year, I've written to great all Christians for the Resurrection with the joyful Paschal Greeting Jesus is Risen and the Miracle of the Holy Fire
Pitily, the number of Roman Catholics who heard or know about this amazing miracle are mostly within the clergy. Its very rare a layman Christian in Roman Catholic realm heard of the miracle. Once again as a closure I want to great everyone with the joyful paschal greeting in the manners of Russians which say it three times during the paschal period.
Христос Воскресе! Воистину Воскресе !
Христос Воскресе! Воистину Воскресе !
Христос Воскресе! Воистину Воскресе !
Tags: Auto, calendar math, Catholic, consequence, consideration, Cross, Crucified, doesn, Draft, easter date, easter this year, feast, feath, glorious resurrection, greeting, gregorian calendar, Holy, human history, lord jesus christ, math model, moon calendar, nbsp, old moon, orthodox christian church, orthodox christian easter, orthodox christians, orthodox church, pascha, paschal, phrase, prophecy, quot, reason, resurrection, Risen, Roman, roman catholic christians, roman catholics, saviour, Third, third day, true messiah, Voistinu, Voskrese, year, year 2012
Posted in Christianity | 1 Comment »
Thursday, April 28th, 2011 
How to install Toshiba L40 B14 Wireless Adapter ( ID 0bda:8197 Realtek Semiconductor Corp. RTL8187B) on Ubuntu and Debian Linux
I've been struggling for more than 10 hours to fix up issues on a Ubuntu Maverick-Meerkaat with a rtl8187B Wireless Adapter
The RTL8187B almost drove me mad. I could see the wlan0 which meant the kernel is detecting the device, I could even bring it up with ifconfig wlan0 up , however when I tried it in gnome's network-manager or wicd the wireless networks were not showing up.
Trying to scan for networks using the commands:
ubuntu:~# iwlist wlan0 scan
was also unsuccesful, trying to bring up and down the wireless wlan0 interface with:
ubuntu:~# iwconfig wlan0 up
or
ubuntu:~# iwconfig wlan0 down
Both returned the error:
iwconfig: unknown command "up" and iwconfig: unknown command "down"
Running simply iwconfig was properly returning information about my Wireless Interface wlan0 :
wlan0 IEEE 802.11bg ESSID:off/any

Mode:Managed Access Point: Not-Associated Tx-Power=20 dBm

Retry long limit:7 RTS thr:off Fragment thr:off

Encryption key:off

Power Management:off
The exact information I could get about the wireless device was via the command:
ubuntu:~# lsusb | grep realtek

Bus 001 Device 002: ID 0bda:8197 Realtek Semiconductor Corp. RTL8187B Wireless Adapter
Trying manually to scan for wireless networks from console or gnome-terminal with command returned also the below weird results:
ubuntu:~# iwconfig wlan0 scan

iwconfig: unknown command "scan"
More oddly tunning wlan0 interface with commands like:
ubuntu:~# iwconfig wlan0 mode managed

ubuntu:~# iwconfig wlan0 essid ESSID

ubuntu:~# iwconfig wlan0 rate 11M
were succesful …
I read a bunch of documentation online concerning the wireless card troubles on Ubuntu, Gentoo, Debian etc.
Just few of all the resources I've read and tried are:
http://rtl-wifi.sourceforge.net/wiki/Main_Page (Returning empty page already a lot resource)
http://rtl8187b.sourceforge.net (A fork of rtl-wifi.sourceforge.net which is still available though it was not usable)
Some of the other resources which most of the people recommended as a way to properly install the RTL8187B wireless driver on linux was located on the website:
http://datanorth.net/~cuervo/rtl8187b/ (Trying to access this page returned a 404 error e.g. this page is no-longer usable)
I found even a webpage in Ubuntu Help which claimed to explain how to properly install and configure the RTL8187B wireless driver on which is below:
https://help.ubuntu.com/community/WifiDocs/Device/RealtekRTL8187b
Even the Ubuntu help instructions were pointing me to the broken cuervo's website URL
Anyways I was able to find the rtl8187b-modified-dist.tar.gz online and made a mirror of rtl8187b-modified-dist.tar.gz which you can download here
Another rtl8187b driver I found was on a toshiba website made especailly for the wireless linux drivers:
http://linux.toshiba-dme.co.jp/linux/eng/pc/sat_PSPD0_report.htm
The questionable file which was claimed to properly be able to make the Realtek Semiconductor Corp. RTL8187B Wireless Adapter to work out was called rl8187b-modified-804.tar.gz.
I've made a mirror of rtl8187b-modified-804.tar.gz is here
None of the driver archives rtl8187b-modified-dist.tar.gz and rl8187b-modified-804.tar.gz that was supposed to make the Toshiba L40 realtek wireless to work out, after compiling and installing the drivers from source worked out …
Both archives produced plenty of error messages and it seems on newer kernels like the one on this notebook:
Linux zlatina 2.6.35-28-generic #50-Ubuntu SMP Fri Mar 18 19:00:26 UTC 2011 i686 GNU/Linux, they're no longer usable.
The compile errors I got when I tried compiling the rtl8187b driver provided by the archive rtl8187b-modified-dist were:
root@ubuntu:/home/zlatina/rtl8187b-modified# sh makedrv
rm -fr *.mod.c *.mod *.o .*.cmd *.mod.* *.ko *.o *~
make -C /lib/modules/2.6.35-28-generic/build M=/home/zlatina/rtl8187b-modified/ieee80211 CC=gcc modules
make[1]: Entering directory `/usr/src/linux-headers-2.6.35-28-generic'
scripts/Makefile.build:49: *** CFLAGS was changed in "/home/zlatina/rtl8187b-modified/ieee80211/Makefile". Fix it to use EXTRA_CFLAGS. Stop.
make[1]: *** [_module_/home/zlatina/rtl8187b-modified/ieee80211] Error 2
make[1]: Leaving directory `/usr/src/linux-headers-2.6.35-28-generic'
make: *** [modules] Error 2
rm -fr *.mod.c *.mod *.o .*.cmd *.ko *~
make -C /lib/modules/2.6.35-28-generic/build M=/home/zlatina/rtl8187b-modified/rtl8187 CC=gcc modules
make[1]: Entering directory `/usr/src/linux-headers-2.6.35-28-generic'
scripts/Makefile.build:49: *** CFLAGS was changed in "/home/zlatina/rtl8187b-modified/rtl8187/Makefile". Fix it to use EXTRA_CFLAGS. Stop.
make[1]: *** [_module_/home/zlatina/rtl8187b-modified/rtl8187] Error 2
make[1]: Leaving directory `/usr/src/linux-headers-2.6.35-28-generic'
make: *** [modules] Error 2
root@ubuntu:/home/zlatina/rtl8187b-modified#
Another driver I tried which was found on aircrack-ng.org's website was rtl8187_linux_26.1010.zip
Here are the error messages I experienced while I tried to compile the realtek wireless driver from the archive rtl8187_linux_26.1010.0622.2006
compilation terminated.
make[2]: *** [/home/zlatina/rtl8187_linux_26.1010.0622.2006/beta-8187/r8187_core.o] Error 1
make[1]: *** [_module_/home/zlatina/rtl8187_linux_26.1010.0622.2006/beta-8187] Error 2
make[1]: Leaving directory `/usr/src/linux-headers-2.6.35-28-generic'
make: *** [modules] Error 2
make: *** [modules] Error 2
I tried a number of fix ups hoping to solve the compile error messages, but my efforts were useless, as it seems many things has changed in newer Ubuntu versions and they could no longer be compiled.
As I realized I couldn't make the native drivers provided by the above sources compile, I decided to give a try to the Windows drivers for Realtek 8187B with ndiswrapper, a link for download of Realtek 8187B (RTL8187B_XP_6.1163.0331.2010_Win7_62.1182.0331.2010_UI_1.00.0179 is found here
I untarred the
RTL8187B_XP driver
and used ndiswrapper to load driver like so:
root@ubuntu:~# tar -zxvf

RTL8187B_XP_6.1163.0331.2010_Win7_....L.tar.gz

root@ubuntu:/home/zlatina/RTL8187B#

root@ubuntu:/home/zlatina/RTL8187B# cd Driver/WinXP

root@ubuntu:/home/zlatina/RTL8187B/Driver/WinXP# ndiswrapper -i net8187b.inf
In order to test the RTL8178B Windows driver I used:
root@ubuntu:~# ndiswrapper -l

net8187b : driver installed

device (0BDA:8197) present (alternate driver: rtl8187)
To finally load the Windows XP RTL8187B driver on the Ubuntu I used again ndiswrapper:
root@ubuntu:~# ndiswrapper -m
Further on I used the ndisgtk graphical ndiswrapper interface to once again test if the Windows driver is working on the Ubuntu and it seemed like it is working, however still my wicd was unable to find any wireless network ….
There were many online documentation which claimed that the driver for rtl8187b works out of the box on newer kernel releases (kernel versions > 2.6.24)
Finally I found out there is a driver which is a default one with the Ubuntu e.g. rtl8187.ko , I proceeded and loaded the module:
root@ubuntu:~# modprobe rtl8187
I also decided to check out if the hardware switch button of the Toshiba Satellite L40 notebook is not switched off and guess what ?! The Wireless ON/OFF button was switched OFF!!! OMG …
I switched on the button and wicd immediately started showing up the wireless networks …
To make the rtl8187 module load on Ubuntu boot up, I had to issue the command:
root@ubuntu:~# echo 'rtl8187' >> /etc/modules
Voila after all this struggle the wireless card is working now, it's sad I had to loose about 10 hours of time until I come with the simple solution of using the default provided ubuntu driver rtl8187 , what is strange is how comes that it does not load up automatically.
Thanks God it works now.
Tags: Associated, Auto, b14, body, cmd, Corp, debian linux, Draft, EXTRA, fragment, gentoo, Gnome, information, iwconfig, kernel, Linux, maverick, Meerkaat, mod, Mode, page, Point, power, power management, Realtek, realtek semiconductor corp, root, RTS, Satellite, Semiconductor, thr, toshiba l40, toshiba satellite, toshiba satellite l40, Tx, Ubuntu, weird results, wireless adapter, wireless interface, wireless networks
Posted in Linux, Linux on Laptops, Various | 3 Comments »
Sunday, March 18th, 2012 
I've noticed in /var/log/apache2/error.log on one of the Debian servers I manage a lot of warnings and errors produced by tidy – HTML syntax checker and reformatter program.
There were actually quite plenty frequently appearing messages in the the log like:
...

To learn more about HTML Tidy see http://tidy.sourceforge.net

Please fill bug reports and queries using the "tracker" on the Tidy web site.

Additionally, questions can be sent to html-tidy@w3.org

HTML and CSS specifications are available from http://www.w3.org/

Lobby your company to join W3C, see http://www.w3.org/Consortium

line 1 column 1 - Warning: missing <!DOCTYPE> declaration

line 1 column 1 - Warning: plain text isn't allowed in <head> elements

line 1 column 1 - Info: <head> previously mentioned

line 1 column 1 - Warning: inserting implicit <body>

line 1 column 1 - Warning: inserting missing 'title' element

Info: Document content looks like HTML 3.2

4 warnings, 0 errors were found!

...
I did a quick investigation on where from this messages are logged in error.log, and discovered few .php scripts in one of the websites containing the tidy string.
I used Linux find + grep cmds find in all php files the "tidy "string, like so:
server:~# find . -iname '*.php'-exec grep -rli 'tidy' '{}' ;

find . -iname '*.php' -exec grep -rli 'tidy' '{}' ; ./new_design/modules/index.mod.php

./modules/index.mod.php

./modules/index_1.mod.php

./modules/index1.mod.php
Opening the files, with vim to check about how tidy is invoked, revealed tidy calls like:
exec('/usr/bin/tidy -e -ashtml -utf8 '.$tmp_name,$rett);
As you see the PHP programmers who wrote this website, made a bigtidy mess. Instead of using php5's tidy module, they hard coded tidy external command to be invoked via php's exec(); external tidy command invocation.
This is extremely bad practice, since it spawns the command via a pseudo limited apache shell.
I've notified about the issue, but I don't know when, the external tidy calls will be rewritten.
Until the external tidy invocations are rewritten to use the php tidy module, I decided to at least remove the tidy warnings and errors output.
To remove the warning and error messages I've changed:
exec('/usr/bin/tidy -e -ashtml -utf8 '.$tmp_name,$rett);
exec('/usr/bin/tidy --show-warnings no --show-errors no -q -e -ashtml -utf8 '.$tmp_name,$rett);
The extra switches meaning is like so:
q – instructs tidy to produce quiet output
-e – show only errors and warnings
–show warnings no && –show errors no, completely disable warnings and error output
Onwards tidy no longer logs junk messages in error.log Not logging all this useless warnings and errors has positive effect on overall server performance especially, when the scripts, running /usr/bin/tidy are called as frequently as 1000 times per sec. or more
Tags: apache, Auto, body, bug reports, command invocation, consortium, content, CSS, css specifications, declaration, design modules, doctype, document content, Draft, element, element info, elementInfo, elements, exec, exec grep, HEAD, How to, HTML, html syntax checker, iname, index, investigation, isn, line 1, Linux, log, logs, lt, mod, php, php exec, php programmers, php scripts, php5, queries, quot, reformatter, rett, rli, servers, Shell, show, sourceforge, text, tmp, usr bin, validator, vim
Posted in System Administration, Web and CMS | No Comments »
Wednesday, February 15th, 2012 !!! IMPORTANT UPDATE COMMENT INFO DETECTOR IS NO LONGER SUPPORTED (IS OBSOLETE) AND THE COUNTRY FLAGS AND OPERATING SYSTEM WILL BE NOT SHOWING INSTEAD,
!!!! TO MAKE THE COUNTRY FLAGS AND OS WP FUNCTIONALITY WORK AGAIN YOU WILL NEED TO INSTALL WP-USERAGENT !!!
I've come across a nice WordPress plugin that displays country flag, operating system and web browser used in each of posted comments blog comments.
Its really nice plugin, since it adds some transperancy and colorfulness to each of blog comments 😉
here is a screenshot of my blog with Comments Info Detector "in action":

Comments Info Detector as of time of writting is at stable ver 1.0.5.
The plugin installation and configuration is very easy as with most other WP plugins. To install the plugin;
1. Download and unzip Comments Info Detector
linux:/var/www/blog:# cd wp-content/plugins

linux:/var/www/blog/wp-content/plugins:# wget http://downloads.wordpress.org/plugin/comment-info-detector.zip

...

linux:/var/www/blog/wp-content/plugins:# unzip comment-info-detector.zip

...
Just for the sake of preservation of history, I've made a mirror of comments-info-detector 1.0.5 wp plugin for download here
2. Activate Comment-Info-Detector
To enable the plugin Navigate to;
Plugins -> Inactive -> Comment Info Detector (Activate)
After having enabled the plugin as a last 3rd step it has to be configured.
3. Configure comment-info-detector wp plugin
By default the plugin is disabled. To change it to enabled (configure it) by navigating to:
Settings -> Comments Info Detector
Next a a page will appear with variout fields and web forms, where stuff can be changed. Here almost all of it should be left as it is the only change should be in the drop down menus near the end of the page:
Display Country Flags Automatically (Change No to Yes)

Display Web Browsers and OS Automatically  (Change No to Yes
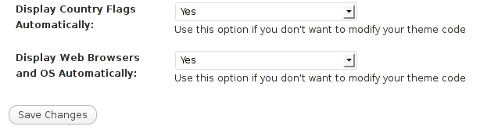
After the two menus are set to "Yes" and pressing on Save Changes the plugin is enabled it will immediately start showing information inside each comment the GeoIP country location flag of the person who commented as well as OS type and Web Browser 🙂
Tags: action, Auto, blog, Browsers, change, Comment, Comments, configured, country flag, country location, Detector, Display, downloads, Draft, drop, drop down menus, flag web, How to, Inactive, information, installation, Linux, location, mirror, operating system, os type, page, person, plugin, plugin installation, quot, sake, Save Changes, screenshot, show, Stable, time, transperancy, type, unzip, web browser type, web browsers, web forms, wget, Wordpress, Wordpress Comments, writting, www, zip linux
Posted in Web and CMS, Wordpress | 1 Comment »
Tuesday, May 8th, 2012 
I believe, the quickest way to take notes on Linux and BSD and later view the notes is to use the command line.
A very easy simple way to keep record of various short notes is just to use a simple text editor like (vim) and store each note in a separate file in lets say ~/notes/ directory.
Actually, I'm using this way to take notes and store sensitive info for various important information I need for further reference, since 5 years or so..
Opening a new text editor for each note and then doing cd ~/notes/; ls |grep -i 'string' is a bit time consuming.
Fortunately there is a quick two shell functions hack that shortens time for note taking. The following two bash functions has to be added in ~/.bashrc:
n() {

vim ~/notes/"$*".txt

}

nls() {

ls -c ~/notes/ | grep "$1"

}
Copy / Paste this two functions in the beginning or the end of ~/.bashrc in order to use them.
Also if ~/notes directory is not existing, yet create it:
hipo@noah:~$ mkdir notes
To make the two new input functions active across opened bash shells on console or terminal either re-login or reread the .bashrc by "sourcing it", e.g.
hipo@noah:~$ source ~/.bashrc
Afterwards, note taking becomes a piece of cake to store a new note with login credentials (user/password) for a new registration to a random named website, type something like:
hipo@noah:~$ n my_website_name-user-pass
This will open for editting ~/.notes/my_website_name-user-pass.txt, type the new desired note content and do save and exit from vim (press esc and type :x!.
Then to get a quick list of all previously stored notes use:
hipo@noah:~$ nls website

my_website_name-user-pass.txt
If you already have a directory containing subdirectories with various taken notes (like me), you will need to use an improved version nls written by Jason Ryan, the nls improved is like this:
nls () { tree -CR --noreport ~/notes | awk '{

if ((NR >) gsub(/.txt/,"")); if

(NF==1) print $1; else if (NF==2)

print $2; else if (NF==3)

printf " %s\n", $3}';

}
This two functions, were not my creation but was suggested in Linux Magazine issue 135 article entitled Command-line task managers and note-taking tools written by Dmitri Popov.
Hope this two functions, will be helpful to console geeks out there.
Tags: Auto, BSD, cake, consuming, copy paste, cr, Draft, file, freebsd, gnu linux, hack, hipo, important information, info, information, input functions, jason ryan, Linux, login, login credentials, mkdir, need, nls, noah, opening, password, piece, piece of cake, sensitive info, Shell, shell functions, shells, something, store, subdirectories, terminal, text, time, time consuming, Tip Quick Note, txtIf, type, use, vim, websitemy
Posted in Curious Facts, Linux, System Administration, vim editor | 2 Comments »
Friday, July 6th, 2012 
Saint George is one of the most venerated Orthodox Christian saints in the Eastern Orthodox Church. My interest in saint George is cause of the reason, I myself bear the name Georgi (the Bulgarian equivalent of George). Saint George is mostly venerated in the Slavonic Christian-dome.In almost all Church icons depicting st. George in Orthodox and Roman Catholic christiandome saint George is piercing killing a dragon.
One of the reasons, st. George is depicted piercing the dragon is a reference of st. George victory over satan, through his martyrdom.
The Beast (Dragon) on the iconi is a straight reference to the Holy Bible; Chapter Revelation also known under the name Apocalypse.
In revelation, we read humanity and our saviour Jesus Christ will finally once and for all will kill the "ancient beast" = (satan)
In same logic, as Saint Martyr George has been victorious over Satan by his unshakable confession of faith in Jesus Christ in early 5th century A.D. , we believe in the Orthodox Church he is given the crown of (eternal) life as a prize for bearing un-human tortures in the name of the of Christ.
To illustrate visually the victory of saint George over Satan through his immesurable faith confession with which he become, there is a an early tradition in iconography in the Church to depict st. George killing a dragon.
The other reason why saint George is depicted to kill a Dragon is due to a Lebanon / Palestinian ancient story saying; There was a huge Dragon living somewhere in nowdays Lebanon / Palestinian lands.
The beast created a huge havoc killing many people and systematically torturing people in the area.
As the Eastern Orthodox Christian tradition continues …. the Dragon is said to have inhabited one of the caves near some village.
Interesting, the story tells these very same dragon was the last Dragon crawling the earth before the final disappearance of dragons.
Many brave local people tried to kill the beast but many died as the beast was unbeatable.
Being unable to beat-up the dragon with a physical (human) force the local population turnted to God for help – saying continously prayers to Saint George to help them defeat their dragon mischief.
Soon after, Saint George appeared on a white horse and pierced the "old dragon / snake". The dragon liberation miracle is said to be evidenced by local people and according to Orthodox monk books is one of the many great miracles occuring in past times.
The report of the miracle has quickly spread around all Lebanon / Palestinian lands and soon, being confirmed as real spread along all Russia as well as the rest of the Slavonic and Orthodox Christian world (Bulgaria, Serbia), Greece, Egypt (Alexandria) etc..
To illustrate saint George's appearance miracle, monastic iconographers started depicting saint George as we see him until this very day – Riding a horse and slaughtering a monstrous beast.
Below are seven 12-th century early icons of saint Saint Great-Martyr George killing the dragon;;
I've collected the icons from various website online. Hope this collection will be blessing for all Christ brother and sisters and generally anyone reading this post:

12-th century mosaic icon of st. George the Great Martyr Xenophontos Monastery

Orthodox Christian icon saint George dated to 1130 – 1150 A.D.

Saint Georgius the Dragon Slayer icon XII century orth icon

St. George Enamel icon Georgia 12th century

saint George Christian icon Yuriev Monastery Novgorod 12th century

st. George Staraya Ladoga Orthodox Christian icon

sv. Georgius 12th century Aios
Nowdays saint George Holy Relics particles are kept for veneration in many Orthodox Christian countries monasteries. Here in Bulgaria saint George Holy Relics are kept in a Monastery nearby the seacoast in Pomorie. Any Christian visiting Bulgaria have the opportunity to venerate the Holy in (Pomorie's Monastery – St. Great Martyr Georgi.
Tags: ancient beast, Auto, beast, bible chapter, Catholic, cause, christiandome, church icons, confession of faith, Draft, drago, dragon, eastern orthodox church, eternal life, faith confession, georgi, Georgius, havoc, help, holy bible, interest, jesus christ, kill, last, last dragon, Lebanon Palestinian, martyr george, martyrdom, miracles, Monastery, monk, nowdays, orthodox christian saints, orthodox christian tradition, palestinian lands, pomorie, quot, reading, reason, relics, report, revelation, Roman, Saint George, satan, saviour, saviour jesus christ, st george, story, tortures, victory, village
Posted in Christianity, Various | 1 Comment »
Monday, May 21st, 2012 
I'm running FreeBSD with Apache and PHP on it and I got in dmesg (kernel log), following error:
freebsd# dmesg|grep -i vm.pmap.shpgperproc

Approaching the limit on PV entries, consider increasing either the vm.pmap.shpgperproc or the vm.pmap.pv_entry_max tunable.

Approaching the limit on PV entries, consider increasing either the vm.pmap.shpgperproc or the vm.pmap.pv_entry_max tunable.

Approaching the limit on PV entries, consider increasing either the vm.pmap.shpgperproc or the vm.pmap.pv_entry_max tunable.

Approaching the limit on PV entries, consider increasing either the vm.pmap.shpgperproc or the vm.pmap.pv_entry_max tunable.

Approaching the limit on PV entries, consider increasing either the vm.pmap.shpgperproc or the vm.pmap.pv_entry_max tunable.
The exact FreeBSD, Apache and php versions I have installed are:
freebsd# uname -a ; httpd -V ; php –version
FreeBSD pcfreak 7.2-RELEASE-p4 FreeBSD 7.2-RELEASE-p4 #0: Fri Oct 2 12:21:39 UTC 2009 root@i386-builder.daemonology.net:/usr/obj/usr/src/sys/GENERIC i386
Server version: Apache/2.0.64
Server built: Mar 13 2011 23:36:25Server's Module Magic Number: 20050127:14
Server loaded: APR 0.9.19, APR-UTIL 0.9.19
Compiled using: APR 0.9.19, APR-UTIL 0.9.19
Architecture: 32-bit
Server compiled with….
-D APACHE_MPM_DIR="server/mpm/prefork"
-D APR_HAS_SENDFILE
-D APR_HAS_MMAP
-D APR_HAVE_IPV6 (IPv4-mapped addresses enabled)
-D APR_USE_FLOCK_SERIALIZE
-D APR_USE_PTHREAD_SERIALIZE
-D SINGLE_LISTEN_UNSERIALIZED_ACCEPT
-D APR_HAS_OTHER_CHILD
-D AP_HAVE_RELIABLE_PIPED_LOGS
-D HTTPD_ROOT="/usr/local"
-D SUEXEC_BIN="/usr/local/bin/suexec"
-D DEFAULT_PIDLOG="/var/run/httpd.pid"
-D DEFAULT_SCOREBOARD="logs/apache_runtime_status"
-D DEFAULT_LOCKFILE="/var/run/accept.lock"
-D DEFAULT_ERRORLOG="logs/error_log"
-D AP_TYPES_CONFIG_FILE="etc/apache2/mime.types"
-D SERVER_CONFIG_FILE="etc/apache2/httpd.conf"
PHP 5.3.5 with Suhosin-Patch (cli) (built: Mar 14 2011 00:29:17)
Copyright (c) 1997-2009 The PHP Group
Zend Engine v2.3.0, Copyright (c) 1998-2010 Zend Technologies
with eAccelerator v0.9.6.1, Copyright (c) 2004-2010 eAccelerator, by eAccelerator
After a bunch of research a FreeBSD forums thread , I've found the fix suggested by a guy.
The solution suggested in the forum is to raise up vm.pmap.pv_entry_ma to vm.pmap.pv_entry_max=1743504, however I've noticed this value is read only and cannot be changed on the BSD running kernel;
freebsd# sysctl vm.pmap.pv_entry_max=1743504

sysctl: oid 'vm.pmap.pv_entry_max' is read only
Instead to solve the;
Approaching the limit on PV entries, consider increasing either the vm.pmap.shpgperproc or the vm.pmap.pv_entry_max tunable.
, I had to add in /boot/loader.conf
vm.pmap.pde.mappings=68

vm.pmap.shpgperproc=500

vm.pmap.pv_entry_max=1743504
Adding this values through /boot/loader.conf set them on kernel boot time. I've seen also in the threads the consider increasing either the vm.pmap.shpgperproc is also encountered on FreeBSD hosts running Squid, Dansguardion and other web proxy softwares on busy hosts.
This problems are not likely to happen for people who are running latest FreeBSD releases (>8.3, 9.x), I've read in same above post in newer BSD kernels the vm.pmap is no longer existing in newer kernels.
Tags: apache 2, apache2, architecture, Auto, boot time, BSD, dmesg, Draft, eeBSDI, errorlog, Fix Approaching, flock, freebsd, freebsd apache, Fri, GENERIC, grep, httpd, kernel, limit, loader, logs apache, magic number, Mar, mime types, mmap, Module, mpm, net usr, number, Oct, patc, pcfreak, php version, php versions, PV, RELEASE-p, root, scoreboard, sendfile, serialize, server, server config, server version, shpgperproc, suexec, threads, uname, UTC, vm, Zend
Posted in FreeBSD, System Administration | No Comments »
Sunday, May 20th, 2012 
My home run machine MySQL server was suddenly down as I tried to check my blog and other sites today, the error I saw while trying to open, this blog as well as other hosted sites using the MySQL was:
Error establishing a database connection
The topology, where this error occured is simple, I have two hosts:
1. Apache version 2.0.64 compiled support externally PHP scripts interpretation via libphp – the host runs on (FreeBSD)
2. A Debian GNU / Linux squeeze running MySQL server version 5.1.61
The Apache host is assigned a local IP address 192.168.0.1 and the SQL server is running on a host with IP 192.168.0.2
To diagnose the error I've logged in to 192.168.0.2 and weirdly the mysql-server was appearing to run just fine:
debian:~# ps ax |grep -i mysql
31781 pts/0 S 0:00 /bin/sh /usr/bin/mysqld_safe
31940 pts/0 Sl 12:08 /usr/sbin/mysqld –basedir=/usr –datadir=/var/lib/mysql –user=mysql –pid-file=/var/run/mysqld/mysqld.pid –socket=/var/run/mysqld/mysqld.sock –port=3306
31941 pts/0 S 0:00 logger -t mysqld -p daemon.error
32292 pts/0 S+ 0:00 grep -i mysql
Moreover I could connect to the localhost SQL server with mysql -u root -p and it seemed to run fine. The error Error establishing a database connection meant that either something is messed up with the database or 192.168.0.2 Mysql port 3306 is not properly accessible.
My first guess was something is wrong due to some firewall rules, so I tried to connect from 192.168.0.1 to 192.168.0.2 with telnet:
freebsd# telnet 192.168.0.2 3306
Trying 192.168.0.2…
Connected to jericho.
Escape character is '^]'.
Host 'webserver' is blocked because of many connection errors; unblock with 'mysqladmin flush-hosts'
Connection closed by foreign host.
Right after the telnet was initiated as I show in the above output the connection was immediately closed with the error:
Host 'webserver' is blocked because of many connection errors; unblock with 'mysqladmin flush-hosts'Connection closed by foreign host.
In the error 'webserver' is my Apache machine set hostname. The error clearly states the problems with the 'webserver' apache host unable to connect to the SQL database are due to 'many connection errors' and a fix i suggested with mysqladmin flush-hosts
To temporary solve the error and restore my normal connectivity between the Apache and the SQL servers I logged I had to issue on the SQL host:
mysqladmin -u root -p flush-hostsEnter password:
Thogh this temporar fix restored accessibility to the databases and hence the websites errors were resolved, this doesn't guarantee that in the future I wouldn't end up in the same situation and therefore I looked for a permanent fix to the issues once and for all.
The permanent fix consists in changing the default value set for max_connect_error in /etc/mysql/my.cnf, which by default is not too high. Therefore to raise up the variable value, added in my.cnf in conf section [mysqld]:
debian:~# vim /etc/mysql/my.cnf

...

max_connect_errors=4294967295
and afterwards restarted MYSQL:
debian:~# /etc/init.d/mysql restart

Stopping MySQL database server: mysqld.

Starting MySQL database server: mysqld.

Checking for corrupt, not cleanly closed and upgrade needing tables..
To make sure the assigned max_connect_errors=4294967295 is never reached due to Apache to SQL connection errors, I've also added as a cronjob.
debian:~# crontab -u root -e

00 03 * * * mysqladmin flush-hosts
In the cron I have omitted the mysqladmin -u root -p (user/pass) input options because for convenience I have already stored the mysql root password in /root/.my.cnf
Here is how /root/.my.cnf looks like:
debian:~# cat /root/.my.cnf

[client]

user=root

password=a_secret_sql_password
Now hopefully, this would permanently solve SQL's 'failure to accept connections' due to too many connection errors for future.
Tags: apache version, Auto, basedir, bin, cnf, connection, connectionThe, daemon, database connection, debian gnu, default, Draft, due, error error, firewall rules, fix, freebsd, GNU, guess, host, host name, hostname, lib, Linux, local ip address, localhost, machine, mysql server, mysqladmin, mysqld, mysqlMoreover, nbsp, occured, password, port 3306, root, root password, running, server version, sl 12, Socket, something, SQL, sql server, squeeze, support, topology, value, webserver
Posted in MySQL, System Administration, Web and CMS | No Comments »
Tuesday, January 17th, 2012 
My beloved sister was complaining games were failing to properly be played with wine emulator , therefore I decided to be kind and help her by installing a Windows XP to run inside a Virtual Machine.My previous install experiments with running MS Windows XP on Linux was on Debian using QEMU virtualmachine emulator.
However as Qemu is a bit less interactive and slower virtualmachine for running Windows (though I prefer it for being completely free software), this time I decided to install the Windows OS with Virtualbox.
My hope was using VirtualBox would be a way easier but I was wrong… I've faced few troubles and I thought many people who initially try to install Virtualbox VM to run Windows on Ubuntu and other Debian based Linux distros will probably experience the same problems as mine, so here is how this article was born.
Here is what I did to have a VirtualBox OS emulator to run Windows XP SP2 on Ubuntu 11.10 Linux
1. Install Virtualbox required packages with apt
root@ubuntu:~# apt-get install virtualbox virtualbox-dkms virtualbox-guest-dkms
root@ubuntu:~# apt-get install virtualbox-ose-dkms virtualbox-guest-utils virtualbox-guest-x11

...
If you prefer more GUI or lazy to type commands, the Software Package Manager can also be used to straight install the same packages.
virtualbox-dkms virtualbox-guest-dkms packages are the two which are absolutely necessery in order to enable VirtualBox to support installing Microsoft Windows XP. DKMS modules are also necessery to be able to emulate some other proprietary (non-free) operating systems.
The DKMS packages provide a source for building Vbox guest (OS) additional kernel modules. They also require the kernel source to be install otherwise they fail to compile.
Failing to build the DKMS modules will give you error every time you try to create new VirtualMachine container for installing a fresh Windows XP.
The error happens if the two packages do not properly build the vboxdrv extra Vbox kernel module while the Windows XP installer is loaded from a CD or ISO. The error to pop up is:
Kernel driver not installed (rc=-1908)
The VirtualBox Linux kernel driver (vboxdrv) is either not loaded or there is a permission problem with /dev/vboxdrv. Please reinstall the kernel module by executing
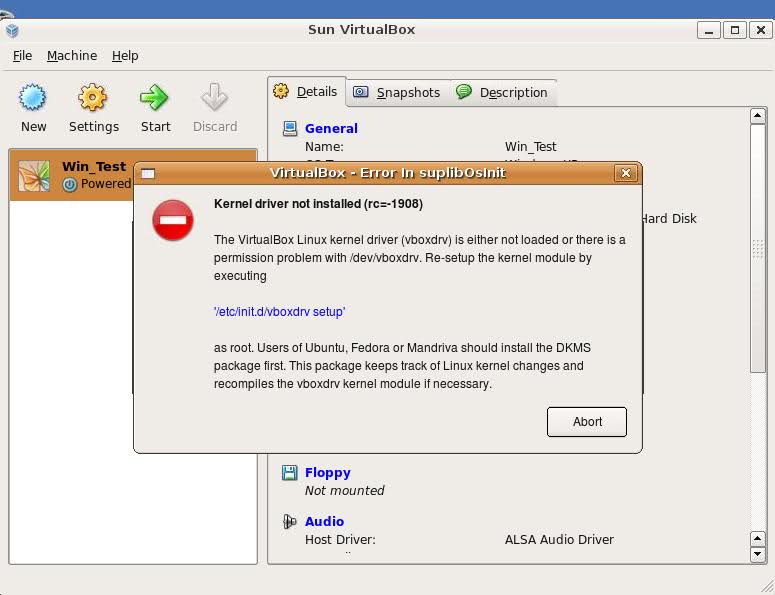
To fix the error:
2. Install latest Kernel source that corresponds to your current kernel version
root@ubuntu:~# apt-get install linux-headers-`uname -r`

...
Next its necessery to rebuild the DKMS modules using dpkg-reconfigure:
3. Rebuild VirtualBox DKMS deb packages
root@ubuntu:~# dpkg-reconfigure virtualbox-dkms

...

root@ubuntu:~# dpkg-reconfigure virtualbox-guest-dkms

...

root@ubuntu:~# dpkg-reconfigure virtualbox-ose-dkms

...
Hopefully the copilation of vboxdrv kernel module should complete succesfully.
To test if all is fine just load the module:
4. Load vboxdrv virtualbox kernel module
root@ubuntu:~# modprobe vboxdrv

root@ubuntu:~#
If you get some error during loading, this means vboxdrv failed to properly compile, try read thoroughfully what the error is and fix it) ;).
As a next step the vboxdrv has to be set to load on every system boot.
5. Set vboxdrv to load on every Ubuntu boot
root@ubuntu:~# echo 'vboxdrv' >> /etc/modules
I am not sure if this step is required, it could be /etc/init.d/virtualbox init script automatically loads the module, anyways putting it to load on boot would do no harm, so better do it.
That's all now, you can launch VirtualBox and use the New button to initiate a new Virtual Machine, I will skip explaining how to do the configurations for a Windows XP as most of the configurations offered by default would simply work without any tampering.
After booting the Windows XP installer I simply followed the usual steps to install Windows and all went smoothly.
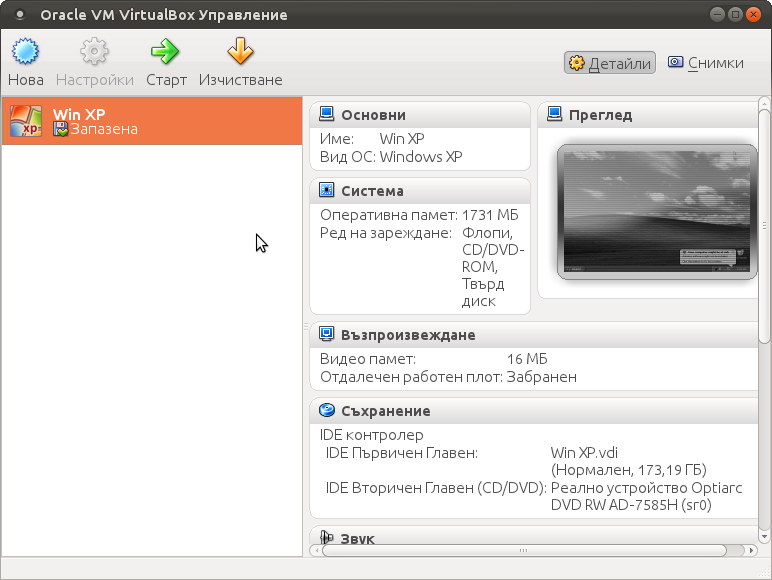
Below you see a screenshot showing the installed Windows XP Virtualbox saved VM session. The screenshot letters are in Bulgarian as my sisters default lanaguage for Ubuntu is bulgarian 😉
I hope this article helps someone out there. Please drop me a comment if you experience any troubles with it. Cya 🙂
Tags: Auto, beloved sister, DKMS, Draft, Failing, free operating systems, guest os, How to, init, init script, Install, ISO, kernel modules, kernel source, Linux, loading, Microsoft, microsoft windows, ms windows, necessery, Permission, qemu, root, screenshot, Set, software, software package, system boot, time, type, Ubuntu, uname, vbox, Virtual, virtual machine, VirtualBox, virtualmachine, vm, Windows, windows os, windows xp, windows xp sp2, wine, x11
Posted in Linux, Linux and FreeBSD Desktop, Linux Audio & Video | 1 Comment »


How to show country flag, web browser type and Operating System in WordPress Comments
Wednesday, February 15th, 2012!!! IMPORTANT UPDATE COMMENT INFO DETECTOR IS NO LONGER SUPPORTED (IS OBSOLETE) AND THE COUNTRY FLAGS AND OPERATING SYSTEM WILL BE NOT SHOWING INSTEAD,
!!!! TO MAKE THE COUNTRY FLAGS AND OS WP FUNCTIONALITY WORK AGAIN YOU WILL NEED TO INSTALL WP-USERAGENT !!!
I've come across a nice WordPress plugin that displays country flag, operating system and web browser used in each of posted comments blog comments.
Its really nice plugin, since it adds some transperancy and colorfulness to each of blog comments 😉
here is a screenshot of my blog with Comments Info Detector "in action":
Comments Info Detector as of time of writting is at stable ver 1.0.5.
The plugin installation and configuration is very easy as with most other WP plugins. To install the plugin;
1. Download and unzip Comments Info Detector
linux:/var/www/blog:# cd wp-content/pluginslinux:/var/www/blog/wp-content/plugins:# wget http://downloads.wordpress.org/plugin/comment-info-detector.zip
...
linux:/var/www/blog/wp-content/plugins:# unzip comment-info-detector.zip
...
Just for the sake of preservation of history, I've made a mirror of comments-info-detector 1.0.5 wp plugin for download here
2. Activate Comment-Info-Detector
To enable the plugin Navigate to;
Plugins -> Inactive -> Comment Info Detector (Activate)After having enabled the plugin as a last 3rd step it has to be configured.
3. Configure comment-info-detector wp plugin
By default the plugin is disabled. To change it to enabled (configure it) by navigating to:
Settings -> Comments Info DetectorNext a a page will appear with variout fields and web forms, where stuff can be changed. Here almost all of it should be left as it is the only change should be in the drop down menus near the end of the page:
Display Country Flags Automatically (Change No to Yes)Display Web Browsers and OS Automatically (Change No to Yes
After the two menus are set to "Yes" and pressing on Save Changes the plugin is enabled it will immediately start showing information inside each comment the GeoIP country location flag of the person who commented as well as OS type and Web Browser 🙂
Tags: action, Auto, blog, Browsers, change, Comment, Comments, configured, country flag, country location, Detector, Display, downloads, Draft, drop, drop down menus, flag web, How to, Inactive, information, installation, Linux, location, mirror, operating system, os type, page, person, plugin, plugin installation, quot, sake, Save Changes, screenshot, show, Stable, time, transperancy, type, unzip, web browser type, web browsers, web forms, wget, Wordpress, Wordpress Comments, writting, www, zip linux
Posted in Web and CMS, Wordpress | 1 Comment »