Posts Tagged ‘copy files’

Rsync copy files with root privileges between servers with root superuser account disabled

Tuesday, December 3rd, 2019


rsync-copy-files-between-two-servers-with-root-privileges-with-root-superuser-account-disabled

Sometimes on servers that follow high security standards in companies following PCI Security (Payment Card Data Security) standards it is necessery to have a very weird configurations on servers,to be able to do trivial things such as syncing files between servers with root privileges in a weird manners.This is the case for example if due to security policies you have disabled root user logins via ssh server and you still need to synchronize files in directories such as lets say /etc , /usr/local/etc/ /var/ with root:root user and group belongings.

Disabling root user logins in sshd is controlled by a variable in /etc/ssh/sshd_config that on most default Linux OS
installations is switched on, e.g. 

grep -i permitrootlogin /etc/ssh/sshd_config
PermitRootLogin yes


Many corporations use Vulnerability Scanners such as Qualys are always having in their list of remote server scan for SSH Port 22 to turn have the PermitRootLogin stopped with:


PermitRootLogin no


In this article, I'll explain a scenario where we have synchronization between 2 or more servers Server A / Server B, whatever number of servers that have already turned off this value, but still need to
synchronize traditionally owned and allowed to write directories only by root superuser, here is 4 easy steps to acheive it.


1. Add rsyncuser to Source Server (Server A) and Destination (Server B)


a. Execute on Src Host:


groupadd rsyncuser
useradd -g 1000 -c 'Rsync user to sync files as root src_host' -d /home/rsyncuser -m rsyncuser


b. Execute on Dst Host:


groupadd rsyncuser
useradd -g 1000 -c 'Rsync user to sync files dst_host' -d /home/rsyncuser -m rsyncuser


2. Generate RSA SSH Key pair to be used for passwordless authentication


a. On Src Host
 

su – rsyncuser

ssh-keygen -t rsa -b 4096


b. Check .ssh/ generated key pairs and make sure the directory content look like.


[rsyncuser@src-host .ssh]$ cd ~/.ssh/;  ls -1

id_rsa
id_rsa.pub
known_hosts


3. Copy id_rsa.pub to Destination host server under authorized_keys


scp ~/.ssh/id_rsa.pub  rsyncuser@dst-host:~/.ssh/authorized_keys


Next fix permissions of authorized_keys file for rsyncuser as anyone who have access to that file (that exists as a user account) on the system
could steal the key and use it to run rsync commands and overwrite remotely files, like overwrite /etc/passwd /etc/shadow files with his custom crafted credentials
and hence hack you 🙂
 

Hence, On Destionation Host Server B fix permissions with:
 

su – rsyncuser; chmod 0600 ~/.ssh/authorized_keys
[rsyncuser@dst-host ~]$


An alternative way for the lazy sysadmins is to use the ssh-copy-id command


$ ssh-copy-id rsyncuser@192.168.0.180
/usr/bin/ssh-copy-id: INFO: Source of key(s) to be installed: "/root/.ssh/id_rsa.pub"
/usr/bin/ssh-copy-id: INFO: attempting to log in with the new key(s), to filter out any that are already installed
/usr/bin/ssh-copy-id: INFO: 1 key(s) remain to be installed — if you are prompted now it is to install the new keys
root@192.168.0.180's password: 


For improved security here to restrict rsyncuser to be able to run only specific command such as very specific script instead of being able to run any command it is good to use little known command= option
once creating the authorized_keys


4. Test ssh passwordless authentication works correctly


For that Run as a normal ssh from rsyncuser

On Src Host


[rsyncuser@src-host ~]$ ssh rsyncuser@dst-host


Perhaps here is time that for those who, think enabling a passwordless authentication is not enough secure and prefer to authorize rsyncuser via a password red from a secured file take a look in my prior article how to login to remote server with password provided from command line as a script argument / Running same commands on many servers 

5. Enable rsync in sudoers to be able to execute as root superuser (copy files as root)


For this step you will need to have sudo package installed on the Linux server.

Then, Execute once logged in as root on Destionation Server (Server B)


[root@dst-host ~]# grep 'rsyncuser ALL' /etc/sudoers|wc -l || echo ‘rsyncuser ALL=NOPASSWD:/usr/bin/rsync’ >> /etc/sudoers


Note that using rsync with a ALL=NOPASSWD in /etc/sudoers could pose a high security risk for the system as anyone authorized to run as rsyncuser is able to overwrite and
respectivle nullify important files on Destionation Host Server B and hence easily mess the system, even shell script bugs could produce a mess, thus perhaps a better solution to the problem
to copy files with root privileges with the root account disabled is to rsync as normal user somewhere on Dst_host and use some kind of additional script running on Dst_host via lets say cron job and
will copy gently files on selective basis.

Perhaps, even a better solution would be if instead of granting ALL=NOPASSWD:/usr/bin/rsync in /etc/sudoers is to do ALL=NOPASSWD:/usr/local/bin/some_copy_script.sh
that will get triggered, once the files are copied with a regular rsyncuser acct.


6. Test rsync passwordless authentication copy with superuser works


Do some simple copy, lets say copy files on Encrypted tunnel configurations located under some directory in /etc/stunnel on Server A to /etc/stunnel on Server B

The general command to test is like so:
 

rsync -aPz -e 'ssh' '–rsync-path=sudo rsync' /var/log rsyncuser@$dst_host:/root/tmp/


This will copy /var/log files to /root/tmp, you will get a success messages for the copy and the files will be at destination folder if succesful.


On Src_Host run:


[rsyncuser@src-host ~]$ dst=FQDN-DST-HOST; user=rsyncuser; src_dir=/etc/stunnel; dst_dir=/root/tmp;  rsync -aP -e 'ssh' '–rsync-path=sudo rsync' $src_dir  $rsyncuser@$dst:$dst_dir;


7. Copying files with root credentials via script


The simlest file to use to copy a bunch of predefined files  is best to be handled by some shell script, the most simple version of it, could look something like this.
 

#!/bin/bash
# On server1 use something like this
# On server2 dst server
# add in /etc/sudoers
# rsyncuser ALL=NOPASSWD:/usr/bin/rsync

user='rsyncuser';

dst_dir="/root/tmp";
dst_host='$dst_host';
src[1]="/etc/hosts.deny";
src[2]="/etc/sysctl.conf";
src[3]="/etc/samhainrc";
src[4]="/etc/pki/tls/";
src[5]="/usr/local/bin/";


for i in $(echo ${src[@]}); do
rsync -aPvz –delete –dry-run -e 'ssh' '–rsync-path=sudo rsync' "$i" $rsyncuser@$dst_host:$dst_dir"$i";
done


In above script as you can see, we define a bunch of files that will be copied in bash array and then run a loop to take each of them and copy to testination dir.
A very sample version of the script rsync_with_superuser-while-root_account_prohibited.sh 
 

Conclusion


Lets do short overview on what we have done here. First Created rsyncuser on SRC Server A and DST Server B, set up the key pair on both copied the keys to make passwordless login possible,
set-up rsync to be able to write as root on Dst_Host / testing all the setup and pinpointing a small script that can be used as a backbone to develop something more complex
to sync backups or keep system configurations identicatial – for example if you have doubts that some user might by mistake change a config etc.
In short it was pointed the security downsides of using rsync NOPASSWD via /etc/sudoers and few ideas given that could be used to work on if you target even higher
PCI standards.


Virtualbox Shared folder set up on Linux between Host and Guest OS – Set up Virtualbox shared folder to Copy files from PC Host to Guest

Wednesday, September 12th, 2018

mount-shares-between-host-OS-and-guest-virtual-machine-howto-virtualbox-vbox-logo

How to set-up Virtualbox shared folder to Copy files from PC Host  and Guest Virtualized OS?

Running VirtualBox Host is an easy thing to set-up across all Operating Systems.  Once you have it sooner or later you will need to copy files from the VM Host OS (that in my case is GNU / Linux) to the virtualized Guest operating system (again in my case that's again another Linux ISO running indide the Virtual Machine).

Below are steps to follow To use Virtualbox Shared Folder functionality to copy files between VBox and your Desktop / server Linux install.

1. Install Virtualbox Guest Additions CD Image ISO

I've explained how to add the Guest Additions CD image thoroughfully in my previous article Howto enable Copy / Paste Virtualbox betwen Linux guest and Host OS
Anyways I'll repeat myself below for sake of clarity:

To do so use Oracle VBox menus (on the booted virtualized OS VBox window):


Devices -> Insert Guest additions CD Image


Mount the ISO inside the Linux Virtual Machine:

root@debian:~# mount /media/cdrom1/
 

If the mount fails and there are no files inside the mount point it might be because the virtualbox-dkms and virtualbox-guest-dkms packages might be missing on the Host OS.

To install them (on Debian GNU / Linux) assuming that you're using virtualbox default distro packages /etc/apt/sources.list :
 

apt-get install –yes -qq virtualbox-dkms virtualbox-guest-dkms


and run:


root@debian:/media/cdrom1# cd /media/cdrom1; sh VBoxLinuxAdditions.run


2. Create directory for Shared Folder that will be used to access Host / OS files from the Guest Virtualized OS
 

root@debian:~# mkdir /mnt/shared_folder


3. Map from VBox program interface Shared folder settings and Mount /mnt/shared_folder location
virtualbox-virtual-machine-devices-shared-folders-shared-folder-settings-linux-screenshot


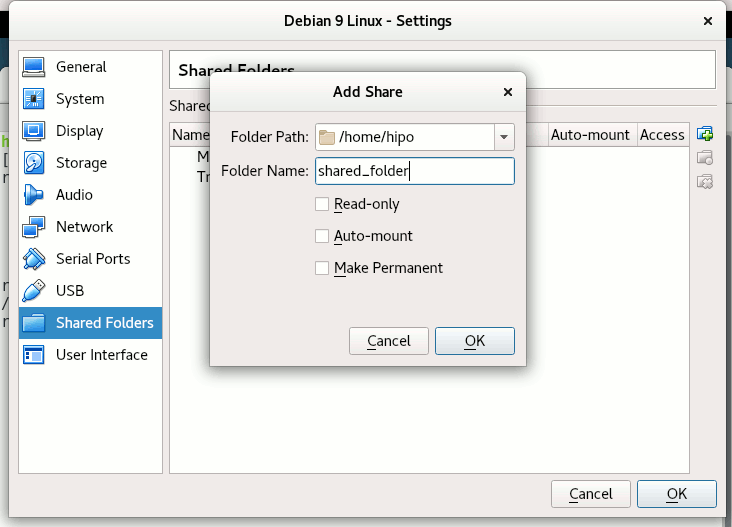
Devices -> Shared Folder -> Shared Folder settings -> Transient Folders (click blue folder add small button right)


From Transient Folders add whatever directory you want to be shared from your local notebook / PC to the VM.
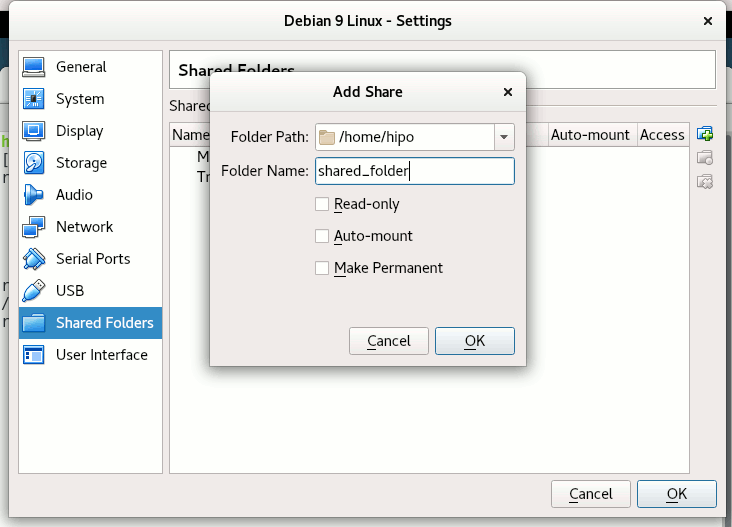
virtualbox-devices-Shared-Folder-Add-Shared-Folder-add-share-linux-screenshotDepending on whether you would like to mount the shared folder only for reading files (choose Read Only) to make it a permanent shared folder (and not just for the one session of current running Virtual Machine until its killed use Make Permanent) or check Auto-Mount tick if you want the shared_folder mapping to be mounted on every VM boot.

Once the shared_folder directory location is set-up from GUI menu click OK and in order for the settings to take effect, you'll need to restart the VM Guest with Linux (use halt command from terminal) or Power Off the Machine via the VBox menus.

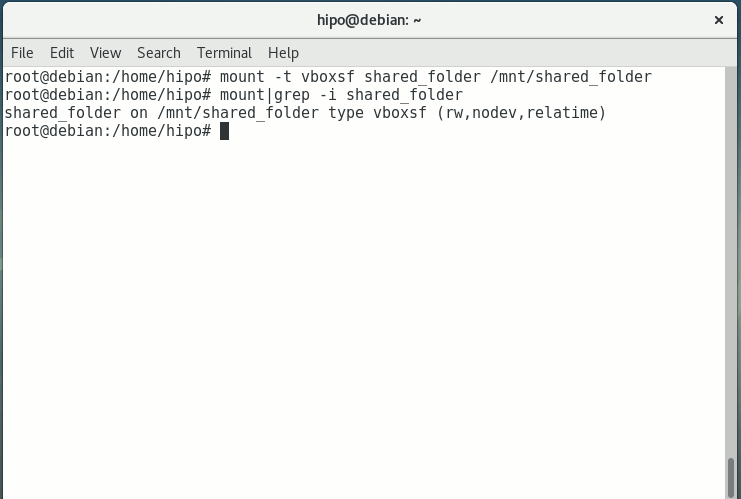
To mount use command like:

mount -t vboxsf name_of_folder_linked_from_vbox  /mnt/name_folder_guest_os/

mount-vboxsf-shared-folder-mnt-shared-linux-guest-screenshot

In my case I wanted to share home folder /home so the command I used is:

root@debian:~# mount -t vboxsf  shared_folder /mnt/shared_folder


If everything is fine your Host OS file content from /home will be visible (for read and write if you Mapped it so) 
under /mnt/shared_folder …

And as Turtles Ninja used to heavily say Cowabunga !!! 🙂
You have it mounted and ready for file share between Desktop -> Virtualized OS.


Bear in mind that above mount command has to run as root (superuser) to succeed.

You now could copy files from your Host OS (running the Virtual Machine) and the Guest OS (Virtualized OS) using /mnt/shared_folder mount point without problems.

The example is if you want to share files between VirtualBox installed Linux and the Guest (Desktop / server) OS, however at many cases mounting your Host OS directory for root users might be not very practical but, instead you might prefer to do the mount for specific non admin user, for example I prefer to do the shared folder mount with my pointed non-root username hipo.

Here is how to do above VM shared_folder mount for non-root user:

First you need to know the exact UID / GID (User ID / Group ID) of user, you can get that with id command:


hipo@linux:~$  id
uid=1000(hipo) gid=1000(hipo) groups=1000(hipo),24(cdrom),25(floppy),29(audio),30(dip),44(video),46(plugdev),108(netdev),114(bluetooth),115(lpadmin),119(scanner)


As you see UID / GID in my case are 1000 / 1000

hipo@linux:~$ sudo mount -t vboxsf -o rw,uid=1000,gid=1000 shared_folder /mnt/shared_folder
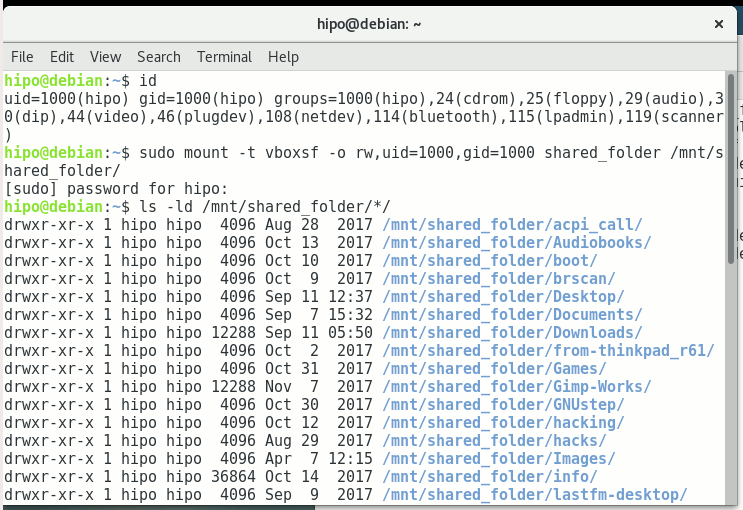
 

mount-virtual-box-shared_folder-with-non-administration-permissions-non-root-permissions-id-and-mount-command-screenshot-linux


4. Mounting configured shared_folder to automatically mount into the Guest OS Linux on every boot

a) Configuring shared_folder auto-mount using /etc/rc.local

If you need the shared_folder to automatically mount next-time you boot the virtual machine quickest way is to add the mount command to /etc/rc.local (on Debian 8 and Debian 9 and newer Ubuntu Linuxes rc.local is missing by default to enable it to work like it worked before read follow my previous article ).

b) Configuring auto-mount for shared_folder through /etc/fstab

The more professional way to auto-mount on emulated OS VM boot time,  you could add the vboxsf mount definitions to /etc/fstab with your favourite text-editor mcedit, nano, joe etc. … (for me that's vim).

Syntax of /etc/fstab is as follows:
 

<Device> <Mount Point> <Type> <Options> <Dump> <Pass>

root@linux:~# vim /etc/fstab


shared_folder /mnt/shared_folder                                vboxsf rw,uid=1000,gid=1000 0 0

Note that you will want to change 1000 / 1000, id / gid with the ones of the non-admin user you would like to add to mount it for.

A quick way to add it to /etc/fstab with a shell one-liner is with command
 

root@linux:~# echo 'shared_folder /mnt/shared_folder                                vboxsf rw,uid=1000,gid=1000 0  0' >> /etc/fstab

An alternative way to add a user to have permissions for vboxsf file system (without specifying the long -o uid=1000,gid=1000 options is to simply add the username in question to group vboxsf like so:

c) Adding non super user username to vboxsf group

root@linux:~# usermod -G vboxsf hipo
root@linux:~# grep -i vboxsf /etc/group
vboxsf:x:999:hipo


hipo@linux:~$ sudo mount -t vboxsf  shared_folder /mnt/shared_folder


without the extra arguments and the options to pass to /etc/fstab (for eventual requirement to auto mount the shared_folder) would be more simple e.g.:


echo 'shared_folder /mnt/shared_folder                                vboxsf ' >> /etc/fstab


One note to make here is if the uesr is added to vboxsf the line for /etc/fstab to auto mount to mount for root user and non-root will be identical.

Then you can get the /etc/fstab auto-mount configured tested by running:

c) Checking auto-mount is working

hipo@linux:~# mount -a
hipo@linux:~# mount |grep -i vboxsf
shared_folder on /mnt/shared_folder type vboxsf (rw,nodev,relatime)


5. What if you end up with mounting failed errors ? – What might be causing the mounting failed Protocol error (a few things to check to solve)


In case of troubles with the mount you might get an error like:

hipo@linux:~# mount -t vboxsf  share_folder /mnt/shared_folder

/sbin/mount.vboxsf: mounting failed with the error: Protocol error


This error might be caused because of Insert Guest Additions CD Image might be not properly enabled and installed using the ISO provided VBoxLinuxAdditions.sh shell script.
Other common reason you might get this error if you have mistyped the Folder name: given in Shared Folders -> Folder Path -> Add Share for example I have given shared_folder as a Map name but as you can see in above mount -t vboxsf, I've mistyped share_folder instead of the correct one shared_folder inserted.
In some VBox releases this error was caused by bugs in the Virtual Machine.
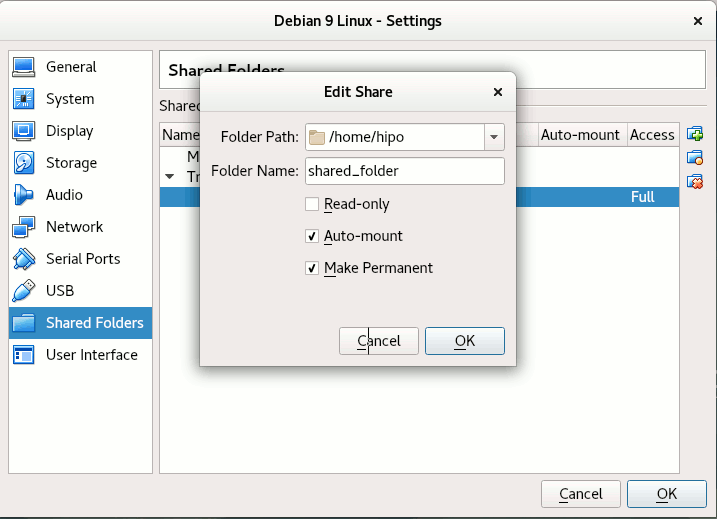
 

virtualbox-virtual-machine-shared-folder-transient-folder-add-folder-linux-VM-guest-linux

One useful tip is to be able to check whether a Virtualbox Virtual Machine has a configured shared_folder (if you're logging to manage the machine on remote server – nomatter whether you have logged in with VNC / Teamviewer / Citrix etc. or via SSH session.

To do so use VBoxControl as of time of writting usually located on most distributions under (/usr/bin/VBoxControl)


hipo@linux:~# VBoxControl sharedfolder list -automount
Oracle VM VirtualBox Guest Additions Command Line Management Interface Version 5.2.18
(C) 2008-2018 Oracle Corporation
All rights reserved.


Auto-mounted Shared Folder mappings (0):

No Shared Folders available.

You can use VBoxControl command to get set and list a number of settings on the VBox VM, here is an useful example with it where you get information about numerous VBox info values:


root@linux:~# VBoxControl guestproperty enumerate
Oracle VM VirtualBox Guest Additions Command Line Management Interface Version 5.2.18
(C) 2008-2018 Oracle Corporation
All rights reserved.


Name: /VirtualBox/GuestInfo/OS/Product, value: Linux, timestamp: 1536681633430852000, flags: <NULL>
Name: /VirtualBox/GuestInfo/Net/0/V4/IP, value: 10.0.2.15, timestamp: 1536681633438717000, flags: <NULL>
Name: /VirtualBox/HostInfo/GUI/LanguageID, value: en_US, timestamp: 1536697521395621000, flags: RDONLYGUEST
Name: /VirtualBox/GuestInfo/Net/0/MAC, value: 08002762FA1C, timestamp: 1536681633442120000, flags: <NULL>
Name: /VirtualBox/GuestInfo/OS/ServicePack, value: <NULL>, timestamp: 1536681633431259000, flags: <NULL>
Name: /VirtualBox/HostInfo/VBoxVerExt, value: 5.2.18, timestamp: 1536681619002646000, flags: TRANSIENT, RDONLYGUEST
Name: /VirtualBox/GuestInfo/Net/0/V4/Netmask, value: 255.255.255.0, timestamp: 1536681633440157000, flags: <NULL>
Name: /VirtualBox/GuestInfo/OS/Version, value: #1 SMP Debian 4.9.110-3+deb9u2 (2018-08-13), timestamp: 1536681633431125000, flags: <NULL>
Name: /VirtualBox/GuestAdd/VersionExt, value: 5.2.18, timestamp: 1536681633431582000, flags: <NULL>
Name: /VirtualBox/GuestAdd/Revision, value: 124319, timestamp: 1536681633432515000, flags: <NULL>
Name: /VirtualBox/HostGuest/SysprepExec, value: <NULL>, timestamp: 1536681619002355000, flags: TRANSIENT, RDONLYGUEST
Name: /VirtualBox/GuestInfo/OS/LoggedInUsers, value: 1, timestamp: 1536681673447293000, flags: TRANSIENT, TRANSRESET
Name: /VirtualBox/GuestInfo/Net/0/Status, value: Up, timestamp: 1536681633443911000, flags: <NULL>
Name: /VirtualBox/GuestInfo/Net/0/Name, value: enp0s3, timestamp: 1536681633445302000, flags: <NULL>
Name: /VirtualBox/HostGuest/SysprepArgs, value: <NULL>, timestamp: 1536681619002387000, flags: TRANSIENT, RDONLYGUEST
Name: /VirtualBox/GuestAdd/Version, value: 5.2.18, timestamp: 1536681633431419000, flags: <NULL>
Name: /VirtualBox/HostInfo/VBoxRev, value: 124319, timestamp: 1536681619002668000, flags: TRANSIENT, RDONLYGUEST
Name: /VirtualBox/GuestInfo/Net/0/V4/Broadcast, value: 10.0.2.255, timestamp: 1536681633439531000, flags: <NULL>
Name: /VirtualBox/HostInfo/VBoxVer, value: 5.2.18, timestamp: 1536681619002613000, flags: TRANSIENT, RDONLYGUEST
Name: /VirtualBox/GuestInfo/OS/LoggedInUsersList, value: hipo, timestamp: 1536681673446498000, flags: TRANSIENT, TRANSRESET
Name: /VirtualBox/GuestInfo/Net/Count, value: 1, timestamp: 1536698949773993000, flags: <NULL>
Name: /VirtualBox/GuestInfo/OS/Release, value: 4.9.0-7-amd64, timestamp: 1536681633431001000, flags: <NULL>
Name: /VirtualBox/GuestInfo/OS/NoLoggedInUsers, value: false, timestamp: 1536681673447965000, flags: TRANSIENT, TRANSRESET
Name: /VirtualBox/GuestAdd/HostVerLastChecked, value: 5.2.18, timestamp: 1536681702832389000, flags: <NULL>

Hope you enjoyed ! Have phun! 🙂
How to Copy large data directories between 2 Linux / Unix servers without direct ssh / ftp access between server1 and server2 other by using SSH, TAR and Unix pipes

Monday, April 27th, 2015

how-to-copy-large-data-directories-between-2-linux-unix-servers-without-direct-ssh-ftp-access-btween-each-other

In a Web application data migration project, I've come across a situation where I have to copy / transfer 500 Gigabytes of data from Linux server 1 (host A) to Linux server 2 (host B). However the two machines doesn't have direct access to each other (via port 22) for security reasons and hence I cannot use sshfs to mount remotely host dir via ssh and copy files like local ones.

As this is a data migration project its however necessery to migrate the data finding a way … Normal way companies do it is to copy the data to External Hard disk storage and send it via some Country Post services or some employee being send in Data center to attach the SAN to new server where data is being migrated However in my case this was not possible so I had to do it different.

I have access to both servers as they're situated in the same Corporate DMZ network and I can thus access both UNIX machines via SSH.

Thanksfully there is a small SSH protocol + TAR archiver and default UNIX pipe's capabilities hack that makes possible to transfer easy multiple (large) files and directories. The only requirement to use this nice trick is to have SSH client installed on the middle host from which you can access via SSH protocol Server1 (from where data is migrated) and Server2 (where data will be migrated).

If the hopping / jump server from which you're allowed to have access to Linux  servers Server1 and Server2 is not Linux and you're missing the SSH client and don't have access on Win host to install anything on it just use portable mobaxterm (as it have Cygwin SSH client embedded )

Here is how:
 

jump-host:~$ ssh server1 "tar czf – /somedir/" | pv | ssh server2 "cd /somedir/; tar xf


As you can see from above command line example an SSH is made to server1  a tar is used to archive the directory / directories containing my hundred of gigabytes and then this is passed to another opened ssh session to server 2  via UNIX Pipe mechanism and then TAR archiver is used second time to unarchive previously passed archived content. pv command which is in the middle is not obligitory though it is a nice way to monitor status about data transfer like below:
 

500GB 0:00:01 [10,5MB/s] [===================================================>] 27%


P.S. If you don't have PV installed install it either with apt-get on Debian:


debian:~# apt-get install –yes pv


Or on CentOS / Fedora / RHEL etc.


[root@centos ~]# yum -y install pv


Below is a small chunk of PV manual to give you better idea of what it does:

NAME
       pv – monitor the progress of data through a pipe

SYNOPSIS
       pv [OPTION] [FILE]…
       pv [-h|-V]

DESCRIPTION
       pv  allows  a  user to see the progress of data through a pipeline, by giving information such as time elapsed, percentage
       completed (with progress bar), current throughput rate, total data transferred, and ETA.

       To use it, insert it in a pipeline between two processes, with the appropriate options.  Its standard input will be passed
       through to its standard output and progress will be shown on standard error.

       pv  will  copy  each  supplied FILE in turn to standard output (- means standard input), or if no FILEs are specified just
       standard input is copied. This is the same behaviour as cat(1).

       A simple example to watch how quickly a file is transferred using nc(1):

              pv file | nc -w 1 somewhere.com 3000

       A similar example, transferring a file from another process and passing the expected size to pv:

              cat file | pv -s 12345 | nc -w 1 somewhere.com 3000


Note that with too big file transfers using PV will delay data transfer because everything will have to pass through another 2 pipes, however for file transfers up to few gigabytes its really nice to include it.

If you only need to transfer huge .tar.gz archive and you don't bother about traffic security (i.e. don't care whether transferred traffic is going through encrypted SSH tunnel and don't want to put an overhead to both systems for encrypting the data and you have some unfiltered ports between host 1 and host 2 you can run netcat on host 2 to listen for connections and forward .tar.gz content via netcat's port like so:
 

linux2:~$ nc -l -p 12345 > /path/destinationfile
linux2:~$ cat /path/sourcfile | nc desti.nation.ip.address 12345


Another way to transfer large data without having connection with server1 and server2 but having connection to a third host PC is to use rsync and good old SSH Tunneling, like so:
 

jump-host:~$ ssh -R 2200:Linux-server1:22 root@Linux-server2 "rsync -e 'ssh -p 2200' –stats –progress -vaz /directory/to/copy root@localhost:/copy/destination/dir"

Teracopy faster Windows copy or Save files from Windows PC with dying hard drive

Wednesday, July 3rd, 2013

TeraCopy logo copy files faster and prevent windows hangs up on broken hard disks
My sysadmin colleague mentioned today about TeraCopy. An application for Microsoft Windows designed to be used to Move or Copy  files. So why would one want to use Teracopy instead of normal Windows Explorer copy integrated soft? Reason is Teracopy is faster than MS Windows Copy / Move and uses dynamically adjusted buffers to reduce seek times. This asynchronous copying speeds up file transfers between physical HDDs.

More precious feature of TeraCopy is whether you have to Save data from hard disks with Bad Sectors, it can skip faulty files (stored on bad sectors) without triggering Windows to hang up or halt with the Blue Screen of Death.TeraCopy even can be setup to replace Windows Explorer (i.e. Shell Integration copy and move functions). Beside that it works well with Unicode encoded file names (Cyrillic, Chineese) etc.

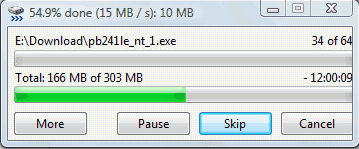
Teracopy copying files on Microsoft windows 7 substitutes default windows copy and move opeartions

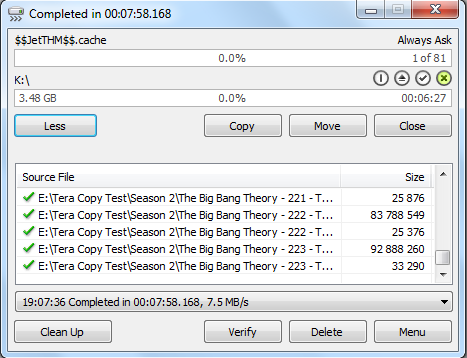
As of time of writting article, TeraCopy has support for all Windows NT (Windows XP / 2000) as well as for Windows 7 and 8. Whether a failure to copy file occurs it tries to recopy file several times in order to achieve copy success. After each file is copied a CRC check up value of file is calculated and matched. It also provides a way more verbose information on copied files than Windows default Copy. It is very useful in copying large files from system to system as file transfers complete time is significantly lower

teracopy with more information on copying files screenshot MS Windows

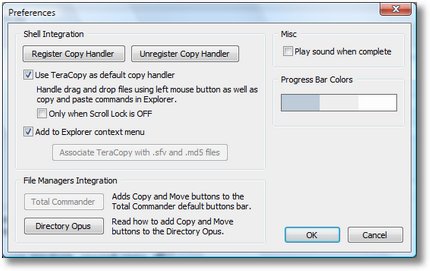
Once TeraCopy is installed it automatically does replace Explorer Copy and Move functions, hence after install every next Move or Copy operation is auto handled by it. In preferences the user could still revert back Copy / Move functions to Explorer original.

TeraCopy copy faster files and save files from broken win hdd preferences screenshot

Unfortunately TeraCopy is not-free software but freeware and can only be used to non-commercial use, for commercial use you have to purchase TeraCopy Pro version.