Archive for the ‘Mac OS X’ Category

Create Bootable Windows installer USB from a MAC PC, MacBook host or Linux Desktop computer

Thursday, February 8th, 2024

Creating Windows bootable installer with Windows Media Creation tool is easy, but sometimes if you're a geek like me you don't have a Windows personal PC at home and your Work PC is so paranoidly restricted by its administrator through paranoid Domain Controller Policies, that you can only copy from a USB drive towards the Win PC but you cannot write to the USB. 

1. Preparing Linux installer USB via Mac's Boot Camp Assistant

If you're lucky you might have a MAC Book Air or some kind of other mac PC, if that is the case you can burn the Windows Installer iso, with the Native Mac tool called BootCamp Assistant, by simply downloading the Win Boot ISO, launching the app and burning it:

Finder > Applications > Utilities and open Boot Camp Assistant.
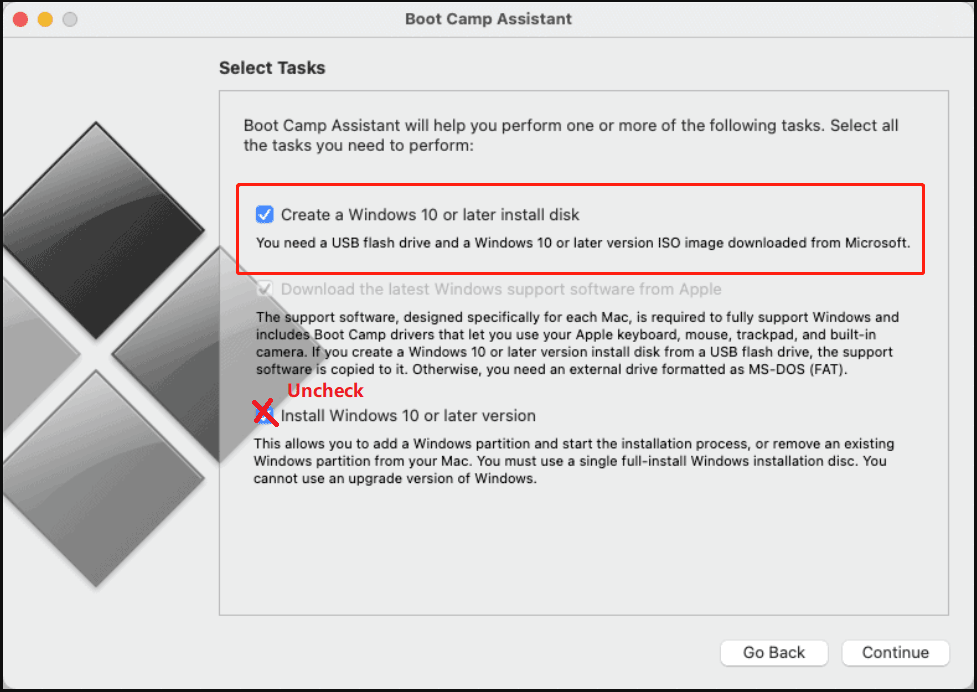
create-windows-10-bootable-installer-usb-mac-screenshot.png

2. Preparing Bootable Windows installer on Linux host machine

On DEBIAN / UBUNTU and other Deb based Linuxes

# apt install gddrescue 

On CENTOS / FEDORA :

# dnf install ddrescue

To install the Windows Image to the right USB drive, first find it out with fdisk and list it:

# fdisk -l
 

Disk /dev/sdb: 14.41 GiB, 15472047104 bytes, 30218842 sectors
Disk model: DataTraveler 3.0
Units: sectors of 1 * 512 = 512 bytes
Sector size (logical/physical): 512 bytes / 512 bytes
I/O size (minimum/optimal): 512 bytes / 512 bytes
Disklabel type: dos
Disk identifier: 0xc23dc587

Device     Boot    Start      End  Sectors  Size Id Type
/dev/sdb1           8192 30216793 30208602 14.4G  7 HPFS/NTFS/exFAT
/dev/sdb2       30216794 30218841     2048    1M  e W95 FAT16 (LBA)

Then Use ddrescue to create the bootable MS windows Installer USB disk.

# ddrescue windows10.iso /dev/sd1 –force -D

3. Using GUI Linux tool WoeUSB-ng to prepare Microsoft Windows start up USB drive

If you're a lazy Linux user and you plan to prepare up to date Windows image files regularly, perhaps the WoeUSB-ng Graphical tool will suit you better, to use it you will have to install a bunch of python libraries.
 

On Ubuntu Linux:

# apt install git p7zip-full python3-pip python3-wxgtk4.0 grub2-common grub-pc-bin
# pip3 install WoeUSB-ng

On Fedora Linux:

dnf install git p7zip p7zip-plugins python3-pip python3-wxpython4
# sudo pip3 install WoeUSB-ng

Launch the WoeUSB-ng program :


$ python3 /usr/local/bin/woeusbgui


Download, the latest Version of Windows Installer .ISO IMAGE file, plug in your USB flash disk and let the program burn the ISO and create the GRUB boot loader, that will make WIndows installer bootable on your PC.
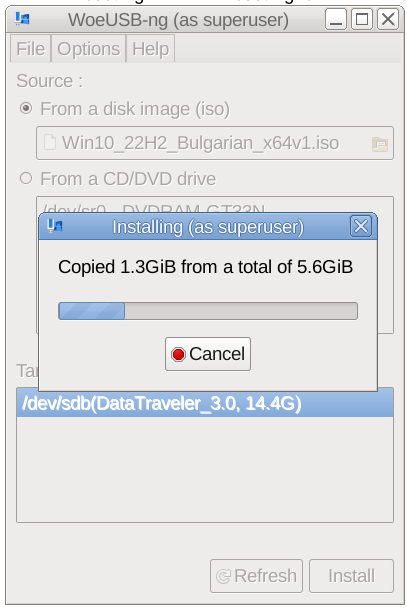
WoeUSB-ng-python-burn-windows-installer.-tool-screenshot

With WoeUSB-ng you have to be patient, it will take some time to prepare and copy the Windows installer content and will take about 15 to 20 minutes from my experience to finalize the GRUB records required, that will make the new burnt ISO bootable.


Then just plug it in to your Desktop PC or laptop, virtual machine, whatever where you would like to install the Windows from its latest installation Source image and Go on with doing the necessery evil to have Microsoft Spy on you permanently.

P.S. I just learned, from colleagues from Kvant Serviz (a famous hardware second hand, shop and repair shop here in Bulgaria, that nowadays Windows has evolved to the points, they can and they actually do overwrite the PC BIOS / UEFI as part of updates without any asking the end user !!!
At first I disbelived that, but after a short investigation online it turned out this is true, 
there are discussions online from people complaining, that WIndows updates has ovewritten their current BIOS settings and people complaining BIOS versions are ovewritten.

Enjoy your new personal Spy OS ! 🙂
How to run SSH server Mac OS X and set it to auto boot on Mac Book system start

Monday, February 5th, 2024

mac os X

How to run SSH Server on Mac OS X to administrate remotely your MAC OS to access remote MacBook Air or Mac OS 

Linux / UNIX users know it is pretty easy to run OpenSSH server on old Linux SystemV releases

it is done with cmd:

# /etc/init.d/sshd start


On newer Linux distros where systemd is the standard it is done wtih:

# systemctl start ssh.service

To enable ssh service on boot on systemd distros

# systemctl enable ssh.service


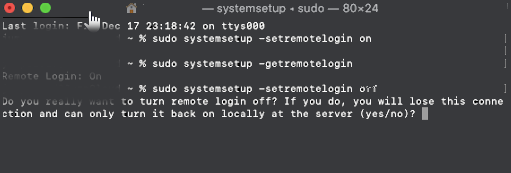
To enable SSH access on Mac OS X this is done wtih a simple command

To check the status of SSH server being on or OFF, either connect with netcat to TCP port 22, which is usually installed by default on most MAC OS-es or run:

# systemsetup -getremotelogin

To start and enable SSH service on Mac OS X run:

# systemsetup -setremotelogin on 


If you later need to turn off the SSH service

# systemsetup -setremotelogin off

Actually systemsetup command can do pretty much on MAC OS X and it is worthy to take a look at it, if you're running a MAC PC or Mac Book laptop.

systemsetup can set the current date, change time server host, set computer name (hostname) and much more.

sh-3.2# systemsetup -help

systemsetup Help Information
————————————-
Usage: systemsetup -getdate
        Display current date.

Usage: systemsetup -setdate <mm:dd:yy>
        Set current date to <mm:dd:yy>.

Usage: systemsetup -gettime
        Display current time.

Usage: systemsetup -settime <hh:mm:ss>
        Set current time to <hh:mm:ss>.

Usage: systemsetup -gettimezone
        Display current time zone.

Usage: systemsetup -settimezone <timezone>
        Set current time zone to <timezone>. Use "-listtimezones" to list time zones.

Usage: systemsetup -listtimezones
        List time zones supported by this machine.

Usage: systemsetup -getusingnetworktime
        Display whether network time is on or off.

Usage: systemsetup -setusingnetworktime <on off>
        Set using network time to either <on> or <off>.

Usage: systemsetup -getnetworktimeserver
        Display network time server.

Usage: systemsetup -setnetworktimeserver <timeserver>
        Set network time server to <timeserver>.

Usage: systemsetup -getsleep
        Display amount of idle time until computer, display and hard disk sleep.

Usage: systemsetup -setsleep <minutes>
        Set amount of idle time until computer, display and hard disk sleep to <minutes>.
        Specify "Never" or "Off" for never.

Usage: systemsetup -getcomputersleep
        Display amount of idle time until computer sleeps.

Usage: systemsetup -setcomputersleep <minutes>
        Set amount of idle time until compputer sleeps to <minutes>.
        Specify "Never" or "Off" for never.

Usage: systemsetup -getdisplaysleep
        Display amount of idle time until display sleeps.

Usage: systemsetup -setdisplaysleep <minutes>
        Set amount of idle time until display sleeps to <minutes>.
        Specify "Never" or "Off" for never.

Usage: systemsetup -getharddisksleep
        Display amount of idle time until hard disk sleeps.

Usage: systemsetup -setharddisksleep <minutes>
        Set amount of idle time until hard disk sleeps to <minutes>.
        Specify "Never" or "Off" for never.

Usage: systemsetup -getwakeonmodem
        Display whether wake on modem is on or off.

Usage: systemsetup -setwakeonmodem <on off>
        Set wake on modem to either <on> or <off>.

Usage: systemsetup -getwakeonnetworkaccess
        Display whether wake on network access is on or off.

Usage: systemsetup -setwakeonnetworkaccess <on off>
        Set wake on network access to either <on> or <off>.

Usage: systemsetup -getrestartpowerfailure
        Display whether restart on power failure is on or off.

Usage: systemsetup -setrestartpowerfailure <on off>
        Set restart on power failure to either <on> or <off>.

Usage: systemsetup -getrestartfreeze
        Display whether restart on freeze is on or off.

Usage: systemsetup -setrestartfreeze <on off>
        Set restart on freeze to either <on> or <off>.

Usage: systemsetup -getallowpowerbuttontosleepcomputer
        Display whether the power button is able to sleep the computer.

Usage: systemsetup -setallowpowerbuttontosleepcomputer <on off>
        Enable or disable whether the power button can sleep the computer.

Usage: systemsetup -getremotelogin
        Display whether remote login is on or off.

Usage: systemsetup -setremotelogin <on off>
        Set remote login to either <on> or <off>. Use "systemsetup -f -setremotelogin off" to suppress prompting when turning remote login off.

Usage: systemsetup -getremoteappleevents
        Display whether remote apple events are on or off.

Usage: systemsetup -setremoteappleevents <on off>
        Set remote apple events to either <on> or <off>.

Usage: systemsetup -getcomputername
        Display computer name.

Usage: systemsetup -setcomputername <computername>
        Set computer name to <computername>.

Usage: systemsetup -getlocalsubnetname
        Display local subnet name.

Usage: systemsetup -setlocalsubnetname <name>
        Set local subnet name to <name>.

Usage: systemsetup -getstartupdisk
        Display current startup disk.

Usage: systemsetup -setstartupdisk <disk>
        Set current startup disk to <disk>.

Usage: systemsetup -liststartupdisks
        List startup disks on this machine.

Usage: systemsetup -getwaitforstartupafterpowerfailure
        Get the number of seconds after which the computer will start up after a power failure.

Usage: systemsetup -setwaitforstartupafterpowerfailure <seconds>
        Set the number of seconds after which the computer will start up after a power failure. The <seconds> value must be a multiple of 30 seconds.

Usage: systemsetup -getdisablekeyboardwhenenclosurelockisengaged
        Get whether or not the keyboard should be disabled when the X Serve enclosure lock is engaged.

Usage: systemsetup -setdisablekeyboardwhenenclosurelockisengaged <yes no>
        Set whether or not the keyboard should be disabled when the X Serve enclosure lock is engaged.

Usage: systemsetup -version
        Display version of systemsetup tool.

Usage: systemsetup -help
        Display help.

Usage: systemsetup -printCommands
        Display commands.


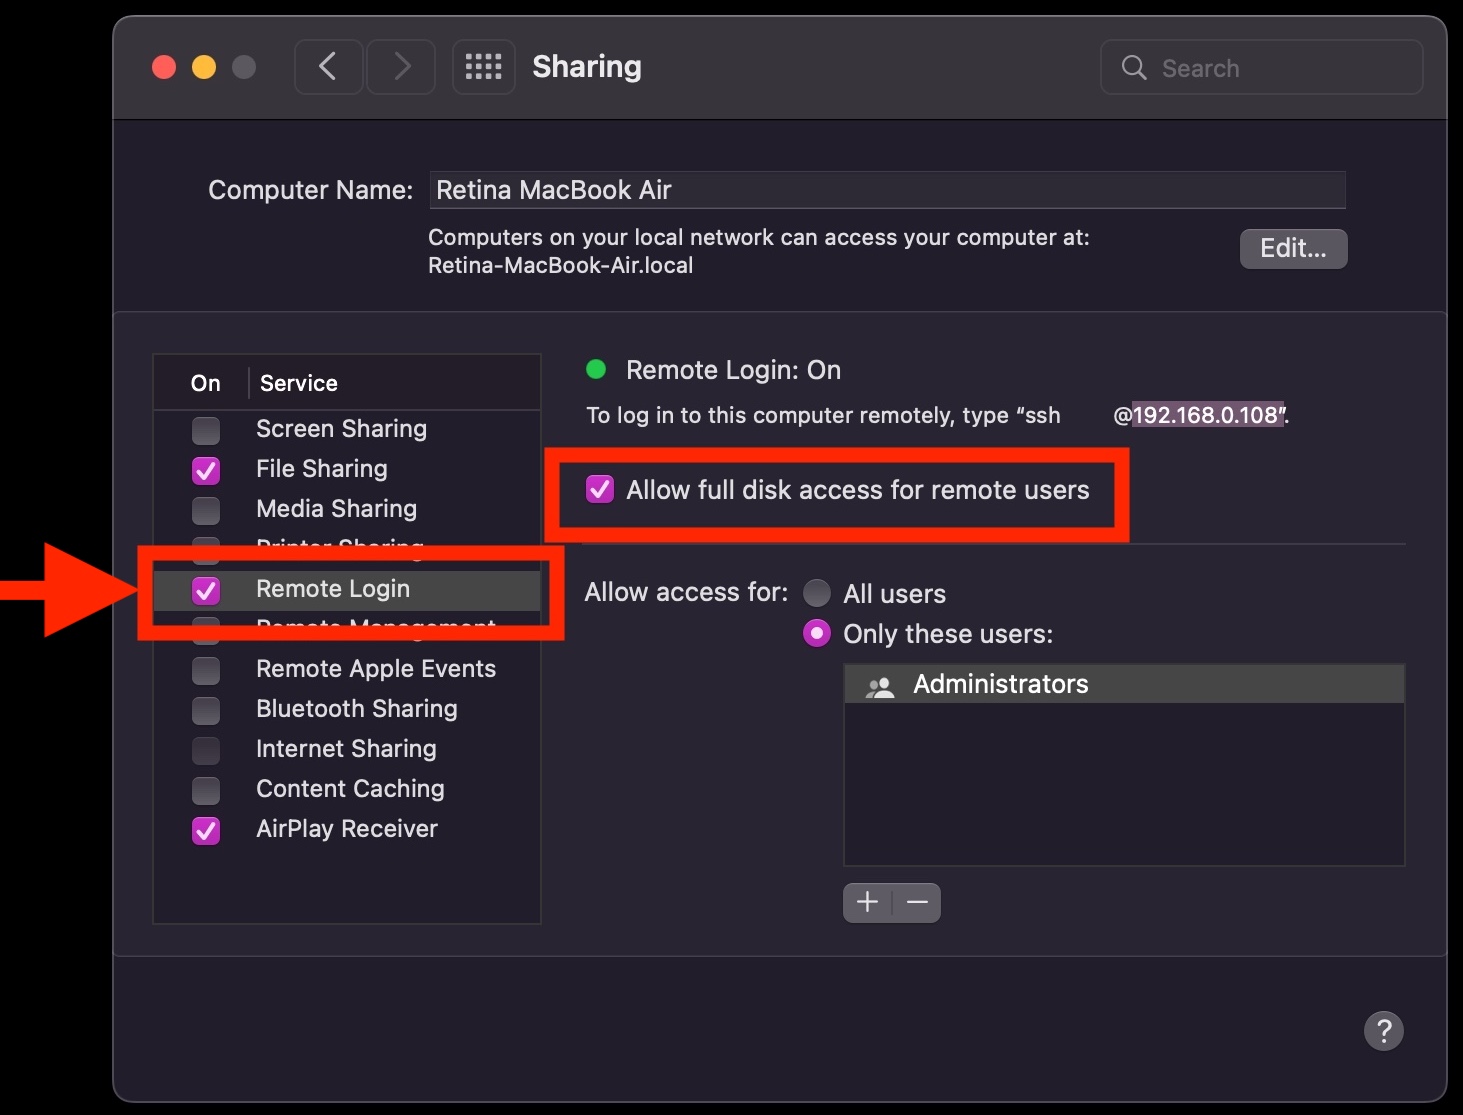
Enabling SSH in Mac OS X computers can be done also from Graphical interface for the lazy ones.

enable-ssh-mac-remote-login-from-mac-OS-X-gui

How to list and uninstall installed Mac OS X packages command

Saturday, September 15th, 2018

how-to-list-and-remove-packages-on-Mac-OS-X-MacBook-Air-Pro-notebooks-with-commands-Terminal
1. Listing All installed packages (.pkg) files on Mac OS X

If you are used to Linux package management (with dpkg .deb package tool or Redhat's .rpm package manager rpm command) and out of a suddeny you have to use for some time or permanently choose to migrate to Mac OS X and joined the Jailed closed Computer model of Mr. Steve Jobs.

As a Linux command addict,yYou might be wondering on how to list all installed packages on Mac OS with a command just like you use Debian / Ubuntus terminal to list installed packages and their overall state for example with dpkg with:

dpkg -l

or Fedora / CentOS to list all installed packages you're pretty much accustomed to:
 

rpm -qa

The same is possible in Mac OS X by opening Terminal and running cmd:


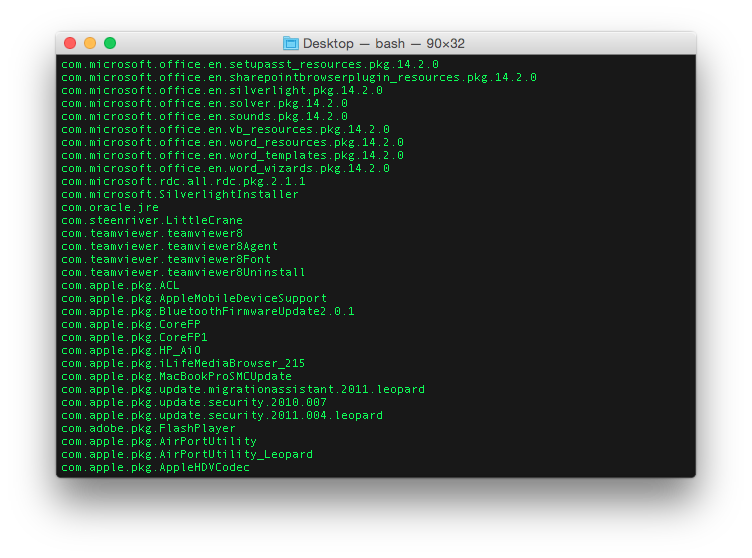
MacBook-Air:Volumes root# pkgutil –pkgs

om.apple.pkg.OSX_10_13_IncompatibleAppList.16U1254
com.apple.pkg.MRTConfigData.16U4001
com.apple.pkg.ChineseWordlistUpdate.14U1355
com.apple.pkg.GatekeeperConfigData.16U1300
com.apple.pkg.MRTConfigData.16U4003
com.apple.pkg.ChineseWordlistUpdate.14U1356
com.apple.pkg.ChineseWordlistUpdate.14U1346
com.apple.pkg.GatekeeperConfigData.16U1259
com.apple.pkg.GatekeeperConfigData.16U1265
com.apple.pkg.XProtectPlistConfigData.16U4009
com.apple.pkg.ChineseWordlistUpdate.14U1353
com.apple.pkg.ChineseWordlistUpdate.14U1347
com.apple.pkg.ChineseWordlistUpdate.14U1351
com.apple.pkg.MRTConfigData.16U4038
com.apple.pkg.iTunesX.12.7.3.delta
com.apple.pkg.XProtectPlistConfigData.14U4058
com.apple.pkg.GatekeeperConfigData.16U1138
com.apple.pkg.MLVUpdate_en_GB_daniel.16U1127
com.apple.pkg.EmbeddedOSFirmware
com.apple.pkg.MRTConfigData.16U4005
com.apple.pkg.ChineseWordlistUpdate.14U1323
com.apple.pkg.GatekeeperConfigData.16U1572
com.apple.pkg.iTunesX.12.7.delta
com.apple.pkg.MRT.14U2321

For the sake of convenience run it with a pipe to less cmd:

MacBook-Air:Volumes root# pkgutil –pkgs | less

To find whether a package with a certain name is installed or not

mac-os-x-listing-installed-operating-system-packages-with-pkgutil-command

MacBook-Air:Volumes root# pkgutil –pkgs|grep -i oracle
com.oracle.jre|


To further list the content of the package (the package files contained and directory structure etc.)


MacBook-Air:Volumes root# pkgutil –files the-package-name.pkg


this is like the Linux equivalent of
dpkg -L packagename and rpm -qa rpm-packagename:

Checking the package directory location on Mac OS is done with:


MacBook-Air:Volumes root#  pkgutil –pkg-info com.oracle.jre
package-id: com.oracle.jre
version: 1.0
volume: /
location: Library/Internet Plug-Ins/JavaAppletPlugin.plugin
install-time: 1523533193


2. Deleting a Mac OS X package .pkg 
 

After reviewing the .pkg file content for smaller sized packages the best way to remove it is to manually remove all files belonging to the package (but before make sure you are not deleting an important packageand have visually closely inspected them otherwise you might break badly your Mac OS X  …) you can run below 2 commands to delete package files and directory:


# pkgutil –only-files –files the-package-name.pkg | tr '\n' '\0' | xargs -n 1 -0 sudo rm -f
# pkgutil –only-dirs –files the-package-name.pkg | tail -r | tr '\n' '\0' | xargs -n 1 -0 sudo rmdir


Once you have removed the files you can remove the receipt (e.g. remove it from Mac package database), with:
 

# pkgutil –forget the-package-name.pkg


pkgutil –forget is useful if you get errors during removal attempt with pkgutil –only-files … , pkgutil –only-dirs …. cmds.
 

Note that to remove a package you have to be root  or run the commands via sudo with admin privileges if you have it installed and using it.

When removing the files be extremely careful as some of the packages you might try to remove might be updating important Mac OS X system components or used as a backbone for the overall Mac OS GUI / background operations thus removing a system related package might leave your MacBook unbootable because of the removal of the necessery component …

If you get some errors while issuing some of the 2 above commands like:

"Operation not permitted when trying to uninstall" this is because  the command or directory you're trying to remove is in current use by a running process on the Mac OS or because the file or directory has a special set permissions to prevent them from easy removal (as a precaution OS safety measures).

You might wonder what might be the purpose of a manual command removal of Mac package but, If you have to regularly delete Mac OS X packages by scripting the removal of unnecessery packages or Mac OS X updates on a many numbers of computers to automate removal jobs.
I've found also a github repository bash shell script that is automating the process of removal and could even save further time if in need to script a package information about Macs and be able to easily manage packages of mac Desktops via (lets say SSH), check out pkg-remove.sh script here.

Fix Mac OS X camera problems – Tell which application is using Mac OS X builtin Camera

Sunday, September 16th, 2018

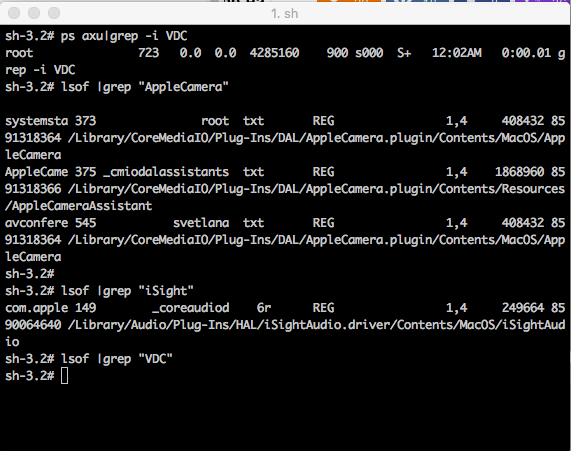
https://www.pc-freak.net/images/macosx-check-what-process-is-using-camera-screenshot
It is a common problem on Mac OS X notebooks (MacBook Air , MacBook Proc)  with builtin Video Camera to have issues with Camera in Facetime, Skype and other applications which use it.

Considering that the Camera is physically working on the Mac (it did not burn etc.) and it stooped working suddenly (is not detected by Mac OS applications which support it), the most common cause for that is the fact that another application running on the system is using it.
With the spread of spyware and malware that can easily hit your computer by exploiting Javascript bugs in browser intepreter (Firefox, Chrome, Chrome) it is not impossible that your Mac PC got infected with a kind of WebCam spy software that keeps your Video Camera active all time.

Webcam spying is a real issue of today so to secure yourself partially you can place Oversight App to get notifications when an application starts using Mac's Webcam or audio.

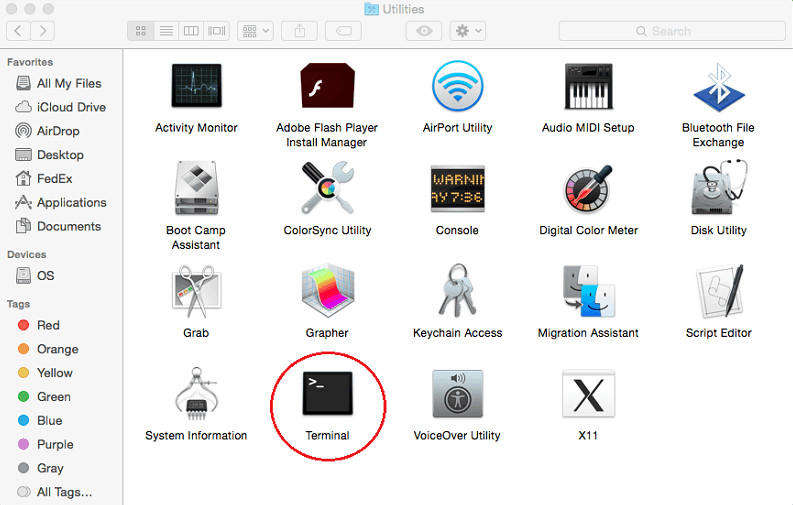
Open Finder and run Terminal to check whether the Web Camera is used by some of the Mac running processes.


Applications -> Utilities -> Terminal


macosx-utilities-terminal-osx-screenshot


MacBook-Air:Volumes root#  lsof | grep "AppleCamera"


You should see one or more results. If you don’t see any results, try running the following commands as well.
One of the below commands may be necessary if you’re using an older version of macOS.


MacBook-Air:Volumes root#  lsof | grep "iSight"


MacBook-Air:Volumes root#  lsof | grep "VDC"


If VDCAssistant process shows running kill it.
 

MacBook-Air:Volumes root#  killall -9 VDCAssistant


https://www.pc-freak.net/images/macosx-check-what-process-is-using-camera-screenshot

You can also check whether the Mac Camera is being detected by Mac OS with system_profiler command (this is Mac's equivalent of Linux's lspci / lsusb / lshw / dmidecode for more on the topic you can check my previous article Get hardware system info on Linux etc.)
 

/usr/sbin/system_profiler


   Type8Camera::12.781 system_profiler[1075:84585] Exception NSInvalidArgumentE
      Version: 10,1
      Obtained from: Apple
      Last Modified: 13.12.2017, 9:34
      Kind: Intel
      64-Bit (Intel): Yes
      Signed by: Software Signing, Apple Code Signing Certification Authority, Apple Root CA
      Location: /System/Library/Image Capture/Devices/Type8Camera.app
      Get Info String: 10.1, © Copyright 2002-2014 Apple Inc. All rights reserved.

    Type5Camera:

      Version: 10,1
      Obtained from: Apple
      Last Modified: 13.12.2017, 9:34
      Kind: Intel
      64-Bit (Intel): Yes
      Signed by: Software Signing, Apple Code Signing Certification Authority, Apple Root CA
      Location: /System/Library/Image Capture/Devices/Type5Camera.app
      Get Info String: 10.1, © Copyright 2001-2014 Apple Inc. All rights reserve

.

    Type4Camera:

      Version: 10,1
      Obtained from: Apple
      Last Modified: 13.12.2017, 9:34
      Kind: Intel
      64-Bit (Intel): Yes
      Signed by: Software Signing, Apple Code Signing Certification Authority, Apple Root CA
      Location: /System/Library/Image Capture/Devices/Type4Camera.app
      Get Info String: 10.1, © Copyright 2001-2014 Apple Inc. All rights reserved.

    PTPCamera:

      Version: 10,1
      Obtained from: Apple
      Last Modified: 13.12.2017, 9:34
      Kind: Intel
      64-Bit (Intel): Yes
      Signed by: Software Signing, Apple Code Signing Certification Authority, Apple Root CA

Skype remove word completion / Howto Disable spellcheck autocorrect on Mac OS X, Android Phones Tablets and IPhone iOS

Tuesday, March 14th, 2017

How-to-disable-auto-correct-on-MacOS-X-android-and-iphone

I've recently upgraded my wife's Mac Book Air Mac OS X release from Mountain Lion to latest available OS X release Yosemite and after upgrade the old version of Skype used for about 3 years without any problems (except camera issues due to mac OS X bug the old post is here) stopped working (did crashed) on Skype launch so I took few minutes to upgrade Skype as well from Skype.com Skype for Mac official download page after the quick and unproblematic Skype re-install, Skype client was back to normal with a shiny new outlook and on a first glimpse all worked like a charm but …

On the next day when I took use of temporary the upgraded Mac Book Air with the fresh new OS X Yosemite and Skype's latest app to to do a quick login with my Skype credentials noticed a very annoying autocorrect (auto spelling)  Skype behavior on any new input text message.

I have to admit the idea of autocorrect feature on a system wide scale is great however quick keyboard typers like me who are used to type more than a letter per second use to type so quickly that occasinally you do errors which you're quick to fix but anyhow errors are automatically corrected in a way that you have to retype the whole word quite often which makes your typing a hellish experience. Then the same auto-correct feature becomes a terrible experience and on any device I notice this behavior I tend to remove it immediately.

I remember  the same dictionary auto-spell check / corect behavior was present on my Android run ZTE blade 3 mobile after first Mobile boot and also present on my current iPhone 5 iOS and thus the first thing I did once I start using it is to remove autocorrect (auto spelling) feature and relax the irritation of it.

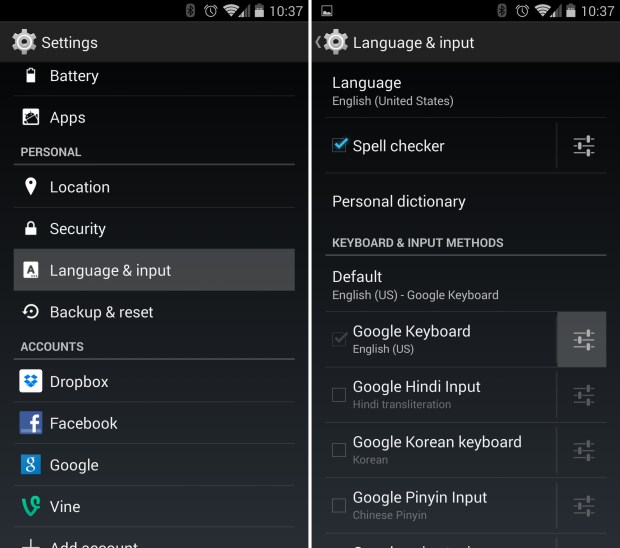
Just in case if you need to disable Spellcheck auto-correct on Android Phone or Tablet do it from

Settings -> Language & input

android-phone-tablet-disable-autocorrect-spell-check

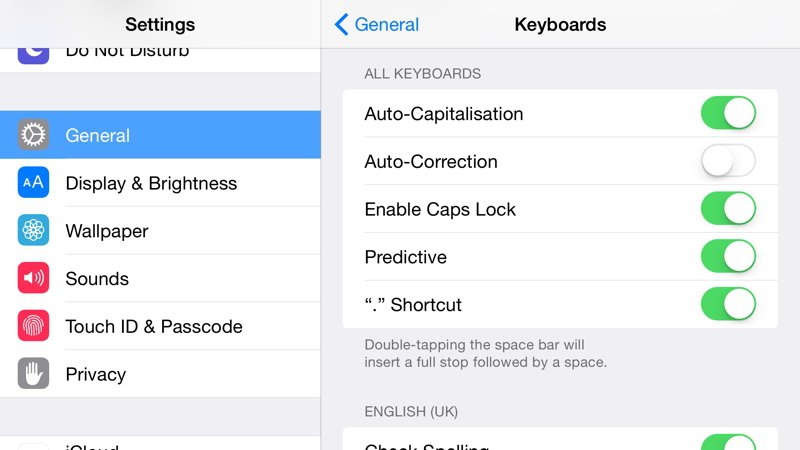
If you happen to be using also IPhone 5 as me or  Iphone 6 / 7 to disable AutoCorrect feature on SMSes / Skype / Viber and other applications do it from Phone's:

Settings -> General

disable_Turn_off_AutoCorrect_in_IPhone_iOS

Shortly I've noticed that the auto-correct feature does not only mess up your typing in Skype but also in Mail and TweetDeck and generally any open application where you can type on Yosemite.


I've took the time to investigate quickly what was causing the new feature that bugged me so much online and came to this nice little article How to turnoff autocorrect on Mac OS X 10.11 El Captain

As the article revealed to Turn off the autocorrect Mac OS X feature you I have to go:

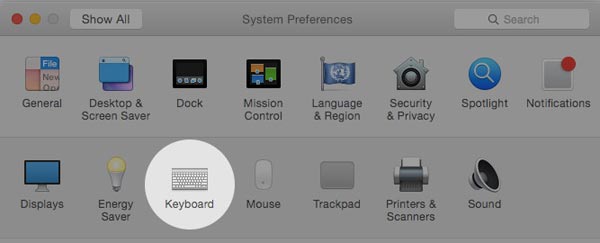
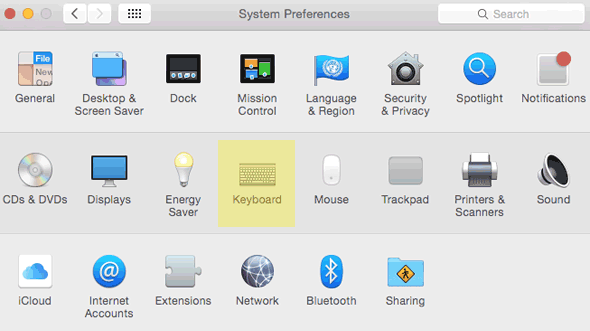
Finder -> System Preferences


stop-skype-autocorrect-annoying-macosx-yosemite-system-preferences-menu-screenshot

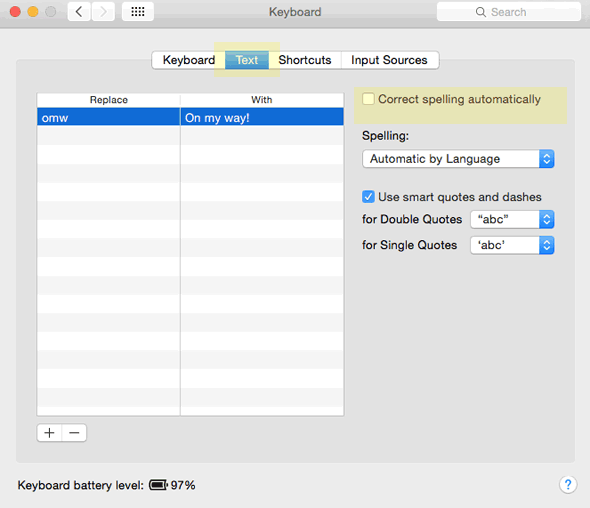
Click on Keyboard -> Text
and turn  Autocorrect off by unchecking Correct spelling automatically

stop-skype-autocorrect-annoying-macosx-yosemite-system-preferences-keyboard-menu-screenshot

By doing this autocorrect spelling is disabled for all applications, however for some people it might be handy to leave the correct feature for Mail app or Microsoft Office (Microsoft Word / Excel) etc. and only turn off (disable) the autorrect feature per application side.

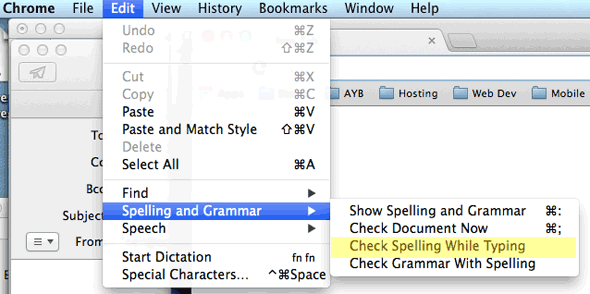
You can  do this in the separate Applications (of choise where you need auto spelling) from  Edit Menu under Spelling and Grammer and enable / disableCheck Spelling While Typing

stop-skype-autocorrect-annoying-macosx-yosemite-spelling-and-grammar-menu-screenshot


Tadam Enjoy ! 🙂


Adobe PDF Reader Mac OS X disable (Automatic) Update annoying prompt popping up every now and then

Wednesday, June 8th, 2016

Adobe-Reader-icon

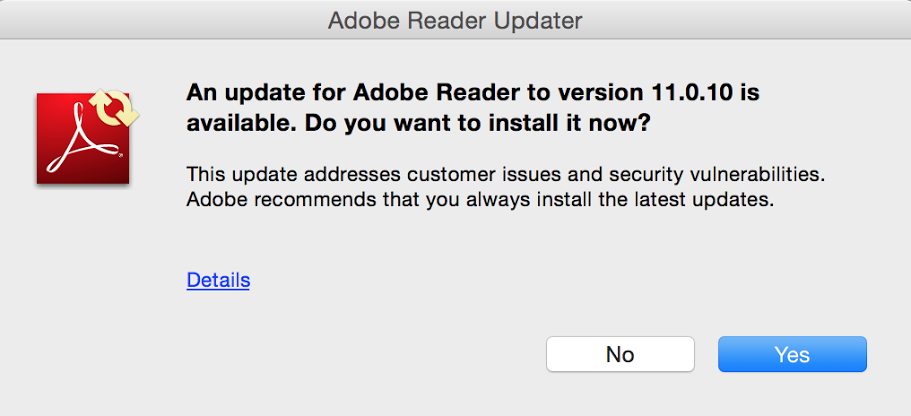
Generally recent'y I've been more and more convinced the less you update the better. I've recently installed Adobe Reader on the Mac Book Air of Svetlana, cause I still have some illusions some PDFs are visible more clearly with Adobe. And soon I was unpleasently suprised that once installed Adobe automatically added auto-update service to the Mac and an auto-update policy that is popping up all the time with offers to update.

This could get crazy every normal person that prefer to not update software so often. There are not much people I know of that like to be puzzled on every next release about the new functionality he don't need anyways but I guess adobe's company aggressiveness escalated nowadays.

Thanksfully as I've googled quickly I found the fix on the common site for Mac problems Mac OS X Daily here

FlashUpdateNotification_annoying-prompt-how-to-disable

To get rid of the m'f'in Automatic Adobe Reader update


 Launch Terminal (located in /Applications/Utilities/)
* At the command prompt, paste this command exactly

defaults write com.adobe.AdobeUpdater.Admin Disable.Update -bool yes

* Hit return to execute the command 

You will get no output but anyways this nice command will have created for you inside your home directory (/Library/Preferences/) the file Preferences/com.adobe.AdobeUpdater.Admin.plist

You check the file's existence with command:


svetlana@localhost:~$ ls -al ~/Library/Preferences/com.adobe.AdobeUpdater.Admin.plist
-rw——-  1 svetlana  staff  62 Jun  6 19:52 /Users/svetlana/Library/Preferences/com.adobe.AdobeUpdater.Admin.plist


The conent of the file is simple it sets a boolean valiable of Disable.Update to True 


cat ~/Library/Preferences/com.adobe.AdobeUpdater.Admin.plist
bplist00?^Disable.Update


This will guarantee you that rebooting your Mac (which I guess was some 6 months ago or just a simple user logging out will not prompt you with the sh*tty annoying Adobe Update Manager

Use mac PC built-in camera to make / take pictures on Mac OS X macbookair notebook with Photo Booth

Friday, February 26th, 2016

take-picture-or-video-with-built-in-camera-on-MacOSX-PhotoboothLOGO

It seems we lost our Good high quality Digital Camera somewhere and I was in need urgently to make a good quality photo (my ZTE Phone) has a very bad camera, so I got the idea to use Macbookair's camera as it has better
resolution to picture my present a  Tank Tort 🙂 hand made by my wife as a present for the Day of the Defender of the Fatherland which is a major feast in Russia, Belarus and many of the ex-Soviet Union members communist countries.

Actually using build in camare in MacBookAir is a handy thing for people mising at the moment a good high quality digital camera as it is thin and light and build in MacBook cam can be used to make Videos and Pictures exactly the same way
as an ordinary Tablet Computer is used so commonly nowadays by many:

In other words I needed for the Mac OS X equivalent to Cheese's (Photo and Video) capturer program for Linux.

Luckily for people interested in using their Mac OS notebook as a amateur camera this is easy by using default shipped Mac Application called:

Photo Booth app

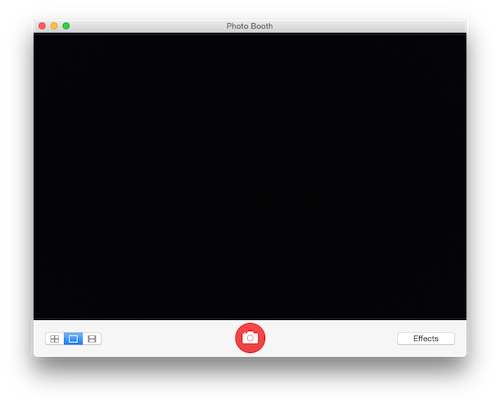
To Launch Photo Booth app it just look it up in Finder and double click it:

PhotoBooth-how-to-take-photos-on-macosx

Clicking the large red button underneath the preview area will take a picture after an optional countdown.

Tort Tank of Svetka

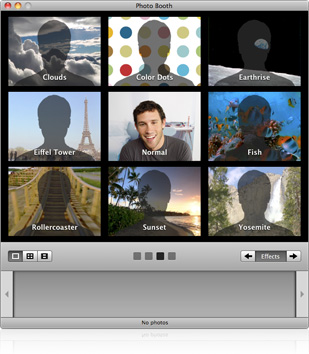
Besides being able to capture Video and Pictures from Mac's camera it could add also some nice effects to taken pictures and videos (supports a basic video editing) features and effects.

The effects you can choose are are: Sepia, Black and White, Glow, Comic Book, Normal, Colored Pencil, Thermal Camera, X-Ray, and Pop Art. There are also effects that change the person in the picture using these effects: Bulge, Dent, Twirl, Squeeze, Mirror, Light Tunnel, Fish Eye, and Stretch. Actually  photographic filters of Photo Booth are very similar to Adobe Photoshop.

make-picture-on-mac-photobooth-effects-screenshot
By default Photo Booth will create picture, howver

Photo Booth saves your photos as JPEG files in a folder named Photo Booth, located in your home folder.

Choose File > Reveal in Finder

to see your picture files.

A much better way to be able to easily see and access all taken Pictures and Videos with Photo Booth is to


open Terminal


and type:

——-


$ cd Pictures
$ ln -s Photo\ Booth\ Library/Pictures/ PhotoBoothPics


This will make Link to pictures be easily accessible from your Finder -> Pictures folder
 
Applying custom photo backgrounds

A very useful feature of Photo Booth is that the user can apply backdrops to provide an effect similar to a green screen. When a backdrop is selected, a message appears telling the user to step away from the camera. Once the background is analyzed, the user steps back in front of the camera and is shown in front of the chosen backdrop.

For people who prefer to take photos using a console program on Mac OS I guess you should take a look at ffpeg
Here is one more snapshot of the Tort Tank snapshot made with the Macbookair of Svetlana 🙂

Tort Tank


P.S. If you like the Tort Tank and you happen to live in Sofia Bulgaria, you can order it  by dropping me a comment with request 🙂

Enjoy ! 🙂

Word 2011 Check spelling for Mac OS X 2011 – Word check text in Mac OS X Office

Monday, February 29th, 2016

office-for-mac-2011-logo
 

If you happen to be running Mac OS X powered notebook and have recently installed Microsoft Office 2011 for Mac OS because you used to migrate from a Windows PC, you will probably suprrised that your Native Language Dictionary check you used heavily on Windows might be not performing on Mac.
This was exactly the case with my wife Svetlana and as she is not a computer expert and I'm the IT support at home I had to solve it somehow.

Luckily Office 2011 for Mac OS X which I have installed earlier comes with plenty of foreign-languages such as Russian, Bulgarian, Czech, French, German, UK English, US English etc.
Proofing tools is very handy especially for people like my wife who is natively Belarusian and is in process of learning Bulgarian, thus often in need to check Bulgarian words spelling.

By Default the Check spelling on Office package was set to English, there is a quick way to change this to a certain text without changing the check-spelling default from English, the key shortcut to use is:

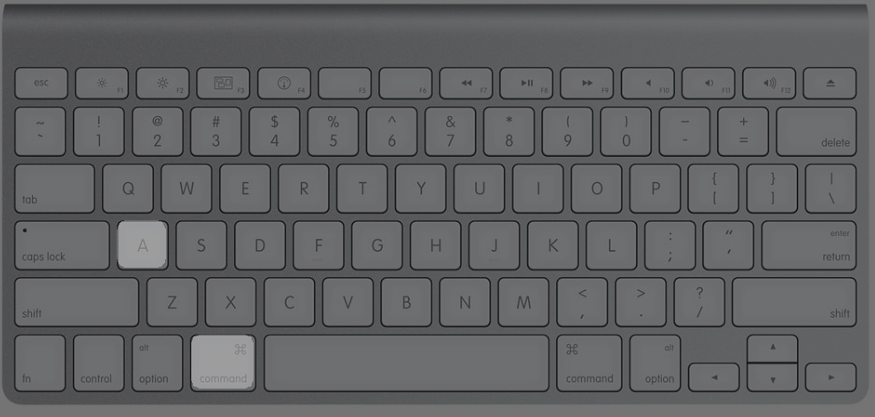
I. Press Mac command (key) + A – To select All text in opened document (in our case text was in Bulgarian)

command-a-mac-os-x

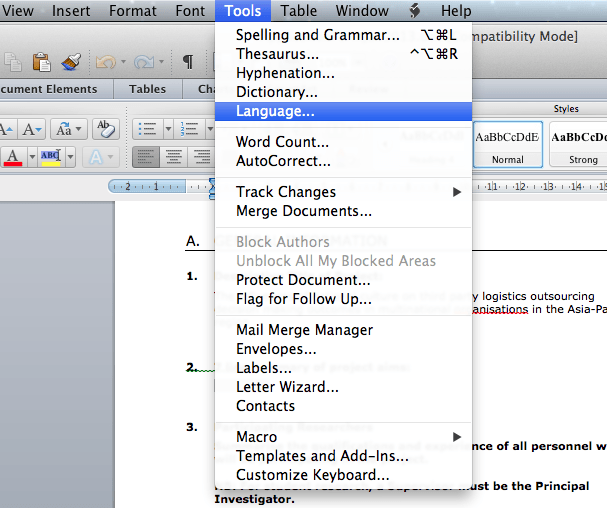
Click Word window menu and:
 

Choose Tools→Language


and select Bulgarian (or whatever language you need check spelling for.

If you need to change the Language default for all time, again you can do it from Tools


 Tools→Language


language-menu-on-mac-os-x-microsoft-word-office-2011-package-screenshot

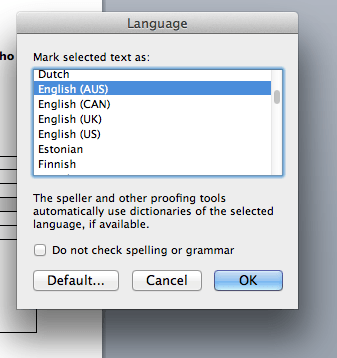
II. The Language dialog will appear and you'll see a list of languages to choose. 

select-language-menu-screenshot-ms-word-2011-on-mac-os-x

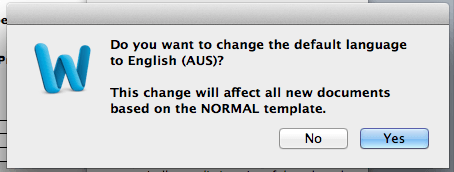
III. Next a Pop-up Dialog will ask you whether you're sure you want to change the default language to the language of choice in my case this was Russian.

language-default-dialog-mac-osx-word-2011-office-on-mac-change-default-spelling-language

That's it check spelling default will be aplpied now to Word normal template, so next time you open a document your default spelling choice will set

How to install Winrar on Mac OS X on Console and Graphical Interface – IZIP and Keka Free archivers short review

Friday, February 19th, 2016

howto-install-winrar-free-gui-program-for-mac-osx-notebook-pc

If you're looking for just Mac OS X, console version of rar and unrar then standard WinRar website binaries for Mac should be perfect for you.
If you're an advanced Mac OS X user with UNIX background and you've already installed Mac Ports or Brew – The Missing package manager for Mac OS X
To install WinRar on Mac (with brew) with:
 

macosx# brew install unrar


If you're using MacPorts instead:
 

macosx:/home$ sudo port install unrar


However console version isn't the best choice for my wife which is not a console ninja, so I had to look and install some oher Graphic Interface program 🙂
As I don't like using AppleStore (I can't even properly register for an Apple Store ID,as I'm required to fill in my credit card … )
Hence I looked online on some WinRar dearchiver GUIs and  found IZip which is natively a ZIP archiver but also supports .RAR Archives.
Though IZIp website give the impression IZip is a great tiny prog, once installing the .DMG downloaded from the website and installing into Applications it turned out IZip is currently crashing on the Mac Book Air with Mac OS X 10.8.5Mountain Lion

If you want a simplistic interface program you would probably want to check out UnrarX though I personally didin't liked that one because it is not properly handing UTF-8 and CP-1251 filenames written in Russian, Bulgarian Cyrillic and probably also Chineese, Viatnamese and other exotic language encodings.
After few more minutes of searching I finally got KEKA – The Free  Mac OSX file archiver.

keka_winrar-archive-unarchive-free-program-for-macosx-icon

Though the program Logo is a little scary, Keka turned to be very nice tiny, easy  to install WinRAR GUI interfaced program for Mac OS X and the installation comes to standard download and run of .DMG file and moving it to the Finder Applications.

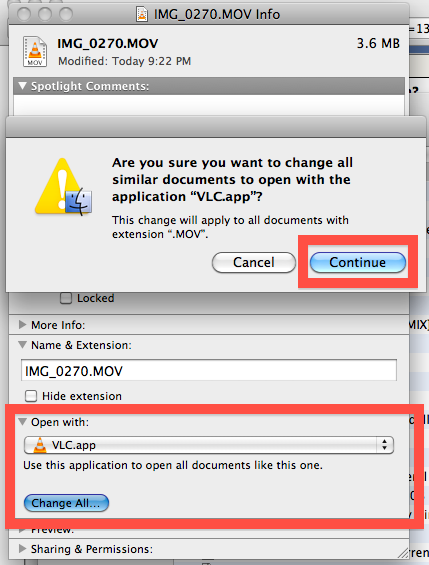
Once installed, if you turn to have a .rar file association issues (by default in my case) files were opened with VLC. To change the file type association of a certain file on the Mac I've had to press Command (button) + I over the .rar extensioned file, e.g:

  • Command + I
  • Click to expand the “Open with” section within that files info screen
  • From the pull down menu, select the application you want to open this specific file with
  • Close the Get Info window
     

change-mac-file-association-to-rar-kaka-free-winrar-winzip-archive-dearchive-macosx

How to use wget and curl via HTTP Proxy server / How to set a HTTPS proxy server on a bash shell on Linux

Wednesday, January 27th, 2016

linux-ssl-proxy-configuration-from-command-line-with-wget-and-curl-howto

I've been working a bit on a client's automation, the task is to automate process of installations of Apaches / Tomcats / JBoss and Java servers, so me and colleagues don't waste too
much time in trivial things. To complete that I've created a small repository on a Apache with a WebDav server with major versions of each general branch of Application servers and Javas.
In order to access the remote URL where the .tar.gz binaries archives reside, I had to use a proxy serve as the client runs all his network in a DMZ and all Web Port 80 and 443 HTTPS traffic inside the client network
has to pass by the network proxy.

Thus to make the downloads possible via the shell script, writting I needed to set the script to use the HTTPS proxy server. I've been using proxy earlier and I was pretty aware of the http_proxy bash shell
variable thus I tried to use this one for the Secured HTTPS proxy, however the connection was failing and thanks to colleague Anatoliy I realized the whole problem is I'm trying to use http_proxy shell variable
which has to only be used for unencrypted Proxy servers and in this case the proxy server is over SSL encrypted HTTPS protocol so instead the right variable to use is:
 

https_proxy


The https_proxy var syntax, goes like this:

proxy_url='http-proxy-url.net:8080';
export https_proxy="$proxy_url"

how-to-set-https_proxy_url-on-linux-freebsd-openbsd-bsd-and-unix-from-terminal-console

Once the https_proxy variable is set  UNIX's wget non interactive download tool starts using the proxy_url variable set proxy and the downloads in my script works.

Hence to make the different version application archives download work out, I've used wget like so:
 

 wget –no-check-certificate –timeout=5 https://full-path-to-url.net/file.rar


For other BSD / HP-UX / SunOS UNIX Servers where  shells are different from Bourne Again (Bash) Shell, the http_proxy and  https_proxy variable might not be working.
In such cases if you have curl (command line tool) is available instead of wget to script downloads you can use something like:
 

 curl -O -1 -k –proxy http-proxy-url.net:8080 https://full-path-to-url.net/file.rar

The http_proxy and https_proxy variables works perfect also on Mac OS X, default bash shell, so Mac users enjoy.
For some bash users in some kind of firewall hardened environments like in my case, its handy to permanently set a proxy to all shell activities via auto login Linux / *unix scripts .bashrc or .bash_profile that saves the inconvenience to always
set the proxy so lynx and links, elinks text console browsers does work also anytime you login to shell.

Well that's it, my script enjoys proxying traffic 🙂