Archive for the ‘FreeBSD’ Category

Improve DNS lookup domain resolve speed on Linux / UNIX servers through /etc/resolv.conf timeout, attempts, rorate options

Thursday, February 27th, 2020

improve-dns-lookup-speed-on-Linux-UNIX-servers-resolv.conf-change-dns-settings-linux
If you're an performance optimization freak and you want to optimize your Linux servers to perform better in terms of DNS resolve slowness because of failing DNS resolve queries due to Domain Name Server request overload or due to Denial of Service attack towards it. It might be interesting to mention about some little known functionalities of /etc/resolv.conf described in the manual page.

The defined nameservers under /etc/resolv.conf are queried one by one waiting for responce of the sent DNS resolve request if it is not replied from the first one for some time, the 2nd one is queried until a responce is received by any of the defined nameserver IPs

A default /etc/resolv.conf on a new Linux server install looks something like this:
 

nameserver      10.10.8.1
nameserver      10.10.8.2
nameserver      10.10.8.3
search          sub.subdomain.com subdom.dom.domain.com


However one thing is that defined if NS1 dies out due to anything, it takes timeout time until the second or 3rd working one takes over to resolve the query.
This is controlled by the timeout value.

Below is description from man page

timeout:n
sets the amount of time the resolver will wait for a
response from a remote name server before retrying the
query via a different name server.  Measured in
seconds, the default is RES_TIMEOUT (currently 5, see
<resolv.h>).  The value for this option is silently
capped to 30.


  • In other words Timeout value is time to resolving IP address from hostname through DNS server,timeout option is to reduce hostname lookup time

As you see from manual default is 5 seconds which is quite high, thus reducing the value to 3 secs or even 1 seconds is a good sysadmin practice IMHO.

Another value that could be tuned in /etc/resolv.conf is attempts value below is what the manual says about it: 
 

attempts:n
                     Sets the number of times the resolver will send a query to its name servers before giving up and returning an error to the calling application.  The default is RES_DFLRETRY (cur‐
                     rently 2, see <resolv.h>).  The value for this option is silently capped to 5.


  • This means default behaviour on a failing DNS query resolve is to try to resend the DNS resolve request to the failing nameserver 5 more times, that is quite high thus it is a good practice from my experience to reduce it to something as 2 or 1


Another very useful resolv.conf value is rotate
The default behavior of how DNS outgoing Domain requests are handled is to use only the primary defined DNS, instead if you need to do a load balancing in a round-robin manner add to conf rotate option.

The final /etc/resolv.conf optimized would look like so:


linux# cat /etc/resolv.conf

nameserver      10.10.8.1
nameserver      10.10.8.2
nameserver      10.10.8.3
search          sub.subdomain.com subdom.dom.domain.com
options ndots:1
options timeout:1
options attempts:1
options rotate


The search opt. placement is also important to be placed in the right location in the file. The correct placement is after the nameservers defined, I have to say in older Linux distributions the correct placement of search option was to be on top of resolv.conf.

Note that this configuration is good and fits not only Linux but also is a good DNS lookup optimization speed on other UNIX derivatives such as FreeBSD / NetBSD as well as other Proprietary OS UNIX machines running IBM AIX etc.

On Linux it is also possible to place the options given in one single line like so, below is the config I have on my www.pc-freak.net running Lenovo server:


domain www.pc-freak.net
search www.pc-freak.net
#nameserver 192.168.0.1
nameserver 127.0.0.1
nameserver 83.228.92.2
nameserver 8.8.8.8
nameserver 83.228.92.1
nameserver 208.67.222.222
nameserver 208.67.220.220
options timeout:2 attempts:1 rotate


When is /etc/hosts record venerated and when is /etc/resolv.conf DNS defined queried for a defined DNS host?


One important thing to know when dealing with /etc/resolv.conf  is what happens if a Name domain is defined in both /etc/hosts and /etc/resolv.conf.
For example you have a www.pc-freak.net domain record in /etc/hosts to a certain domain
but the DNS nameserver 8.8.8.8 in Google has a record to an IP that is the real IP 83.228.93.76


83.228.93.75 irc.www.pc-freak.net www.pc-freak.net pcfreak.biz www.pc-freak.net pcfreak.us services.www.pc-freak.net jabber.www.pc-freak.net


# dig @8.8.8.8 www.pc-freak.net

; <<>> DiG 9.11.5-P4-5.1-Debian <<>> @8.8.8.8 www.pc-freak.net
; (1 server found)
;; global options: +cmd
;; Got answer:
;; ->>HEADER<<- opcode: QUERY, status: NOERROR, id: 54656
;; flags: qr rd ra; QUERY: 1, ANSWER: 1, AUTHORITY: 0, ADDITIONAL: 1

;; OPT PSEUDOSECTION:
; EDNS: version: 0, flags:; udp: 512
;; QUESTION SECTION:
;www.pc-freak.net.                  IN      A

;; ANSWER SECTION:
www.pc-freak.net.           3599    IN      A       83.228.93.76

;; Query time: 40 msec
;; SERVER: 8.8.8.8#53(8.8.8.8)
;; WHEN: чт фев 27 18:04:23 EET 2020
;; MSG SIZE  rcvd: 57


  • Which of the 2 different IPs will the applications installed on the server such as Apache / Squid / MySQL / tinyproxy for their DNS resolve operations?


Now it is time to say few words about /etc/nsswitch.conf (The Nameserver switching configuration file). This file defines the DNS resolve file used order in which the Operationg System does IP to domain translation and backwards.
 

# grep -i hosts: /etc/nsswitch.conf

hosts:          files dns myhostname

As you can see first the local defined in files like /etc/hosts record is venerated when resolving, then it is the externally configured DNS resolver IPs from /etc/resolv.conf.

nsswitch.conf  is used also for defining where the OS will look up for user / passwd (e.g. login credentials) on login, on systems which are having an LDAP authentication via the sssd (system security services daemon) via definitions like:


passwd:     files sss
shadow:     files sss
group:      files sss


E.g. the user login will be first try to read from local /etc/passwd , /etc/shadow , /etc/groups and if no matched record is found then the LDAP service the sssd is queried.

Optimize PNG images by compressing on GNU / Linux, FreeBSD server to Improve Website overall Performance

Monday, November 27th, 2017

how-to-optimize-your-png-pictures-to-reduce-size-and-save-speed-bandwidth-optipng-compression-tests-results

If you own a website with some few hundreds of .PNG images like 10 000 / 15 000 png images and the website shows to perform slow in Google PageSpeed Insights and is slow to open when Google Searched or Shared on Facebook / Twitter etc. then one recommended step to boost up the website opening speed is to compress (optimize) the .PNG pictures without loosing the images quality to both save space and account bandwidth you could use optipng even though this is not the only tool available to help you optimize and reduce the size of your images, some few other tools you might like to check out if you have more time are:

 a.)  pngcrush – optimizes PNG (Portable Network Graphics) files.
 b.)  pngnq – tool for optimizing PNG (Portable Network Graphics) images. It is a tool for quantizing PNG images in RGBA format.
 c.)  pngquant – PNG (Portable Network Graphics) image optimising utility. It is a command-line utility for converting 24/32-bit PNG images to paletted (8-bit) PNGs.
 

1. Install and Compress / optimize PNG / GIF / PNM / TIFF file format with optipng
 

OPTIPING tool recompresses the .PNG images to a smaller size without loosing any quality information, besides PNG file format it also supports (BMP, GIF, PNM and TIFF) image format.

If you don't have optipng installed on your server you can;

a.) install it on Redhat RPM based Linux distributions lets say CentOS Linux use:


[root@centos: ~]# yum install epel-release
[root@centos: ~]# yum install optipng

Note that, You will need to  first enable epel repo on centos 7


b.) If instead you're on a Debian GNU / Linux

debian:~# apt-get install optipng


c.) FreeBSD users can install it from FreeBSD ports with:


freebsd# cd /usr/ports/graphics/optipng
freebsd# make install clean

optipng syntax is quite self explanatory
optipng [options] what-ever-file.png


You can get a full list of possible command options with -? command, here is a list:


debian:~# optipng -?
Synopsis:
    optipng [options] files …
Files:
    Image files of type: PNG, BMP, GIF, PNM or TIFF
Basic options:
    -?, -h, -help    show this help
    -o <level>        optimization level (0-7)        [default: 2]
    -v            run in verbose mode / show copyright and version info
General options:
    -backup, -keep    keep a backup of the modified files
    -clobber        overwrite existing files
    -fix        enable error recovery
    -force        enforce writing of a new output file
    -preserve        preserve file attributes if possible
    -quiet, -silent    run in quiet mode
    -simulate        run in simulation mode
    -out <file>        write output file to <file>
    -dir <directory>    write output file(s) to <directory>
    -log <file>        log messages to <file>
    —            stop option switch parsing
Optimization options:
    -f <filters>    PNG delta filters (0-5)            [default: 0,5]
    -i <type>        PNG interlace type (0-1)
    -zc <levels>    zlib compression levels (1-9)        [default: 9]
    -zm <levels>    zlib memory levels (1-9)        [default: 8]
    -zs <strategies>    zlib compression strategies (0-3)    [default: 0-3]
    -zw <size>        zlib window size (256,512,1k,2k,4k,8k,16k,32k)
    -full        produce a full report on IDAT (might reduce speed)
    -nb            no bit depth reduction
    -nc            no color type reduction
    -np            no palette reduction
    -nx            no reductions
    -nz            no IDAT recoding
Editing options:
    -snip        cut one image out of multi-image or animation files
    -strip <objects>    strip metadata objects (e.g. "all")
Optimization levels:
    -o0        <=>    -o1 -nx -nz                (0 or 1 trials)
    -o1        <=>    -zc9 -zm8 -zs0 -f0            (1 trial)
            (or…)    -zc9 -zm8 -zs1 -f5            (1 trial)
    -o2        <=>    -zc9 -zm8 -zs0-3 -f0,5            (8 trials)
    -o3        <=>    -zc9 -zm8-9 -zs0-3 -f0,5        (16 trials)
    -o4        <=>    -zc9 -zm8 -zs0-3 -f0-5            (24 trials)
    -o5        <=>    -zc9 -zm8-9 -zs0-3 -f0-5        (48 trials)
    -o6        <=>    -zc1-9 -zm8 -zs0-3 -f0-5        (120 trials)
    -o7        <=>    -zc1-9 -zm8-9 -zs0-3 -f0-5        (240 trials)
    -o7 -zm1-9    <=>    -zc1-9 -zm1-9 -zs0-3 -f0-5        (1080 trials)
Notes:
    The combination for -o1 is chosen heuristically.
    Exhaustive combinations such as "-o7 -zm1-9" are not generally recommended.
Examples:
    optipng file.png                        (default speed)
    optipng -o5 file.png                    (slow)
    optipng -o7 file.png                    (very slow)

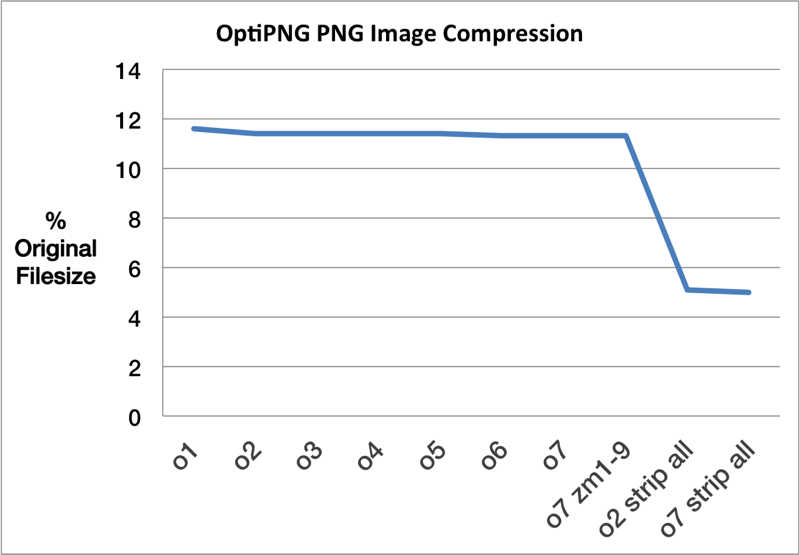
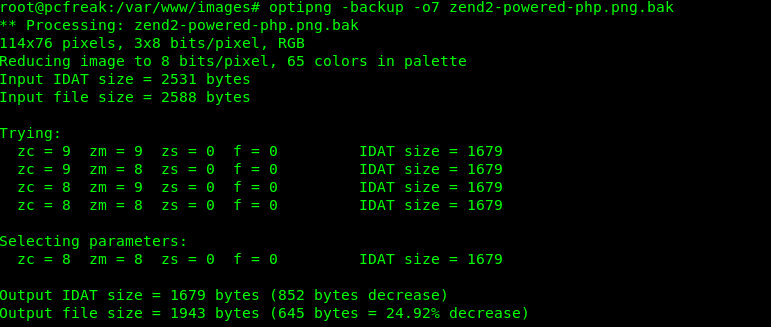
Just running it with, lets say -o7 arguments is enough for optipng to compress your image and reduce some 15 to 30% of picture size

optipng -o7 what-ever-image-you-have.png

optipng-example-on-reducing-image-screenshot-24.9-png-image-compression

2. Compress images without loosing quality recursively inside directory and subdirectories with optiping

a.) To optimize all pictures inside a single directory (without sub-directories) on remote server you can run, below command:
 

cd whatever-dir/
for i in *.png; do optipng -o6 -quiet -keep -preserve -dir optimized -log optipng-compress.log "$i"; done


As you can see a log is being written on what the command has done and the originals of the optimized images is going to be preserved, the optimize level is 6 is the PNG encoding level.


cd /var/www/your-site/images/
find . -type f -iname "*.png" -print0 | xargs -I {} -0 optipng -o6 -keep -preserve -log optipng-compress.log "{}"


This command is pretty handy to run on own dedicated server, if you don't have one just do it on your Linux computer at home or if you don't own a PC with Linux install any Deb / RPM based Linux inside VirtualBox or VMWare Virtual Machine and do it there, then upload to your Hosting Provider / Amazon EC2 etc and Enjoy the increased website performance 🙂


Where are Apache log files on my server – Apache log file locations on Debian / Ubuntu / CentOS / Fedora and FreeBSD ?

Tuesday, November 7th, 2017

apache-where-are-httpd-access-log-files

Where are Apache log files on my server?

1. Finding Linux / FreeBSD operating system distribtion and version

Before finding location of Apache log files it is useful to check what is the remote / local Linux operating system version, hence

First thing to do when you login to your remote Linux server is to check what kind of GNU / Linux you're dealing with:

cat /etc/issue
cat /etc/issue.net


In most GNU / Linux distributions should give you enough information about the exact Linux distribution and version remote server is running.

You will get outputs like

# cat /etc/issue
SUSE LINUX Enterprise Server 10.2 Kernel \r (\m), \l

or

# cat /etc/issue
Debian GNU/Linux 8 \n \l

If remote Linux is Fedora look for fedora-release file:

cat /etc/fedora-release Fedora release 7 (Moonshine)

The proposed freedesktop.org standard with the introduction of systemd across all Linux distributions is

/etc/os-release


# cat /etc/os-release
PRETTY_NAME="Debian GNU/Linux 8 (jessie)"
NAME="Debian GNU/Linux"
VERSION_ID="8"
VERSION="8 (jessie)"
ID=debian
HOME_URL="http://www.debian.org/"
SUPPORT_URL="http://www.debian.org/support"
BUG_REPORT_URL="https://bugs.debian.org/"


Once we know what kind of Linux distribution we're dealing with, we can proceed with looking up for standard location of Apache config:

2. Apache config file location for Fedora / CentOS / RHEL and other RPM based distributions

RHEL / Red Hat / CentOS / Fedora Linux Apache access file location
 

/var/log/httpd/access_log


3. Apache config file location for Debian / Ubuntu and other deb based Linux distributions

Debian / Ubuntu Linux Apache access log file location

/var/log/apache2/access.log


4. Apache config file location for FreeBSD

FreeBSD Apache access log file location –

/var/log/httpd-access.log


5. Finding custom Apache access log locations
 

If for some reason the system administrator on the remote server changed default path for each of distributions, you can find custom configured log files through:

a) On Debian / Ubuntu / deb distros:

debian:~# grep CustomLog /etc/apache2/apache2.conf


b) On CentOS / RHEL / Fedora Linux RPM based ones:

[root@centos:  ~]# grep CustomLog /etc/httpd/conf/httpd.conf


c) On FreeBSD OS


freebsd# grep CustomLog /etc/httpd/conf/httpd.conf
 # a CustomLog directive (see below).
    #CustomLog "/var/log/httpd-access.log" common
    CustomLog "/var/log/httpd-access.log" combined

How to make for loop (cycles) in KSH useful for FreeBSD / UNIX system administrators

Friday, November 3rd, 2017

korn-shell-how-to-make-loops-easily-for-sys-admin-purposes

Sometimes we have to administrate this operating systems such as FreeBSD / AIX / HP UX or even Mac OS server where by default due to historical reasons or for security bash shell is not avialable. That's not a common scenario but it happens so if as sysadmin we need to create for loops on ksh it is useful to know how to do that, as for loop cycles are one of the most important command line tools the sysadmin swiss army knife kind of.

So how to create a for loop (cycle) in ksh (Korn Shell)?

The most basic example for a KSH loop shell is below:
 

#!/bin/ksh
for i in 1 2 3 4 5
do
  echo "Welcome $i times"
done


Add the content to any file lets say ksh_loop.ksh then make it executable as you do in bash shells


$ chmod +x ksh_loop.ksh
$ ksh ksh_loop.ksh


The overall syntax of the for loop ksh command is as follows:


for {Variable} in {lists}
do
    echo ${Variable}
done


Hence to list lets say 20 iterations in a loop in ksh you can use something like:
 

#!/bin/ksh
for i in {1..20}
do
  echo "Just a simple echo Command $i times";
# add whatever system commands you like here
done


Example for some useful example with KSH loop is to list a directory content so you can execute whatever command you need on each of the files or directories inside


#!/bin/ksh
for f in $(ls /tmp/*)
do
        print "Iterating whatever command you like on /tmp dir : $f"
done


Other useful for loop iteration would be to print a file content line by line just like it is done in bash shell, you can do that with a small loop like belows:


#!/bin/ksh
for iteration_variable in $(cat  file_with-your-loved-content-to-iterate.txt)
do
        print "Current iteration like is : $iteration_variable"
done


FreeBSD post install configuration steps to make on fresh FreeBSD install to make ready for server and Desktop use

Saturday, October 28th, 2017

freebsd-post-install-configuration-steps-to-make-on-fresh-install-to-make-ready-for-server-freebsd-logo


1. Update binary packages

First thing to do just like on any new operating system install is to update / patch the server
 

# freebsd-update fetch
# freebsd-update install


2. Update FreeBSD port packages

As a FreeBSD administrator you will need ports every now and then so make sure you have them at their latest release for your FBSD release


# pkg update
# pkg upgrade


3. Install editors and bash


# pkg install nano vim joe bash bash_completion


4. Install sudo

To be able to run commands without becoming superuser root just like on any Linux you will probably want to have sudo package installed

# pkg install sudo


Sudo config file is under /usr/local/etc/sudoers

To edit it with syntax check enabled use visudo


# visudo

# sudo pkg update


If you want a regular account to have root superuser edit / modify and do things permissions


# pw groupmod wheel -M your_user_name


Then to make the wheel permissions work add to sudoers:


%wheel    ALL=(ALL=ALL)    ALL

5. FreeBSD modify personal information for account


# chpass your_user_name

To change your account and others to use bash instead of default freebsd csh


# csh -s /bin/bash your_user_name


7. Set a Static IP address for a FreeBSD server and configure DNS

Edit /etc/rc.local to look something like so


#ifconfig_em0="DHCP"
ifconfig_em0="inet 192.168.1.100 netmask 255.255.255.0"
# default gateway
defaultrouter="192.168.1.1"


/etc/rc.conf is also the file where you can easily enable / disable freebsd startup scripts

To restart network interafaces just like Debian Linux's /etc/init.d/networking restart type


# service netif restart
# service routing restart


To set Google DNS in FreeBSD just like in Linux add the IPs with nameserver prefix to /etc/resolv.conf


# echo 'nameserver 8.8.8.8' >> /etc/resolv.conf
# echo 'search your-domain-name' >> /etc/resolv.conf


– If you need to change the hostname of the FreeBSD server change in /etc/rc.conf

hostname="your-freebsdhostname"

– To add multiple IP addresses to a network interface on FBSD add line like below to /etc/rc.conf

ifconfig_em0_alias0="192.168.1.5 netmask 255.255.255.255"
ifconfig_em0_alias1="192.168.1.6 netmask 255.255.255.255"

To apply changes and bring up the newly set multiple IPs

# service netif restart


8. Setting up proper timezone

If for some reason the Time zone is improperly set during FreeBSD install, you can later set that with

# tzsetup

9. Set up ntp time server synchronization daemon

# vim /etc/rc.conf

ntpd_enable="YES"
ntpd_sync_on_start="YES"

First command will bring up NTP server at start up and second make it synchroniza with Internet NTP servers, to restart ntp so it set proper time
immediately

# service ntpd start


10. Add additional SWAP space to FreeBSD server after install

– First we need to create the swap file with command and then set up proper permissions for it

# truncate -S 3G /swapf
# chmod 0600 /swapf

– Then to make the swapf being used on boot we need to add it to /etc/fstab

# echo "md99 none swap sw,file=/swapf,late 0 0" >> /etc/fstab

To immediately apply the new added swap to be used by the system run:

# swapon -aqL

To check various things on how swap is configured use

# swapinfo -g


11. Configure Firewall in FreeBSD

# vim /etc/rc.conf

firewall_enable="YES"
firewall_script="/usr/local/etc/ipfw.rules"

A very basic firewall to add to ipfw.rules file would be something like so:
 

    $IPF 70 allow all from any to any out keep-state
    $IPF 80 allow icmp from any to any
    # open port ftp

    $IPF 110 allow tcp from any to any 21 in
    $IPF 120 allow tcp from any to any 21 out

    # 22 for ssh
    $IPF 130 allow tcp from any to any 22 in
    $IPF 140 allow tcp from any to any 22 out

    # mail port 25

    $IPF 150 allow tcp from any to any 25 in
    $IPF 160 allow tcp from any to any 25 out

    # dns (53) udp and tcp in
    $IPF 170 allow udp from any to any 53 in
    $IPF 175 allow tcp from any to any 53 in

    # dns (53) udp and tcp out
    $IPF 180 allow udp from any to any 53 out
    $IPF 185 allow tcp from any to any 53 out

    # http (80),
    $IPF 200 allow tcp from any to any 80 in
    $IPF 210 allow tcp from any to any 80 out
    # deny and log everything
    $IPF 500 deny log all from any to any

To launch the firewall
 

# service ipfw start


To list current FreeBSD Firewall rules use

# ipfw list

Finally if you need to check your connections to the server just like Linux's netstat you might consider using sockstat comand
 

# sockstat -4 -6

– 4 -6 will list you network connections for ipv4 and ipv6 both tcp and udp

Find all running hosts, used IPs and ports on your local wireless / ethernet network or how to do a basic network security audit with nmap

Monday, September 4th, 2017

Find all running hosts / used IPs on your local wireless or ethernet network

nmap-scn-local-network-find-all-running-hosts-used-IPs-on-your-wireless-ethernet-network

If you're using a Free Software OS such as GNU / Linux or some other proprietary OS such as Mac OS X or Windows and you need a quick way to check all running IPs hosts / nodes locally on your current connected Ethernet or Wireless network, here is how to do it with nmap (Network exploration and security tool port scanner).

So why would you do scan that? 

Well just for fun, out of curiousity or just because you want to inspect your local network whether someone unexpected cracker did not break and is not using your Wi-Fi or Ethernet local network and badly snoring your network listening for passwords.

Before you start you should have installed NMAP network scanner on your GNU / Linux, to do so on 

Redhat Based Linux (Fedora / CentOS / Redhat Enterprise RHEL):


yum -y install nmap


On Deb based GNU / Linux-es such as Ubuntu / Mint / Debian etc.


apt-get install –yes nmap


To install nmap on FreeBSD / NetBSD / OpenBSD OS issue from console or terminal:


cd /usr/ports/security/nmap
make install clean 


or if you prefer to install it from latest binary instead of compiling


pkg_add -vr nmap


On a proprietary Mac OS X (I don't recommend you to use this obnoxious OS which is designed as a proprpietary software to steal your freedom and control you, but anyways for Mac OS victims), you can do it to with Macs equivalent tool of apt-get / yum called homebrew:

Open Mac OS X terminal and to install homebrew run:


ruby -e "$(curl -fsSL https://raw.githubusercontent.com/Homebrew/install/master/install)"
brew install nmap
brew search nmap
brew info nmap


If you want to do it system wide become root (super user) from Mac terminal with


su root


and run above commands as administrator user.

Windows users might take a look at Nmap for Windows or use the M$ Windows native portqry command line port scanner

Test whether nmap is properly installed and ready to use with command:


nmap –help
Nmap 6.00 ( http://nmap.org )
Usage: nmap [Scan Type(s)] [Options] {target specification}
TARGET SPECIFICATION:
  Can pass hostnames, IP addresses, networks, etc.
  Ex: scanme.nmap.org, microsoft.com/24, 192.168.0.1; 10.0.0-255.1-254
  -iL <inputfilename>: Input from list of hosts/networks
  -iR <num hosts>: Choose random targets
  –exclude <host1[,host2][,host3],…>: Exclude hosts/networks
  –excludefile <exclude_file>: Exclude list from file
HOST DISCOVERY:
  -sL: List Scan – simply list targets to scan
  -sn: Ping Scan – disable port scan
  -Pn: Treat all hosts as online — skip host discovery
  -PS/PA/PU/PY[portlist]: TCP SYN/ACK, UDP or SCTP discovery to given ports
  -PE/PP/PM: ICMP echo, timestamp, and netmask request discovery probes
  -PO[protocol list]: IP Protocol Ping
  -n/-R: Never do DNS resolution/Always resolve [default: sometimes]
  –dns-servers <serv1[,serv2],…>: Specify custom DNS servers
  –system-dns: Use OS's DNS resolver
  –traceroute: Trace hop path to each host
SCAN TECHNIQUES:
  -sS/sT/sA/sW/sM: TCP SYN/Connect()/ACK/Window/Maimon scans
  -sU: UDP Scan
  -sN/sF/sX: TCP Null, FIN, and Xmas scans
  –scanflags <flags>: Customize TCP scan flags
  -sI <zombie host[:probeport]>: Idle scan
  -sY/sZ: SCTP INIT/COOKIE-ECHO scans
  -sO: IP protocol scan
  -b <FTP relay host>: FTP bounce scan
PORT SPECIFICATION AND SCAN ORDER:
  -p <port ranges>: Only scan specified ports
    Ex: -p22; -p1-65535; -p U:53,111,137,T:21-25,80,139,8080,S:9
  -F: Fast mode – Scan fewer ports than the default scan
  -r: Scan ports consecutively – don't randomize
  –top-ports <number>: Scan <number> most common ports
  –port-ratio <ratio>: Scan ports more common than <ratio>
SERVICE/VERSION DETECTION:
  -sV: Probe open ports to determine service/version info
  –version-intensity <level>: Set from 0 (light) to 9 (try all probes)
  –version-light: Limit to most likely probes (intensity 2)
  –version-all: Try every single probe (intensity 9)
  –version-trace: Show detailed version scan activity (for debugging)
SCRIPT SCAN:
  -sC: equivalent to –script=default
  –script=<Lua scripts>: <Lua scripts> is a comma separated list of 
           directories, script-files or script-categories
  –script-args=<n1=v1,[n2=v2,…]>: provide arguments to scripts
  –script-args-file=filename: provide NSE script args in a file
  –script-trace: Show all data sent and received
  –script-updatedb: Update the script database.
  –script-help=<Lua scripts>: Show help about scripts.
           <Lua scripts> is a comma separted list of script-files or
           script-categories.
OS DETECTION:
  -O: Enable OS detection
  –osscan-limit: Limit OS detection to promising targets
  –osscan-guess: Guess OS more aggressively
TIMING AND PERFORMANCE:
  Options which take <time> are in seconds, or append 'ms' (milliseconds),
  's' (seconds), 'm' (minutes), or 'h' (hours) to the value (e.g. 30m).
  -T<0-5>: Set timing template (higher is faster)
  –min-hostgroup/max-hostgroup <size>: Parallel host scan group sizes
  –min-parallelism/max-parallelism <numprobes>: Probe parallelization
  –min-rtt-timeout/max-rtt-timeout/initial-rtt-timeout <time>: Specifies
      probe round trip time.
  –max-retries <tries>: Caps number of port scan probe retransmissions.
  –host-timeout <time>: Give up on target after this long
  –scan-delay/–max-scan-delay <time>: Adjust delay between probes
  –min-rate <number>: Send packets no slower than <number> per second
  –max-rate <number>: Send packets no faster than <number> per second
FIREWALL/IDS EVASION AND SPOOFING:
  -f; –mtu <val>: fragment packets (optionally w/given MTU)
  -D <decoy1,decoy2[,ME],…>: Cloak a scan with decoys
  -S <IP_Address>: Spoof source address
  -e <iface>: Use specified interface
  -g/–source-port <portnum>: Use given port number
  –data-length <num>: Append random data to sent packets
  –ip-options <options>: Send packets with specified ip options
  –ttl <val>: Set IP time-to-live field
  –spoof-mac <mac address/prefix/vendor name>: Spoof your MAC address
  –badsum: Send packets with a bogus TCP/UDP/SCTP checksum
OUTPUT:
  -oN/-oX/-oS/-oG <file>: Output scan in normal, XML, s|<rIpt kIddi3,
     and Grepable format, respectively, to the given filename.
  -oA <basename>: Output in the three major formats at once
  -v: Increase verbosity level (use -vv or more for greater effect)
  -d: Increase debugging level (use -dd or more for greater effect)
  –reason: Display the reason a port is in a particular state
  –open: Only show open (or possibly open) ports
  –packet-trace: Show all packets sent and received
  –iflist: Print host interfaces and routes (for debugging)
  –log-errors: Log errors/warnings to the normal-format output file
  –append-output: Append to rather than clobber specified output files
  –resume <filename>: Resume an aborted scan
  –stylesheet <path/URL>: XSL stylesheet to transform XML output to HTML
  –webxml: Reference stylesheet from Nmap.Org for more portable XML
  –no-stylesheet: Prevent associating of XSL stylesheet w/XML output
MISC:
  -6: Enable IPv6 scanning
  -A: Enable OS detection, version detection, script scanning, and traceroute
  –datadir <dirname>: Specify custom Nmap data file location
  –send-eth/–send-ip: Send using raw ethernet frames or IP packets
  –privileged: Assume that the user is fully privileged
  –unprivileged: Assume the user lacks raw socket privileges
  -V: Print version number
  -h: Print this help summary page.
EXAMPLES:
  nmap -v -A scanme.nmap.org
  nmap -v -sn 192.168.0.0/16 10.0.0.0/8
  nmap -v -iR 10000 -Pn -p 80
SEE THE MAN PAGE (http://nmap.org/book/man.html) FOR MORE OPTIONS AND EXAMPLES


Most local router local networks are running under an IP range of 192.168.0.1/24 (192.168.0.1.254) or 192.168.1.1/24 or at some weird occasions depending on how the router is configured it might be something like 192.168.10.0/24 to be sure on what kind of network your computer is configured, you can check with ifconfig command, what kind of network IP has the router assigned to your computer, here is output from my Debian GNU / Linux /sbin/ifconfig


 hipo@noah:~$ /sbin/ifconfig 
lo        Link encap:Local Loopback  
          inet addr:127.0.0.1  Mask:255.0.0.0
          inet6 addr: ::1/128 Scope:Host
          UP LOOPBACK RUNNING  MTU:16436  Metric:1
          RX packets:336 errors:0 dropped:0 overruns:0 frame:0
          TX packets:336 errors:0 dropped:0 overruns:0 carrier:0
          collisions:0 txqueuelen:0 
          RX bytes:26656 (26.0 KiB)  TX bytes:26656 (26.0 KiB)


wlan0     Link encap:Ethernet  HWaddr 00:1c:bf:bd:27:59  
          inet addr:192.168.0.103  Bcast:192.168.0.255  Mask:255.255.255.0
          inet6 addr: fe80::21c:bfff:ffbd:2759/64 Scope:Link
          UP BROADCAST RUNNING MULTICAST  MTU:1500  Metric:1
          RX packets:112836 errors:0 dropped:0 overruns:0 frame:0
          TX packets:55363 errors:0 dropped:0 overruns:0 carrier:0
          collisions:0 txqueuelen:1000 
          RX bytes:141318655 (134.7 MiB)  TX bytes:7391330 (7.0 MiB)


As evident from above output my router assigns IPs via DHCP once authenticated into the Wi-Fi router under standard IP range of 192.168.0.0/24

So under this IP range case, to inspect my small local networkconnected computer I had to run from gnome-terminal or under a /dev/ttyX virtual console:


hipo@noah:~$ nmap -sn 192.168.0.0/24

Starting Nmap 6.00 ( http://nmap.org ) at 2017-09-04 12:45 EEST
Nmap scan report for pcfreak (192.168.0.1)
Host is up (0.011s latency).
Nmap scan report for 192.168.0.103
Host is up (0.00011s latency).
Nmap done: 256 IP addresses (2 hosts up) scanned in 2.53 seconds


-sn argument instructs nmap to do the so called ping scan, e.g. not to do a port s
can after host discovery but just print available hosts that are responding

Some bigger corporate networks are configured to run a couple of local networks simultaneously such as 192.168.168.0.0/24, 192.168.1.0/24, 192.168.2.0/24 etc.

So if that's the case you can add more virtual IPs to your ifconfig after becoming root super user with:


hipo@noah:~$ su root 
Password: 
root@noah:/home/hipo# 


And then run:


/sbin/ifconfig wlan0:0 192.168.1.110 netmask 255.255.255.0
/sbin/ifconfig wlan0:1 192.168.2.110 netmask 255.255.255.0


etc.

Note that here I purposefully choose .110 IP because often the 192.168.1.1 is an IP assigned to the router and that might cause some IP conflicts and trigger alarms in the router security which I want to avoid.

To check just added extra Virtual IPs on wlan0 wireless interface (note that depending on your Wi-Fi card and your driver this interface might come under a different name on your computer):


root@noah# /sbin/ifconfig |grep -i wlan0 -A 1
wlan0     Link encap:Ethernet  HWaddr 00:1c:bf:bd:25:59  
          inet addr:192.168.0.103  Bcast:192.168.0.255  Mask:255.255.255.0

wlan0:0   Link encap:Ethernet  HWaddr 00:1c:bf:bd:25:59  
          inet addr:192.168.1.110  Bcast:192.168.1.255  Mask:255.255.255.0

wlan0:1   Link encap:Ethernet  HWaddr 00:1c:bf:bd:27:59  
          inet addr:192.168.2.110  Bcast:192.168.2.255  Mask:255.255.255.0


If you're scanning not on your own network but on a public connected network you might prefer to not use the ping scan as this might identify you in router's firewall as possible intruder and could cause you headaches, besides that some network connected nodes are connected to not respond on a ping scan (some networks purposefully disable pings at all) to avoid possibility of the so called ping flood that might overload a router buffer or bring down hosts on the network beinf flooded.

If you have doubts that a network has ping disabled and it shows no result you can give a try to the so called SYN / FIN Stealth packet scan with added requirement to scan for UDP open ports (-sS) argument


root@noah:/~# nmap -sS -sU -sT 192.168.0.1-255

Starting Nmap 6.00 ( http://nmap.org ) at 2017-09-04 13:31 EEST
Nmap scan report for pcfreak (192.168.0.1)
Host is up (0.012s latency).
Not shown: 998 closed ports
PORT     STATE SERVICE
80/tcp   open  http
1900/tcp open  upnp
MAC Address: 10:FE:ED:43:CF:0E (Unknown)

Nmap scan report for 192.168.0.100
Host is up (0.0036s latency).
Not shown: 998 closed ports
PORT      STATE SERVICE
625/tcp   open  apple-xsrvr-admin
49153/tcp open  unknown
MAC Address: 84:38:35:5F:28:75 (Unknown)

Nmap scan report for 192.168.0.103
Host is up (0.000012s latency).
Not shown: 999 closed ports
PORT   STATE SERVICE
22/tcp open  ssh


You might also like to add some verbosy (that would generate a lot of output so be careful):

In case if above scan fails due to firewalls and you have a ping scan disabled on the network too you might also try out the so called nmap connect TCP connect scan (-sT), that would avoid the SYN scan. The -sT is useful also if you're not possessing root superprivileges on nmap running host.


nmap -sS -sU 192.168.0.1-255


Note that connect scan could take ages as nmap tries to connect every port from default port scanned ranged on remote found hosts that are reporting as up and running.

If the shown results lead you find some unknown computer / tablet / mobile / phone device connected to your network, then connect to your router and thoroughfully inspect the traffic flowing through it, if you find intruder cut him off and change immediately your router passwords and monitor your network periodically to make sure the unwanted guest did not go back in future.

There is much more you can do with nmap so if you have some extra time and interest into penetration testing I recommend you check out Nmap Book (The Official Nmap project guide to Network Discovery and Security Scanning)

Fix “Approaching the limit on PV entries, consider increasing either the vm.pmap.shpgperproc or the vm.pmap.pv_entry_max tunable.” in FreeBSD

Monday, May 21st, 2012

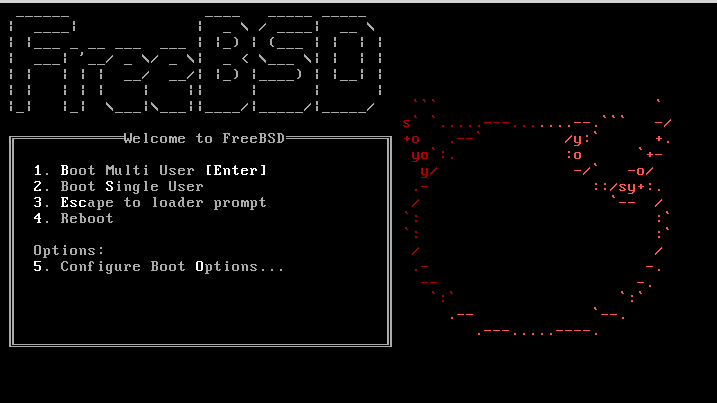
bsdinstall-newboot-loader-menu-pv_entries_consider_increasing_vm_pmap_shpgrepproc

I'm running FreeBSD with Apache and PHP on it and I got in dmesg (kernel log), following error:

freebsd# dmesg|grep -i vm.pmap.shpgperproc
Approaching the limit on PV entries, consider increasing either the vm.pmap.shpgperproc or the vm.pmap.pv_entry_max tunable.

The exact FreeBSD, Apache and php versions I have installed are:
 

freebsd# uname -a ; httpd -V ; php –version
FreeBSD pcfreak 7.2-RELEASE-p4 FreeBSD 7.2-RELEASE-p4 #0: Fri Oct 2 12:21:39 UTC 2009 root@i386-builder.daemonology.net:/usr/obj/usr/src/sys/GENERIC i386
Server version: Apache/2.0.64
Server built: Mar 13 2011 23:36:25Server's Module Magic Number: 20050127:14
Server loaded: APR 0.9.19, APR-UTIL 0.9.19
Compiled using: APR 0.9.19, APR-UTIL 0.9.19
Architecture: 32-bit
Server compiled with….
-D APACHE_MPM_DIR="server/mpm/prefork"
-D APR_HAS_SENDFILE
-D APR_HAS_MMAP
-D APR_HAVE_IPV6 (IPv4-mapped addresses enabled)
-D APR_USE_FLOCK_SERIALIZE
-D APR_USE_PTHREAD_SERIALIZE
-D SINGLE_LISTEN_UNSERIALIZED_ACCEPT
-D APR_HAS_OTHER_CHILD
-D AP_HAVE_RELIABLE_PIPED_LOGS
-D HTTPD_ROOT="/usr/local"
-D SUEXEC_BIN="/usr/local/bin/suexec"
-D DEFAULT_PIDLOG="/var/run/httpd.pid"
-D DEFAULT_SCOREBOARD="logs/apache_runtime_status"
-D DEFAULT_LOCKFILE="/var/run/accept.lock"
-D DEFAULT_ERRORLOG="logs/error_log"
-D AP_TYPES_CONFIG_FILE="etc/apache2/mime.types"
-D SERVER_CONFIG_FILE="etc/apache2/httpd.conf"
PHP 5.3.5 with Suhosin-Patch (cli) (built: Mar 14 2011 00:29:17)
Copyright (c) 1997-2009 The PHP Group
Zend Engine v2.3.0, Copyright (c) 1998-2010 Zend Technologies
with eAccelerator v0.9.6.1, Copyright (c) 2004-2010 eAccelerator, by eAccelerator

After a bunch of research a FreeBSD forums thread , I've found the fix suggested by a guy.

The solution suggested in the forum is to raise up vm.pmap.pv_entry_ma to vm.pmap.pv_entry_max=1743504, however I've noticed this value is read only and cannot be changed on the BSD running kernel;

freebsd# sysctl vm.pmap.pv_entry_max=1743504
sysctl: oid 'vm.pmap.pv_entry_max' is read only

Instead to solve the;

Approaching the limit on PV entries, consider increasing either the vm.pmap.shpgperproc or the vm.pmap.pv_entry_max tunable.
, I had to add in /boot/loader.conf

vm.pmap.pde.mappings=68
vm.pmap.shpgperproc=500
vm.pmap.pv_entry_max=1743504

Adding this values through /boot/loader.conf set them on kernel boot time. I've seen also in the threads the consider increasing either the vm.pmap.shpgperproc is also encountered on FreeBSD hosts running Squid, Dansguardion and other web proxy softwares on busy hosts.

This problems are not likely to happen for people who are running latest FreeBSD releases (>8.3, 9.x), I've read in same above post in newer BSD kernels the vm.pmap is no longer existing in newer kernels.